# https://docs.chain.link/ccip llms-full.txt
## Chainlink CCIP Overview
[iframe](https://www.googletagmanager.com/ns.html?id=GTM-N6DQ47T)
Chainlink CCIP is now officially live on Solana. [View lanes and tokens.](https://docs.chain.link/ccip/directory/mainnet/chain/solana-mainnet?utm_medium=referral&utm_source=chainlink-docs&utm_campaign=solana-ccip)
On this page
# [Chainlink CCIP](https://docs.chain.link/ccip\#overview)
Blockchain interoperability protocols are important for the Web3 ecosystem and traditional systems that need to interact with different blockchains. These protocols are the foundation for building blockchain abstraction layers, allowing traditional backends and dApps to interact with any blockchain network through a single middleware solution. Without a blockchain interoperability protocol, Web2 systems and dApps would need to build separate in-house implementations for each cross-chain interaction that they want to use, which is a time-consuming, resource-intensive, and complex process.
Blockchain interoperability protocols provide the following capabilities:
- You can transfer assets and information across multiple blockchains.
- Application developers can leverage the strengths and benefits of different chains.
- Collaboration between developers from diverse blockchain ecosystems enables the building of cross-chain applications to serve more users and provide additional features or products for them.
The _Chainlink Cross-Chain Interoperability Protocol (CCIP)_ provides these capabilities and enables a variety of [use cases](https://docs.chain.link/ccip#common-use-cases).
## [What is Chainlink CCIP?](https://docs.chain.link/ccip\#what-is-chainlink-ccip)
Chainlink CCIP is a blockchain interoperability protocol that enables developers to build secure applications that can transfer tokens, messages (data), or both tokens and messages across chains.
Given the [inherent risks of cross-chain interoperability](https://docs.chain.link/resources/bridge-risks), CCIP features [defense-in-depth security](https://blog.chain.link/five-levels-cross-chain-security/#level_5__defense-in-depth) and is powered by Chainlink's industry-standard oracle networks which have a proven track record of securing tens of billions of dollars and enabling over $14 trillion in onchain transaction value.
CCIP provides several key security benefits:
- Multiple independent nodes run by independent key holders.
- Three decentralized networks all executing and verifying every cross-chain transaction.
- Separation of responsibilities, with distinct sets of node operators, and with no nodes shared between the transactional DONs and the [Risk Management Network](https://docs.chain.link/ccip/concepts/architecture/key-concepts#risk-management-network).
- Increased decentralization with two separate code bases across two different implementations, written in two different languages to create a previously unseen diversity of software clients in the cross-chain world.
- Novel risk management system with [level-5 security](https://blog.chain.link/five-levels-cross-chain-security/#level_5__defense-in-depth) that can be rapidly adapted to any new risks or attacks that appear in cross-chain messaging.
To understand how Chainlink CCIP works, refer to the [architecture](https://docs.chain.link/ccip/concepts/architecture) section. If you are new to using Chainlink CCIP, read these guides before you deploy any contracts that use CCIP.
## [Chainlink CCIP core capabilities](https://docs.chain.link/ccip\#chainlink-ccip-core-capabilities)
Chainlink CCIP supports three main capabilities:
### [Arbitrary Messaging](https://docs.chain.link/ccip\#arbitrary-messaging)
The ability to send arbitrary data (encoded as bytes) to a receiving smart contract on a different blockchain. The developer is free to encode any data they wish to send.
Typically, developers use arbitrary messaging to trigger an informed action on the receiving smart contract, such as rebalancing an index, minting a specific NFT, or calling an arbitrary function with the sent data as custom parameters. Developers can encode multiple instructions in a single message, enabling them to orchestrate complex, multi-step, multi-chain tasks.
### [Token Transfer](https://docs.chain.link/ccip\#token-transfer)
The ability to transfer tokens to an account on a different blockchain. This capability enables the seamless movement of assets across chains.
### [Programmable Token Transfer](https://docs.chain.link/ccip\#programmable-token-transfer)
The ability to simultaneously transfer tokens and arbitrary data (encoded as bytes) within a single transaction. This mechanism allows users to transfer tokens and send instructions on what to do with those tokens.
For example, a user could transfer tokens to a lending protocol with instructions to leverage those tokens as collateral for a loan, borrowing another asset to be sent back to the user.
### [Receiving account types](https://docs.chain.link/ccip\#receiving-account-types)
With CCIP, you send transactions with data (arbitrary messaging), tokens, or both data and tokens (programmable token transfer). The receiver of a CCIP transaction varies by blockchain family:
| CCIP capability | What is sent | Receiving account types |
| --- | --- | --- |
| Arbitrary Messaging | Data | EVM: Smart contracts only
SVM: Programs only |
| Token Transfer | Tokens | EVM: Smart contracts and EOAs
SVM: User wallets or program-controlled PDAs |
| Programmable Token Transfer | Data and tokens | EVM: Smart contracts only
SVM: Data to programs, tokens to program-controlled PDAs |
**Note**: On EVM chains, EOAs cannot receive messages. On Solana (SVM), programs work with Program Derived Addresses (PDAs) to manage token reception.
## [Common use cases](https://docs.chain.link/ccip\#common-use-cases)
Chainlink CCIP enables a variety of use cases:
- **Cross-chain lending:** Chainlink CCIP enables users to lend and borrow a wide range of crypto assets across multiple DeFi platforms running on independent chains.
- **Low-cost transaction computation:** Chainlink CCIP can help offload the computation of transaction data on cost-optimized chains.
- **Optimizing cross-chain yield:** Users can leverage Chainlink CCIP to move collateral to new DeFi protocols to maximize yield across chains.
- **Creating new kinds of dApps:** Chainlink CCIP enables users to take advantage of network effects on certain chains while harnessing compute and storage capabilities of other chains.
Read [What Are Cross-Chain Smart Contracts](https://chain.link/education-hub/cross-chain-smart-contracts) to learn about cross-chain smart contracts and examples of use cases they enable.
## [CCIP Directory](https://docs.chain.link/ccip\#ccip-directory)
See the [CCIP Directory](https://docs.chain.link/ccip/directory) page for a list of supported networks, tokens, and contract addresses.
To learn about tokens, token pools, and the token onboarding process, see the [CCIP Architecture](https://docs.chain.link/ccip/concepts/cross-chain-token/evm/token-pools) page.
## What's next
- [\> Complete the Getting Started guide to learn the basics](https://docs.chain.link/ccip/getting-started)
- [\> CCIP Directory](https://docs.chain.link/ccip/directory)
- [\> Learn how to transfer tokens](https://docs.chain.link/ccip/tutorials/evm/transfer-tokens-from-contract)
- [\> Learn more about CCIP architecture](https://docs.chain.link/ccip/concepts/architecture)
## Get the latest Chainlink content straight to your inbox.
Email Address
## CCIP Concepts Overview
[iframe](https://www.googletagmanager.com/ns.html?id=GTM-N6DQ47T)
Chainlink CCIP is now officially live on Solana. [View lanes and tokens.](https://docs.chain.link/ccip/directory/mainnet/chain/solana-mainnet?utm_medium=referral&utm_source=chainlink-docs&utm_campaign=solana-ccip)
On this page
# [CCIP Concepts](https://docs.chain.link/ccip/concepts\#overview)
This section explores the foundational concepts of the Cross-Chain Interoperability Protocol (CCIP). Understanding these concepts will help you effectively build and deploy secure cross-chain applications.
- **[Architecture](https://docs.chain.link/ccip/concepts/architecture/)**: Understand the core components and structure of CCIP, including onchain and offchain systems.
- **[Cross-Chain Token Standard](https://docs.chain.link/ccip/concepts/cross-chain-token/)**: Learn about the Cross-Chain Token (CCT) standard that enables secure token transfers across different blockchains.
- **[Best Practices](https://docs.chain.link/ccip/concepts/best-practices/)**: Discover recommended guidelines for using CCIP effectively and securely on both EVM and SVM blockchains.
- **[Manual Execution](https://docs.chain.link/ccip/concepts/manual-execution)**: Learn why some CCIP messages might require manual execution and how to handle these situations.
## Get the latest Chainlink content straight to your inbox.
Email Address
## Chainlink CCIP Tutorials
[iframe](https://www.googletagmanager.com/ns.html?id=GTM-N6DQ47T)
Chainlink CCIP is now officially live on Solana. [View lanes and tokens.](https://docs.chain.link/ccip/directory/mainnet/chain/solana-mainnet?utm_medium=referral&utm_source=chainlink-docs&utm_campaign=solana-ccip)
On this page
# [CCIP Tutorials](https://docs.chain.link/ccip/tutorials\#overview)
# [Chainlink CCIP Tutorials](https://docs.chain.link/ccip/tutorials\#chainlink-ccip-tutorials)
Chainlink Cross-Chain Interoperability Protocol (CCIP) enables secure cross-chain communication, allowing you to transfer tokens and data across different blockchain networks. These tutorials provide step-by-step instructions to help you understand and implement cross-chain functionality in your applications.
## [Available Tutorials](https://docs.chain.link/ccip/tutorials\#available-tutorials)
Choose the tutorial section based on your blockchain platform:
- [EVM Tutorials](https://docs.chain.link/ccip/tutorials/evm) \- Tutorials for Ethereum Virtual Machine compatible chains
- [SVM Tutorials](https://docs.chain.link/ccip/tutorials/svm) \- Tutorials for Solana Virtual Machine chains
## Get the latest Chainlink content straight to your inbox.
Email Address
## Cross-chain dApps Examples
[iframe](https://www.googletagmanager.com/ns.html?id=GTM-N6DQ47T)
Chainlink CCIP is now officially live on Solana. [View lanes and tokens.](https://docs.chain.link/ccip/directory/mainnet/chain/solana-mainnet?utm_medium=referral&utm_source=chainlink-docs&utm_campaign=solana-ccip)
On this page
# [Example Cross-chain dApps and Tools](https://docs.chain.link/ccip/examples\#overview)
Several example dApps and tools are available to help you learn about use cases for CCIP.
## [CCIP Starter Kits](https://docs.chain.link/ccip/examples\#ccip-starter-kits)
The CCIP Starter Kits demonstrate how to transfer tokens and send messages using the HardHat or Foundry frameworks.
- [HardHat CCIP Starter Kit](https://github.com/smartcontractkit/ccip-starter-kit-hardhat)
- [Foundry CCIP Starter Kit](https://github.com/smartcontractkit/ccip-starter-kit-foundry)
## [CCIP Tic Tac Toe](https://docs.chain.link/ccip/examples\#ccip-tic-tac-toe)
[CCIP Tic Tac Toe](https://github.com/smartcontractkit/ccip-tic-tac-toe) demonstrates how to build a gaming dApp that operates across multiple blockchain networks.
## [Cross-chain name service](https://docs.chain.link/ccip/examples\#cross-chain-name-service)
The [Cross-chain Name Service](https://github.com/smartcontractkit/ccip-cross-chain-name-service) is an educational example of how to create a minimal cross-chain name service using Chainlink CCIP.
## [DeFi lending](https://docs.chain.link/ccip/examples\#defi-lending)
The [DeFi Lending](https://github.com/smartcontractkit/ccip-defi-lending) examples shows how a cross-chain lending application can work using CCIP.
## [DeFi liquidation protection](https://docs.chain.link/ccip/examples\#defi-liquidation-protection)
The [DeFi liquidation protection](https://github.com/smartcontractkit/ccip-liquidation-protector) example shows how a DeFi dApp can use CCIP to prevent liquidation when lending assets across multiple blockchain networks.
## [Cross Chain NFT](https://docs.chain.link/ccip/examples\#cross-chain-nft)
The [Cross Chain NFT](https://github.com/smartcontractkit/ccip-cross-chain-nft) example shows you how to mint an NFT on one blockchain from another blockchain.
## What's next
- [\> CCIP Directory](https://docs.chain.link/ccip/directory)
- [\> Learn CCIP best practices](https://docs.chain.link/ccip/concepts/best-practices)
## Get the latest Chainlink content straight to your inbox.
Email Address
## CCIP Billing Overview
[iframe](https://www.googletagmanager.com/ns.html?id=GTM-N6DQ47T)
Chainlink CCIP is now officially live on Solana. [View lanes and tokens.](https://docs.chain.link/ccip/directory/mainnet/chain/solana-mainnet?utm_medium=referral&utm_source=chainlink-docs&utm_campaign=solana-ccip)
On this page
# [CCIP Billing](https://docs.chain.link/ccip/billing\#overview)
The CCIP billing model uses the `feeToken` specified in the [message](https://docs.chain.link/ccip/api-reference/evm/v1.6.0/client#evm2anymessage) to pay a single fee on the source blockchain. CCIP uses a gas-locked fee payment mechanism to help ensure the reliable execution of cross-chain transactions regardless of destination blockchain gas spikes. For developers, this means you can simply pay on the source blockchain and CCIP will take care of execution on the destination blockchain.
CCIP supports fee payments in LINK and in alternative assets, including blockchain-native gas tokens and their ERC-20 wrapped versions. The payment model for CCIP is designed to significantly reduce friction for users and quickly scale CCIP to more blockchains by supporting fee payments that originate across a multitude of blockchains over time.
Aside from billing, remember to [carefully estimate the `gasLimit` that you set](https://docs.chain.link/ccip/concepts/best-practices/evm#setting-gaslimit) for your destination contract so CCIP can have enough gas to execute `ccipReceive()`, if applicable. Any unspent gas from this user-set limit is not refunded.
## [Billing mechanism](https://docs.chain.link/ccip/billing\#billing-mechanism)
The fee is calculated by the following formula:

```plaintext
fee = blockchain fee + network fee
```
Where:
- `fee`: The total fee for processing a [CCIP message](https://docs.chain.link/ccip/api-reference/evm/v1.6.0/client#evm2anymessage). **Note:** Users can call the [getFee](https://docs.chain.link/ccip/api-reference/evm/v1.6.0/i-router-client#getfee) function to estimate the fee.
- `blockchain fee`: This represents an estimation of the gas cost the node operators will pay to deliver the CCIP message to the destination blockchain.
- `network fee`: Fee paid to CCIP service providers, including node operators running the [Decentralized Oracle Network](https://docs.chain.link/ccip/concepts/architecture/key-concepts#decentralized-oracle-network-don) and [Risk Management Network](https://docs.chain.link/ccip/concepts/architecture/key-concepts#risk-management-network).
### [Blockchain fee](https://docs.chain.link/ccip/billing\#blockchain-fee)
The blockchain fee is calculated by the following formula:

```plaintext
blockchain fee = execution cost + data availability cost
```
#### [Execution cost](https://docs.chain.link/ccip/billing\#execution-cost)
The execution cost is directly correlated with the estimated gas usage to execute the transaction on the destination blockchain:

```plaintext
execution cost = gas price * gas usage * gas multiplier
```
Where:
- `gas price`: The destination gas price. CCIP maintains a cache of destination gas prices on each source blockchain, denominated in each `feeToken`.
- `gas multiplier`: Scaling factor. This multiplier ensures the reliable execution of transactions regardless of destination blockchain gas spikes.
- `gas usage`:

```plaintext
gas usage = gas limit + destination gas overhead + destination gas per payload + gas for token transfers`
```
Where:
- `gas limit`: This specifies the maximum amount of gas CCIP can consume to execute [ccipReceive()](https://docs.chain.link/ccip/api-reference/evm/v1.6.0/ccip-receiver#ccipreceive) on the receiver contract located on the destination blockchain. Users set the gas limit in the [extra argument field](https://docs.chain.link/ccip/api-reference/evm/v1.6.0/client#genericextraargsv2) of the CCIP message. **Note:** Remember to [carefully estimate the `gasLimit` that you set](https://docs.chain.link/ccip/concepts/best-practices/evm#setting-gaslimit) for your destination contract so CCIP can have enough gas to execute `ccipReceive()`. Any unspent gas from this user-set limit is not refunded.
- `destination gas overhead`: This is the fixed gas cost incurred on the destination blockchain by CCIP (Committing DON + Executing DON) and Risk Management Network.
- `destination gas per payload`: This variable gas depends on the length of the data field in the [CCIP message](https://docs.chain.link/ccip/api-reference/evm/v1.6.0/client#evm2anymessage). If there is no payload (CCIP only transfers tokens), the value is `0`.
- `gas for token transfers`: This variable gas cost is for transferring tokens onto the destination blockchain. If there are no token transfers, the value is `0`.
#### [Data availability cost](https://docs.chain.link/ccip/billing\#data-availability-cost)
This cost is only relevant if the destination blockchain is a [L2 layer](https://chain.link/education-hub/what-is-layer-2). Some L2s charge fees for [data availability](https://ethereum.org/en/developers/docs/data-availability). For instance, [optimistic rollups](https://ethereum.org/en/developers/docs/scaling/optimistic-rollups/) process the transactions offchain then post the transaction data to Ethereum as calldata, which costs additional gas.
### [Network fee](https://docs.chain.link/ccip/billing\#network-fee)
The fee paid to CCIP service providers, including node operators running the [Decentralized Oracle Network](https://docs.chain.link/ccip/concepts/architecture/key-concepts#decentralized-oracle-network-don) and [Risk Management Network](https://docs.chain.link/ccip/concepts/architecture/key-concepts#risk-management-network) is calculated as follows:
#### [Token transfers or programmable token transfers](https://docs.chain.link/ccip/billing\#token-transfers-or-programmable-token-transfers)
For token transfers or programmable token transfers (token + data), the network fee varies based on the [token handling mechanism](https://docs.chain.link/ccip/concepts/cross-chain-token/overview#token-handling-mechanisms) and the lanes:
- **Lock and Unlock**: The network fee is percentage-based. For each token, it is calculated using the following expression:

```plaintext
tokenAmount * price * percentage
```
Where:
- `tokenAmount`: The amount of tokens being transferred.
- `price`: Initially priced in USD and converted into the `feeToken`.
- `percentage`: The values are provided in the [network fee table](https://docs.chain.link/ccip/billing#network-fee-table).
- **Lock and Mint**, **Burn and Mint** and **Burn and Unlock**: The network fee is a static amount. See the [network fee table](https://docs.chain.link/ccip/billing#network-fee-table).
#### [Messaging (only data)](https://docs.chain.link/ccip/billing\#messaging-only-data)
For messaging (only data): The network fee is a static amount, denominated in USD. See the [network fee table](https://docs.chain.link/ccip/billing#network-fee-table).
#### [Network fee table](https://docs.chain.link/ccip/billing\#network-fee-table)
The table below provides an overview of the network fees charged for different use cases on different lanes. Percentage-based fees are calculated on the value transferred in a message. USD-denominated fees are applied per message.
| Use case | Token Pool Mechanism | Lanes | Fee Token |
| --- | --- | --- | --- |
| LINK | Others |
| --- | --- |
| - Token Transfers
- Programmable Token Transfers | Lock and Unlock | All Lanes | 0.063 % | 0.07 % |
| Lock and Mint
Burn and Mint
Burn and Unlock | Non-Ethereum | 0.225 USD | 0.25 USD |
| From: Ethereum | 0.45 USD | 0.50 USD |
| To: Ethereum | 1.35 USD | 1.50 USD |
| Messaging | N/A | Non-Ethereum | 0.09 USD | 0.10 USD |
| From/To: Ethereum | 0.45 USD | 0.50 USD |
You can use the calculator below to learn the network fees for a specific token. Select the environment (mainnet/testnet), the token, the source blockchain, and the destination blockchain to get the network fee:
Calculate
| Token | Mechanism | Fee Token |
| --- | --- | --- |
| LINK | Others |
| --- | --- |
| | | | |
## Get the latest Chainlink content straight to your inbox.
Email Address
## CCIP EVM Tutorials
[iframe](https://www.googletagmanager.com/ns.html?id=GTM-N6DQ47T)
Chainlink CCIP is now officially live on Solana. [View lanes and tokens.](https://docs.chain.link/ccip/directory/mainnet/chain/solana-mainnet?utm_medium=referral&utm_source=chainlink-docs&utm_campaign=solana-ccip)
On this page
# [CCIP Tutorials (EVM)](https://docs.chain.link/ccip/tutorials/evm\#overview)
You can explore several comprehensive guides to learn about cross-chain interoperability using CCIP. These tutorials provide step-by-step instructions to help you understand different patterns that you can incorporate into your blockchain projects.
## [Guides](https://docs.chain.link/ccip/tutorials/evm\#guides)
- [Transfer Tokens](https://docs.chain.link/ccip/tutorials/evm/transfer-tokens-from-contract)
- [Transfer Tokens with Data](https://docs.chain.link/ccip/tutorials/evm/programmable-token-transfers)
- [Transfer Tokens with Data - Defensive Example](https://docs.chain.link/ccip/tutorials/evm/programmable-token-transfers-defensive)
- [Cross-Chain Token (CCT)](https://docs.chain.link/ccip/tutorials/evm/cross-chain-tokens)
- [Test CCIP Locally](https://docs.chain.link/ccip/tutorials/evm/test-ccip-locally)
- [Offchain](https://docs.chain.link/ccip/tutorials/evm/offchain)
- [Transfer Tokens between EOAs](https://docs.chain.link/ccip/tutorials/evm/offchain/transfer-tokens-from-eoa)
- [Checking CCIP Message Status](https://docs.chain.link/ccip/tutorials/evm/offchain/get-status-offchain)
- [Transfer USDC with Data](https://docs.chain.link/ccip/tutorials/evm/usdc)
- [Send Arbitrary Data](https://docs.chain.link/ccip/tutorials/evm/send-arbitrary-data)
- [Send Arbitrary Data and Receive Transfer Confirmation: A -> B -> A](https://docs.chain.link/ccip/tutorials/evm/send-arbitrary-data-receipt-acknowledgment)
- [Manual Execution](https://docs.chain.link/ccip/tutorials/evm/manual-execution)
- [Optimizing Gas Limit Settings in CCIP Messages](https://docs.chain.link/ccip/tutorials/evm/ccipreceive-gaslimit)
- [Acquire Test Tokens](https://docs.chain.link/ccip/test-tokens)
## Get the latest Chainlink content straight to your inbox.
Email Address
## Transfer USDC with Chainlink CCIP
[iframe](https://www.googletagmanager.com/ns.html?id=GTM-N6DQ47T)
Chainlink CCIP is now officially live on Solana. [View lanes and tokens.](https://docs.chain.link/ccip/directory/mainnet/chain/solana-mainnet?utm_medium=referral&utm_source=chainlink-docs&utm_campaign=solana-ccip)
On this page
# [Transfer USDC with Data](https://docs.chain.link/ccip/tutorials/evm/usdc\#overview)
USDC is a digital dollar backed 100% and is always redeemable 1:1 for US dollars. The [stablecoin](https://chain.link/education-hub/stablecoins) is issued by [Circle](https://www.circle.com/en/usdc) on multiple blockchain platforms.
This guide will first explain how Chainlink CCIP enables native USDC transfers when both the source and destination blockchains support [Circle's Cross-Chain Transfer Protocol (CCTP)](https://www.circle.com/en/cross-chain-transfer-protocol).
Additionally, it will outline how CCIP also supports transferring Bridged USDC on blockchains that **are not** CCTP-enabled, allowing projects to later migrate to CCTP-enabled transfers if approved by Circle.
The hands-on tutorial at the end demonstrates how to use Chainlink CCIP to transfer USDC and arbitrary data from a smart contract on _Avalanche Fuji_ to a smart contract on _Ethereum Sepolia_.
**Note**: In addition to programmable token transfers, you can also use CCIP to transfer USDC tokens without data. Check the [Mainnets](https://docs.chain.link/ccip/directory/mainnet) and [Testnets](https://docs.chain.link/ccip/directory/testnet) configuration pages to learn on which blockchains CCIP supports USDC transfers.
## [Architecture](https://docs.chain.link/ccip/tutorials/evm/usdc\#architecture)
### [Native USDC vs. Bridged USDC](https://docs.chain.link/ccip/tutorials/evm/usdc\#native-usdc-vs-bridged-usdc)
New blockchains frequently encounter the **cold start problem**—a scarcity of initial liquidity and limited user adoption that hampers the development and functionality of decentralized applications (dApps). Without sufficient stablecoin liquidity, essential use cases such as borrowing, lending, and trading remain constrained.
To overcome this challenge, Circle introduced the [Bridged USDC Standard](https://www.circle.com/blog/bridged-usdc-standard). This standard facilitates the seamless issuance of Bridged USDC on any EVM-compatible blockchain, enabling third-party teams to deploy USDC without awaiting native support from Circle. By standardizing bridged token issuance, Circle aims to:
- **Reduce Liquidity Fragmentation**: Ensure a unified and efficient USDC supply across multiple blockchains.
- **Enhance User Experience**: Minimize complexities and inconsistencies in managing multiple bridged USDC versions.
- **Facilitate Seamless Upgrades**: Enable projects to transition smoothly to Native USDC once their blockchain is approved for native issuance via the [Cross-Chain Transfer Protocol (CCTP)](https://www.circle.com/en/cross-chain-transfer-protocol).
Projects using Bridged USDC can easily migrate to Native USDC once their blockchain is approved for CCTP by Circle. This migration ensures that user balances, contract addresses, and integrations remain intact, eliminating the need for complex token swaps or liquidity migrations. For more detailed information, refer to Circle's [Bridged USDC Standard](https://www.circle.com/blog/bridged-usdc-standard).
### [How CCIP Works with USDC](https://docs.chain.link/ccip/tutorials/evm/usdc\#how-ccip-works-with-usdc)
Chainlink CCIP maintains a consistent [API](https://docs.chain.link/ccip/api-reference/evm/v1.6.0/i-router-client) regardless of whether the transfer involves Native USDC or Bridged USDC. Here's how it operates in both scenarios:
- The sender has to interact with the CCIP router to initiate a cross-chain transaction, similar to the process for any other token transfers. See the [Transfer Tokens](https://docs.chain.link/ccip/tutorials/evm/transfer-tokens-from-contract) guide to learn more.
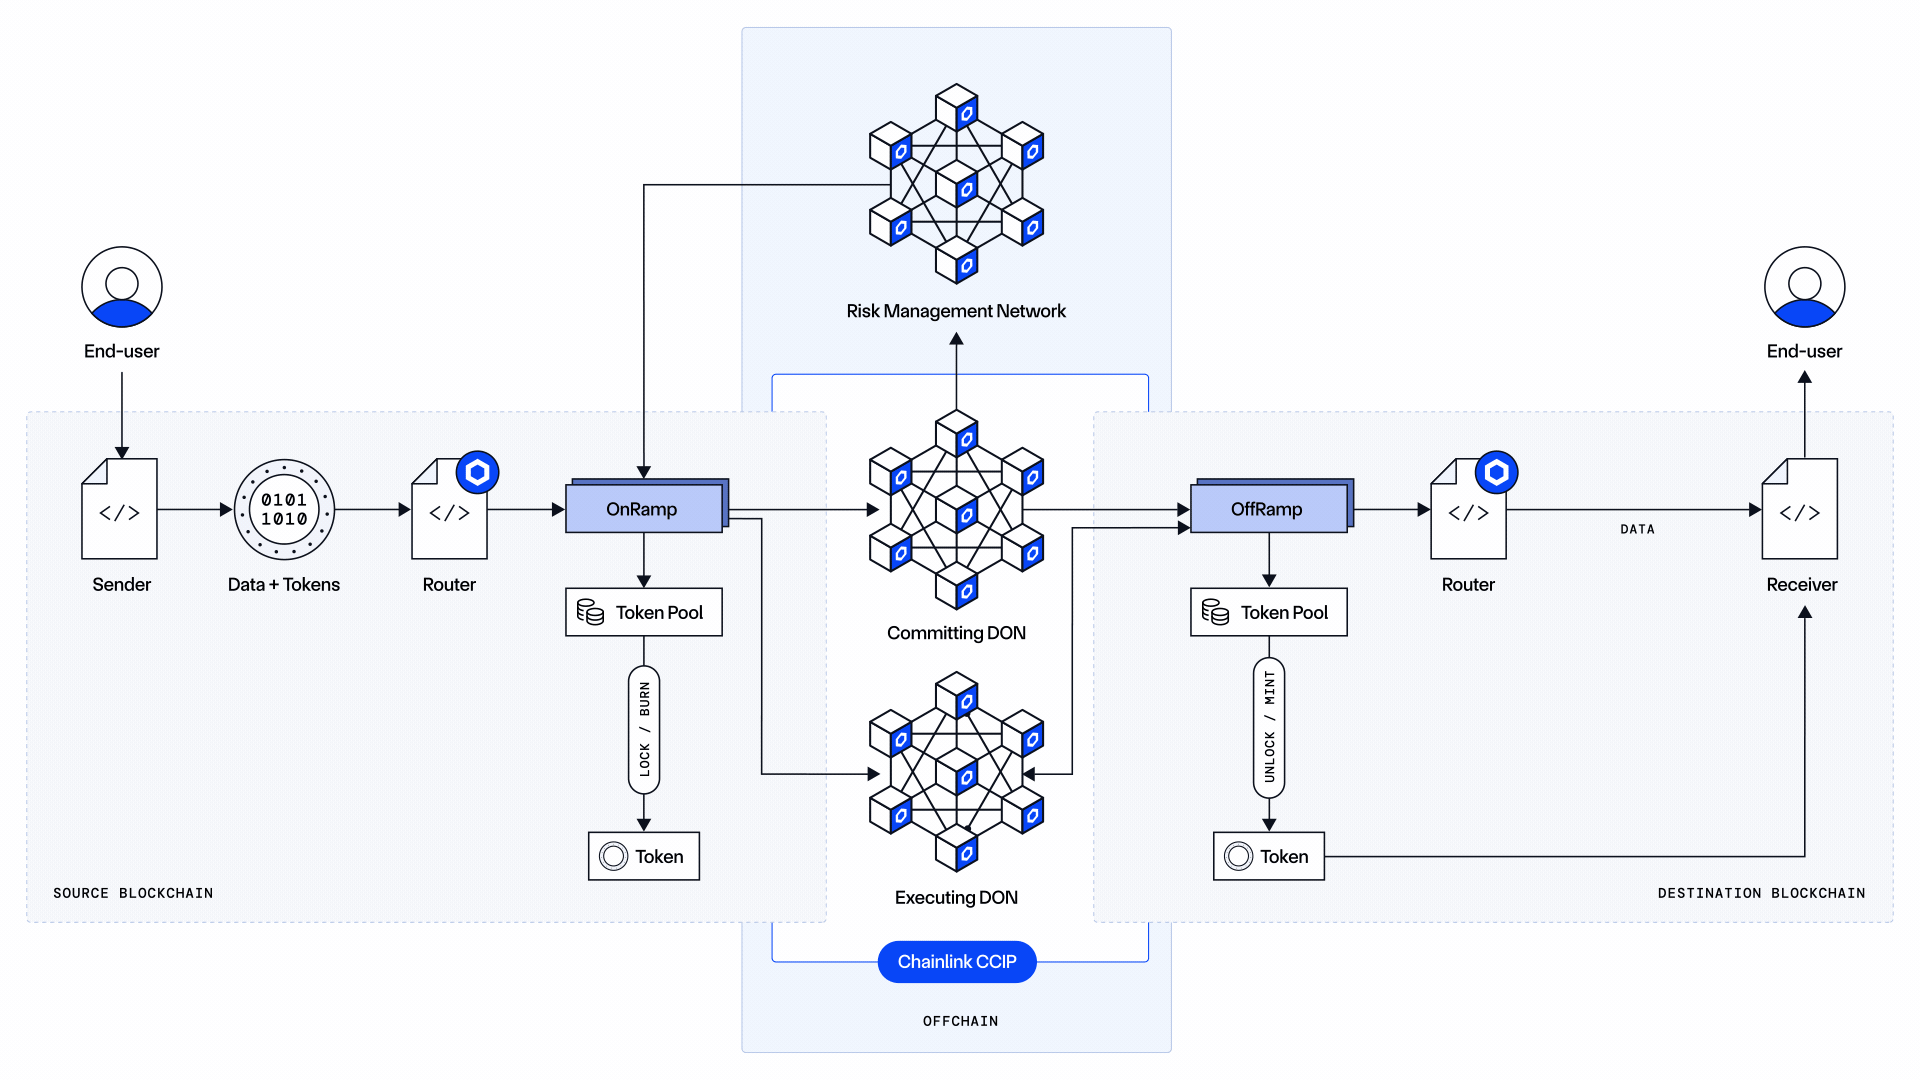
- The process uses the same onchain components including the Router, OnRamp, Commit Store, OffRamp, and Token Pool.
- The process uses the same offchain components including the Committing DON, Executing DON, and the Risk Management Network.
- USDC transfers also benefit from CCIP additional security provided by the [Risk Management Network](https://docs.chain.link/ccip/concepts/architecture/key-concepts#risk-management-network).
#### [Native USDC (CCTP-enabled)](https://docs.chain.link/ccip/tutorials/evm/usdc\#native-usdc-cctp-enabled)
The diagram below shows that the USDC token pools and Executing DON handle the integration with Circle's contracts and offchain CCTP Attestation API. As with any other supported ERC-20 token, USDC has a linked token pool on each supported blockchain to facilitate OnRamp and OffRamp operations. To learn more about these components, read the [architecture page](https://docs.chain.link/ccip/concepts/architecture/onchain/evm/overview).
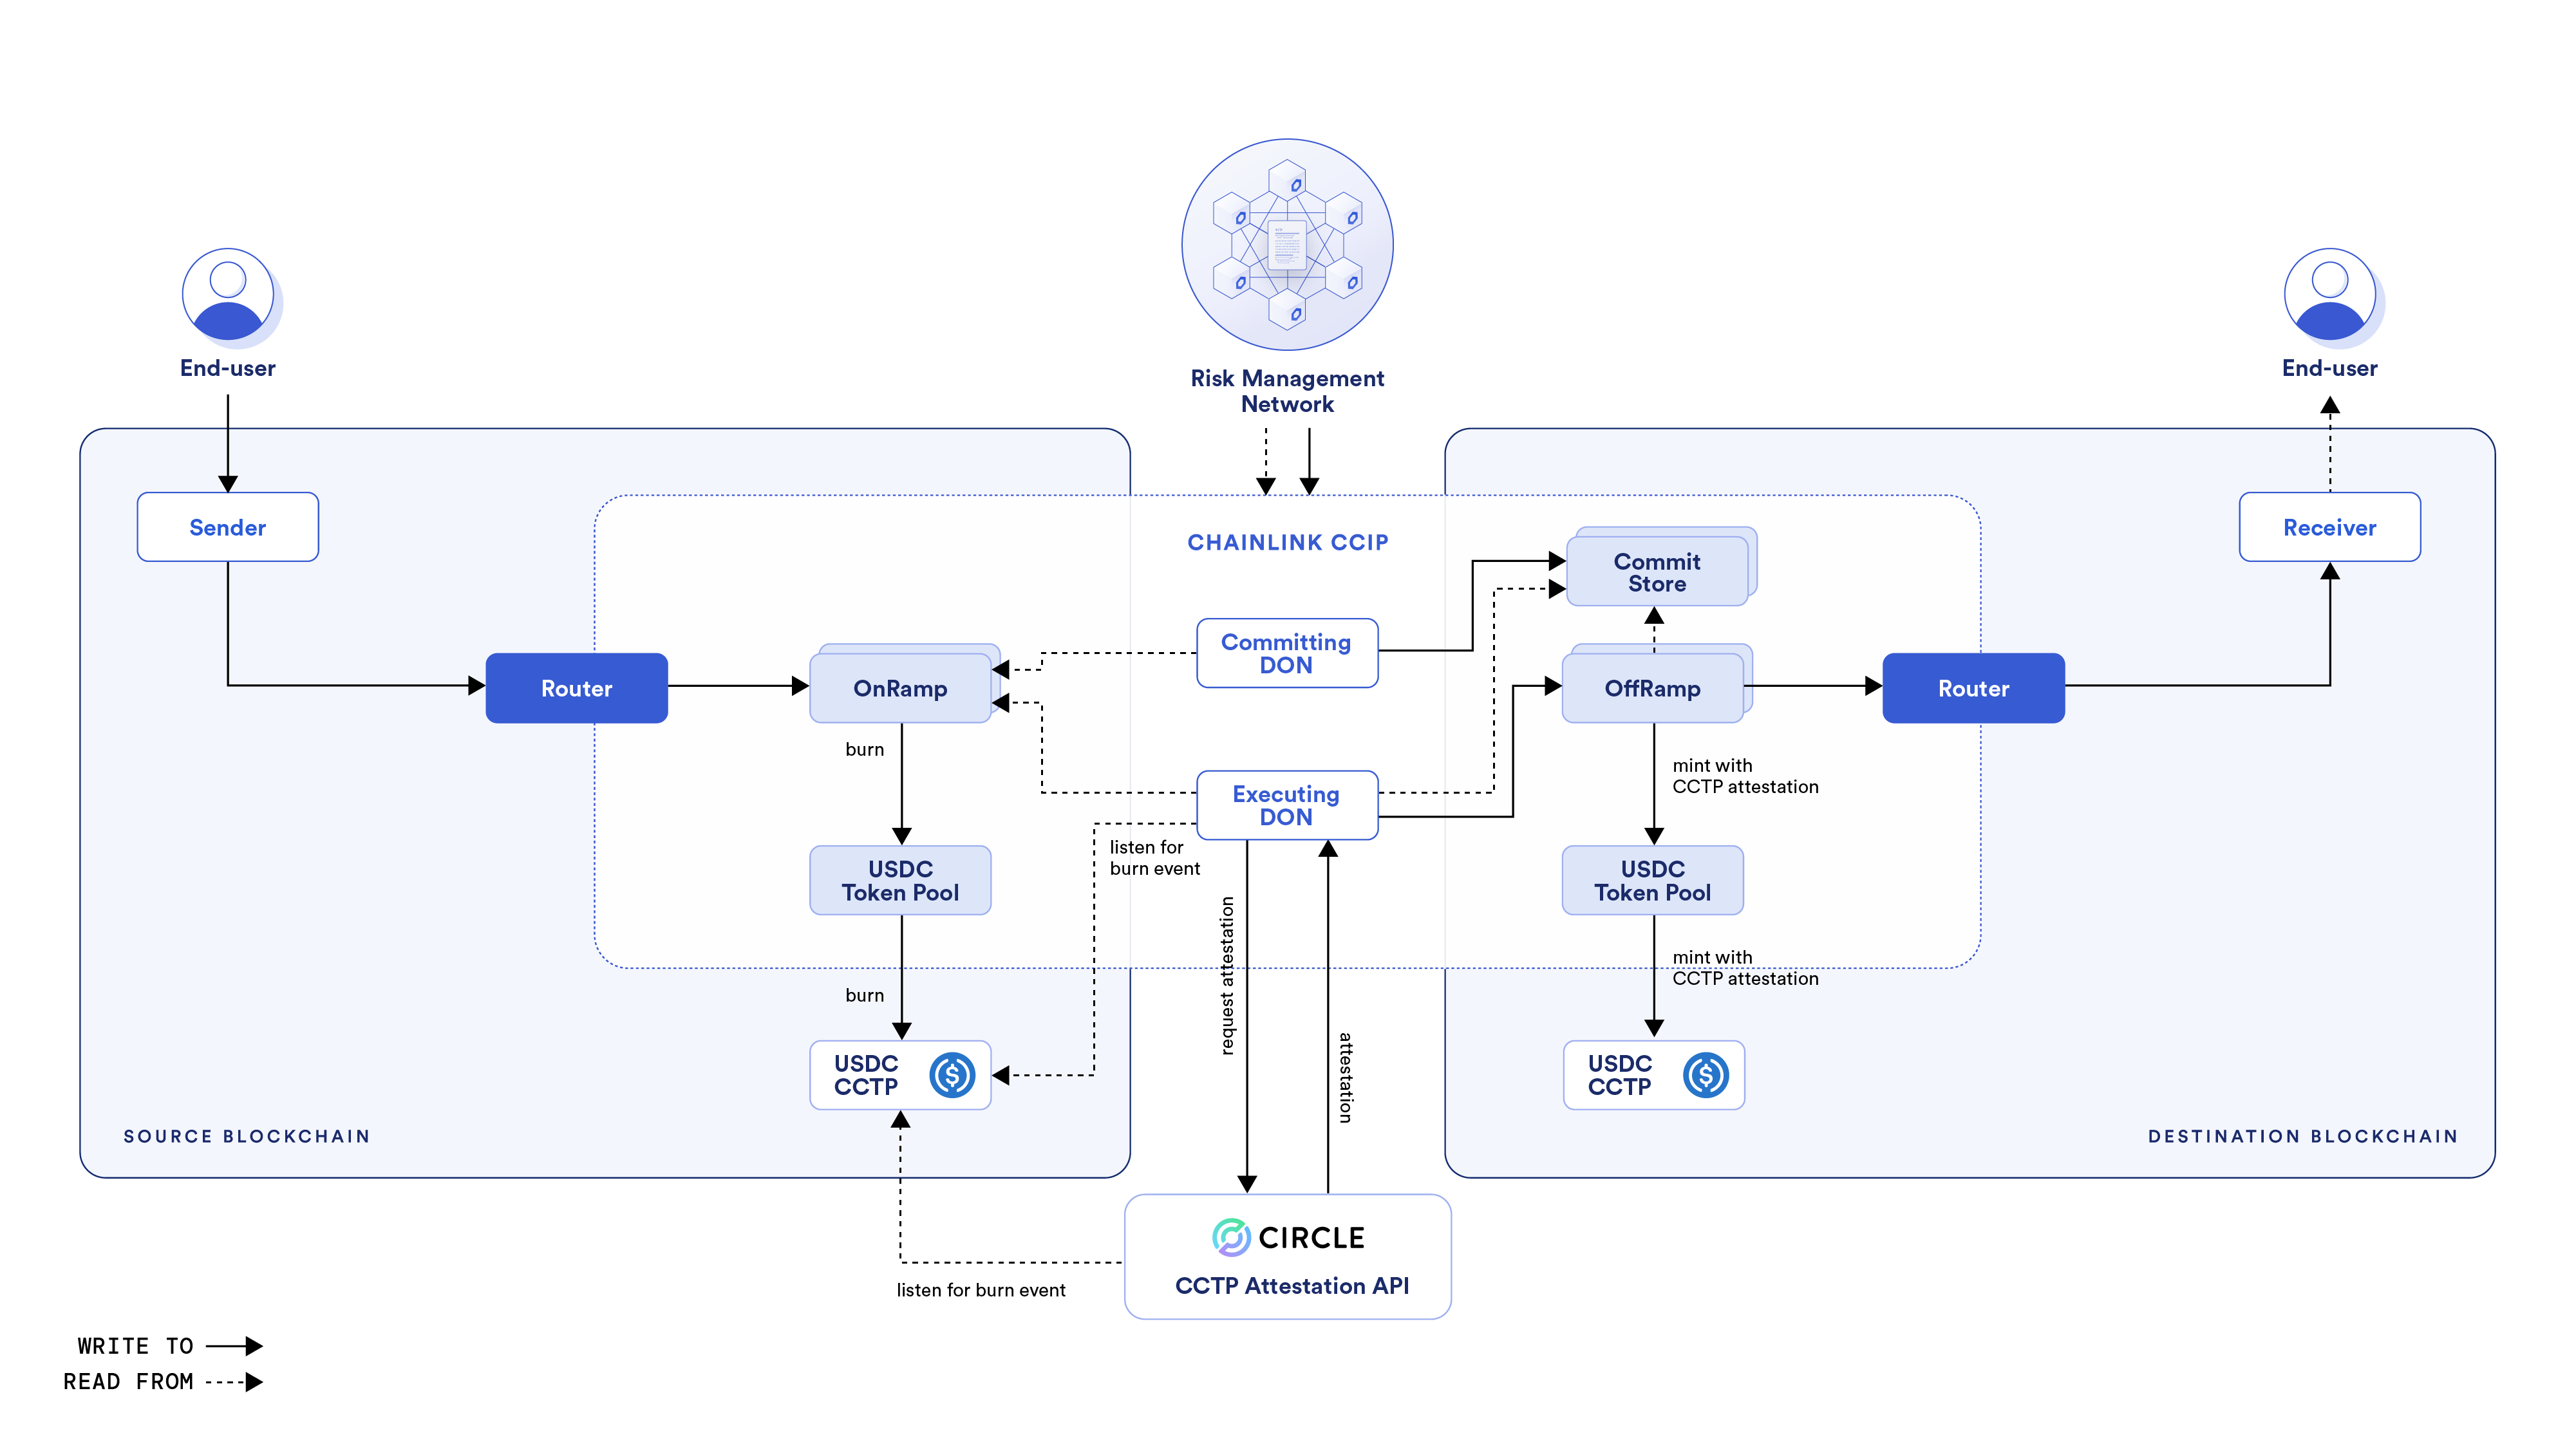
The following describes the operational process:
1. On the source blockchain:
1. When the sender initiates a transfer of USDC, the USDC token pool interacts with CCTP's contract to burn USDC tokens and specifies the USDC token pool address on the destination blockchain as the authorized caller to mint them.
2. CCTP burns the specified USDC tokens and emits an associated CCTP event.
2. Offchain:
1. The Circle attestation service listens to CCTP events on the source blockchain.
2. The CCIP [Executing DON](https://docs.chain.link/ccip/concepts/architecture/offchain/overview#executing-ocr-process) listens to relevant CCTP events on the source blockchain. When it captures such an event, it calls the Circle Attestation service API to request an attestation. An attestation is a signed authorization to mint the specified amount of USDC on the destination blockchain.
3. On the destination blockchain:
1. The [Executing DON](https://docs.chain.link/ccip/concepts/architecture/offchain/overview#executing-ocr-process) provides the attestation to the [OffRamp contract](https://docs.chain.link/ccip/concepts/architecture/onchain/evm/components#offramp).
2. The OffRamp contract calls the USDC token pool with the USDC amount to be minted, the Receiver address, and the Circle attestation.
3. The USDC token pool calls the CCTP contract. The CCTP contract verifies the attestation signature before minting the specified USDC amount into the Receiver.
4. If there is data in the CCIP message and the Receiver is not an EOA, then the OffRamp contract transmits the CCIP message via the [Router](https://docs.chain.link/ccip/concepts/architecture/onchain/evm/components#router) contract to the Receiver.
#### [Bridged USDC (non-CCTP-enabled)](https://docs.chain.link/ccip/tutorials/evm/usdc\#bridged-usdc-non-cctp-enabled)
To facilitate USDC transfers between a blockchain that issues native USDC and another that only supports Bridged USDC, Chainlink CCIP employs the [Lock and Mint mechanism](https://docs.chain.link/ccip/concepts/cross-chain-token/overview#token-handling-mechanisms). This approach ensures that each Bridged USDC token on the destination blockchain is fully backed by an equivalent amount of native USDC locked on the source blockchain. Accounting for Non-CCTP-Enabled USDC is isolated on a per-blockchain basis for security and risk mitigation.
1. **Lock native USDC on Source**: The [Lock and Release token pool](https://github.com/smartcontractkit/ccip/blob/ccip-develop/contracts/src/v0.8/ccip/pools/USDC/HybridLockReleaseUSDCTokenPool.sol) locks the specified USDC tokens.
2. **Mint Bridged USDC on Destination**: This Bridged USDC serves as a proxy for the original USDC, enabling liquidity and user adoption without direct integration with CCTP. A [Burn and Mint token pool](https://docs.chain.link/ccip/concepts/cross-chain-token/evm/token-pools#standard-token-pools) is recommended for the Destination Chain; it will mint Bridged USDC for incoming transfers and burn Bridged USDC for outgoing transfers. Other token pools are also supported, depending on the preferences and constraints of the Destination Chain.
## [Example](https://docs.chain.link/ccip/tutorials/evm/usdc\#example)
In this tutorial, you will learn how to send USDC tokens from a smart contract on Avalanche Fuji to a smart contract on Ethereum Sepolia using Chainlink CCIP and pay CCIP fees in LINK tokens.
The process uses the following steps:
1. **Transfer USDC and Data:** Initiate a transfer of USDC tokens and associated data from the Sender contract on Avalanche Fuji. The data includes the required arguments and the signature of the `stake` function from the Staker contract.
2. **Receive and Stake:** The Receiver contract on Ethereum Sepolia receives the tokens and data. Then, it uses this data to make a low-level call to the Staker contract, executing the `stake` function to stake USDC on behalf of a beneficiary.
3. **Redeem Staked Tokens:** The beneficiary can redeem the staked tokens for USDC later.
The purpose of including the function signature and arguments in the data is to demonstrate how arbitrary data can support a variety of scenarios and use cases. By sending specific instructions within the data, you can define various interactions between smart contracts across different blockchain networks and make your decentralized application more flexible and powerful.

### [Before you begin](https://docs.chain.link/ccip/tutorials/evm/usdc\#before-you-begin)
1. You should understand how to write, compile, deploy, and fund a smart contract. If you need to brush up on the basics, read this [tutorial](https://docs.chain.link/quickstarts/deploy-your-first-contract), which will guide you through using the [Solidity programming language](https://soliditylang.org/), interacting with the [MetaMask wallet](https://metamask.io/) and working within the [Remix Development Environment](https://remix.ethereum.org/).
2. Your account must have some AVAX and LINK tokens on _Avalanche Fuji_ and ETH tokens on _Ethereum Sepolia_. You can use the [Chainlink faucet](https://faucets.chain.link/) to acquire testnet tokens.
3. Check the [CCIP Directory](https://docs.chain.link/ccip/directory) to confirm that USDC are supported for your lane. In this example, you will transfer tokens from _Avalanche Fuji_ to _Ethereum Sepolia_ so check the list of supported tokens [here](https://docs.chain.link/ccip/directory/testnet/chain/avalanche-fuji-testnet).
4. Use the [Circle faucet](https://faucet.circle.com/) to acquire USDC tokens on _Avalanche Fuji_.
5. Learn how to [fund your contract](https://docs.chain.link/resources/fund-your-contract). This guide shows how to fund your contract in LINK, but you can use the same guide for funding your contract with any ERC-20 tokens as long as they appear in the list of tokens in MetaMask.
### [Tutorial](https://docs.chain.link/ccip/tutorials/evm/usdc\#tutorial)
#### [Deploy your contracts](https://docs.chain.link/ccip/tutorials/evm/usdc\#deploy-your-contracts)
Deploy the Sender contract on _Avalanche Fuji_:
1. [Open the Sender contract in Remix](https://remix.ethereum.org/#url=https://docs.chain.link/samples/CCIP/usdc/Sender.sol&autoCompile=true).
2. Compile your contract.
3. Deploy, fund your sender contract on _Avalanche Fuji_ and enable sending messages to _Ethereum Sepolia_:
1. Open MetaMask and select the network _Avalanche Fuji_.
2. In Remix IDE, click on _Deploy & Run Transactions_ and select _Injected Provider - MetaMask_ from the environment list. Remix will then interact with your MetaMask wallet to communicate with _Avalanche Fuji_.
3. Fill in your blockchain's router, LINK, and USDC contract addresses. The router and USDC addresses can be found on the [CCIP Directory](https://docs.chain.link/ccip/directory) and the LINK contract address on the [LINK token contracts page](https://docs.chain.link/resources/link-token-contracts). For Avalanche Fuji, the addresses are:
- Router address: `0xf694e193200268f9a4868e4aa017a0118c9a8177`
- LINK contract address: `0x0b9d5D9136855f6FEc3c0993feE6E9CE8a297846`
- USDC contract address: `0x5425890298aed601595a70AB815c96711a31Bc65`
4. Click the **transact** button. After you confirm the transaction, the contract address appears on the _Deployed Contracts_ list.
Note your contract address.
5. Open MetaMask and fund your contract with USDC tokens. You can transfer `1` _USDC_ to your contract.
6. Fund your contract with LINK tokens. You can transfer `70` _LINK_ to your contract. In this example, LINK is used to pay the CCIP fees.
**Note:** This transaction fee is significantly higher than normal due to gas spikes on Sepolia. To run this tutorial, you can get additional testnet LINK
from [faucets.chain.link](https://faucets.chain.link/) or use a supported testnet other than Sepolia.
Deploy the Staker and Receiver contracts on _Ethereum Sepolia_. Configure the Receiver contract to receive CCIP messages from the Sender contract:
1. Deploy the Staker contract:
1. Open MetaMask and select the network _Ethereum Sepolia_.
2. [Open the Staker contract in Remix](https://remix.ethereum.org/#url=https://docs.chain.link/samples/CCIP/usdc/Staker.sol&autoCompile=true).
3. Compile your contract.
4. In Remix IDE, under _Deploy & Run Transactions_, make sure the environment is still _Injected Provider - MetaMask_.
5. Fill in the usdc contract address. The usdc contract address can be found on the [CCIP Directory](https://docs.chain.link/ccip/directory). For _Ethereum Sepolia_, the usdc contract address is:
- `0x1c7D4B196Cb0C7B01d743Fbc6116a902379C7238`.
6. Click the **transact** button. After you confirm the transaction, the contract address appears on the _Deployed Contracts_ list.
Note your contract address.
2. Deploy the Receiver contract:
1. [Open the Receiver contract in Remix](https://remix.ethereum.org/#url=https://docs.chain.link/samples/CCIP/usdc/Receiver.sol&autoCompile=true).
2. Compile your contract.
3. In Remix IDE, under _Deploy & Run Transactions_, make sure the environment is still _Injected Provider - MetaMask_ and that you are still connected to _Ethereum Sepolia_.
4. Fill in your blockchain's router, LINK, and Staker contract addresses. The router and usdc addresses can be found on the [CCIP Directory](https://docs.chain.link/ccip/directory) and the Staker contract address from the previous step. For _Ethereum Sepolia_, the addresses are:
- Router address: `0x0BF3dE8c5D3e8A2B34D2BEeB17ABfCeBaf363A59`
- USDC contract address: `0x1c7D4B196Cb0C7B01d743Fbc6116a902379C7238`
- Staker address: Copied from the previous step
3. Configure the Receiver contract to receive CCIP messages from the Sender contract:
1. In Remix IDE, under _Deploy & Run Transactions_, open the list of transactions of your Receiver contract deployed on _Ethereum Sepolia_.
2. Fill in the arguments of the _**setSenderForSourceChain**_ function:
| Argument | Value and Description |
| --- | --- |
| \_sourceChainSelector | `14767482510784806043`
The chain selector of _Avalanche Fuji_. You can find it on the [CCIP Directory](https://docs.chain.link/ccip/directory). |
| \_sender | Your sender contract address at _Avalanche Fuji_.
The sender contract address. |
3. Click on `transact` and confirm the transaction on MetaMask.
4. Configure the Sender contract on _Avalanche Fuji_:
1. Open MetaMask and select the network _Avalanche Fuji_.
2. In Remix IDE, under _Deploy & Run Transactions_, open the list of transactions of your Sender contract deployed on _Avalanche Fuji_.
3. Fill in the arguments of the _**setReceiverForDestinationChain**_ function:
| Argument | Value and Description |
| --- | --- |
| \_destinationChainSelector | `16015286601757825753`
The chain selector of _Ethereum Sepolia_. You can find it on the [CCIP Directory](https://docs.chain.link/ccip/directory). |
| \_receiver | Your receiver contract address at _Ethereum Sepolia_.
The receiver contract address. |
4. Fill in the arguments of the _**setGasLimitForDestinationChain**_: function:
| Argument | Value and Description |
| --- | --- |
| \_destinationChainSelector | `16015286601757825753`
The chain selector of _Ethereum Sepolia_. You can find it on the [CCIP Directory](https://docs.chain.link/ccip/directory). |
| \_gasLimit | `200000`
The gas limit for the execution of the CCIP message on the destination chain. |
At this point:
- You have one _sender_ contract on _Avalanche Fuji_, one _staker_ contract and one _receiver_ contract on _Ethereum Sepolia_.
- You enabled the sender contract to send messages to the receiver contract on _Ethereum Sepolia_.
- You set the gas limit for the execution of the CCIP message on _Ethereum Sepolia_.
- You enabled the receiver contract to receive messages from the sender contract on _Avalanche Fuji_.
- You funded the sender contract with USDC and LINK tokens on _Avalanche Fuji_.
#### [Transfer and Receive tokens and data and pay in LINK](https://docs.chain.link/ccip/tutorials/evm/usdc\#transfer-and-receive-tokens-and-data-and-pay-in-link)
You will transfer _1 USDC_ and arbitrary data, which contains the encoded stake function name and parameters for calling Staker's stake function on the destination chain. The parameters contain the amount of staked tokens and the beneficiary address. The CCIP fees for using CCIP will be paid in LINK.
1. Transfer tokens and data from _Avalanche Fuji_:
1. Open MetaMask and select the network _Avalanche Fuji_.
2. In Remix IDE, under _Deploy & Run Transactions_, open the list of transactions of your smart contract deployed on _Avalanche Fuji_.
3. Fill in the arguments of the _**sendMessagePayLINK**_ function:
| Argument | Value and Description |
| --- | --- |
| \_destinationChainSelector | `16015286601757825753`
CCIP Chain identifier of the destination blockchain ( _Ethereum Sepolia_ in this example). You can find each chain selector on the [CCIP Directory](https://docs.chain.link/ccip/directory). |
| \_beneficiary | The beneficiary of the Staker tokens on _Ethereum Sepolia_. You can set your own EOA (Externally Owned Account) so you can redeem the Staker tokens in exchange for USDC tokens. |
| \_amount | `1000000`
The token amount ( _1 USDC_). |
4. Click on `transact` and confirm the transaction on MetaMask.
5. After the transaction is successful, record the transaction hash. Here is an [example](https://testnet.snowtrace.io/tx/0x5e066ec7e94496e1547c368df4199b9f0c4f8f6c82012b2d974aa258a5c9e9fe) of a transaction on _Avalanche Fuji_.
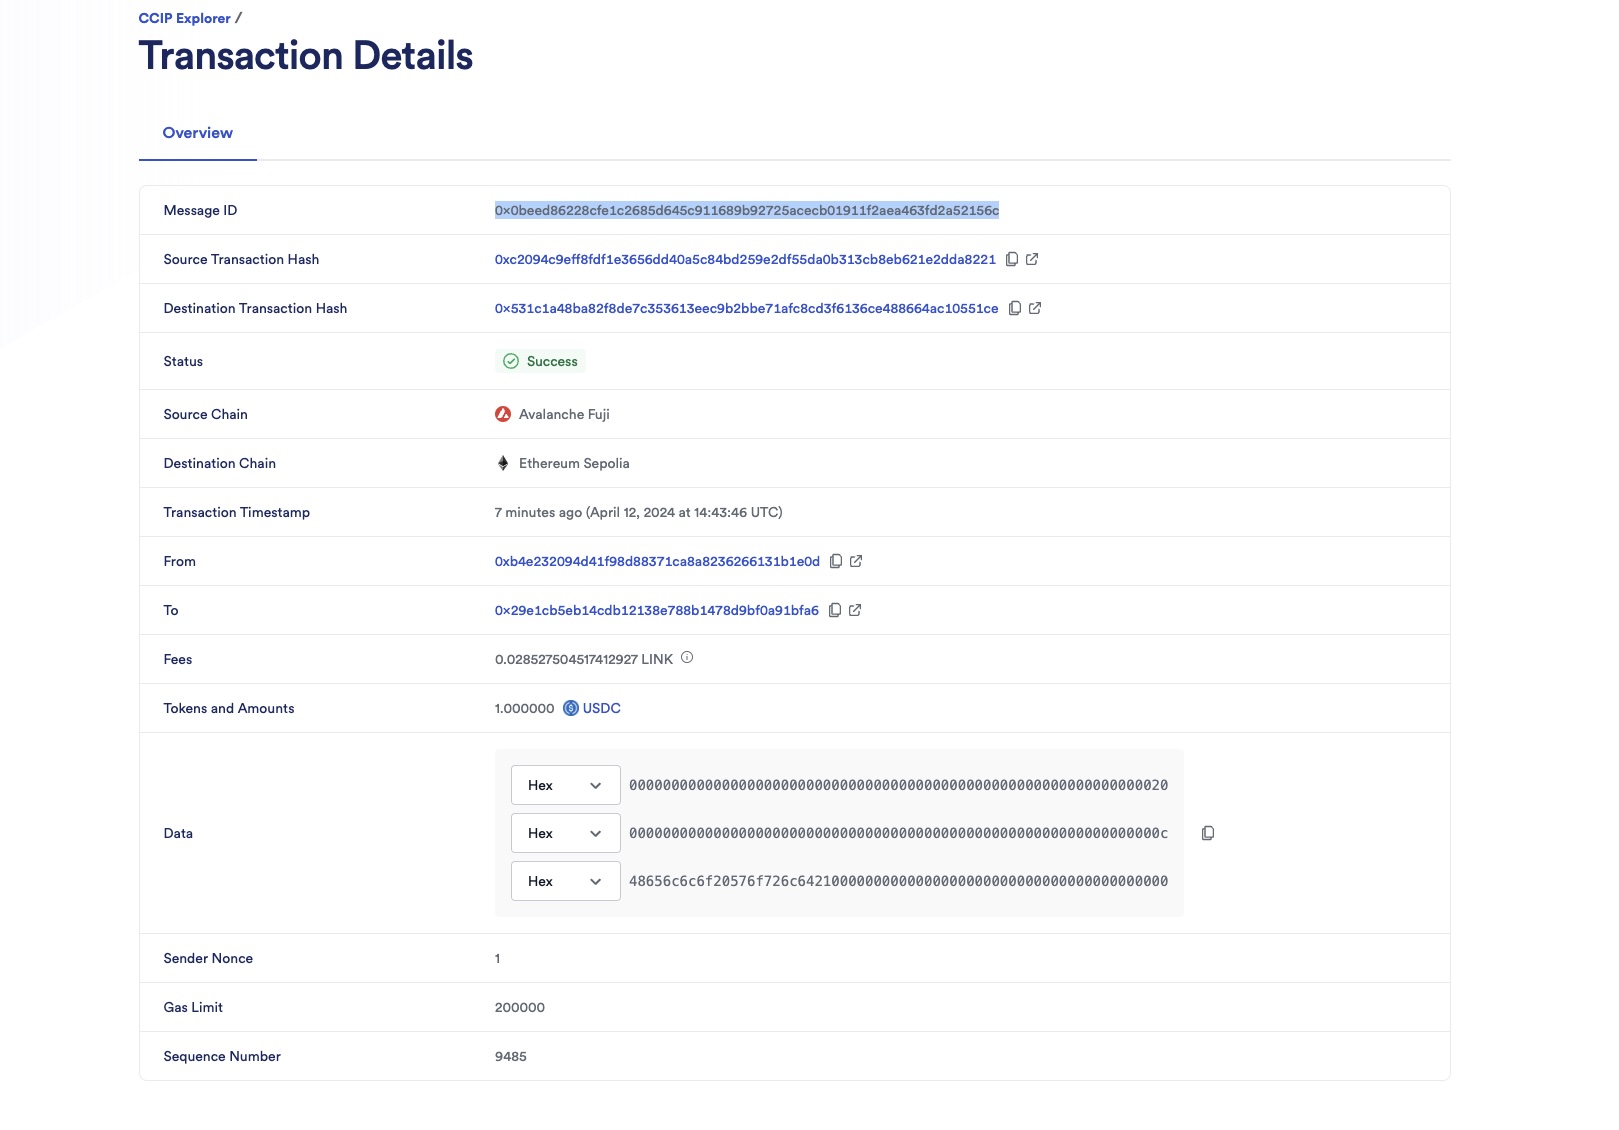
2. Open the [CCIP explorer](https://ccip.chain.link/) and search your cross-chain transaction using the transaction hash.
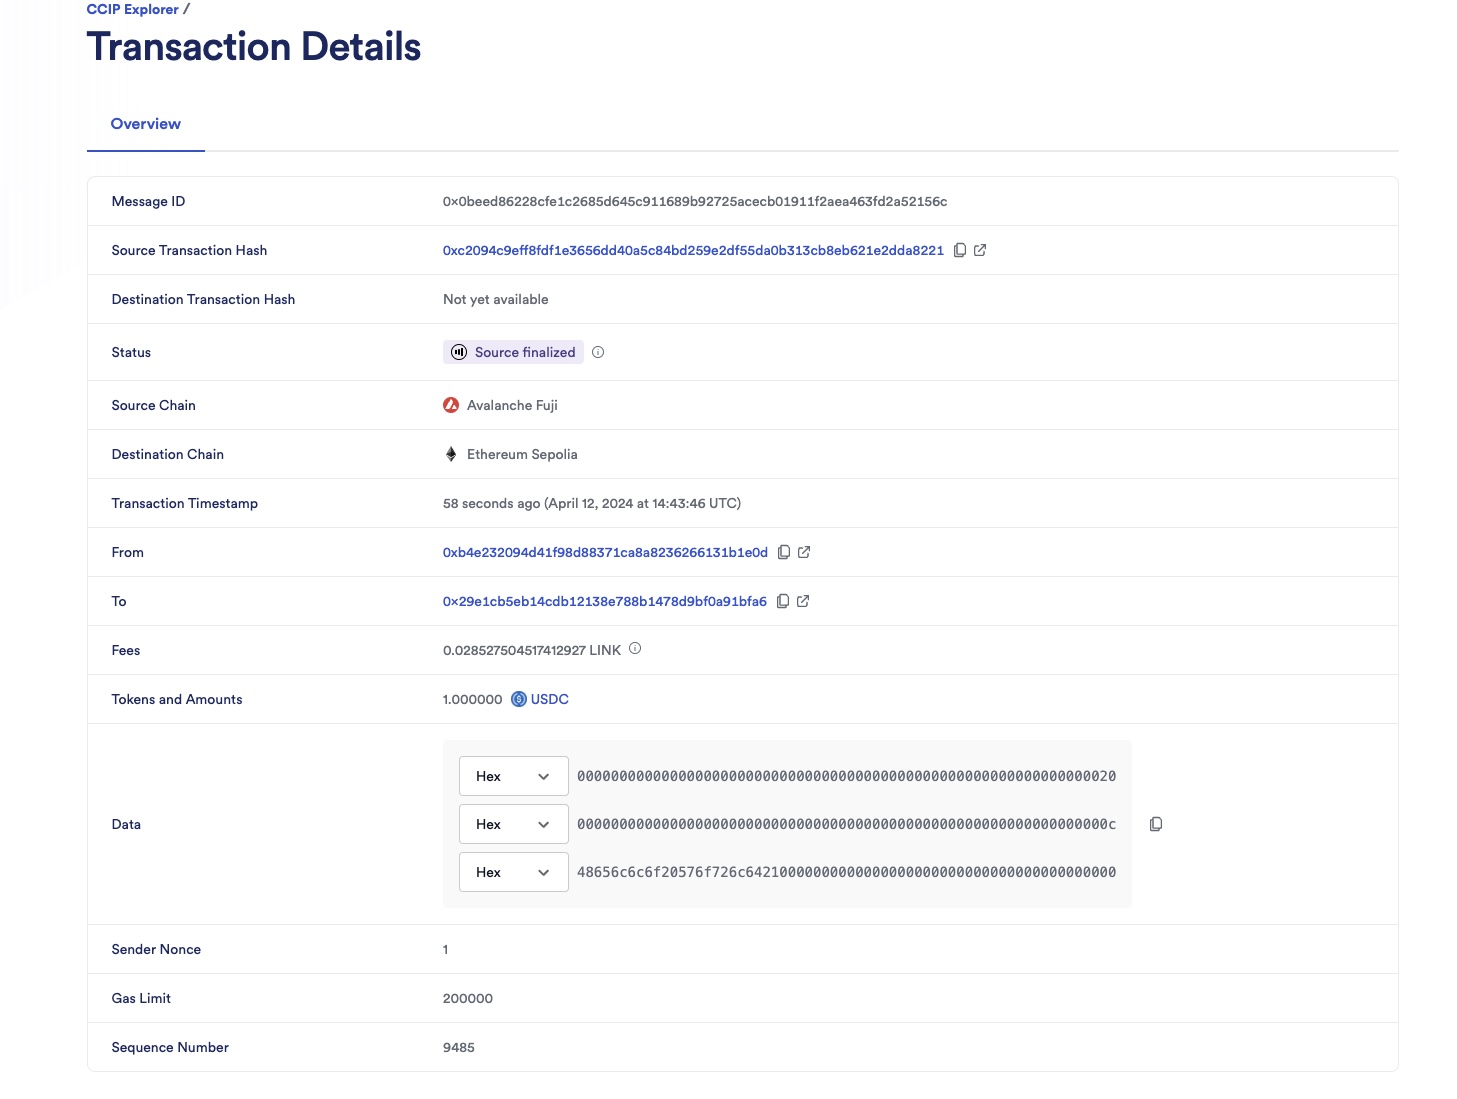
3. The CCIP transaction is completed once the status is marked as "Success". In this example, the CCIP message ID is _0xcb0fad9eec6664ad959f145cc4eb023924faded08baefc29952205ee37da7f13_.
4. Check the balance of the beneficiary on the destination chain:
1. Open MetaMask and select the network _Ethereum Sepolia_.
2. In Remix IDE, under _Deploy & Run Transactions_, open the list of transactions of your Staker contract deployed on _Ethereum Sepolia_.
3. Call the `balanceOf` function with the beneficiary address.

4. Notice that the balance of the beneficiary is 1,000,000 Staker tokens. The Staker contract has the same number of decimals as the USDC token, which is 6. This means the beneficiary has 1 USDC staked and can redeem it by providing the same amount of Staker tokens.
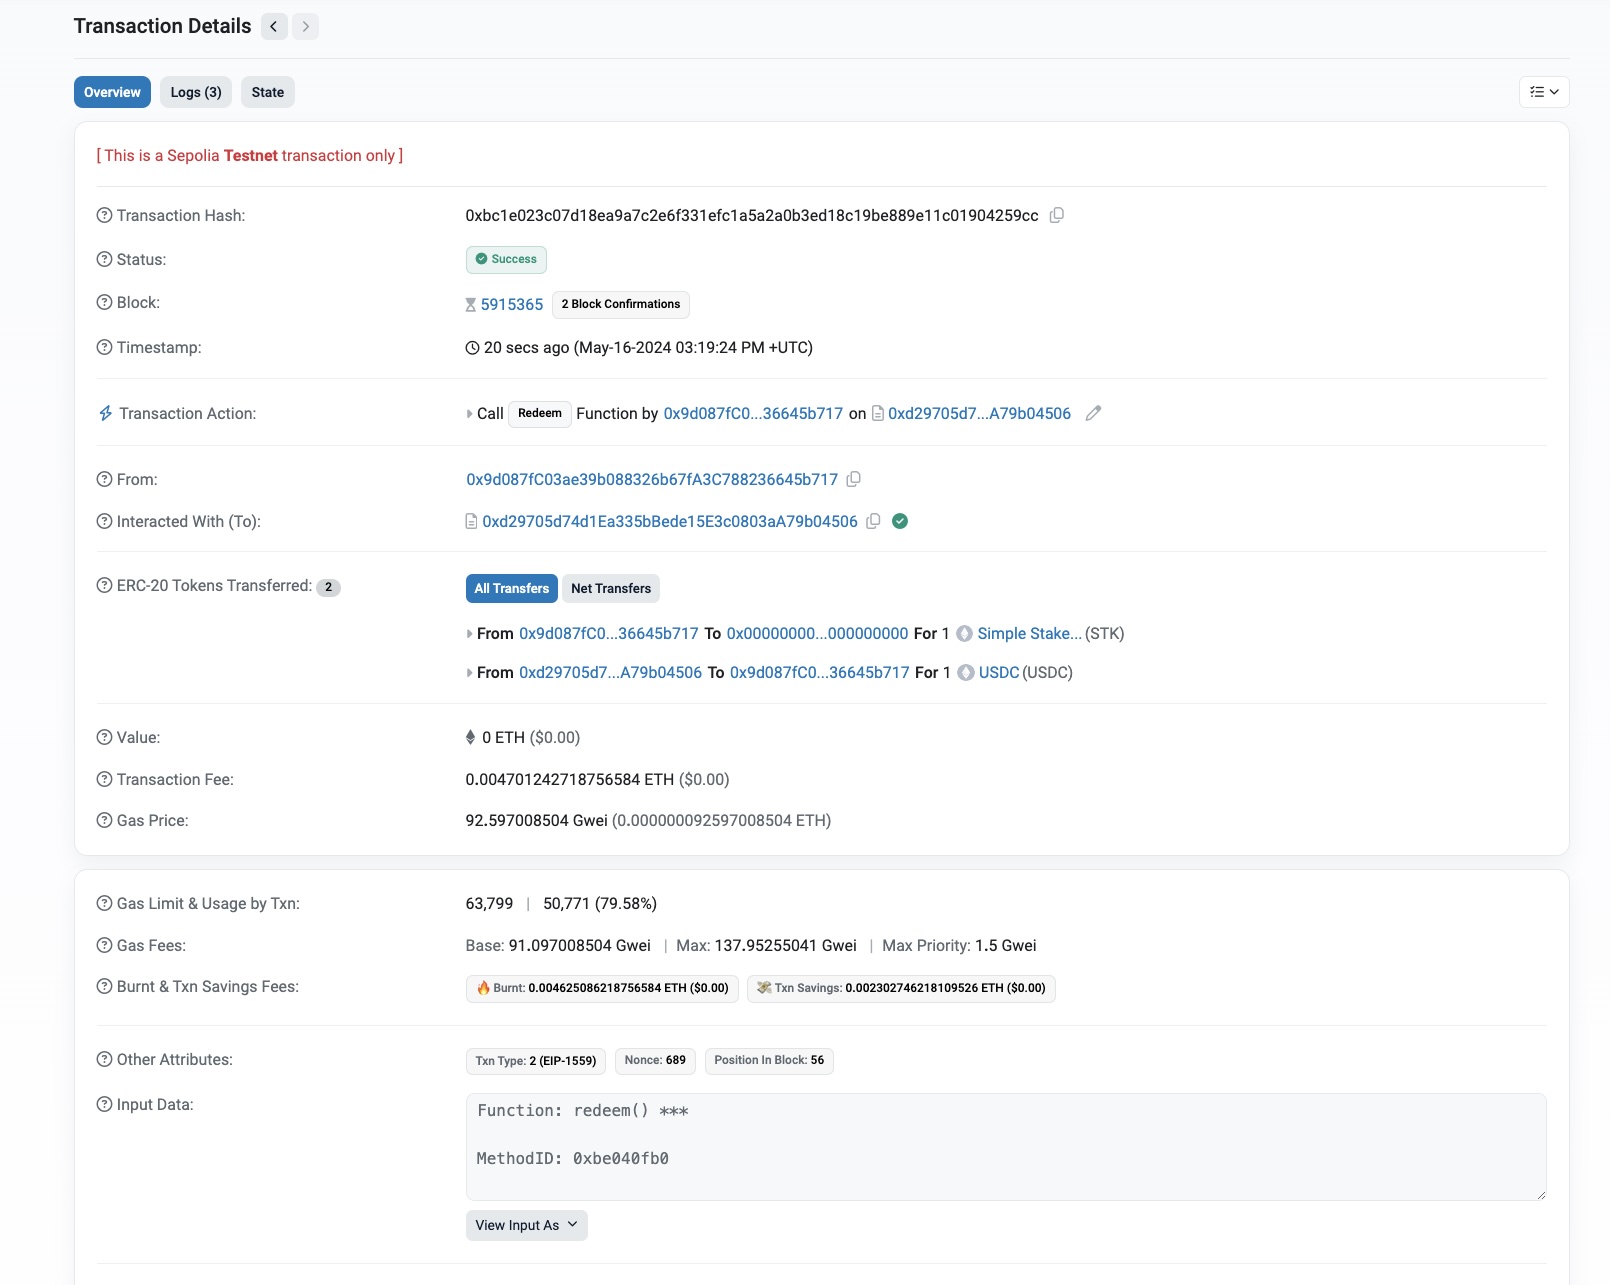
5. Redeem the staked tokens:
1. Open MetaMask and make sure the network is _Ethereum Sepolia_.
2. Make sure you are connected with the beneficiary account.
3. In Remix IDE, under _Deploy & Run Transactions_, open the list of transactions of your Staker contract deployed on _Ethereum Sepolia_.
4. Call the `redeem` function with the amount of Staker tokens to redeem. In this example, the beneficiary will redeem 1,000,000 Staker tokens. When confirming, MetaMask will confirm that you will transfer the Staker tokens in exchange for USDC tokens.
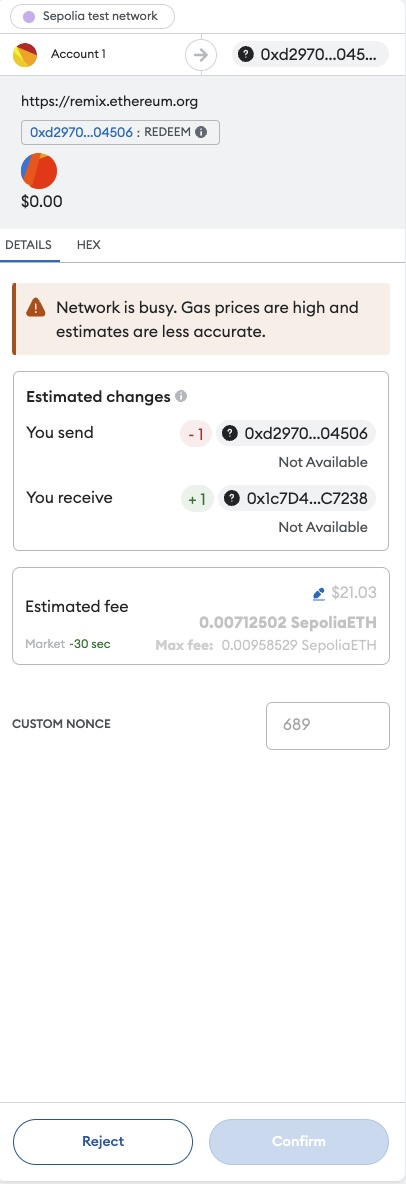
5. Confirm the transaction on MetaMask. After the transaction is successful, the beneficiary will receive 1 USDC tokens.
## [Explanation](https://docs.chain.link/ccip/tutorials/evm/usdc\#explanation)
The smart contracts featured in this tutorial are designed to interact with CCIP to send and receive USDC tokens and data across different blockchains. The contract code contains supporting comments clarifying the functions, events, and underlying logic. We will explain the Sender, Staker, and Receiver contracts further.
### [Sender Contract](https://docs.chain.link/ccip/tutorials/evm/usdc\#sender-contract)

```solidity
// SPDX-License-Identifier: MIT
pragma solidity 0.8.24;
import {IRouterClient} from "@chainlink/contracts-ccip/contracts/interfaces/IRouterClient.sol";
import {OwnerIsCreator} from "@chainlink/contracts/src/v0.8/shared/access/OwnerIsCreator.sol";
import {Client} from "@chainlink/contracts-ccip/contracts/libraries/Client.sol";
import {IERC20} from "@chainlink/contracts/src/v0.8/vendor/openzeppelin-solidity/v4.8.3/contracts/token/ERC20/IERC20.sol";
import {SafeERC20} from "@chainlink/contracts/src/v0.8/vendor/openzeppelin-solidity/v4.8.3/contracts/token/ERC20/utils/SafeERC20.sol";
/**
* THIS IS AN EXAMPLE CONTRACT THAT USES HARDCODED VALUES FOR CLARITY.
* THIS IS AN EXAMPLE CONTRACT THAT USES UN-AUDITED CODE.
* DO NOT USE THIS CODE IN PRODUCTION.
*/
interface IStaker {
function stake(address beneficiary, uint256 amount) external;
function redeem() external;
}
/// @title - A simple messenger contract for transferring tokens to a receiver that calls a staker contract.
contract Sender is OwnerIsCreator {
using SafeERC20 for IERC20;
// Custom errors to provide more descriptive revert messages.
error InvalidRouter(); // Used when the router address is 0
error InvalidLinkToken(); // Used when the link token address is 0
error InvalidUsdcToken(); // Used when the usdc token address is 0
error NotEnoughBalance(uint256 currentBalance, uint256 calculatedFees); // Used to make sure contract has enough balance to cover the fees.
error NothingToWithdraw(); // Used when trying to withdraw Ether but there's nothing to withdraw.
error InvalidDestinationChain(); // Used when the destination chain selector is 0.
error InvalidReceiverAddress(); // Used when the receiver address is 0.
error NoReceiverOnDestinationChain(uint64 destinationChainSelector); // Used when the receiver address is 0 for a given destination chain.
error AmountIsZero(); // Used if the amount to transfer is 0.
error InvalidGasLimit(); // Used if the gas limit is 0.
error NoGasLimitOnDestinationChain(uint64 destinationChainSelector); // Used when the gas limit is 0.
// Event emitted when a message is sent to another chain.
event MessageSent(
bytes32 indexed messageId, // The unique ID of the CCIP message.
uint64 indexed destinationChainSelector, // The chain selector of the destination chain.
address indexed receiver, // The address of the receiver contract on the destination chain.
address beneficiary, // The beneficiary of the staked tokens on the destination chain.
address token, // The token address that was transferred.
uint256 tokenAmount, // The token amount that was transferred.
address feeToken, // the token address used to pay CCIP fees.
uint256 fees // The fees paid for sending the message.
);
IRouterClient private immutable i_router;
IERC20 private immutable i_linkToken;
IERC20 private immutable i_usdcToken;
// Mapping to keep track of the receiver contract per destination chain.
mapping(uint64 => address) public s_receivers;
// Mapping to store the gas limit per destination chain.
mapping(uint64 => uint256) public s_gasLimits;
modifier validateDestinationChain(uint64 _destinationChainSelector) {
if (_destinationChainSelector == 0) revert InvalidDestinationChain();
_;
}
/// @notice Constructor initializes the contract with the router address.
/// @param _router The address of the router contract.
/// @param _link The address of the link contract.
/// @param _usdcToken The address of the usdc contract.
constructor(address _router, address _link, address _usdcToken) {
if (_router == address(0)) revert InvalidRouter();
if (_link == address(0)) revert InvalidLinkToken();
if (_usdcToken == address(0)) revert InvalidUsdcToken();
i_router = IRouterClient(_router);
i_linkToken = IERC20(_link);
i_usdcToken = IERC20(_usdcToken);
}
/// @dev Set the receiver contract for a given destination chain.
/// @notice This function can only be called by the owner.
/// @param _destinationChainSelector The selector of the destination chain.
/// @param _receiver The receiver contract on the destination chain .
function setReceiverForDestinationChain(
uint64 _destinationChainSelector,
address _receiver
) external onlyOwner validateDestinationChain(_destinationChainSelector) {
if (_receiver == address(0)) revert InvalidReceiverAddress();
s_receivers[_destinationChainSelector] = _receiver;
}
/// @dev Set the gas limit for a given destination chain.
/// @notice This function can only be called by the owner.
/// @param _destinationChainSelector The selector of the destination chain.
/// @param _gasLimit The gas limit on the destination chain .
function setGasLimitForDestinationChain(
uint64 _destinationChainSelector,
uint256 _gasLimit
) external onlyOwner validateDestinationChain(_destinationChainSelector) {
if (_gasLimit == 0) revert InvalidGasLimit();
s_gasLimits[_destinationChainSelector] = _gasLimit;
}
/// @dev Delete the receiver contract for a given destination chain.
/// @notice This function can only be called by the owner.
/// @param _destinationChainSelector The selector of the destination chain.
function deleteReceiverForDestinationChain(
uint64 _destinationChainSelector
) external onlyOwner validateDestinationChain(_destinationChainSelector) {
if (s_receivers[_destinationChainSelector] == address(0))
revert NoReceiverOnDestinationChain(_destinationChainSelector);
delete s_receivers[_destinationChainSelector];
}
/// @notice Sends data and transfer tokens to receiver on the destination chain.
/// @notice Pay for fees in LINK.
/// @dev Assumes your contract has sufficient LINK to pay for CCIP fees.
/// @param _destinationChainSelector The identifier (aka selector) for the destination blockchain.
/// @param _beneficiary The address of the beneficiary of the staked tokens on the destination blockchain.
/// @param _amount token amount.
/// @return messageId The ID of the CCIP message that was sent.
function sendMessagePayLINK(
uint64 _destinationChainSelector,
address _beneficiary,
uint256 _amount
)
external
onlyOwner
validateDestinationChain(_destinationChainSelector)
returns (bytes32 messageId)
{
address receiver = s_receivers[_destinationChainSelector];
if (receiver == address(0))
revert NoReceiverOnDestinationChain(_destinationChainSelector);
if (_amount == 0) revert AmountIsZero();
uint256 gasLimit = s_gasLimits[_destinationChainSelector];
if (gasLimit == 0)
revert NoGasLimitOnDestinationChain(_destinationChainSelector);
// Create an EVM2AnyMessage struct in memory with necessary information for sending a cross-chain message
// address(linkToken) means fees are paid in LINK
Client.EVMTokenAmount[]
memory tokenAmounts = new Client.EVMTokenAmount[](1);
tokenAmounts[0] = Client.EVMTokenAmount({
token: address(i_usdcToken),
amount: _amount
});
// Create an EVM2AnyMessage struct in memory with necessary information for sending a cross-chain message
Client.EVM2AnyMessage memory evm2AnyMessage = Client.EVM2AnyMessage({
receiver: abi.encode(receiver), // ABI-encoded receiver address
data: abi.encodeWithSelector(
IStaker.stake.selector,
_beneficiary,
_amount
), // Encode the function selector and the arguments of the stake function
tokenAmounts: tokenAmounts, // The amount and type of token being transferred
extraArgs: Client._argsToBytes(
// Additional arguments, setting gas limit and allowing out-of-order execution.
// Best Practice: For simplicity, the values are hardcoded. It is advisable to use a more dynamic approach
// where you set the extra arguments off-chain. This allows adaptation depending on the lanes, messages,
// and ensures compatibility with future CCIP upgrades. Read more about it here: https://docs.chain.link/ccip/concepts/best-practices/evm#using-extraargs
Client.GenericExtraArgsV2({
gasLimit: gasLimit, // Gas limit for the callback on the destination chain
allowOutOfOrderExecution: true // Allows the message to be executed out of order relative to other messages from the same sender
})
),
// Set the feeToken to a feeTokenAddress, indicating specific asset will be used for fees
feeToken: address(i_linkToken)
});
// Get the fee required to send the CCIP message
uint256 fees = i_router.getFee(
_destinationChainSelector,
evm2AnyMessage
);
if (fees > i_linkToken.balanceOf(address(this)))
revert NotEnoughBalance(i_linkToken.balanceOf(address(this)), fees);
// approve the Router to transfer LINK tokens on contract's behalf. It will spend the fees in LINK
i_linkToken.approve(address(i_router), fees);
// approve the Router to spend usdc tokens on contract's behalf. It will spend the amount of the given token
i_usdcToken.approve(address(i_router), _amount);
// Send the message through the router and store the returned message ID
messageId = i_router.ccipSend(
_destinationChainSelector,
evm2AnyMessage
);
// Emit an event with message details
emit MessageSent(
messageId,
_destinationChainSelector,
receiver,
_beneficiary,
address(i_usdcToken),
_amount,
address(i_linkToken),
fees
);
// Return the message ID
return messageId;
}
/// @notice Allows the owner of the contract to withdraw all LINK tokens in the contract and transfer them to a beneficiary.
/// @dev This function reverts with a 'NothingToWithdraw' error if there are no tokens to withdraw.
/// @param _beneficiary The address to which the tokens will be sent.
function withdrawLinkToken(address _beneficiary) public onlyOwner {
// Retrieve the balance of this contract
uint256 amount = i_linkToken.balanceOf(address(this));
// Revert if there is nothing to withdraw
if (amount == 0) revert NothingToWithdraw();
i_linkToken.safeTransfer(_beneficiary, amount);
}
/// @notice Allows the owner of the contract to withdraw all usdc tokens in the contract and transfer them to a beneficiary.
/// @dev This function reverts with a 'NothingToWithdraw' error if there are no tokens to withdraw.
/// @param _beneficiary The address to which the tokens will be sent.
function withdrawUsdcToken(address _beneficiary) public onlyOwner {
// Retrieve the balance of this contract
uint256 amount = i_usdcToken.balanceOf(address(this));
// Revert if there is nothing to withdraw
if (amount == 0) revert NothingToWithdraw();
i_usdcToken.safeTransfer(_beneficiary, amount);
}
}
```
[Open in Remix](https://remix.ethereum.org/#url=https://docs.chain.link/samples/CCIP/usdc/Sender.sol&autoCompile=true) [What is Remix?](https://docs.chain.link/getting-started/conceptual-overview#what-is-remix)
The Sender contract is responsible for initiating the transfer of USDC tokens and data. Here's how it works:
1. Initializing the contract:
- When deploying the contract, you define the router address, LINK contract address, and USDC contract address.
- These addresses are essential for interacting with the CCIP router and handling token transfers.
2. `sendMessagePayLINK` function:
- This function sends USDC tokens, the encoded function signature of the `stake` function, and arguments (beneficiary address and amount) to the Receiver contract on the destination chain.
- Constructs a CCIP message using the `EVM2AnyMessage` struct.
- Computes the necessary fees using the router's `getFee` function.
- Ensures the contract has enough LINK to cover the fees and approves the router transfer of LINK on its behalf.
- Dispatches the CCIP message to the destination chain by executing the router's `ccipSend` function.
- Emits a `MessageSent` event.
### [Staker Contract](https://docs.chain.link/ccip/tutorials/evm/usdc\#staker-contract)

```solidity
// SPDX-License-Identifier: MIT
pragma solidity 0.8.24;
import {ERC20} from "@chainlink/contracts/src/v0.8/vendor/openzeppelin-solidity/v4.8.3/contracts/token/ERC20/ERC20.sol";
import {SafeERC20} from "@chainlink/contracts/src/v0.8/vendor/openzeppelin-solidity/v4.8.3/contracts/token/ERC20/utils/SafeERC20.sol";
/**
* THIS IS AN EXAMPLE CONTRACT THAT USES HARDCODED VALUES FOR CLARITY.
* THIS IS AN EXAMPLE CONTRACT THAT USES UN-AUDITED CODE.
* DO NOT USE THIS CODE IN PRODUCTION.
*/
interface IStaker {
function stake(address beneficiary, uint256 amount) external;
function redeem() external;
}
/// @title - A simple Staker contract for staking usc tokens and redeeming the staker contracts
contract Staker is IStaker, ERC20 {
using SafeERC20 for ERC20;
error InvalidUsdcToken(); // Used when the usdc token address is 0
error InvalidNumberOfDecimals(); // Used when the number of decimals is 0
error InvalidBeneficiary(); // Used when the beneficiary address is 0
error InvalidAmount(); // Used when the amount is 0
error NothingToRedeem(); // Used when the balance of Staker tokens is 0
event UsdcStaked(address indexed beneficiary, uint256 amount);
event UsdcRedeemed(address indexed beneficiary, uint256 amount);
ERC20 private immutable i_usdcToken;
uint8 private immutable i_decimals;
/// @notice Constructor initializes the contract with the usdc token address.
/// @param _usdcToken The address of the usdc contract.
constructor(address _usdcToken) ERC20("Simple Staker", "STK") {
if (_usdcToken == address(0)) revert InvalidUsdcToken();
i_usdcToken = ERC20(_usdcToken);
i_decimals = i_usdcToken.decimals();
if (i_decimals == 0) revert InvalidNumberOfDecimals();
}
function stake(address _beneficiary, uint256 _amount) external {
if (_beneficiary == address(0)) revert InvalidBeneficiary();
if (_amount == 0) revert InvalidAmount();
i_usdcToken.safeTransferFrom(msg.sender, address(this), _amount);
_mint(_beneficiary, _amount);
emit UsdcStaked(_beneficiary, _amount);
}
function redeem() external {
uint256 balance = balanceOf(msg.sender);
if (balance == 0) revert NothingToRedeem();
_burn(msg.sender, balance);
i_usdcToken.safeTransfer(msg.sender, balance);
emit UsdcRedeemed(msg.sender, balance);
}
function decimals() public view override returns (uint8) {
return i_decimals;
}
}
```
[Open in Remix](https://remix.ethereum.org/#url=https://docs.chain.link/samples/CCIP/usdc/Staker.sol&autoCompile=true) [What is Remix?](https://docs.chain.link/getting-started/conceptual-overview#what-is-remix)
The Staker contract manages the staking and redemption of USDC tokens. Here's how it works:
1. Initializing the contract:
- When deploying the contract, you define the USDC token address.
- This address is essential for interacting with the USDC token contract.
2. `stake` function:
- Allows staking of USDC tokens on behalf of a beneficiary.
- Transfers USDC from the caller ( `msg.sender`) to the contract, then mints an equivalent amount of staking tokens to the beneficiary.
3. `redeem` function:
- Allows beneficiaries to redeem their staked tokens for USDC.
- Burns the staked tokens and transfers the equivalent USDC to the beneficiary.
### [Receiver Contract](https://docs.chain.link/ccip/tutorials/evm/usdc\#receiver-contract)

```solidity
// SPDX-License-Identifier: MIT
pragma solidity 0.8.24;
import {OwnerIsCreator} from "@chainlink/contracts/src/v0.8/shared/access/OwnerIsCreator.sol";
import {Client} from "@chainlink/contracts-ccip/contracts/libraries/Client.sol";
import {CCIPReceiver} from "@chainlink/contracts-ccip/contracts/applications/CCIPReceiver.sol";
import {IERC20} from "@chainlink/contracts/src/v0.8/vendor/openzeppelin-solidity/v4.8.3/contracts/token/ERC20/IERC20.sol";
import {SafeERC20} from "@chainlink/contracts/src/v0.8/vendor/openzeppelin-solidity/v4.8.3/contracts/token/ERC20/utils/SafeERC20.sol";
import {EnumerableMap} from "@chainlink/contracts/src/v0.8/vendor/openzeppelin-solidity/v4.8.3/contracts/utils/structs/EnumerableMap.sol";
/**
* THIS IS AN EXAMPLE CONTRACT THAT USES HARDCODED VALUES FOR CLARITY.
* THIS IS AN EXAMPLE CONTRACT THAT USES UN-AUDITED CODE.
* DO NOT USE THIS CODE IN PRODUCTION.
*/
/// @title - A simple receiver contract for receiving usdc tokens then calling a staking contract.
contract Receiver is CCIPReceiver, OwnerIsCreator {
using SafeERC20 for IERC20;
using EnumerableMap for EnumerableMap.Bytes32ToUintMap;
error InvalidUsdcToken(); // Used when the usdc token address is 0
error InvalidStaker(); // Used when the staker address is 0
error InvalidSourceChain(); // Used when the source chain is 0
error InvalidSenderAddress(); // Used when the sender address is 0
error NoSenderOnSourceChain(uint64 sourceChainSelector); // Used when there is no sender for a given source chain
error WrongSenderForSourceChain(uint64 sourceChainSelector); // Used when the sender contract is not the correct one
error OnlySelf(); // Used when a function is called outside of the contract itself
error WrongReceivedToken(address usdcToken, address receivedToken); // Used if the received token is different than usdc token
error CallToStakerFailed(); // Used when the call to the stake function of the staker contract is not successful
error NoReturnDataExpected(); // Used if the call to the stake function of the staker contract returns data. This is not expected
error MessageNotFailed(bytes32 messageId); // Used if you try to retry a message that has no failed
// Event emitted when a message is received from another chain.
event MessageReceived(
bytes32 indexed messageId, // The unique ID of the CCIP message.
uint64 indexed sourceChainSelector, // The chain selector of the source chain.
address indexed sender, // The address of the sender from the source chain.
bytes data, // The data that was received.
address token, // The token address that was transferred.
uint256 tokenAmount // The token amount that was transferred.
);
event MessageFailed(bytes32 indexed messageId, bytes reason);
event MessageRecovered(bytes32 indexed messageId);
// Example error code, could have many different error codes.
enum ErrorCode {
// RESOLVED is first so that the default value is resolved.
RESOLVED,
// Could have any number of error codes here.
FAILED
}
struct FailedMessage {
bytes32 messageId;
ErrorCode errorCode;
}
IERC20 private immutable i_usdcToken;
address private immutable i_staker;
// Mapping to keep track of the sender contract per source chain.
mapping(uint64 => address) public s_senders;
// The message contents of failed messages are stored here.
mapping(bytes32 => Client.Any2EVMMessage) public s_messageContents;
// Contains failed messages and their state.
EnumerableMap.Bytes32ToUintMap internal s_failedMessages;
modifier validateSourceChain(uint64 _sourceChainSelector) {
if (_sourceChainSelector == 0) revert InvalidSourceChain();
_;
}
/// @dev Modifier to allow only the contract itself to execute a function.
/// Throws an exception if called by any account other than the contract itself.
modifier onlySelf() {
if (msg.sender != address(this)) revert OnlySelf();
_;
}
/// @notice Constructor initializes the contract with the router address.
/// @param _router The address of the router contract.
/// @param _usdcToken The address of the usdc contract.
/// @param _staker The address of the staker contract.
constructor(
address _router,
address _usdcToken,
address _staker
) CCIPReceiver(_router) {
if (_usdcToken == address(0)) revert InvalidUsdcToken();
if (_staker == address(0)) revert InvalidStaker();
i_usdcToken = IERC20(_usdcToken);
i_staker = _staker;
i_usdcToken.safeApprove(_staker, type(uint256).max);
}
/// @dev Set the sender contract for a given source chain.
/// @notice This function can only be called by the owner.
/// @param _sourceChainSelector The selector of the source chain.
/// @param _sender The sender contract on the source chain .
function setSenderForSourceChain(
uint64 _sourceChainSelector,
address _sender
) external onlyOwner validateSourceChain(_sourceChainSelector) {
if (_sender == address(0)) revert InvalidSenderAddress();
s_senders[_sourceChainSelector] = _sender;
}
/// @dev Delete the sender contract for a given source chain.
/// @notice This function can only be called by the owner.
/// @param _sourceChainSelector The selector of the source chain.
function deleteSenderForSourceChain(
uint64 _sourceChainSelector
) external onlyOwner validateSourceChain(_sourceChainSelector) {
if (s_senders[_sourceChainSelector] == address(0))
revert NoSenderOnSourceChain(_sourceChainSelector);
delete s_senders[_sourceChainSelector];
}
/// @notice The entrypoint for the CCIP router to call. This function should
/// never revert, all errors should be handled internally in this contract.
/// @param any2EvmMessage The message to process.
/// @dev Extremely important to ensure only router calls this.
function ccipReceive(
Client.Any2EVMMessage calldata any2EvmMessage
) external override onlyRouter {
// validate the sender contract
if (
abi.decode(any2EvmMessage.sender, (address)) !=
s_senders[any2EvmMessage.sourceChainSelector]
) revert WrongSenderForSourceChain(any2EvmMessage.sourceChainSelector);
/* solhint-disable no-empty-blocks */
try this.processMessage(any2EvmMessage) {
// Intentionally empty in this example; no action needed if processMessage succeeds
} catch (bytes memory err) {
// Could set different error codes based on the caught error. Each could be
// handled differently.
s_failedMessages.set(
any2EvmMessage.messageId,
uint256(ErrorCode.FAILED)
);
s_messageContents[any2EvmMessage.messageId] = any2EvmMessage;
// Don't revert so CCIP doesn't revert. Emit event instead.
// The message can be retried later without having to do manual execution of CCIP.
emit MessageFailed(any2EvmMessage.messageId, err);
return;
}
}
/// @notice Serves as the entry point for this contract to process incoming messages.
/// @param any2EvmMessage Received CCIP message.
/// @dev Transfers specified token amounts to the owner of this contract. This function
/// must be external because of the try/catch for error handling.
/// It uses the `onlySelf`: can only be called from the contract.
function processMessage(
Client.Any2EVMMessage calldata any2EvmMessage
) external onlySelf {
_ccipReceive(any2EvmMessage); // process the message - may revert
}
function _ccipReceive(
Client.Any2EVMMessage memory any2EvmMessage
) internal override {
if (any2EvmMessage.destTokenAmounts[0].token != address(i_usdcToken))
revert WrongReceivedToken(
address(i_usdcToken),
any2EvmMessage.destTokenAmounts[0].token
);
(bool success, bytes memory returnData) = i_staker.call(
any2EvmMessage.data
); // low level call to the staker contract using the encoded function selector and arguments
if (!success) revert CallToStakerFailed();
if (returnData.length > 0) revert NoReturnDataExpected();
emit MessageReceived(
any2EvmMessage.messageId,
any2EvmMessage.sourceChainSelector, // fetch the source chain identifier (aka selector)
abi.decode(any2EvmMessage.sender, (address)), // abi-decoding of the sender address,
any2EvmMessage.data, // received data
any2EvmMessage.destTokenAmounts[0].token,
any2EvmMessage.destTokenAmounts[0].amount
);
}
/// @notice Allows the owner to retry a failed message in order to unblock the associated tokens.
/// @param messageId The unique identifier of the failed message.
/// @param beneficiary The address to which the tokens will be sent.
/// @dev This function is only callable by the contract owner. It changes the status of the message
/// from 'failed' to 'resolved' to prevent reentry and multiple retries of the same message.
function retryFailedMessage(
bytes32 messageId,
address beneficiary
) external onlyOwner {
// Check if the message has failed; if not, revert the transaction.
if (s_failedMessages.get(messageId) != uint256(ErrorCode.FAILED))
revert MessageNotFailed(messageId);
// Set the error code to RESOLVED to disallow reentry and multiple retries of the same failed message.
s_failedMessages.set(messageId, uint256(ErrorCode.RESOLVED));
// Retrieve the content of the failed message.
Client.Any2EVMMessage memory message = s_messageContents[messageId];
// This example expects one token to have been sent.
// Transfer the associated tokens to the specified receiver as an escape hatch.
IERC20(message.destTokenAmounts[0].token).safeTransfer(
beneficiary,
message.destTokenAmounts[0].amount
);
// Emit an event indicating that the message has been recovered.
emit MessageRecovered(messageId);
}
/// @notice Retrieves a paginated list of failed messages.
/// @dev This function returns a subset of failed messages defined by `offset` and `limit` parameters. It ensures that the pagination parameters are within the bounds of the available data set.
/// @param offset The index of the first failed message to return, enabling pagination by skipping a specified number of messages from the start of the dataset.
/// @param limit The maximum number of failed messages to return, restricting the size of the returned array.
/// @return failedMessages An array of `FailedMessage` struct, each containing a `messageId` and an `errorCode` (RESOLVED or FAILED), representing the requested subset of failed messages. The length of the returned array is determined by the `limit` and the total number of failed messages.
function getFailedMessages(
uint256 offset,
uint256 limit
) external view returns (FailedMessage[] memory) {
uint256 length = s_failedMessages.length();
// Calculate the actual number of items to return (can't exceed total length or requested limit)
uint256 returnLength = (offset + limit > length)
? length - offset
: limit;
FailedMessage[] memory failedMessages = new FailedMessage[](
returnLength
);
// Adjust loop to respect pagination (start at offset, end at offset + limit or total length)
for (uint256 i = 0; i < returnLength; i++) {
(bytes32 messageId, uint256 errorCode) = s_failedMessages.at(
offset + i
);
failedMessages[i] = FailedMessage(messageId, ErrorCode(errorCode));
}
return failedMessages;
}
}
```
[Open in Remix](https://remix.ethereum.org/#url=https://docs.chain.link/samples/CCIP/usdc/Receiver.sol&autoCompile=true) [What is Remix?](https://docs.chain.link/getting-started/conceptual-overview#what-is-remix)
The Receiver contract handles incoming cross-chain messages, processes them, and interacts with the Staker contract to stake USDC on behalf of the beneficiary. Here's how it works:
1. Initializing the Contract:
- When deploying the contract, you define the router address, USDC token address, and staker contract address.
- These addresses are essential for interacting with the CCIP router, USDC token, and Staker contracts.
2. `ccipReceive` function:
- The entry point for the CCIP router to deliver messages to the contract.
- Validates the sender and processes the message, ensuring it comes from the correct sender contract on the source chain.
3. Processing Message:
- Calls the `processMessage` function, which is external to leverage Solidity's try/catch error handling mechanism.
- Inside `processMessage`, it calls the `_ccipReceive` function for further message processing.
4. `_ccipReceive` function:
- Checks if the received token is USDC. If not, it reverts.
- Makes a low-level call to the `stake` function of the Staker contract using the encoded function signature and arguments from the received data.
- Emits a `MessageReceived` event upon successful processing.
5. Error Handling:
- If an error occurs during processing, the catch block within ccipReceive is executed.
- The `messageId` of the failed message is added to `s_failedMessages`, and the message content is stored in `s_messageContents`.
- A `MessageFailed` event is emitted, allowing for later identification and reprocessing of failed messages.
6. `retryFailedMessage` function:
- Allows the contract owner to retry a failed message and recover the associated tokens.
- Updates the error code for the message to `RESOLVED` to prevent multiple retries.
- Transfers the locked tokens associated with the failed message to the specified beneficiary as an escape hatch.
7. `getFailedMessages` function:
- Retrieves a paginated list of failed messages for inspection.
## Get the latest Chainlink content straight to your inbox.
Email Address
## Chainlink CCIP API
[iframe](https://www.googletagmanager.com/ns.html?id=GTM-N6DQ47T)
Chainlink CCIP is now officially live on Solana. [View lanes and tokens.](https://docs.chain.link/ccip/directory/mainnet/chain/solana-mainnet?utm_medium=referral&utm_source=chainlink-docs&utm_campaign=solana-ccip)
On this page
# [CCIP API Reference](https://docs.chain.link/ccip/api-reference\#overview)
Chainlink Cross-Chain Interoperability Protocol (CCIP) provides secure cross-chain messaging and token transfers between blockchain networks.
- **[EVM-based Blockchains](https://docs.chain.link/ccip/api-reference/evm/)**: Complete API reference for CCIP on Ethereum Virtual Machine (EVM) compatible blockchains.
- **[SVM-based Blockchains](https://docs.chain.link/ccip/api-reference/svm/)**: Complete API reference for CCIP on Solana Virtual Machine (SVM) compatible blockchains.
## Get the latest Chainlink content straight to your inbox.
Email Address
## Chainlink CCIP Updates
[iframe](https://www.googletagmanager.com/ns.html?id=GTM-N6DQ47T)
Chainlink CCIP is now officially live on Solana. [View lanes and tokens.](https://docs.chain.link/ccip/directory/mainnet/chain/solana-mainnet?utm_medium=referral&utm_source=chainlink-docs&utm_campaign=solana-ccip)
On this page
# [Chainlink CCIP Release Notes](https://docs.chain.link/ccip/release-notes\#overview)
## [2025-05-22 - CCIP on opBNB](https://docs.chain.link/ccip/release-notes\#2025-05-22-ccip-on-opbnb)
Chainlink CCIP expands support to new blockchains:
- [opBNB Mainnet](https://docs.chain.link/ccip/directory/mainnet/chain/binance-smart-chain-mainnet-opbnb-1)
- [opBNB Testnet](https://docs.chain.link/ccip/directory/testnet/chain/binance-smart-chain-testnet-opbnb-1)
## [2025-05-19 - CCIP v1.6 on Solana](https://docs.chain.link/ccip/release-notes\#2025-05-19-ccip-v1-6-on-solana)
- This release expands CCIP to non-EVMs, starting with Solana.
- Solana is now interoperable with 6 EVM chains: Ethereum, BNB, Arbitrum, Optimism, BASE and Sonic using an upgraded [CCIP v1.6 architecture](https://docs.chain.link/ccip/concepts/architecture).
- More lanes to/from Solana will be added in coming weeks.
- No change to any existing EVM Router addresses.
- Solana CCIP details can be seen on the [CCIP Directory](https://docs.chain.link/ccip/directory).
- [Solana Mainnet](https://docs.chain.link/ccip/directory/mainnet/chain/solana-mainnet)
- [Solana Devnet](https://docs.chain.link/ccip/directory/testnet/chain/solana-devnet)
## [2025-05-19 - Cross-chain token (CCT) standard: Added support for new tokens](https://docs.chain.link/ccip/release-notes\#2025-05-19-cross-chain-token-cct-standard-added-support-for-new-tokens)
Newly supported tokens: FLUID, NXPC, SXT, USD1, syrupUSDC, zBTC
- [Fluid (FLUID)](https://docs.chain.link/ccip/directory/mainnet/token/FLUID)
- [NXPC (NXPC)](https://docs.chain.link/ccip/directory/mainnet/token/NXPC)
- [Space and Time (SXT)](https://docs.chain.link/ccip/directory/mainnet/token/SXT)
- [World Liberty Financial USD (USD1)](https://docs.chain.link/ccip/directory/mainnet/token/USD1)
- [Syrup USDC (syrupUSDC)](https://docs.chain.link/ccip/directory/mainnet/token/syrupUSDC)
- [zBTC (zBTC)](https://docs.chain.link/ccip/directory/mainnet/token/zBTC)
## [2025-05-13 - CCIP on new blockchains](https://docs.chain.link/ccip/release-notes\#2025-05-13-ccip-on-new-blockchains)
Chainlink CCIP expands support to new blockchains:
- [Rootstock Mainnet](https://docs.chain.link/ccip/directory/mainnet/chain/rootstock-mainnet)
## [2025-05-11 - Cross-chain token (CCT) standard: Added support for new tokens](https://docs.chain.link/ccip/release-notes\#2025-05-11-cross-chain-token-cct-standard-added-support-for-new-tokens)
Newly supported tokens: BR, CANNED, CRTV, FHE, GEN, LUISA, SHIPA, SHIRO, SILO, SNOW, TRADE, USAGI, ZeUSD, brBTC, xRPL, xrETH
- [Bedrock (BR)](https://docs.chain.link/ccip/directory/mainnet/token/BR)
- [Canned dog (CANNED)](https://docs.chain.link/ccip/directory/mainnet/token/CANNED)
- [Creative Token (CRTV)](https://docs.chain.link/ccip/directory/mainnet/token/CRTV)
- [MindNetwork FHE Token (FHE)](https://docs.chain.link/ccip/directory/mainnet/token/FHE)
- [Generative Protocol (GEN)](https://docs.chain.link/ccip/directory/mainnet/token/GEN)
- [Luisa (LUISA)](https://docs.chain.link/ccip/directory/mainnet/token/LUISA)
- [Shipa (SHIPA)](https://docs.chain.link/ccip/directory/mainnet/token/SHIPA)
- [Shiro Neko (SHIRO)](https://docs.chain.link/ccip/directory/mainnet/token/SHIRO)
- [Silo Token (SILO)](https://docs.chain.link/ccip/directory/mainnet/token/SILO)
- [Snow Ball (SNOW)](https://docs.chain.link/ccip/directory/mainnet/token/SNOW)
- [Polytrade (TRADE)](https://docs.chain.link/ccip/directory/mainnet/token/TRADE)
- [Usagi (USAGI)](https://docs.chain.link/ccip/directory/mainnet/token/USAGI)
- [ZeUSD (ZeUSD)](https://docs.chain.link/ccip/directory/mainnet/token/ZeUSD)
- [brBTC (brBTC)](https://docs.chain.link/ccip/directory/mainnet/token/brBTC)
- [Constellation RPL (xRPL)](https://docs.chain.link/ccip/directory/mainnet/token/xRPL)
- [Constellation ETH (xrETH)](https://docs.chain.link/ccip/directory/mainnet/token/xrETH)
## [2025-05-06 - CCIP on new blockchains](https://docs.chain.link/ccip/release-notes\#2025-05-06-ccip-on-new-blockchains)
Chainlink CCIP expands support to new blockchains:
- [Rootstock Testnet](https://docs.chain.link/ccip/directory/testnet/chain/bitcoin-testnet-rootstock)
- [Superseed Mainnet](https://docs.chain.link/ccip/directory/mainnet/chain/superseed-mainnet)
- [Taiko Alethia](https://docs.chain.link/ccip/directory/mainnet/chain/ethereum-mainnet-taiko-1)
- [Zora Mainnet](https://docs.chain.link/ccip/directory/mainnet/chain/zora-mainnet)
## [2025-04-29 - CCIP on new blockchains](https://docs.chain.link/ccip/release-notes\#2025-04-29-ccip-on-new-blockchains)
Chainlink CCIP expands support to new blockchains:
- [Plume Mainnet](https://docs.chain.link/ccip/directory/mainnet/chain/plume-mainnet)
- [Plume Testnet](https://docs.chain.link/ccip/directory/testnet/chain/plume-testnet-sepolia)
- [Taiko Hekla Testnet](https://docs.chain.link/ccip/directory/testnet/chain/ethereum-testnet-holesky-taiko-1)
## [2025-04-28 - CCIP on new blockchains](https://docs.chain.link/ccip/release-notes\#2025-04-28-ccip-on-new-blockchains)
Chainlink CCIP expands support to new blockchains:
- [Abstract Mainnet](https://docs.chain.link/ccip/directory/mainnet/chain/abstract-mainnet)
- [Lisk Mainnet](https://docs.chain.link/ccip/directory/mainnet/chain/lisk-mainnet)
- [Metal L2 Mainnet](https://docs.chain.link/ccip/directory/mainnet/chain/metal-mainnet)
- [Mint Mainnet](https://docs.chain.link/ccip/directory/mainnet/chain/mint-mainnet)
## [2025-04-27 - Cross-chain token (CCT) standard: Added support for new tokens](https://docs.chain.link/ccip/release-notes\#2025-04-27-cross-chain-token-cct-standard-added-support-for-new-tokens)
Newly supported tokens: ANIMA, APRS, ASTR, AXS, BANANA, DOLO, IXT, LUA, LUAUSD, PIXEL, SKYA, SLP, STBU, WHY, YGG, pufETH
- [Anima (ANIMA)](https://docs.chain.link/ccip/directory/mainnet/token/ANIMA)
- [Aperios (APRS)](https://docs.chain.link/ccip/directory/mainnet/token/APRS)
- [Astar Token (ASTR)](https://docs.chain.link/ccip/directory/mainnet/token/ASTR)
- [Axie Infinity Shard (AXS)](https://docs.chain.link/ccip/directory/mainnet/token/AXS)
- [Banana (BANANA)](https://docs.chain.link/ccip/directory/mainnet/token/BANANA)
- [Dolomite (DOLO)](https://docs.chain.link/ccip/directory/mainnet/token/DOLO)
- [PlanetIX (IXT)](https://docs.chain.link/ccip/directory/mainnet/token/IXT)
- [Lumi Finance Token (LUA)](https://docs.chain.link/ccip/directory/mainnet/token/LUA)
- [Lumi Finance USD (LUAUSD)](https://docs.chain.link/ccip/directory/mainnet/token/LUAUSD)
- [PIXEL (PIXEL)](https://docs.chain.link/ccip/directory/mainnet/token/PIXEL)
- [Sekuya (SKYA)](https://docs.chain.link/ccip/directory/mainnet/token/SKYA)
- [Smooth Love Potion (SLP)](https://docs.chain.link/ccip/directory/mainnet/token/SLP)
- [Stobox Token v.3 (STBU)](https://docs.chain.link/ccip/directory/mainnet/token/STBU)
- [why (WHY)](https://docs.chain.link/ccip/directory/mainnet/token/WHY)
- [Yield Guild Games Token (YGG)](https://docs.chain.link/ccip/directory/mainnet/token/YGG)
- [pufETH (pufETH)](https://docs.chain.link/ccip/directory/mainnet/token/pufETH)
## [2025-04-25 - CCIP on new blockchains](https://docs.chain.link/ccip/release-notes\#2025-04-25-ccip-on-new-blockchains)
Chainlink CCIP expands support to new blockchains:
- [Abstract Sepolia](https://docs.chain.link/ccip/directory/testnet/chain/abstract-testnet)
- [Hemi Mainnet](https://docs.chain.link/ccip/directory/mainnet/chain/hemi-mainnet)
- [Lisk Sepolia](https://docs.chain.link/ccip/directory/testnet/chain/ethereum-testnet-sepolia-lisk-1)
- [Metal L2 Testnet](https://docs.chain.link/ccip/directory/testnet/chain/metal-testnet)
- [Mint Sepolia](https://docs.chain.link/ccip/directory/testnet/chain/mint-testnet)
- [Superseed Sepolia](https://docs.chain.link/ccip/directory/testnet/chain/superseed-testnet)
- [Zora Sepolia](https://docs.chain.link/ccip/directory/testnet/chain/zora-testnet)
## [2025-04-13 - Cross-chain token (CCT) standard: Added support for new tokens](https://docs.chain.link/ccip/release-notes\#2025-04-13-cross-chain-token-cct-standard-added-support-for-new-tokens)
Newly supported tokens: MYST, xSolvBTC
- [MyStandard (MYST)](https://docs.chain.link/ccip/directory/mainnet/token/MYST)
- [SolvBTC Babylon (xSolvBTC)](https://docs.chain.link/ccip/directory/mainnet/token/xSolvBTC)
## [2025-04-11 - CCIP on MegaEth Testnet](https://docs.chain.link/ccip/release-notes\#2025-04-11-ccip-on-megaeth-testnet)
Chainlink CCIP expands support to MegaEth Testnet:
- [MegaEth Testnet](https://docs.chain.link/ccip/directory/testnet/chain/megaeth-testnet)
## [2025-04-04 - CCIP on Lens Mainnet](https://docs.chain.link/ccip/release-notes\#2025-04-04-ccip-on-lens-mainnet)
Chainlink CCIP expands support to Lens Mainnet:
- [Lens Mainnet](https://docs.chain.link/ccip/directory/mainnet/chain/lens-mainnet)
## [2025-03-30 - Cross-chain token (CCT) standard: Added support for new tokens](https://docs.chain.link/ccip/release-notes\#2025-03-30-cross-chain-token-cct-standard-added-support-for-new-tokens)
Newly supported tokens: NPC
- [Non-Playable Coin (NPC)](https://docs.chain.link/ccip/directory/mainnet/token/NPC)
## [2025-03-27 - CCIP Expands to New Blockchains](https://docs.chain.link/ccip/release-notes\#2025-03-27-ccip-expands-to-new-blockchains)
Chainlink CCIP expands support to new blockchains:
- [Apechain Mainnet](https://docs.chain.link/ccip/directory/mainnet/chain/apechain-mainnet)
- [Cronos Mainnet](https://docs.chain.link/ccip/directory/mainnet/chain/cronos-mainnet)
- [Cronos zkEVM Mainnet](https://docs.chain.link/ccip/directory/mainnet/chain/cronos-zkevm-mainnet)
- [Hedera Mainnet](https://docs.chain.link/ccip/directory/mainnet/chain/hedera-mainnet)
## [2025-03-21 - CCIP on Mind Network](https://docs.chain.link/ccip/release-notes\#2025-03-21-ccip-on-mind-network)
Chainlink CCIP expands support to new blockchains:
- [Mind Network Mainnet](https://docs.chain.link/ccip/directory/mainnet/chain/mind-mainnet)
- [Mind Network Testnet](https://docs.chain.link/ccip/directory/testnet/chain/mind-testnet)
## [2025-03-17 - CCIP on Hedera Testnet](https://docs.chain.link/ccip/release-notes\#2025-03-17-ccip-on-hedera-testnet)
Chainlink CCIP expands support to Hedera Testnet:
- [Hedera Testnet](https://docs.chain.link/ccip/directory/testnet/chain/hedera-testnet)
## [2025-03-05 - CCIP Expands to New Blockchains](https://docs.chain.link/ccip/release-notes\#2025-03-05-ccip-expands-to-new-blockchains)
Chainlink CCIP expands support to new blockchains:
- [Apechain Curtis](https://docs.chain.link/ccip/directory/testnet/chain/apechain-testnet-curtis)
- [Cronos Testnet](https://docs.chain.link/ccip/directory/testnet/chain/cronos-testnet)
- [Cronos zkEVM Testnet](https://docs.chain.link/ccip/directory/testnet/chain/cronos-zkevm-testnet-sepolia)
- [Hemi Sepolia](https://docs.chain.link/ccip/directory/testnet/chain/hemi-testnet-sepolia)
## [2025-02-18 - CCIP Expands to New Blockchains](https://docs.chain.link/ccip/release-notes\#2025-02-18-ccip-expands-to-new-blockchains)
Chainlink CCIP expands support to new blockchains:
- [Merlin Mainnet](https://docs.chain.link/ccip/directory/mainnet/chain/bitcoin-merlin-mainnet)
- [Fraxtal Mainnet](https://docs.chain.link/ccip/directory/mainnet/chain/fraxtal-mainnet)
- [Unichain Mainnet](https://docs.chain.link/ccip/directory/mainnet/chain/ethereum-mainnet-unichain-1)
- [Core Mainnet](https://docs.chain.link/ccip/directory/mainnet/chain/core-mainnet)
- [Berachain Mainnet](https://docs.chain.link/ccip/directory/mainnet/chain/berachain-mainnet)
## [2025-02-12 - CCIP Expands to New Blockchains](https://docs.chain.link/ccip/release-notes\#2025-02-12-ccip-expands-to-new-blockchains)
Chainlink CCIP expands support to new blockchains:
- [Merlin Testnet](https://docs.chain.link/ccip/directory/testnet/chain/bitcoin-testnet-merlin)
- [Fraxtal Testnet](https://docs.chain.link/ccip/directory/testnet/chain/ethereum-testnet-holesky-fraxtal-1)
- [Lens Sepolia](https://docs.chain.link/ccip/directory/testnet/chain/ethereum-testnet-sepolia-lens-1)
- [Unichain Sepolia](https://docs.chain.link/ccip/directory/testnet/chain/ethereum-testnet-sepolia-unichain-1)
- [Berachain Bartio](https://docs.chain.link/ccip/directory/testnet/chain/berachain-testnet-bartio)
## [2025-02-10 - CCIP on Treasure](https://docs.chain.link/ccip/release-notes\#2025-02-10-ccip-on-treasure)
Chainlink CCIP expands support to new blockchains:
- [Treasure Mainnet](https://docs.chain.link/ccip/directory/mainnet/chain/treasure-mainnet)
- [Treasure Topaz Testnet](https://docs.chain.link/ccip/directory/testnet/chain/treasure-testnet-topaz)
## [2025-02-07 - CCIP Expands to New Blockchains](https://docs.chain.link/ccip/release-notes\#2025-02-07-ccip-expands-to-new-blockchains)
Chainlink CCIP expands support to new blockchains:
- [Botanix Testnet](https://docs.chain.link/ccip/directory/testnet/chain/bitcoin-testnet-botanix)
- [Corn Network Mainnet](https://docs.chain.link/ccip/directory/mainnet/chain/corn-mainnet)
- [Corn Network Testnet](https://docs.chain.link/ccip/directory/testnet/chain/ethereum-testnet-sepolia-corn-1)
- [Hashkey Chain](https://docs.chain.link/ccip/directory/mainnet/chain/ethereum-mainnet-hashkey-1)
- [Hashkey Chain Testnet](https://docs.chain.link/ccip/directory/testnet/chain/ethereum-testnet-sepolia-hashkey-1)
- [Ink](https://docs.chain.link/ccip/directory/mainnet/chain/ethereum-mainnet-ink-1)
- [Ink Sepolia](https://docs.chain.link/ccip/directory/testnet/chain/ink-testnet-sepolia)
- [Monad Testnet](https://docs.chain.link/ccip/directory/testnet/chain/monad-testnet)
- [Polygon zkEVM](https://docs.chain.link/ccip/directory/mainnet/chain/ethereum-mainnet-polygon-zkevm-1)
- [Polygon zkEVM Cardona](https://docs.chain.link/ccip/directory/testnet/chain/ethereum-testnet-sepolia-polygon-zkevm-1)
- [Sei Network](https://docs.chain.link/ccip/directory/mainnet/chain/sei-mainnet)
- [Sei Testnet](https://docs.chain.link/ccip/directory/testnet/chain/sei-testnet-atlantic)
- [Soneium](https://docs.chain.link/ccip/directory/mainnet/chain/soneium-mainnet)
- [XLayer](https://docs.chain.link/ccip/directory/mainnet/chain/ethereum-mainnet-xlayer-1)
- [XLayer Testnet](https://docs.chain.link/ccip/directory/testnet/chain/ethereum-testnet-sepolia-xlayer-1)
## [2025-01-30 - CCIP on Bitlayer](https://docs.chain.link/ccip/release-notes\#2025-01-30-ccip-on-bitlayer)
Chainlink CCIP expands support to new blockchains:
- [Bitlayer Mainnet](https://docs.chain.link/ccip/directory/mainnet/chain/bitcoin-mainnet-bitlayer-1)
- [Bitlayer Testnet](https://docs.chain.link/ccip/directory/testnet/chain/bitcoin-testnet-bitlayer-1)
## [2025-01-23 - CCIP on World Chain](https://docs.chain.link/ccip/release-notes\#2025-01-23-ccip-on-world-chain)
Chainlink CCIP expands support to new blockchains:
- [World Chain](https://docs.chain.link/ccip/directory/mainnet/chain/ethereum-mainnet-worldchain-1)
- [World Chain Sepolia](https://docs.chain.link/ccip/directory/testnet/chain/ethereum-testnet-sepolia-worldchain-1)
## [2025-01-22 - CCIP Expands to New Blockchains](https://docs.chain.link/ccip/release-notes\#2025-01-22-ccip-expands-to-new-blockchains)
Chainlink CCIP expands support to new blockchains:
- [Bob Mainnet](https://docs.chain.link/ccip/directory/mainnet/chain/bitcoin-mainnet-bob-1)
- [Bob Sepolia](https://docs.chain.link/ccip/directory/testnet/chain/bitcoin-testnet-sepolia-bob-1)
- [Sonic Mainnet](https://docs.chain.link/ccip/directory/mainnet/chain/sonic-mainnet)
- [Sonic Blaze Testnet](https://docs.chain.link/ccip/directory/testnet/chain/sonic-testnet-blaze)
## [2025-01-14 - Bridged USDC Support in CCIP](https://docs.chain.link/ccip/release-notes\#2025-01-14-bridged-usdc-support-in-ccip)
Chainlink CCIP now supports Bridged USDC, addressing the critical challenge of liquidity fragmentation in the multi-chain ecosystem. This enhancement enables:
- **Seamless Liquidity**: Projects can now leverage Bridged USDC to bootstrap initial liquidity on new chains without waiting for native USDC support
- **Standardized Implementation**: Follows Circle's Bridged USDC Standard, ensuring consistency and reliability across different blockchains
- **Future-Proof Integration**: Projects can easily transition to native USDC when their blockchain receives CCTP approval, with no disruption to existing integrations
- **Enhanced DeFi Accessibility**: Accelerates DeFi adoption by providing immediate access to stable, reliable USDC liquidity across emerging blockchain networks
This implementation maintains CCIP's robust security features while expanding the possibilities for cross-chain token transfers and DeFi applications.
For more information, see the [USDC tutorial](https://docs.chain.link/ccip/tutorials/evm/usdc).
## [2025-01-14 - Token Manager](https://docs.chain.link/ccip/release-notes\#2025-01-14-token-manager)
The Token Manager is now available to help token developers to deploy, configure, and manage Cross-Chain Tokens (CCTs) in a simplified web interface. Refer to the [Token Manager](https://docs.chain.link/ccip/tutorials/evm/token-manager) guide for more information.
## [2024-12-17 - CCIP Expands to New Blockchains](https://docs.chain.link/ccip/release-notes\#2024-12-17-ccip-expands-to-new-blockchains)
Chainlink CCIP expands support to new blockchains. Check the CCIP Directory for more information:
- [Shibarium Mainnet](https://docs.chain.link/ccip/directory/mainnet/chain/shibarium-mainnet)
- [Shibarium Puppynet](https://docs.chain.link/ccip/directory/testnet/chain/shibarium-testnet-puppynet)
- [Bsquared Mainnet](https://docs.chain.link/ccip/directory/mainnet/chain/bitcoin-mainnet-bsquared-1)
- [Bsquared Testnet](https://docs.chain.link/ccip/directory/testnet/chain/bitcoin-testnet-bsquared-1)
## [2024-12-11 - CCIP on Ronin](https://docs.chain.link/ccip/release-notes\#2024-12-11-ccip-on-ronin)
Chainlink CCIP expands support to Ronin. Check the CCIP Directory for more information:
- [Ronin Mainnet](https://docs.chain.link/ccip/directory/mainnet/chain/ronin-mainnet)
- [Ronin Saigon testnet](https://docs.chain.link/ccip/directory/testnet/chain/ronin-testnet-saigon)
## [2024-12-12 - CCIP JavaScript SDK](https://docs.chain.link/ccip/release-notes\#2024-12-12-ccip-javascript-sdk)
The [CCIP JavaScript SDK](https://github.com/smartcontractkit/ccip-javascript-sdk) is now available, introducing two packages to simplify management of cross-chain token transfers, and to integrate CCIP with the frontend of your own app.
The [CCIP JavaScript SDK guide](https://docs.chain.link/ccip/ccip-javascript-sdk) introduces the features of the SDK and shows how to run an example app so you can explore the SDK's capabilities.
## [2024-12-04 - Chainlink CCIP 1.5.1](https://docs.chain.link/ccip/release-notes\#2024-12-04-chainlink-ccip-1-5-1)
Chainlink CCIP 1.5.1 is now available, introducing several significant enhancements for cross-chain token pool management.
**Enhanced Token Support:**
- Added support for tokens with different decimals across chains
- New BurnMintERC20 contract for easy token deployment and cross-chain expansion with configurable decimals and max supply
**Improved Token Pool Management:**
- Enhanced token pool upgrades to support multiple active pools simultaneously
- Ensures in-flight messages remain deliverable during pool upgrades
- Upgraded token pool access control from OwnerIsCreator to Ownable2StepMsgSender for better security
For detailed implementation guides and examples, visit our [Cross-Chain Token (CCT) documentation](https://docs.chain.link/ccip/concepts/cross-chain-token/overview). For technical details and interfaces, see the [CCIP v1.5.1 API Reference](https://docs.chain.link/ccip/api-reference/evm/v1.5.1).
## [2024-12-03 - CCIP on Mantle](https://docs.chain.link/ccip/release-notes\#2024-12-03-ccip-on-mantle)
Chainlink CCIP expands support to Mantle. Check the CCIP Directory for more information:
- [Mantle Mainnet](https://docs.chain.link/ccip/directory/mainnet/chain/ethereum-mainnet-mantle-1)
- [Mantle testnet](https://docs.chain.link/ccip/directory/testnet/chain/ethereum-testnet-sepolia-mantle-1)
## [2024-11-25 - CCIP on Zircuit](https://docs.chain.link/ccip/release-notes\#2024-11-25-ccip-on-zircuit)
Chainlink CCIP expands support to Zircuit. Check the CCIP Directory for more information:
- [Zircuit Mainnet](https://docs.chain.link/ccip/directory/mainnet/chain/ethereum-mainnet-zircuit-1)
- [Zircuit testnet](https://docs.chain.link/ccip/directory/testnet/chain/ethereum-testnet-sepolia-zircuit-1)
## [2024-11-19 - CCIP on Astar](https://docs.chain.link/ccip/release-notes\#2024-11-19-ccip-on-astar)
Chainlink CCIP expands support to Astar. Check the CCIP Directory for more information:
- [Astar Mainnet](https://docs.chain.link/ccip/directory/mainnet/chain/polkadot-mainnet-astar)
- [Astar Shibuya](https://docs.chain.link/ccip/directory/testnet/chain/polkadot-testnet-astar-shibuya)
## [2024-11-06 - CCIP on Ethereum Holesky](https://docs.chain.link/ccip/release-notes\#2024-11-06-ccip-on-ethereum-holesky)
Chainlink CCIP expands support to Ethereum Holesky. Check the CCIP Directory for more information:
- [Ethereum Holesky](https://docs.chain.link/ccip/directory/testnet/chain/ethereum-testnet-holesky)
## [2024-10-29 - CCIP Directory and CCIP Explorer](https://docs.chain.link/ccip/release-notes\#2024-10-29-ccip-directory-and-ccip-explorer)
The new [CCIP Directory](https://docs.chain.link/ccip/directory) provides access to network, token, and lane configuration details, replacing the former CCIP Supported Networks pages.
The CCIP Explorer has been refreshed with a new home page, and the Transaction Details now load in a side panel. The CCIP Explorer also supports the option to display CCIP Private Transactions.
## [2024-10-29 - Cross-Chain Token (CCT) standard - Self-Service Availability](https://docs.chain.link/ccip/release-notes\#2024-10-29-cross-chain-token-cct-standard-self-service-availability)
Chainlink's Cross-Chain Token (CCT) standard is now available, introducing a self-service model that allows token developers to enable their tokens in CCIP independently.
- Token developers can deploy, configure, and manage their tokens and token pools in Chainlink's Cross-Chain Interoperability Protocol (CCIP) without requiring manual deployment.
- Chainlink provides fully audited token pools, supporting either Burn & Mint or Lock & Mint mechanisms, which can be combined to provide different token handling mechanisms.
- Token developers maintain complete ownership of their token contracts, pools, and implementation logic, including configuration of rate limits for token transfers across multiple blockchains.
- The CCT standard avoids vendor lock-in and hard-coded functions, ensuring complete autonomy for projects managing cross-chain assets.
- CCT leverages Chainlink's Decentralized Oracle Networks (DONs) to provide secure cross-chain token operations, supported by the Risk Management Network and configurable rate limits.
Read the CCT [conceptual](https://docs.chain.link/ccip/concepts/cross-chain-token/overview) documentation for more information. To learn how to enable your tokens in CCIP in minutes, follow the CCT [tutorials](https://docs.chain.link/ccip/tutorials/evm/cross-chain-tokens).
## [2024-10-22 - CCIP on Soneium Minato](https://docs.chain.link/ccip/release-notes\#2024-10-22-ccip-on-soneium-minato)
Chainlink CCIP expands support to Soneium Minato Testnet. Check the CCIP Directory for more information:
- [Soneium Minato Testnet](https://docs.chain.link/ccip/directory/testnet/chain/ethereum-testnet-sepolia-soneium-1)
## [2024-10-10 - CCIP on Scroll](https://docs.chain.link/ccip/release-notes\#2024-10-10-ccip-on-scroll)
Chainlink CCIP expands support to Scroll. Check the CCIP Directory for more information:
- [Scroll Mainnet](https://docs.chain.link/ccip/directory/mainnet/chain/ethereum-mainnet-scroll-1)
- [Scroll Testnet](https://docs.chain.link/ccip/directory/testnet/chain/ethereum-testnet-sepolia-scroll-1)
## [2024-10-08 - CCIP on Linea](https://docs.chain.link/ccip/release-notes\#2024-10-08-ccip-on-linea)
Chainlink CCIP expands support to Linea. Check the CCIP Directory for more information:
- [Linea Mainnet](https://docs.chain.link/ccip/directory/mainnet/chain/ethereum-mainnet-linea-1)
- [Linea Testnet](https://docs.chain.link/ccip/directory/testnet/chain/ethereum-testnet-sepolia-linea-1)
## [2024-10-04 - Chainlink CCIP 1.5 - Testnet](https://docs.chain.link/ccip/release-notes\#2024-10-04-chainlink-ccip-1-5-testnet)
Chainlink CCIP 1.5 is now available on testnet, introducing several new features and enhancements.
**Risk Management Network Coverage:**
Certain CCIP integrations may not initially include the Risk Management Network (RMN). Blockchains can be integrated with CCIP in a phased approach, starting with the deployment of the Committing and Executing Decentralized Oracle Networks (DONs), followed by the addition of the Risk Management Network in a subsequent update. During a phased deployment, the relevant Commit Stores are configured in the Risk Management contract to always be considered blessed until the Risk Management Network has been deployed for that blockchain. Please refer to the [CCIP Directory](https://docs.chain.link/ccip/directory) to identify which integrations utilize a phased approach, and review the [CCIP Service Responsibility](https://docs.chain.link/ccip/service-responsibility) for more information.
**New Version of `EVMExtraArgs`:**
Chainlink CCIP 1.5 introduces a new version of `EVMExtraArgs`, allowing users to set the `allowOutOfOrderExecution` parameter. This feature enables developers to control the execution order of their messages on the destination blockchain. The `allowOutOfOrderExecution` parameter is part of [`EVMExtraArgsV2`](https://docs.chain.link/ccip/api-reference/client#evmextraargsv2) and is available only on lanes where the **Out of Order Execution** property is set to **Optional** or **Required**. Please consult the [CCIP Directory](https://docs.chain.link/ccip/directory) to determine if your target lane supports this feature.
## [2024-09-16 - CCIP on ZKsync](https://docs.chain.link/ccip/release-notes\#2024-09-16-ccip-on-zksync)
Chainlink CCIP expands support to ZKsync. Check the CCIP Directory for more information:
- [ZKsync Mainnet](https://docs.chain.link/ccip/directory/mainnet/chain/ethereum-mainnet-zksync-1)
- [ZKsync Testnet](https://docs.chain.link/ccip/directory/testnet/chain/ethereum-testnet-sepolia-zksync-1)
## [2024-08-08 - CCIP on Metis](https://docs.chain.link/ccip/release-notes\#2024-08-08-ccip-on-metis)
Chainlink CCIP expands support to Metis. Check the CCIP Directory for more information:
- [Metis Andromeda Mainnet](https://docs.chain.link/ccip/directory/mainnet/chain/ethereum-mainnet-andromeda-1)
- [Metis Sepolia Testnet](https://docs.chain.link/ccip/directory/testnet/chain/ethereum-testnet-sepolia-andromeda-1)
## [2024-07-09 - CCIP on Blast](https://docs.chain.link/ccip/release-notes\#2024-07-09-ccip-on-blast)
Chainlink CCIP expands support to Blast. Check the CCIP Directory for more information:
- [Blast Mainnet](https://docs.chain.link/ccip/directory/mainnet/chain/ethereum-mainnet-blast-1)
- [Blast Sepolia Testnet](https://docs.chain.link/ccip/directory/testnet/chain/ethereum-testnet-sepolia-blast-1)
## [2024-06-19 - CCIP on Mode](https://docs.chain.link/ccip/release-notes\#2024-06-19-ccip-on-mode)
Chainlink CCIP expands support to Mode. Check the CCIP Directory for more information:
- [Mode Mainnet](https://docs.chain.link/ccip/directory/mainnet/chain/ethereum-mainnet-mode-1)
- [Mode Sepolia Testnet](https://docs.chain.link/ccip/directory/testnet/chain/ethereum-testnet-sepolia-mode-1)
## [2024-06-05 - CCIP on Gnosis](https://docs.chain.link/ccip/release-notes\#2024-06-05-ccip-on-gnosis)
Chainlink CCIP expands support to Gnosis Mainnet. Check the CCIP Directory for more information:
- [Gnosis Mainnet](https://docs.chain.link/ccip/directory/mainnet/chain/xdai-mainnet)
## [2024-05-29 - CCIP on Celo](https://docs.chain.link/ccip/release-notes\#2024-05-29-ccip-on-celo)
Chainlink CCIP expands support to Celo. Check the CCIP Directory for more information:
- [Celo Mainnet](https://docs.chain.link/ccip/directory/mainnet/chain/celo-mainnet)
- [Celo Alfajores Testnet](https://docs.chain.link/ccip/directory/testnet/chain/celo-testnet-alfajores)
## [2024-05-08 - CCIP on Polygon Amoy](https://docs.chain.link/ccip/release-notes\#2024-05-08-ccip-on-polygon-amoy)
Chainlink CCIP expands support to Polygon Amoy Testnet. Check the CCIP Directory for more information:
- [Polygon Amoy Testnet](https://docs.chain.link/ccip/directory/testnet/chain/polygon-testnet-amoy)
## [2024-04-24 - Chainlink CCIP GA](https://docs.chain.link/ccip/release-notes\#2024-04-24-chainlink-ccip-ga)
Chainlink CCIP is now Generally Available (GA) on mainnet and testnet.
To support your development and implementation needs, we encourage you to reach out to our team of experts for guidance and support. For expert advice, visit the [Chainlink CCIP Contact form](https://chain.link/ccip-contact).
Additionally, the [Chainlink CCIP local simulator](https://github.com/smartcontractkit/chainlink-local) is available to enhance your development workflow with CCIP. This tool allows you to simulate Chainlink CCIP functionality locally within your Hardhat and Foundry projects. The simulator is designed so you can test your contracts locally and transition smoothly to test networks without any modifications.
## [2024-04-11 - WETH and support of Lock and Unlock mechanism](https://docs.chain.link/ccip/release-notes\#2024-04-11-weth-and-support-of-lock-and-unlock-mechanism)
Chainlink's CCIP now supports WETH (Wrapped Ether) transfers through the Lock and Unlock token mechanism.
This feature allows CCIP to securely lock tokens on the source blockchain and subsequently release an equivalent amount of tokens on the destination blockchain, facilitating seamless cross-chain transfers of WETH. The introduction of this mechanism enables WETH transfers across several key lanes.
For a specific lane configuration, see the [CCIP Directory](https://docs.chain.link/ccip/directory/mainnet). For more detailed information about the Lock and Unlock mechanism and its applications, read the [Token Pools](https://docs.chain.link/ccip/architecture#token-pools) page.
## [2024-04-11 - CCIP gas limit increase on Mainnet](https://docs.chain.link/ccip/release-notes\#2024-04-11-ccip-gas-limit-increase-on-mainnet)
The maximum [gasLimit](https://docs.chain.link/ccip/api-reference/client#evmextraargsv1) that you can set for CCIP messages on mainnet has been increased to 3,000,000 gas units. The change has been documented in the [Service Limits](https://docs.chain.link/ccip/service-limits) page.
## [2024-04-01 - CCIP v1.0.0 deprecated on mainnet](https://docs.chain.link/ccip/release-notes\#2024-04-01-ccip-v1-0-0-deprecated-on-mainnet)
CCIP v1.0.0 is no longer supported on mainnet. You must use the new router addresses listed in the [CCIP Directory](https://docs.chain.link/ccip/directory/mainnet) page.
## [2024-03-11 - CCIP Expands to New Blockchains](https://docs.chain.link/ccip/release-notes\#2024-03-11-ccip-expands-to-new-blockchains)
Chainlink CCIP expands support to new blockchains. Check the CCIP Directory for more information:
- [Wemix Mainnet](https://docs.chain.link/ccip/directory/mainnet/chain/wemix-mainnet)
- [Wemix Testnet](https://docs.chain.link/ccip/directory/testnet/chain/wemix-testnet)
- [Kroma Mainnet](https://docs.chain.link/ccip/directory/mainnet/chain/ethereum-mainnet-kroma-1)
- [Kroma Sepolia Testnet](https://docs.chain.link/ccip/directory/testnet/chain/ethereum-testnet-sepolia-kroma-1)
## [2024-02-07 - v1.0.0 deprecated on testnet](https://docs.chain.link/ccip/release-notes\#2024-02-07-v1-0-0-deprecated-on-testnet)
CCIP v1.0.0 is no longer supported on **testnet**. You must use the new router addresses listed in the [CCIP Directory](https://docs.chain.link/ccip/directory).
## [2024-01-15 - v1.2.0 release on mainnet](https://docs.chain.link/ccip/release-notes\#2024-01-15-v1-2-0-release-on-mainnet)
CCIP v1.0.0 has been deprecated on mainnet. You must use the new router addresses listed in this page **before March 31st, 2024**. Please note that there is no change to the router interface. The CCIP v1.0.0 mainnet routers will continue to function in parallel **until March 31st, 2024**, but we highly recommend switching to the v1.2.0 routers as soon as possible. If you currently use CCIP v1.0.0, use the [@chainlink/contracts-ccip npm package version 0.7.6](https://www.npmjs.com/package/@chainlink/contracts-ccip/v/0.7.6). To migrate to v1.2.0, use [version 1.2.1 of the npm package](https://www.npmjs.com/package/@chainlink/contracts-ccip/v/1.2.1) or later. Please refer to the [release notes](https://docs.chain.link/ccip/release-notes) for a comprehensive overview of the enhancements and new features in v1.2.0.
- There is no change to the router interface, but you must use the new router addresses listed in the [CCIP Directory](https://docs.chain.link/ccip/directory).
- USDC transfers are currently supported on several lanes. See the the [CCIP Directory](https://docs.chain.link/ccip/directory/mainnet) page to get a specific lane's token addresses and rate limits.
- The message sequencing process is simplified in CCIP message handling by removing the `strict` sequencing flag from the [extraArgs](https://docs.chain.link/ccip/api-reference/client#evmextraargsv1) field in [CCIP messages](https://docs.chain.link/ccip/api-reference/client#evm2anymessage).
- The gas limit and maximum message data length for CCIP messages have been adjusted on mainnets. These changes are detailed in the [Service Limits](https://docs.chain.link/ccip/service-limits) documentation.
- To interact with CCIP v1.2.0, use the [@chainlink/contract-ccip](https://www.npmjs.com/package/@chainlink/contracts-ccip) npm package.
## [2023-12-15 - CCIP on Arbitrum Sepolia](https://docs.chain.link/ccip/release-notes\#2023-12-15-ccip-on-arbitrum-sepolia)
Chainlink CCIP expands support to Arbitrum Sepolia. Check the CCIP Directory for more information:
- [Arbitrum Sepolia Testnet](https://docs.chain.link/ccip/directory/testnet/chain/ethereum-testnet-sepolia-arbitrum-1)
## [2023-12-08 - v1.2.0 release on testnet](https://docs.chain.link/ccip/release-notes\#2023-12-08-v1-2-0-release-on-testnet)
CCIP v1.0.0 has been deprecated on testnet. You must use the new router addresses listed in the [CCIP Directory](https://docs.chain.link/ccip/directory/testnet) **before January 31st, 2024**. Please note that there is no change to the router interface. The CCIP v1.0.0 testnet routers will continue to function in parallel **until January 31st, 2024**, but we highly recommend switching to the v1.2.0 routers as soon as possible. If you currently use CCIP v1.0.0, use the [@chainlink/contracts-ccip npm package version 0.7.6](https://www.npmjs.com/package/@chainlink/contracts-ccip/v/0.7.6). To migrate to v1.2.0, use [version 1.2.1 of the npm package](https://www.npmjs.com/package/@chainlink/contracts-ccip/v/1.2.1) or later.
- There is no change to the router interface, but you must use the new router addresses listed in the [CCIP Directory](https://docs.chain.link/ccip/directory/testnet).
USDC transfers are currently supported on several lanes. See the the [CCIP Directory](https://docs.chain.link/ccip/directory/testnet) page to get a specific lane's token addresses and rate limits.
- We've simplified the message sequencing process in our CCIP message handling by removing the `strict` sequencing flag from the [extraArgs](https://docs.chain.link/ccip/api-reference/client#evmextraargsv1) field in [CCIP messages](https://docs.chain.link/ccip/api-reference/client#evm2anymessage).
- The gas limit and maximum message data length for CCIP messages have been adjusted on testnets. These changes are detailed in the [Service Limits](https://docs.chain.link/ccip/service-limits) documentation.
- To interact with CCIP v1.2.0, use the [@chainlink/contract-ccip](https://www.npmjs.com/package/@chainlink/contracts-ccip) npm package.
## [2023-11-17 - CCIP deprecation on Arbitrum Goerli](https://docs.chain.link/ccip/release-notes\#2023-11-17-ccip-deprecation-on-arbitrum-goerli)
Arbitrum Goerli is no longer supported. Arbitrum Sepolia support will be added at a later date.
## [2023-09-27 - CCIP Expands to New Blockchains](https://docs.chain.link/ccip/release-notes\#2023-09-27-ccip-expands-to-new-blockchains)
Chainlink CCIP expands support to new blockchains. Check the CCIP Directory for more information:
- [BNB Chain Mainnet](https://docs.chain.link/ccip/directory/mainnet/chain/bsc-mainnet)
- [Base Mainnet](https://docs.chain.link/ccip/directory/mainnet/chain/ethereum-mainnet-base-1)
## [2023-09-21 - CCIP on Arbitrum Mainnet](https://docs.chain.link/ccip/release-notes\#2023-09-21-ccip-on-arbitrum-mainnet)
Chainlink CCIP expands support to Arbitrum Mainnet. Check the CCIP Directory for more information:
- [Arbitrum Mainnet](https://docs.chain.link/ccip/directory/mainnet/chain/ethereum-mainnet-arbitrum-1)
## [2023-08-25 - CCIP Expands to New Blockchains](https://docs.chain.link/ccip/release-notes\#2023-08-25-ccip-expands-to-new-blockchains)
Chainlink CCIP expands support to new blockchains. Check the CCIP Directory for more information:
- [BNB Chain Testnet](https://docs.chain.link/ccip/directory/testnet/chain/bsc-testnet)
- [Base Sepolia Testnet](https://docs.chain.link/ccip/directory/testnet/chain/ethereum-testnet-sepolia-base-1)
## [2023-07-20 - CCIP Testnet GA release](https://docs.chain.link/ccip/release-notes\#2023-07-20-ccip-testnet-ga-release)
Chainlink CCIP is publicly available on the following testnet chains:
- Ethereum Sepolia
- Optimism Goerli
- Avalanche Fuji
- Arbitrum Goerli
- Polygon Mumbai
See the [CCIP Directory](https://docs.chain.link/ccip/directory/testnet) page for more information.
## [2023-07-17 - CCIP Testnet Early Access](https://docs.chain.link/ccip/release-notes\#2023-07-17-ccip-testnet-early-access)
Chainlink CCIP is available in early access on the following mainnet chains:
- Ethereum Sepolia
- Optimism Goerli
- Avalanche Fuji
- Arbitrum Goerli
- Polygon Mumbai
See the [CCIP Directory](https://docs.chain.link/ccip/directory/testnet) page for more information.
## Get the latest Chainlink content straight to your inbox.
Email Address
## Chainlink CCIP Architecture
[iframe](https://www.googletagmanager.com/ns.html?id=GTM-N6DQ47T)
Chainlink CCIP is now officially live on Solana. [View lanes and tokens.](https://docs.chain.link/ccip/directory/mainnet/chain/solana-mainnet?utm_medium=referral&utm_source=chainlink-docs&utm_campaign=solana-ccip)
On this page
# [CCIP Architecture](https://docs.chain.link/ccip/concepts/architecture\#overview)
This section explains the core architecture of the Cross-Chain Interoperability Protocol (CCIP). Learn about the fundamental components and how they interact to enable secure cross-chain communication.
- **[Overview](https://docs.chain.link/ccip/concepts/architecture/overview)**: Get a high-level summary of the CCIP architecture.
- **[Key Concepts](https://docs.chain.link/ccip/concepts/architecture/key-concepts)**: Understand the essential terms and components within the CCIP ecosystem.
- **[Onchain Components](https://docs.chain.link/ccip/concepts/architecture/onchain/)**: Explore the onchain components, including EVM smart contracts and SVM programs, that operate directly on blockchains.
- **[Offchain Components](https://docs.chain.link/ccip/concepts/architecture/offchain/)**: Discover the offchain systems, like the Risk Management Network and Decentralized Oracle Network, that support CCIP operations.
## Get the latest Chainlink content straight to your inbox.
Email Address
## Chainlink CCIP Responsibilities
[iframe](https://www.googletagmanager.com/ns.html?id=GTM-N6DQ47T)
Chainlink CCIP is now officially live on Solana. [View lanes and tokens.](https://docs.chain.link/ccip/directory/mainnet/chain/solana-mainnet?utm_medium=referral&utm_source=chainlink-docs&utm_campaign=solana-ccip)
On this page
# [Chainlink CCIP Service Responsibility](https://docs.chain.link/ccip/service-responsibility\#overview)
The Chainlink Cross-Chain Interoperability Protocol (CCIP) is a secure, reliable, and easy-to-use interoperability protocol for building cross-chain applications and services. The use of CCIP involves application developers, blockchain development teams, token developers and Chainlink node operators, among others. These participants share responsibility for ensuring that operation and performance match expectations. Please note that CCIP support of a particular blockchain, application, or token does not constitute endorsement of such blockchain, application, or token.
## [Application Developer Responsibilities](https://docs.chain.link/ccip/service-responsibility\#application-developer-responsibilities)
Application developers are responsible for the correctness, security, and reliability of their application. This includes:
- **Code and application audits:** Developers are responsible for auditing their code and applications before deploying to production. Developers must determine the quality of any audits and ensure that they meet the requirements for their application.
- **CCIP upgrades and best practices:** Developers are responsible for following CCIP documentation regarding implementing CCIP upgrades and best practices for integrating CCIP in their applications.
- **Code dependencies and imports:** Developers are responsible for ensuring the quality, reliability, and security of any dependencies or imported packages that they use with Chainlink CCIP, as well as reviewing and auditing these dependencies and packages.
- **Code quality and testing:** Developers are responsible for ensuring that their application code, onchain and offchain, meets the quality expectations and has undergone rigorous testing.
- **Application monitoring and alerting:** Developers must monitor their applications, inform their users of any abnormal activity, and take appropriate action to restore normal operations.
- **Blockchain risk assessment:** Developers are responsible for the risk assessment of any blockchain network where they choose to deploy their application on or decide to interoperate with, when using Chainlink CCIP. This includes reviewing the time-to-finality formally documented by a blockchain's development team, understanding [how CCIP uses it to determine finality](https://docs.chain.link/ccip/ccip-execution-latency), the nuances in the different types of deterministic finality, and being aware of the risks when CCIP uses block depth to determine chain finality.
- **Token risk assessment:** Developers are responsible for the risk assessment of any tokens they choose to support or list in their application and expose to their users.
- **Risk communication:** Developers must clearly articulate and communicate identified risks to their users.
- **Manual execution:** Developers must monitor their CCIP transactions and take action when transactions require manual execution. For example, informing their users and directing them to the appropriate page on the [CCIP Explorer](https://ccip.chain.link/).
- **Risk Management Network coverage:** Developers must check the deployment status of the Risk Management Network on the chains they build on, such as via the [CCIP Directory](https://docs.chain.link/ccip/directory). If the Risk Management Network is not yet active on a chain, developers must validate that its absence conforms to the requirements of their application's specific use case.
## [Blockchain Development Team Responsibilities](https://docs.chain.link/ccip/service-responsibility\#blockchain-development-team-responsibilities)
Blockchain development teams are responsible for the correctness, security, and reliability of their blockchain software. This includes:
- **Block finality:** Blockchain development teams must ensure that blocks with a [commitment level](https://ethereum.org/en/developers/docs/apis/json-rpc/#default-block) of `finalized` are actually final. The properties of the finality mechanism, including underlying assumptions and conditions under which finality violations could occur, must be clearly documented and communicated to application developers in the blockchain ecosystem. The documented time-to-finality informs how long CCIP waits for finality for outbound transactions from that chain; however, an additional buffer may be added.
- **Governance model:** Blockchain development teams are responsible for setting up a clear and effective governance model and communicating its participants and processes clearly to its stakeholders and application developers.
- **Fixes and upgrades:** Blockchain development teams must communicate availability of fixes immediately and announce planned upgrades as much in advance as possible so blockchain validators and application developers can prepare themselves accordingly.
- **Incident management:** Blockchain development teams are responsible for clearly articulating and communicating any security, reliability and availability incidents to their community. This includes root cause analysis, post-mortem details and a clear plan of action to recover and prevent from happening in the future.
- **Blockchain liveness:** Blockchain development teams must take appropriate action to ensure their blockchain maintains a high degree of liveness and aligns with set expectations towards their community members and applications developers.
## [Token Developers Responsibilities](https://docs.chain.link/ccip/service-responsibility\#token-developers-responsibilities)
Token Developers may enable token transfers on CCIP for the tokens that they administer. Enabling token transfers on CCIP allows users to transfer tokens between supported blockchains using either [Burn and Mint](https://docs.chain.link/ccip/concepts/cross-chain-token/overview#burn-and-mint), [Lock and Mint](https://docs.chain.link/ccip/concepts/cross-chain-token/overview#lock-and-mint), or [Lock and Unlock](https://docs.chain.link/ccip/concepts/cross-chain-token/overview#lock-and-unlock) processes. Token Developers who choose to enable token transfers on CCIP are responsible for the correctness, security, and reliability of their token pools, token configurations, and token contracts. This includes:
- **Code and application audits**: Token Developers are responsible for auditing their token contract code and token pool contract code. Developers must determine the quality of any audits and ensure that they meet the requirements for their use cases.
- **Configuration of CCIP contracts**: Token Developers are responsible for maintaining the correct token pool and token administrator for their token in all applicable TokenAdminRegistry contracts. Users are responsible for maintaining control of the address which is set as the token administrator. This token administrator is the only role authorized to map a token to the corresponding token pool on the same network.
- **CCIP upgrades and best practices**: Token Developers are responsible for following CCIP documentation regarding implementing CCIP upgrades and best practices for enabling token transfers on CCIP for their token.
- **Code dependencies and imports**: Token Developers are responsible for ensuring the quality, reliability, and security of any dependencies or imported packages that they use with their token contracts, token pools, or configurations including the TokenAdminRegistry. Token Developers are responsible for reviewing and auditing these dependencies and packages.
- **Token Developers must retain access to the token administrator account** after it has accepted this role in the TokenAdminRegistry. Neither Chainlink Labs nor the Chainlink Foundation is responsible for any loss of access to these token pools, loss of funds, or disruption to applications due to loss of access to these required functions.
- **Blockchain risk assessment**: Token Developers are responsible for the risk assessment of any blockchain network where they choose to deploy their tokens, token pools, and tokens enabled for transfer using Chainlink CCIP.
- **Risk communication**: Token Developers must clearly articulate and communicate identified risks to the users of those tokens including any risks specific to the configuration of tokens enabled for transfer using Chainlink CCIP.
- **Authorization**: Token Developers must verify that they are authorized to create token pools for a given token. Although anyone may create a token pool, the token developer must properly register that token with Chainlink CCIP. Token Developers must also properly configure the TokenAdminRegistry.
- **Token pool configurations for [Rebasable Tokens](https://docs.chain.link/ccip/concepts/cross-chain-token/evm/token-pools#tokens-with-rebasing-or-fee-on-transfer-mechanisms)**: Token Developers must properly write the logic in their token pool for burning and minting tokens based on the rebasing mechanism.
- **Token transfer rate limits**: Token DeveloperToken Owners must select and configure appropriate token transfer rate limits for tokens on each lane where they choose to enable their token.
- **Token transfer types**: Token Developers must select appropriate token transfer type for their tokens; either [Burn and Mint](https://docs.chain.link/ccip/concepts/cross-chain-token/overview#burn-and-mint), [Lock and Mint](https://docs.chain.link/ccip/concepts/cross-chain-token/overview#lock-and-mint), or [Lock and Unlock](https://docs.chain.link/ccip/concepts/cross-chain-token/overview#lock-and-unlock). Token Developers are responsible for implementing the burn and mint functions, lock and mint functions or lock and unlock functions in their token contracts correctly on all applicable chains.
- **Migration between CCIP versions**: Token Developers who wish to adopt future versions of CCIP are responsible for all migration tasks required to adopt new features and functionality.
- **Best Practices**: Token Developers are responsible for following the appropriate best practices for creating, managing, and enabling transfers of their tokens on Chainlink CCIP.
- **Risk Management Network coverage**: Token Developers must check the deployment status of the Risk Management Network on the chains they build on, which can be found on the [CCIP Directory](https://docs.chain.link/ccip/directory) page. If the Risk Management Network is not yet active on a chain, Token Developers must validate that its absence conforms to their requirements.
- **Token Developer Attestation**: Token Developers are responsible for ensuring the quality, reliability, and security of their associated attestation endpoint(s). Token Developers are responsible for adhering to Chainlink-defined specifications and maintaining an up-to-date implementation. Neither Chainlink Labs nor the Chainlink Foundation are responsible for the development, maintenance, or operation of Token Developer Attestation endpoints.
- **Following implementation specifications**: Failure to adhere to design specifications for the Chainlink-defined Token Developer Attestation endpoint can result in stuck or failed transactions for users, incorrect accounting of token supply, and/or potential loss of tokens.
- **Maintenance**: Failure to maintain up-to-date compatibility with the Chainlink-defined design specifications may result in downtime or unreliable attestations.
- **Reliability**: Attestation endpoints must be built to handle user demand, both in terms of transactional capacity and uptime. Failure to respond to attestation requests may result in stuck or failed transactions for users and/or potential loss of tokens.
- **Liquidity Management**: Token Developers who choose the **Lock and Mint** or **Lock and Unlock** mechanism must ensure their token pools have sufficient liquidity when releasing tokens. Failure to maintain adequate liquidity can result in stalled or failed cross-chain transfers, causing a degraded user experience. Token Developers are responsible for:
- **Ensuring sufficient liquidity**: Continuously monitor transaction volumes and add liquidity to the pool before it is depleted to avoid having user funds stuck in transit.
- **Avoiding fragmented liquidity**: Where possible, minimize the use of **Lock and Unlock** across multiple blockchains to reduce operational complexity and prevent liquidity from being split across multiple pools.
- **Monitoring liquidity health and automating alerts**: Implement monitoring and alerting systems that notify Token Developers when liquidity drops below certain thresholds, allowing for proactive liquidity management before user transfers fail.
- **Proper use of provideLiquidity and withdrawLiquidity**: Only authorized entities (such as a trusted liquidity manager) should manage liquidity. Ensure all access controls are in place to prevent unauthorized manipulation of the token pool.
Although Token Developers may request that their tokens be added to Transporter, tokens may be added to Transporter at any time even if it has not been explicitly requested.
## [Chainlink Node Operator Responsibilities](https://docs.chain.link/ccip/service-responsibility\#chainlink-node-operator-responsibilities)
High-quality Chainlink node operators participate in the decentralized oracle networks (DONs) that power CCIP and the Risk Management Network using a configuration specified in the Chainlink software. As participants in these deployments, Node Operators are responsible for the following components of Chainlink CCIP and the Risk Management Network:
- **Node operations:** Chainlink node operators must ensure the proper configuration, maintenance, and monitoring of their nodes participating in the Chainlink CCIP and Risk Management Network DONs.
- **Transaction execution:** Chainlink node operators must ensure that transactions execute onchain in a timely manner and that they apply gas bumping when necessary.
- **Blockchain client:** Chainlink node operators are responsible for selecting and properly employing blockchain clients, including latest fixes and upgrades, to connect to supported blockchain networks.
- **Consensus participation:** Chainlink node operators must maintain continuous uptime and active participation in OCR consensus.
- **Infrastructure security:** Chainlink node operators must follow infrastructure security best practices. These include access control, configuration management, key management, software version & patch management, and (where applicable) physical security of the underlying hardware.
- **Software version:** Chainlink node operators are responsible for ensuring that Chainlink node deployments are running the latest software versions.
- **Responsiveness:** Chainlink node operators must respond to important communication from Chainlink Labs or from other node operators in a timely manner.
## Get the latest Chainlink content straight to your inbox.
Email Address
## Chainlink CCIP Test Tokens
[iframe](https://www.googletagmanager.com/ns.html?id=GTM-N6DQ47T)
Chainlink CCIP is now officially live on Solana. [View lanes and tokens.](https://docs.chain.link/ccip/directory/mainnet/chain/solana-mainnet?utm_medium=referral&utm_source=chainlink-docs&utm_campaign=solana-ccip)
On this page
# [Acquire Test Tokens](https://docs.chain.link/ccip/test-tokens\#overview)
As a best practice, always test your applications thoroughly on testnet before going live on mainnet. When testing token transfers, you must have enough tokens and ensure the [token pools](https://docs.chain.link/ccip/concepts/cross-chain-token/evm/token-pools) have enough funds. Public faucets sometimes limit how many tokens a user can create and token pools might not have enough liquidity. To resolve these issues, CCIP supports two test tokens that you can mint permissionlessly so you don't run out of tokens while testing different scenarios.
## [Tokens](https://docs.chain.link/ccip/test-tokens\#tokens)
Two ERC20 test tokens are currently available on each testnet. You can find the token addresses for each testnet on the [CCIP Directory](https://docs.chain.link/ccip/directory).
| Name | Decimals | Type | Description |
| --- | --- | --- | --- |
| CCIP-BnM | 18 | Burn & Mint | These tokens are minted on each testnet. When transferring these tokens between testnet blockchains, CCIP burns the tokens on the source chain and mint them on the destination chain. |
| CCIP-LnM | 18 | Lock & Mint | These tokens are only minted on **Ethereum Sepolia**. On other testnet blockchains, the token representation is a wrapped/synthetic asset called _clCCIP-LnM_. When transferring these tokens from Ethereum Sepolia to another testnet, CCIP locks the _CCIP-LnM_ tokens on the source chain and mint the wrapped representation _clCCIP-LnM_ on the destination chain. Between non-Ethereum Sepolia chains, CCIP burns and mints the wrapped representation _clCCIP-LnM_. |
## [Mint Test Tokens](https://docs.chain.link/ccip/test-tokens\#mint-test-tokens)
You can mint both of these tokens using the following function call on the token contract. This function acts like a faucet. Each call mints 10\*\*18 units of a token to the specified address.
- For _CCIP-BnM_, you can call `drip` on all testnet blockchains.
- For _CCIP-LnM_, you can call `drip` only on Ethereum Sepolia.

```solidity
function drip(address to) external {
_mint(to, 1e18);
}
```
### [Mint tokens in the documentation](https://docs.chain.link/ccip/test-tokens\#mint-tokens-in-the-documentation)
You can use this interface to connect your MetaMask wallet, select a testnet, and mint tokens to your wallet address. Alternatively, you can call these same functions in the block explorer (Read the [Mint tokens in a block explorer](https://docs.chain.link/ccip/test-tokens#mint-tokens-in-a-block-explorer) section).
Connect your browser wallet to get started:
Connect Wallet
### [Mint tokens in a block explorer](https://docs.chain.link/ccip/test-tokens\#mint-tokens-in-a-block-explorer)
Follow these steps to learn how to mint these tokens. The steps explain how to mint _CCIP-BnM_ on _Ethereum Sepolia_:
- Go to the [CCIP Directory](https://docs.chain.link/ccip/directory/testnet).
- Go to [Ethereum Sepolia section](https://docs.chain.link/ccip/directory/testnet/chain/ethereum-testnet-sepolia). You will find a list of active lanes where the source chain is _Ethereum Sepolia_. You will find the list of supported tokens you can transfer for each lane. You should find _CCIP-BnM_ in the list for each testnet.
- Click on the token address to display it on the block explorer ( [CCIP-BnM on Ethereum Sepolia Etherscan](https://sepolia.etherscan.io/address/0xFd57b4ddBf88a4e07fF4e34C487b99af2Fe82a05) in this case).
- Click the _Contract_ tab and then on _Write Contract_ to see the list of transactions. Notice _Connect to Web3_.
- Click _Connect to Web3_ to connect your MetaMask wallet to the block explorer.
- Once connected, you can call the `drip` function.
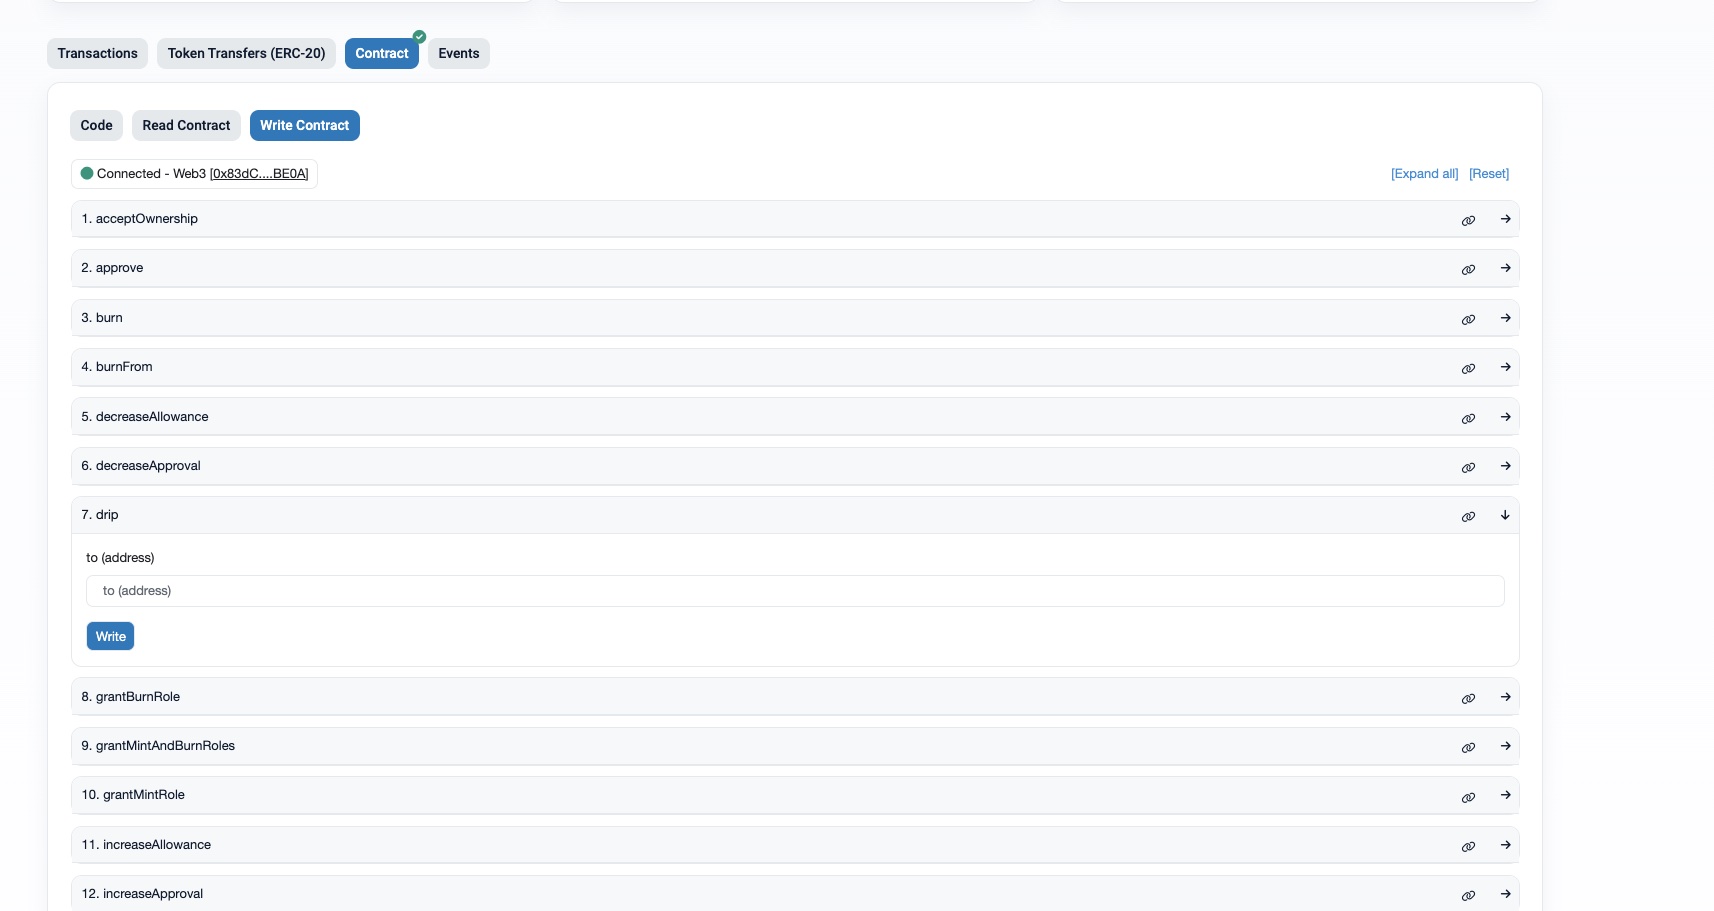
- Fill in the text field with your EOA, then click _Write_.
- MetaMask will open and asks you to confirm the transaction.
- After the transaction is confirmed, click _View your transaction_ to view your transaction.

- You should see a successful transaction confirming that 1 _CCIP-BnM_ was sent to your EOA.
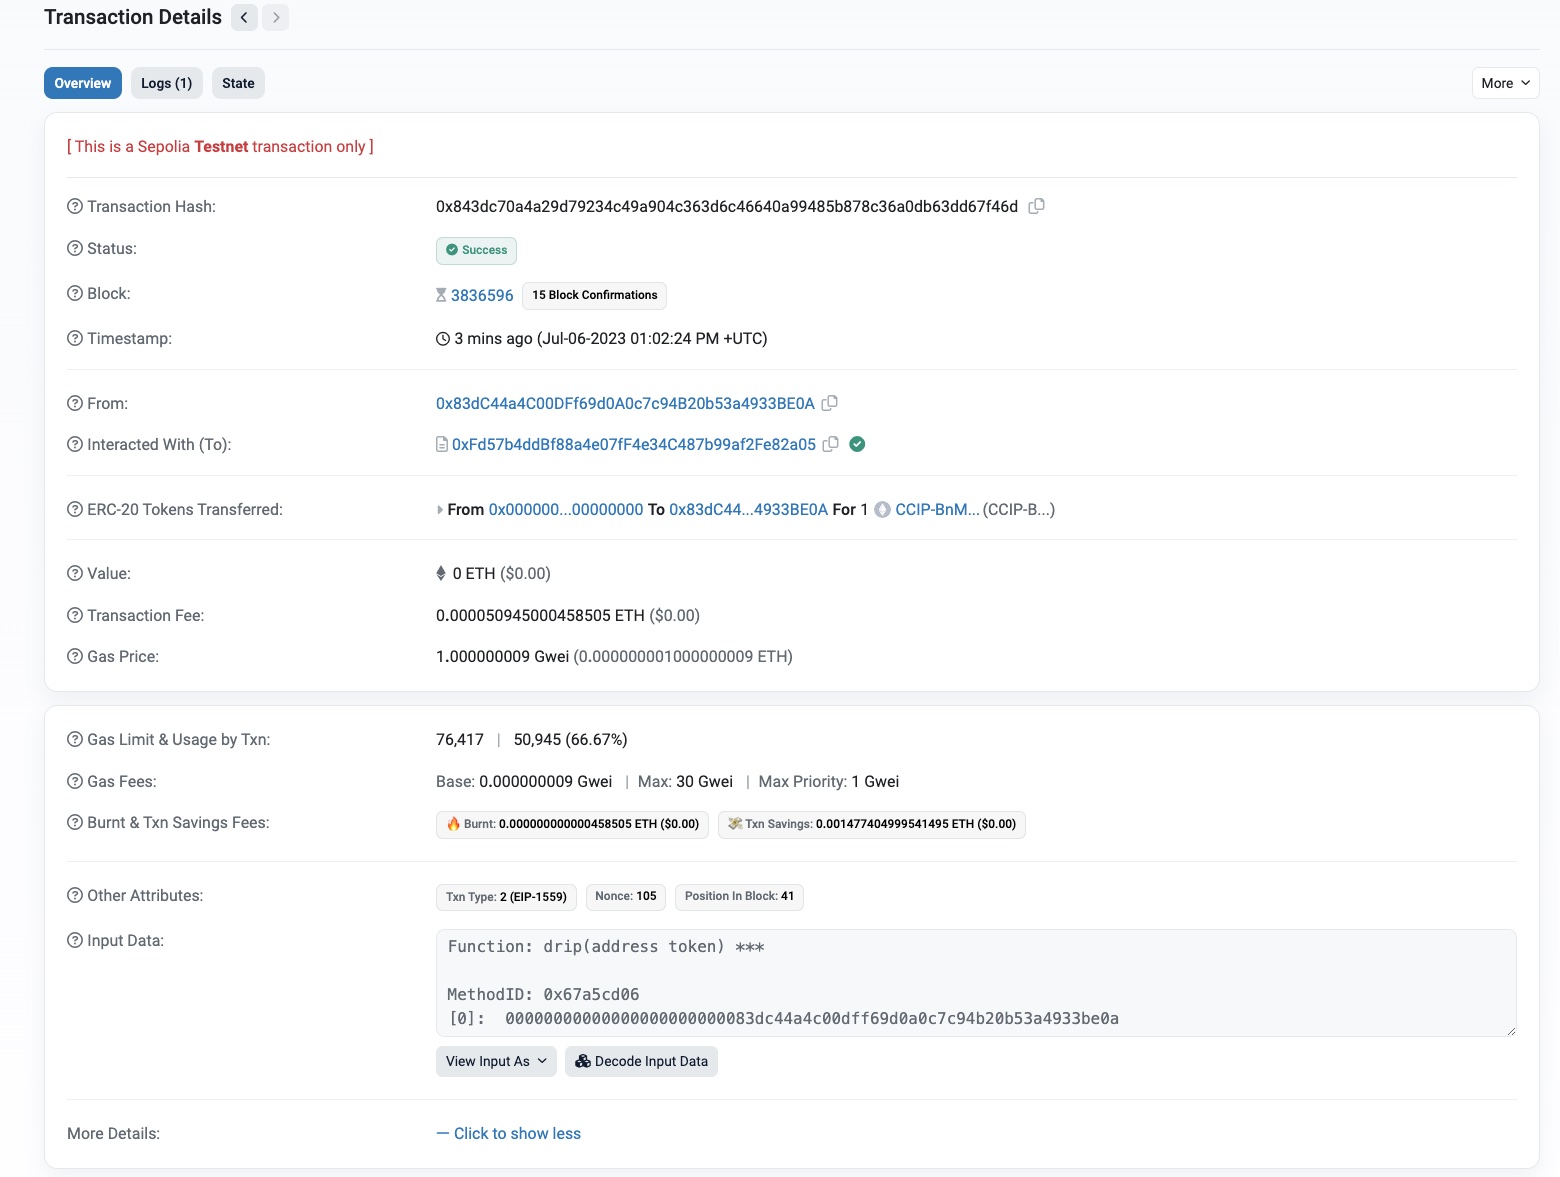
- Follow this [MetaMask guide](https://support.metamask.io/hc/en-us/articles/360015489031#h_01FWH492CHY60HWPC28RW0872H) to import _CCIP-BnM_ in your wallet.
## Get the latest Chainlink content straight to your inbox.
Email Address
## CCIP Directory Overview
[iframe](https://www.googletagmanager.com/ns.html?id=GTM-N6DQ47T)
On this page
# CCIP Directory

## Networks mainnet (58)
[\\
\\
**Abstract** \\
\\
1lane \| 0token](https://docs.chain.link/ccip/directory/mainnet/chain/abstract-mainnet) [\\
\\
**Apechain** \\
\\
4lanes \| 0token](https://docs.chain.link/ccip/directory/mainnet/chain/apechain-mainnet) [\\
\\
**Arbitrum One** \\
\\
28lanes \| 69tokens](https://docs.chain.link/ccip/directory/mainnet/chain/ethereum-mainnet-arbitrum-1) [\\
\\
**Astar** \\
\\
2lanes \| 5tokens](https://docs.chain.link/ccip/directory/mainnet/chain/polkadot-mainnet-astar) [\\
\\
**Avalanche** \\
\\
16lanes \| 15tokens](https://docs.chain.link/ccip/directory/mainnet/chain/avalanche-mainnet) [\\
\\
**B²** \\
\\
2lanes \| 1token](https://docs.chain.link/ccip/directory/mainnet/chain/bitcoin-mainnet-bsquared-1) [\\
\\
**Base** \\
\\
24lanes \| 66tokens](https://docs.chain.link/ccip/directory/mainnet/chain/ethereum-mainnet-base-1) [\\
\\
**Berachain** \\
\\
6lanes \| 6tokens](https://docs.chain.link/ccip/directory/mainnet/chain/berachain-mainnet) [\\
\\
**Bitlayer** \\
\\
3lanes \| 2tokens](https://docs.chain.link/ccip/directory/mainnet/chain/bitcoin-mainnet-bitlayer-1) [\\
\\
**Blast** \\
\\
4lanes \| 5tokens](https://docs.chain.link/ccip/directory/mainnet/chain/ethereum-mainnet-blast-1) [\\
\\
**BNB Chain** \\
\\
22lanes \| 41tokens](https://docs.chain.link/ccip/directory/mainnet/chain/bsc-mainnet) [\\
\\
**BOB** \\
\\
14lanes \| 3tokens](https://docs.chain.link/ccip/directory/mainnet/chain/bitcoin-mainnet-bob-1) [\\
\\
**Celo** \\
\\
11lanes \| 4tokens](https://docs.chain.link/ccip/directory/mainnet/chain/celo-mainnet) [\\
\\
**Core** \\
\\
6lanes \| 0token](https://docs.chain.link/ccip/directory/mainnet/chain/core-mainnet)
See more
## Tokens (133)
[Add my token](https://docs.chain.link/ccip/tutorials/evm/token-manager#verifying-your-token)
[**$PAAL**](https://docs.chain.link/ccip/directory/mainnet/token/$PAAL) [**1XMM**](https://docs.chain.link/ccip/directory/mainnet/token/1XMM) [**ALU**](https://docs.chain.link/ccip/directory/mainnet/token/ALU) [**ANIMA**](https://docs.chain.link/ccip/directory/mainnet/token/ANIMA) [**APRS**](https://docs.chain.link/ccip/directory/mainnet/token/APRS) [**APU**](https://docs.chain.link/ccip/directory/mainnet/token/APU) [**AXS**](https://docs.chain.link/ccip/directory/mainnet/token/AXS) [**BANANA**](https://docs.chain.link/ccip/directory/mainnet/token/BANANA) [**BETS**](https://docs.chain.link/ccip/directory/mainnet/token/BETS) [**BMX**](https://docs.chain.link/ccip/directory/mainnet/token/BMX) [**BOLD**](https://docs.chain.link/ccip/directory/mainnet/token/BOLD) [**BONE**](https://docs.chain.link/ccip/directory/mainnet/token/BONE) [**BR**](https://docs.chain.link/ccip/directory/mainnet/token/BR) [**brBTC**](https://docs.chain.link/ccip/directory/mainnet/token/brBTC) [**BYTES**](https://docs.chain.link/ccip/directory/mainnet/token/BYTES) [**CANNED**](https://docs.chain.link/ccip/directory/mainnet/token/CANNED) [**CHIKA**](https://docs.chain.link/ccip/directory/mainnet/token/CHIKA) [**CKP**](https://docs.chain.link/ccip/directory/mainnet/token/CKP) [**CRTV**](https://docs.chain.link/ccip/directory/mainnet/token/CRTV) [**DAMN**](https://docs.chain.link/ccip/directory/mainnet/token/DAMN) [**deUSD**](https://docs.chain.link/ccip/directory/mainnet/token/deUSD) [**DEXTF**](https://docs.chain.link/ccip/directory/mainnet/token/DEXTF) [**DFX**](https://docs.chain.link/ccip/directory/mainnet/token/DFX) [**DIP**](https://docs.chain.link/ccip/directory/mainnet/token/DIP)
See more
## Get the latest Chainlink content straight to your inbox.
Email Address
## Chainlink CCIP Best Practices
[iframe](https://www.googletagmanager.com/ns.html?id=GTM-N6DQ47T)
On this page
# CCIP Best Practices
This section outlines recommended practices for using Chainlink CCIP effectively and securely.
- **[EVM Best Practices](https://docs.chain.link/ccip/concepts/best-practices/evm)**: Recommended guidelines for interacting with CCIP on EVM-compatible chains.
- **[SVM Best Practices](https://docs.chain.link/ccip/concepts/best-practices/svm)**: Recommended guidelines for interacting with CCIP on SVM-based chains like Solana.
## Get the latest Chainlink content straight to your inbox.
Email Address
## Cross-Chain Communication
[iframe](https://www.googletagmanager.com/ns.html?id=GTM-N6DQ47T)
Chainlink CCIP is now officially live on Solana. [View lanes and tokens.](https://docs.chain.link/ccip/directory/mainnet/chain/solana-mainnet?utm_medium=referral&utm_source=chainlink-docs&utm_campaign=solana-ccip)
On this page
# [CCIP Tutorials (SVM)](https://docs.chain.link/ccip/tutorials/svm\#overview)
Chainlink CCIP enables secure cross-chain communication between Solana and EVM blockchains. These tutorials will help you implement cross-chain functionality in both directions.
## [Getting Started](https://docs.chain.link/ccip/tutorials/svm\#getting-started)
Before diving into specific implementations, ensure you understand the fundamentals:
- [Prerequisites for SVM to EVM Tutorials](https://docs.chain.link/ccip/tutorials/svm/source/prerequisites) \- Set up your development environment for Solana-based CCIP development
- [Implementing CCIP Receivers](https://docs.chain.link/ccip/tutorials/svm/receivers) \- Learn how to build secure Solana programs that can receive cross-chain messages
## [Using Solana as a Source Chain](https://docs.chain.link/ccip/tutorials/svm\#using-solana-as-a-source-chain)
Send messages and tokens from Solana to EVM chains:
- [SVM to EVM Guide](https://docs.chain.link/ccip/tutorials/svm/source) \- Comprehensive guide for building all types of CCIP messages from Solana to EVM chains
- [Token Transfers](https://docs.chain.link/ccip/tutorials/svm/source/token-transfers) \- Transfer tokens from Solana to EVM chains without executing code on the destination
## [Using Solana as a Destination Chain](https://docs.chain.link/ccip/tutorials/svm\#using-solana-as-a-destination-chain)
Send messages and tokens from EVM chains to Solana:
- [EVM to SVM Guide](https://docs.chain.link/ccip/tutorials/svm/destination) \- Comprehensive guide for building all types of CCIP messages from EVM chains to Solana
- [Token Transfers](https://docs.chain.link/ccip/tutorials/svm/destination/token-transfers) \- Transfer tokens from EVM chains to Solana wallets
- [Arbitrary Messaging](https://docs.chain.link/ccip/tutorials/svm/destination/arbitrary-messaging) \- Send data from EVM chains to execute programs on Solana
## [Architecture Reference](https://docs.chain.link/ccip/tutorials/svm\#architecture-reference)
Key Differences from EVM:
- **Account Model:** Solana uses an account-based architecture where programs are stateless and all data is stored in accounts
- **PDAs:** Program Derived Addresses provide deterministic storage for Solana programs
- **Explicit Access:** Programs can only access accounts explicitly provided to them
- **Token Accounts:** Each token requires a separate Associated Token Account (ATA)
Message Types:
- **Token Transfers:** Send tokens across chains without program execution
- **Arbitrary Messaging:** Send data to trigger program execution on the destination chain
- **Programmatic Token Transfers:** Send both tokens and data in a single message to trigger program execution with token transfers
## Get the latest Chainlink content straight to your inbox.
Email Address
## CCIP Service Limits
[iframe](https://www.googletagmanager.com/ns.html?id=GTM-N6DQ47T)
Chainlink CCIP is now officially live on Solana. [View lanes and tokens.](https://docs.chain.link/ccip/directory/mainnet/chain/solana-mainnet?utm_medium=referral&utm_source=chainlink-docs&utm_campaign=solana-ccip)
On this page
# [CCIP Service Limits](https://docs.chain.link/ccip/service-limits\#overview)
This section outlines the operational limits for Chainlink CCIP across different blockchain architectures.
- **[EVM Service Limits](https://docs.chain.link/ccip/service-limits/evm)**: Service limits for Ethereum and other EVM-compatible blockchains.
- **[SVM Service Limits](https://docs.chain.link/ccip/service-limits/svm)**: Service limits for Solana and other SVM-based blockchains.
Understanding these limits is essential for building reliable cross-chain applications that operate within CCIP's intended parameters.
## Get the latest Chainlink content straight to your inbox.
Email Address
## Getting Started with CCIP
[iframe](https://www.googletagmanager.com/ns.html?id=GTM-N6DQ47T)
Chainlink CCIP is now officially live on Solana. [View lanes and tokens.](https://docs.chain.link/ccip/directory/mainnet/chain/solana-mainnet?utm_medium=referral&utm_source=chainlink-docs&utm_campaign=solana-ccip)
On this page
# [Getting Started with Chainlink CCIP](https://docs.chain.link/ccip/getting-started\#overview)
## [Available Blockchain Families](https://docs.chain.link/ccip/getting-started\#available-blockchain-families)
CCIP supports multiple blockchain families:
- **EVM**: Send messages and tokens between Ethereum, Avalanche, Polygon, and other EVM-compatible networks
- **SVM**: Connect Solana with other chain families through CCIP
Check the [CCIP Directory](https://docs.chain.link/ccip/directory) for a list of supported blockchains.
## [What You Can Build with CCIP](https://docs.chain.link/ccip/getting-started\#what-you-can-build-with-ccip)
- **Cross-Chain dApps**: Create applications that operate seamlessly across multiple blockchains
- **Token Bridges**: Transfer tokens between different blockchain networks
- **Cross-Chain Data Messaging**: Send arbitrary data between smart contracts on different chains
- **Programmable Token Transfers**: Combine token transfers with messaging to trigger specific actions on destination chains
## [Getting Started Guides](https://docs.chain.link/ccip/getting-started\#getting-started-guides)
Choose your starting point based on your blockchain platform:
- [Getting Started with CCIP on EVM Chains](https://docs.chain.link/ccip/getting-started/evm) \- Learn how to deploy sender/receiver contracts and send messages between EVM chains
- SVM guides can be found [here](https://docs.chain.link/ccip/tutorials/svm).
## Get the latest Chainlink content straight to your inbox.
Email Address
## Chainlink CCIP Offchain Tutorials
[iframe](https://www.googletagmanager.com/ns.html?id=GTM-N6DQ47T)
Chainlink CCIP is now officially live on Solana. [View lanes and tokens.](https://docs.chain.link/ccip/directory/mainnet/chain/solana-mainnet?utm_medium=referral&utm_source=chainlink-docs&utm_campaign=solana-ccip)
On this page
# [CCIP Offchain tutorials](https://docs.chain.link/ccip/tutorials/evm/offchain\#overview)
These tutorials focus on direct interaction between Externally Owned Accounts (EOAs) and the [CCIP Router](https://docs.chain.link/ccip/concepts/architecture/onchain/evm/components#router).
## [Tutorials](https://docs.chain.link/ccip/tutorials/evm/offchain\#tutorials)
- [Transfer Tokens between EOAs](https://docs.chain.link/ccip/tutorials/evm/offchain/transfer-tokens-from-eoa): Learn how to transfer tokens between Externally Owned Accounts (EOAs) across different blockchains, using Chainlink CCIP.
- [Checking CCIP Message Status Off-Chain](https://docs.chain.link/ccip/tutorials/evm/offchain/get-status-offchain): Learn how to verify the status of Chainlink CCIP messages offchain using JavaScript.
## Get the latest Chainlink content straight to your inbox.
Email Address
## CCIP Testnet Directory
[iframe](https://www.googletagmanager.com/ns.html?id=GTM-N6DQ47T)
On this page
# CCIP Directory

## Networks testnet (62)
[\\
\\
**Abstract Sepolia** \\
\\
1lane \| 1token](https://docs.chain.link/ccip/directory/testnet/chain/abstract-testnet) [\\
\\
**Apechain Curtis** \\
\\
1lane \| 1token](https://docs.chain.link/ccip/directory/testnet/chain/apechain-testnet-curtis) [\\
\\
**Arbitrum Sepolia** \\
\\
15lanes \| 3tokens](https://docs.chain.link/ccip/directory/testnet/chain/ethereum-testnet-sepolia-arbitrum-1) [\\
\\
**Astar Shibuya** \\
\\
2lanes \| 2tokens](https://docs.chain.link/ccip/directory/testnet/chain/polkadot-testnet-astar-shibuya) [\\
\\
**Avalanche Fuji** \\
\\
11lanes \| 3tokens](https://docs.chain.link/ccip/directory/testnet/chain/avalanche-fuji-testnet) [\\
\\
**B² Testnet** \\
\\
2lanes \| 1token](https://docs.chain.link/ccip/directory/testnet/chain/bitcoin-testnet-bsquared-1) [\\
\\
**Base Sepolia** \\
\\
17lanes \| 3tokens](https://docs.chain.link/ccip/directory/testnet/chain/ethereum-testnet-sepolia-base-1) [\\
\\
**Berachain Bartio** \\
\\
1lane \| 0token](https://docs.chain.link/ccip/directory/testnet/chain/berachain-testnet-bartio) [\\
\\
**Bitlayer Testnet** \\
\\
3lanes \| 0token](https://docs.chain.link/ccip/directory/testnet/chain/bitcoin-testnet-bitlayer-1) [\\
\\
**Blast Sepolia** \\
\\
2lanes \| 2tokens](https://docs.chain.link/ccip/directory/testnet/chain/ethereum-testnet-sepolia-blast-1) [\\
\\
**BNB Chain Testnet** \\
\\
13lanes \| 2tokens](https://docs.chain.link/ccip/directory/testnet/chain/bsc-testnet) [\\
\\
**BOB Sepolia** \\
\\
1lane \| 1token](https://docs.chain.link/ccip/directory/testnet/chain/bitcoin-testnet-sepolia-bob-1) [\\
\\
**Botanix Testnet** \\
\\
1lane \| 0token](https://docs.chain.link/ccip/directory/testnet/chain/bitcoin-testnet-botanix) [\\
\\
**Celo Alfajores** \\
\\
3lanes \| 2tokens](https://docs.chain.link/ccip/directory/testnet/chain/celo-testnet-alfajores)
See more
## Tokens (3)
[Add my token](https://docs.chain.link/ccip/tutorials/evm/token-manager#verifying-your-token)
[**CCIP-BnM**](https://docs.chain.link/ccip/directory/testnet/token/CCIP-BnM) [**CCIP-LnM**](https://docs.chain.link/ccip/directory/testnet/token/CCIP-LnM) [**USDC**](https://docs.chain.link/ccip/directory/testnet/token/USDC)
## Get the latest Chainlink content straight to your inbox.
Email Address
## Chainlink CCIP Offchain
[iframe](https://www.googletagmanager.com/ns.html?id=GTM-N6DQ47T)
Chainlink CCIP is now officially live on Solana. [View lanes and tokens.](https://docs.chain.link/ccip/directory/mainnet/chain/solana-mainnet?utm_medium=referral&utm_source=chainlink-docs&utm_campaign=solana-ccip)
On this page
# [Offchain Architecture](https://docs.chain.link/ccip/concepts/architecture/offchain\#overview)
This section describes the offchain components that support the CCIP network, ensuring security, reliability, and efficient cross-chain message processing.
- **[Overview](https://docs.chain.link/ccip/concepts/architecture/offchain/overview)**: A high-level summary of the offchain systems, including Decentralized Oracle Networks (DONs), the Risk Management Network, and node capabilities.
- **[Risk Management Network](https://docs.chain.link/ccip/concepts/architecture/offchain/risk-management-network)**: Understand how this network monitors cross-chain activity for potential risks.
## Get the latest Chainlink content straight to your inbox.
Email Address
## Token Manager Guide
[iframe](https://www.googletagmanager.com/ns.html?id=GTM-N6DQ47T)
On this page
# Using the Token Manager
The Token Manager allows token developers to deploy, configure, and manage Cross-Chain Tokens (CCTs) in a simplified web interface. The process involves deploying tokens and token pools, registering administrative roles, and configuring token pools to enable secure token transfers using CCIP.
The Token Manager guides you through two workflows:
- **Deploy a new token from scratch**: This is the more beginner-friendly workflow that guides you through the entire process step-by-step, starting by creating a token from scratch.
- **Enable an existing token to go cross-chain**: This is a more advanced workflow for token developers who have already deployed their token and want to add cross-chain capabilities.
If you prefer to manage your deployments and configurations programmatically, refer to the [Cross-Chain Tokens](https://docs.chain.link/ccip/tutorials/cross-chain-tokens) guides available for Remix, Hardhat and Foundry.
You can also use the [CCIP JavaScript SDK](https://docs.chain.link/ccip/ccip-javascript-sdk) to add a fully featured CCIP bridge to your app that can be styled to match your app design.
After enabling your tokens, you can also use Transporter to perform transfers and import tokens with the contract address. Use [test.transporter.io](https://test.transporter.io/) for testnet or [transporter.io](https://transporter.io/) for mainnet.
## [Limitations](https://docs.chain.link/ccip/tutorials/evm/token-manager\#limitations)
Currently, the following advanced features are not yet supported in Token Manager:
- **Token pool replacements and upgrades for existing tokens**. This capability will be added in a subsequent update. To learn more about the process of replacing and upgrading existing token pools, review the [CCIP token pool upgradability](https://docs.chain.link/ccip/concepts/cross-chain-token/evm/upgradability) section.
- **Deployment of token pools that use the [Lock and Unlock mechanism](https://docs.chain.link/ccip/concepts/cross-chain-token/overview#token-handling-mechanisms)**. The Token Manager Wizard automatically configures all tokens with the Burn & Mint mechanism. (Refer to the [Burn & Mint token contract](https://github.com/smartcontractkit/chainlink/blob/contracts-ccip/v1.6.0-beta.0/contracts/src/v0.8/ccip/tokenAdminRegistry/TokenPoolFactory/FactoryBurnMintERC20.sol) and [Burn & Mint token pool contract](https://github.com/smartcontractkit/chainlink/blob/contracts-ccip/v1.6.0-beta.0/contracts/src/v0.8/ccip/pools/BurnMintTokenPool.sol) for the Burn & Mint mechanism.)
- Deployment or enablement of custom token pools is not yet supported.
## [Getting started](https://docs.chain.link/ccip/tutorials/evm/token-manager\#getting-started)
The Token Manager includes both testnet and mainnet functionality. It is highly recommended to test and perform any operations on testnet before mainnet.
Before you can deploy a new token or add an existing token, you need to connect and authorize your wallet.
1. Open the Token Manager using the appropriate link for your use case:
- For testnet, use [https://test.tokenmanager.chain.link](https://test.tokenmanager.chain.link/).
- For mainnet, use [https://tokenmanager.chain.link/](https://tokenmanager.chain.link/)
2. Connect your wallet using the **Connect wallet** button in the upper right corner. The following wallets are supported:
- Metamask (EOA)
- Coinbase wallet (EOA)
- WalletConnect (EOA & Safe)
- Rabby wallet (EOA & Safe)
3. After your wallet is connected, authorize the use of your wallet by clicking **Authorize** and complete the subsequent authorization flow for your wallet type. If you are connecting a Safe wallet, authorization is key to enabling permissioned actions on a per user basis; such as initiating transactions, updating off-chain data, and inviting collaborators.
## [Deploy a new token](https://docs.chain.link/ccip/tutorials/evm/token-manager\#deploy-a-new-token)
1. Once wallet connection and authorization is complete, click **Add new token** under the **My tokens** section of the Token Manager Dashboard.
2. In the Token Manager Wizard, select **Deploy a new token** and click **Continue** in the lower right corner.
1. On the **Details** page, enter the details for the first network you're configuring for your token deployment:
- Select the network in the **Network** dropdown field.
- Fill in the **Name** and **Symbol** fields to give your token its name and ticker symbol. For example, "Your Token" and "YOURS" respectively.
- Click **Continue**.
2. On the **Settings** page, configure your token's supply:
- Setting a supply cap is optional — toggle the button to enable it and specify an amount. The supply cap sets a maximum limit for the total number of tokens that can ever be minted for the token you're creating.
- Specify an amount of tokens to mint during this initial deployment step.
- Click **Continue**.
3. On the **Networks** page, select the additional blockchain network(s) where you'd like to deploy your new token and click **Continue**.
4. On the **Owners** page, confirm the accounts that will be taking actions on each network. Click **Continue**.
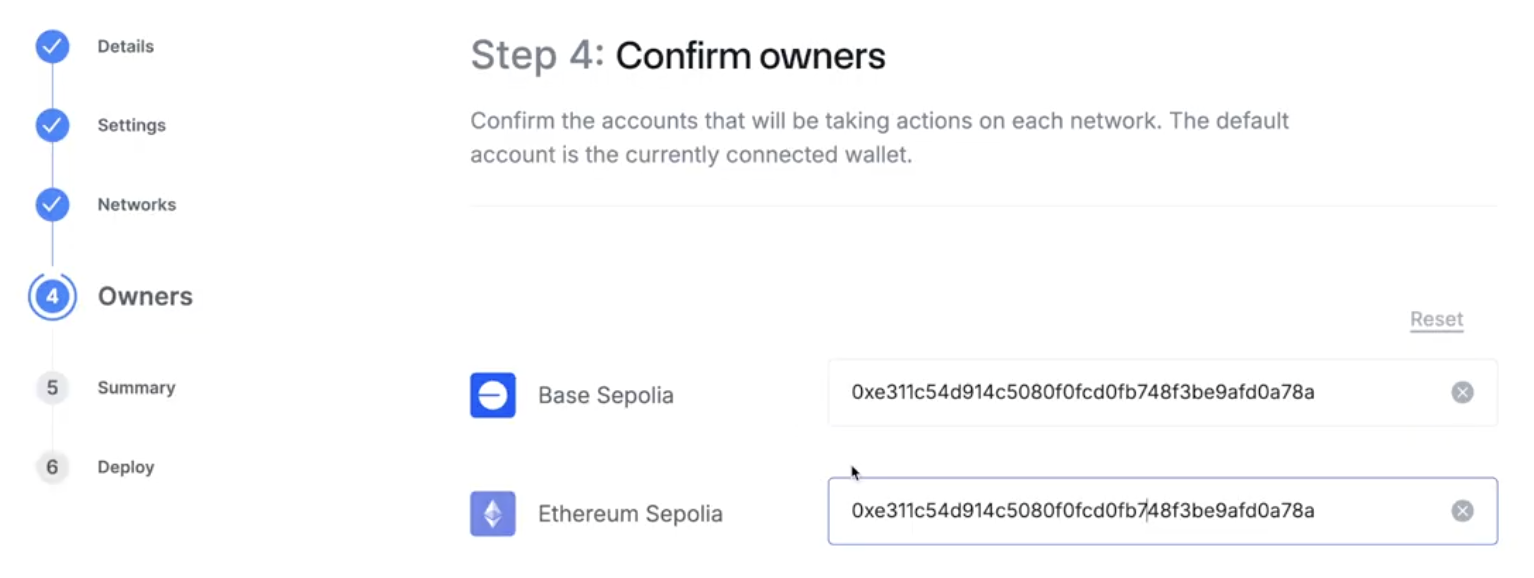
The default account is the currently connected wallet. However, you can have different accounts for each network depending on who you want to be the owner.
5. On the **Summary** page, you can review your upcoming deployments and transactions. Each network you've selected appears along with an expandable list of the transactions the Token Manager will guide you through to deploy your token for each network:
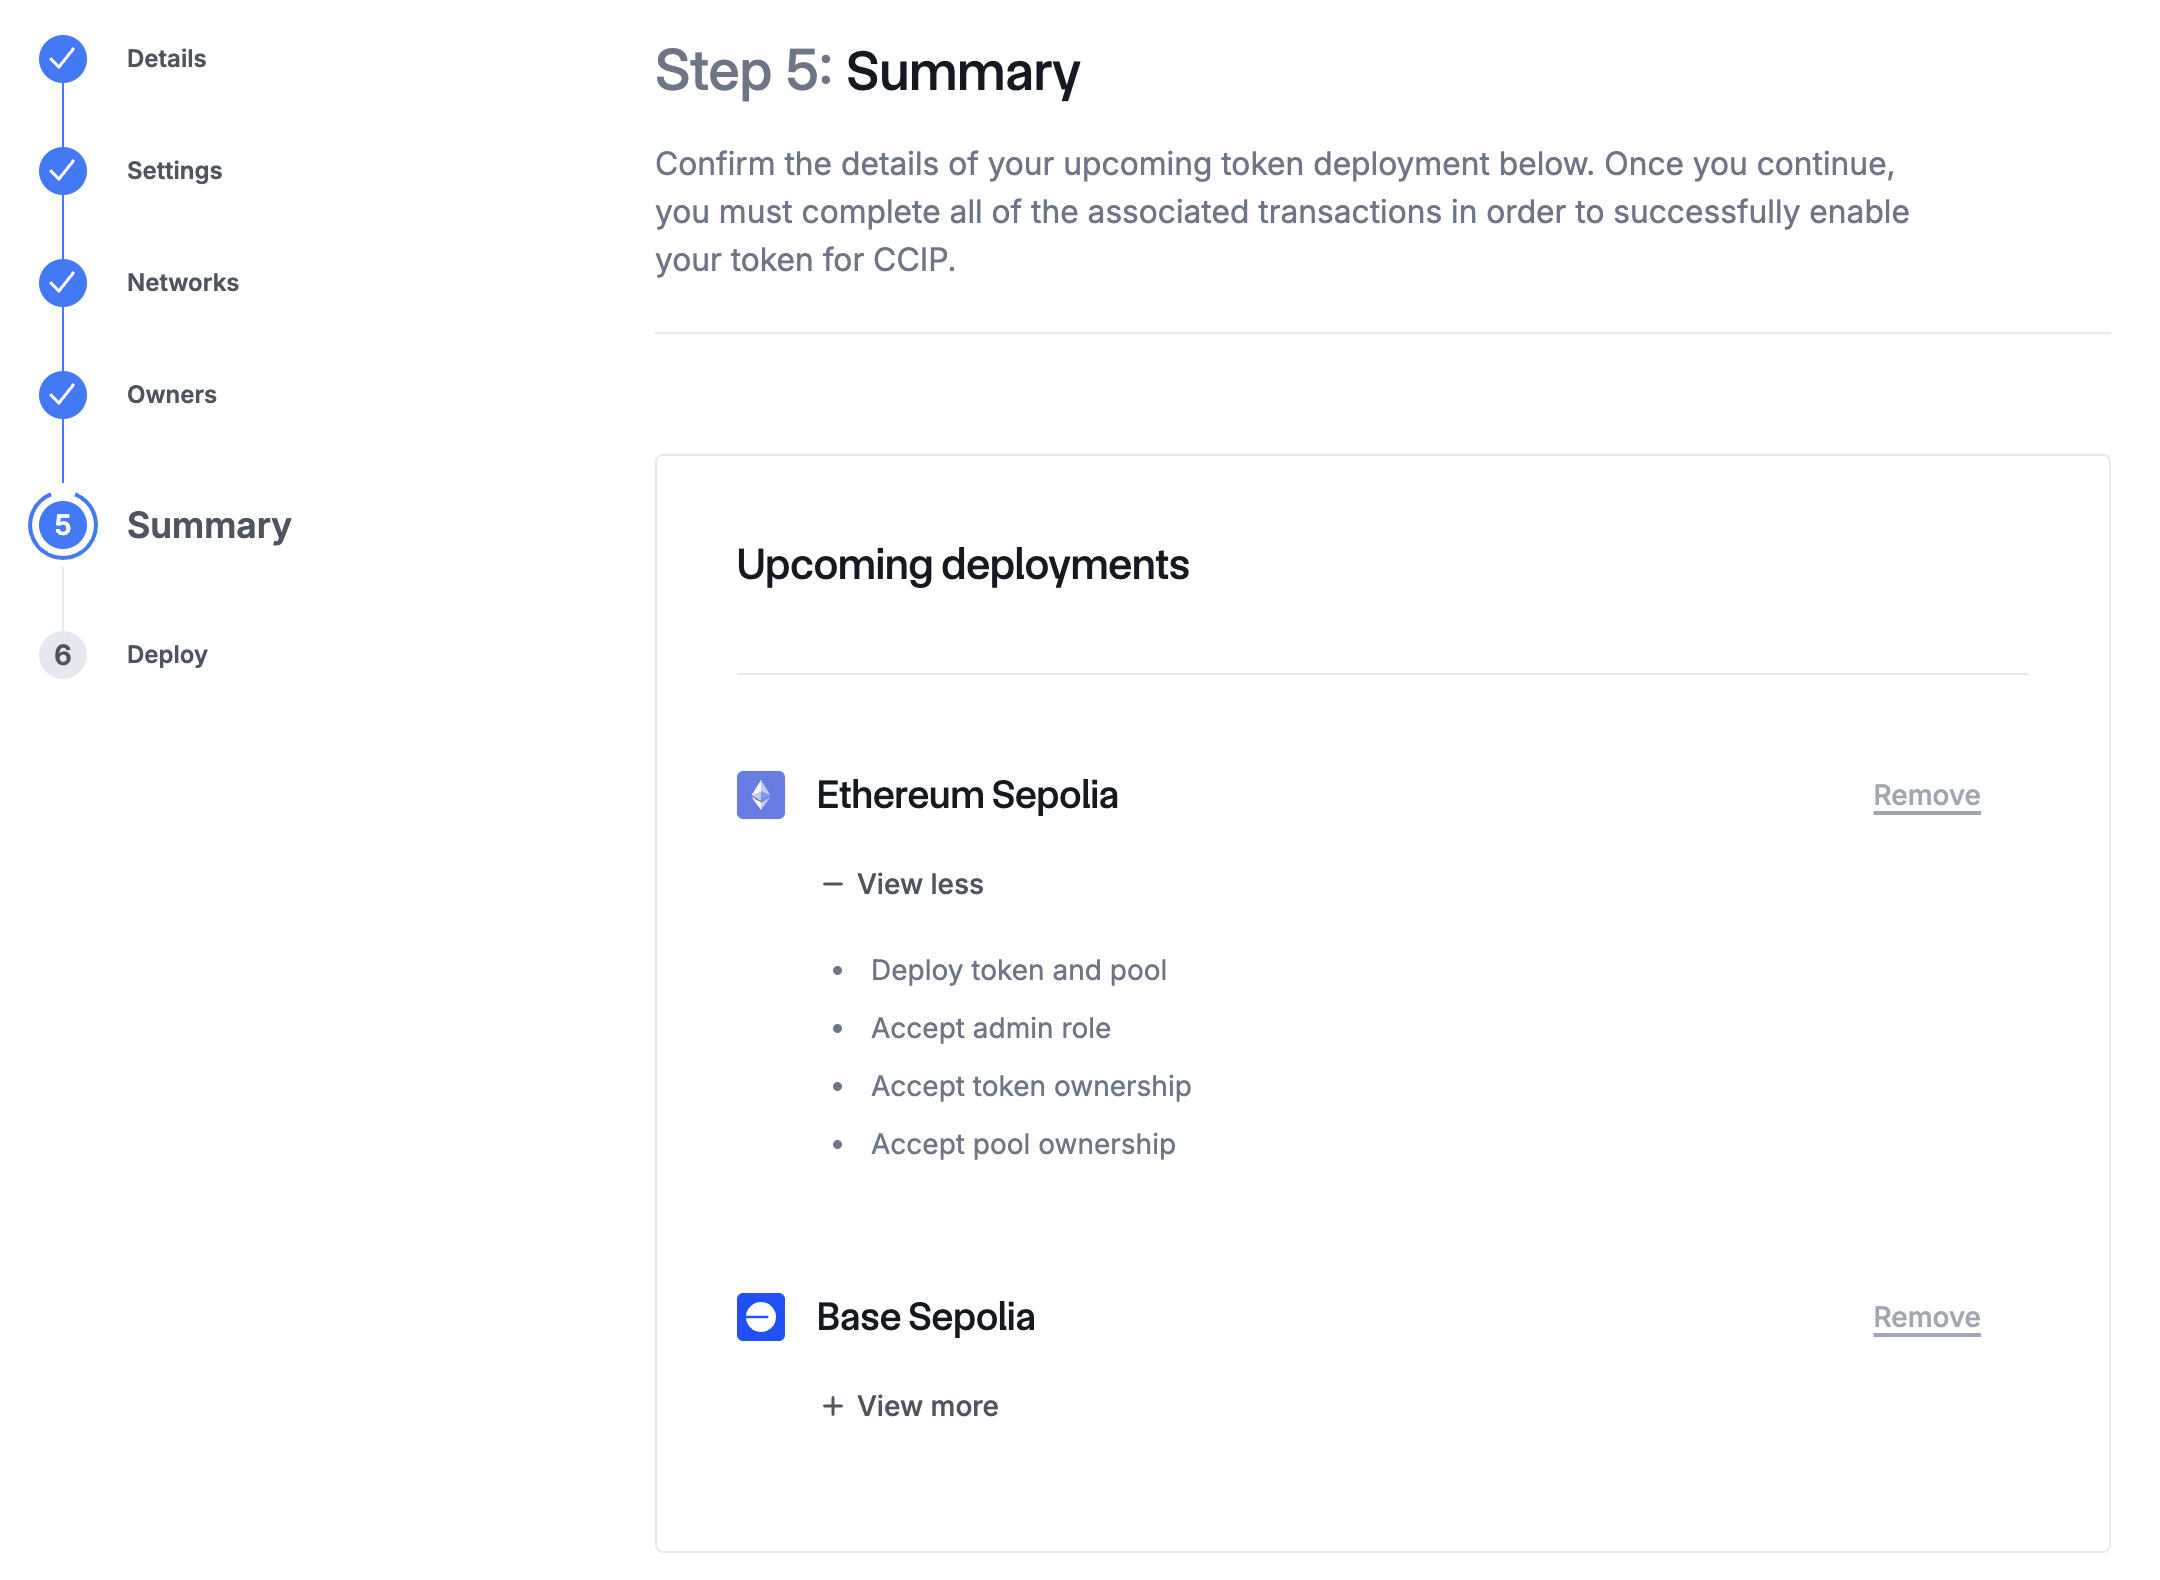
Make sure that your wallet contains gas tokens for each network where you're deploying your token, in order to pay for the deployment transactions.
If you selected more than two networks during the previous step, the _Remove_ links are active, allowing you to remove a network before proceeding. If you only have two networks selected, the _Remove_ links are intentionally not active. If you need to add more networks, navigate back to the **Networks** page.
6. The **Deploy** page displays the steps that you need to complete for each network:
- Deploy token and pool
- Accept admin role
- Accept token ownership
- Accept pool ownership
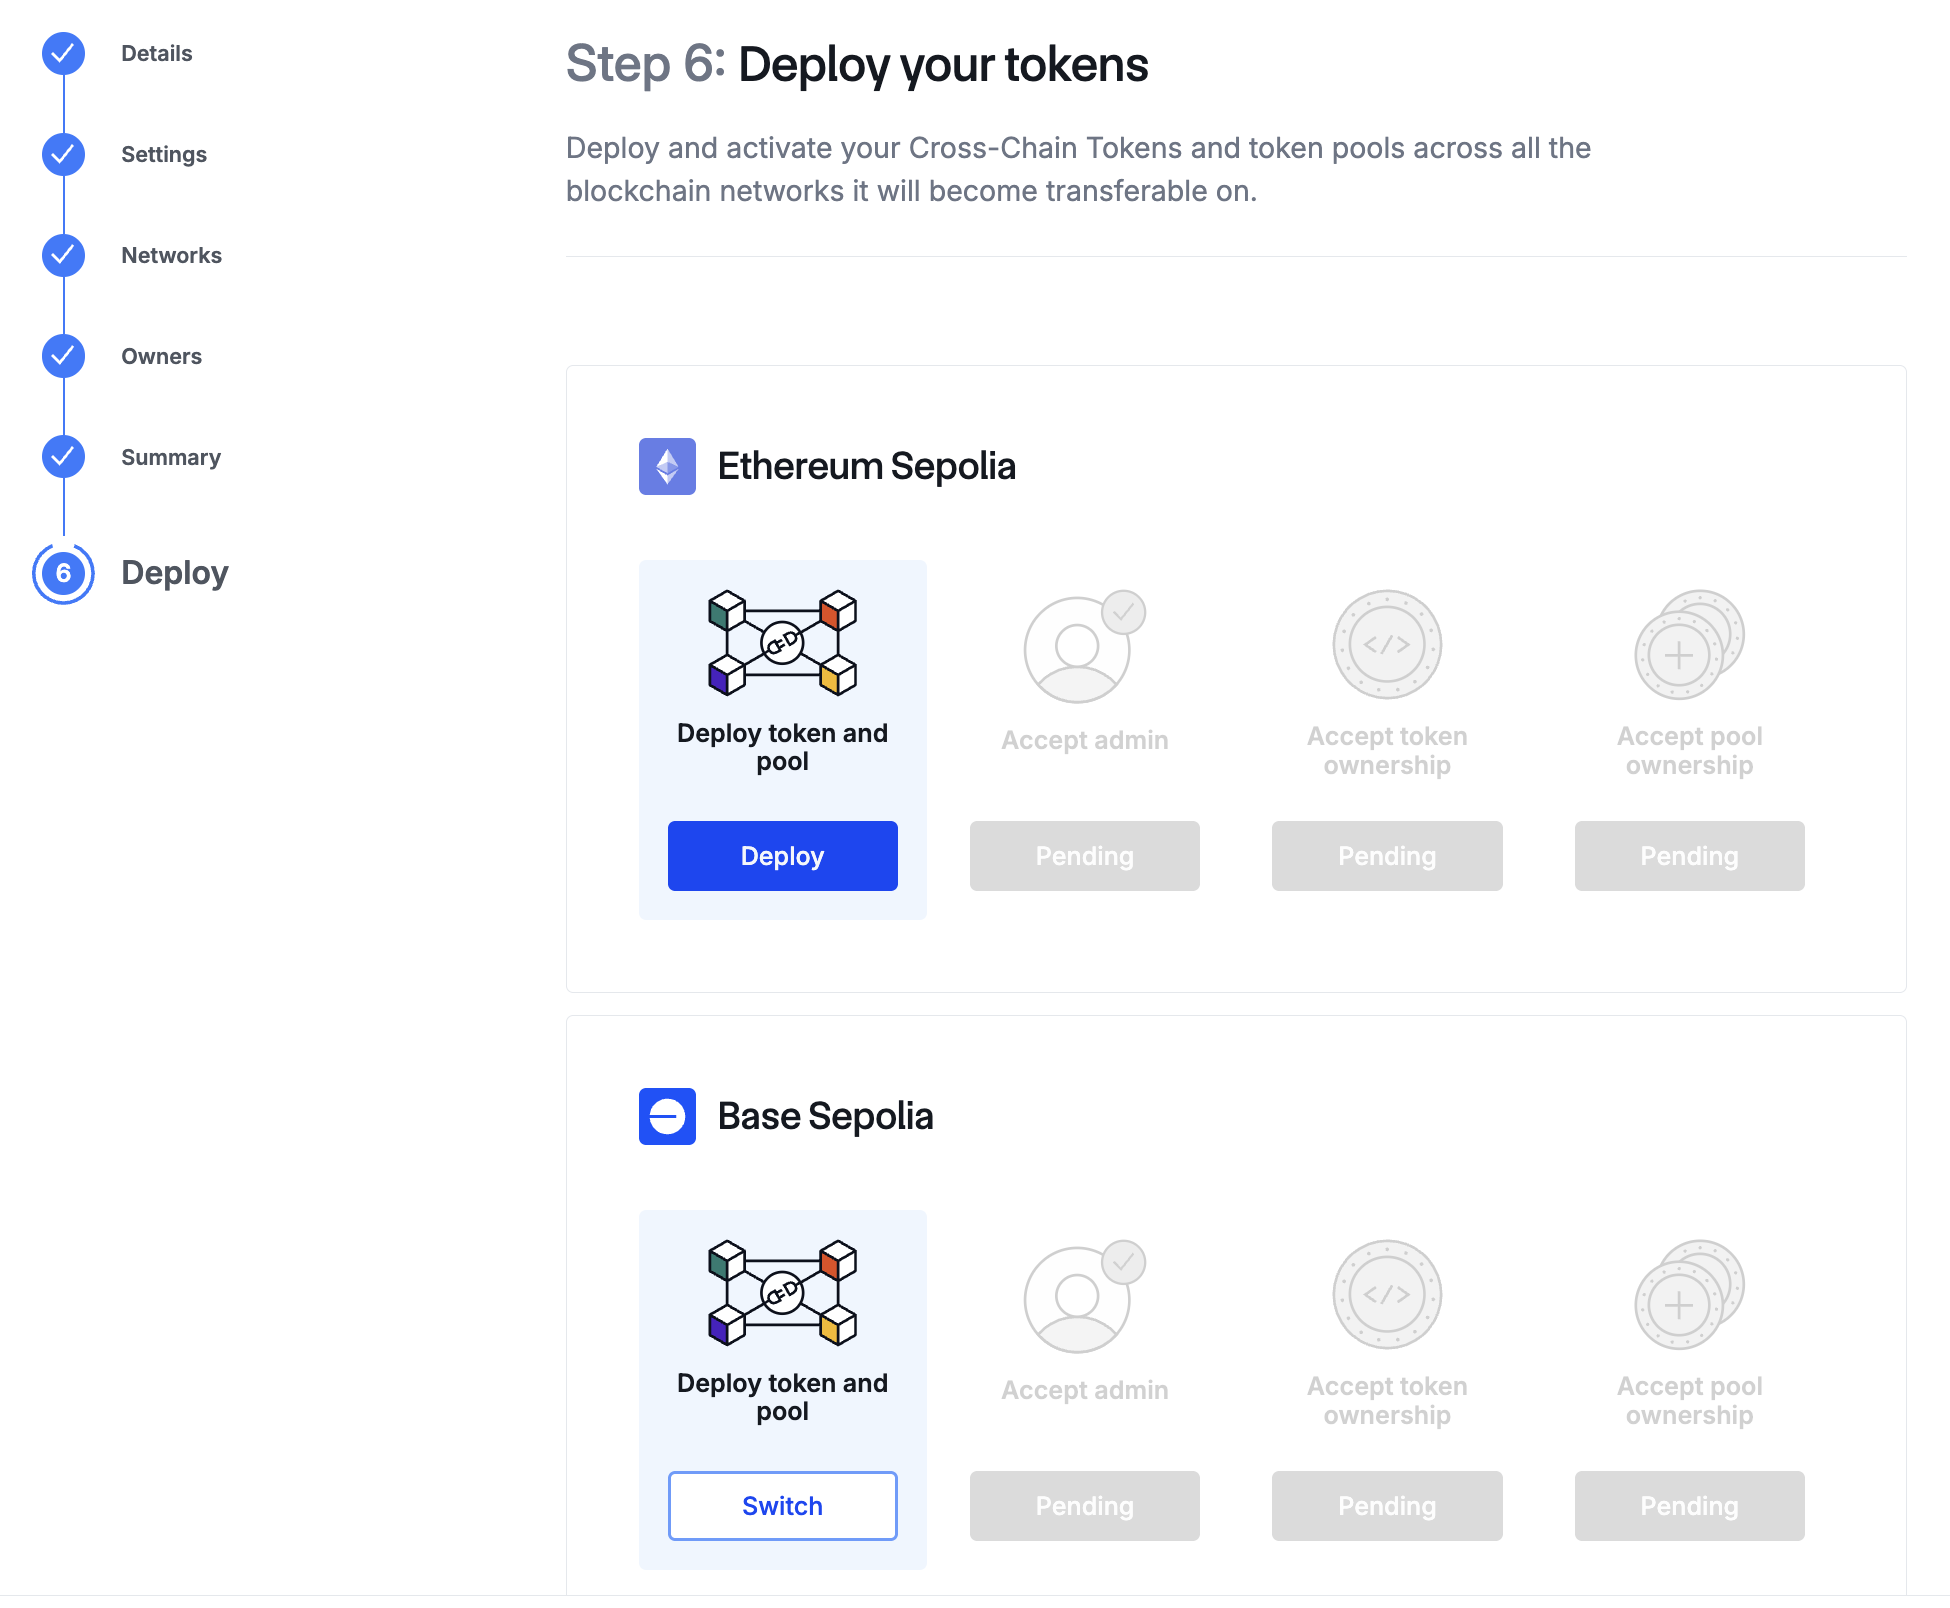
After the **Deploy token and pool** step is completed, you can initiate the other steps all at the same time by clicking **Accept** under each step. While these steps run concurrently, each step separately prompts you to confirm the corresponding transactions in your wallet.
Once all of the steps for one network have been initiated, you can switch to the other network and repeat the same process. You do not have to wait for the first network deploy process to be complete before initiating the second network deploy process.
When the deploy process is complete for all the networks you selected, the Token Manager marks them all as **Done**:
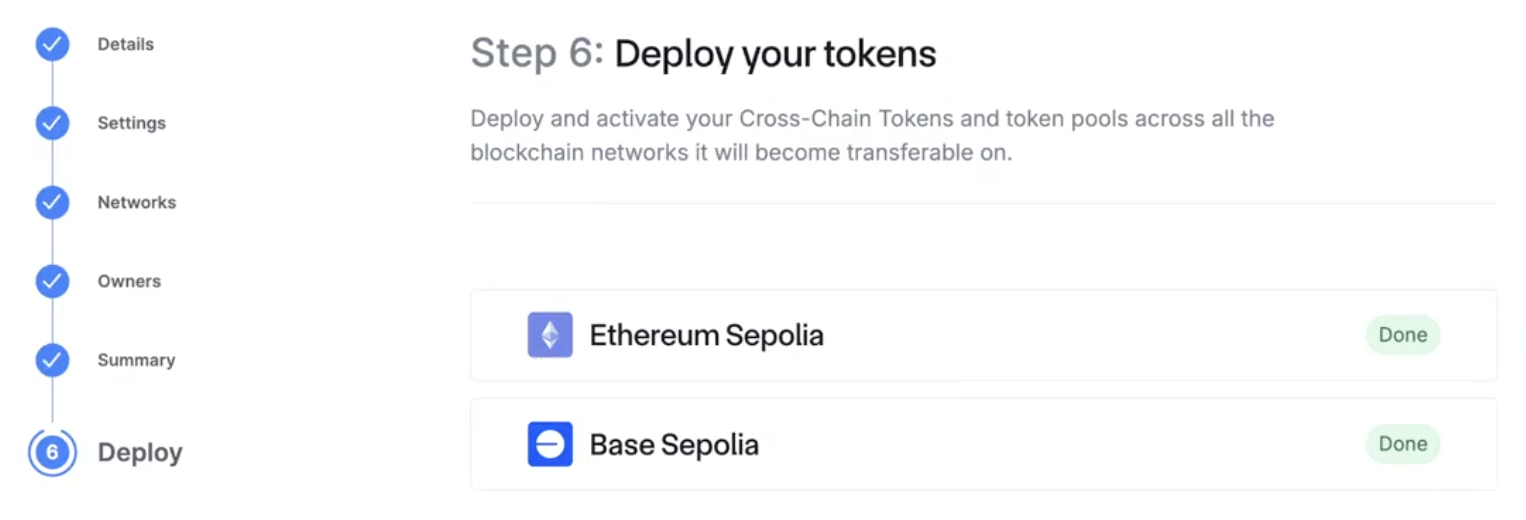
Click **Continue**. The Token Manager displays a message showing that your configuration was successful:
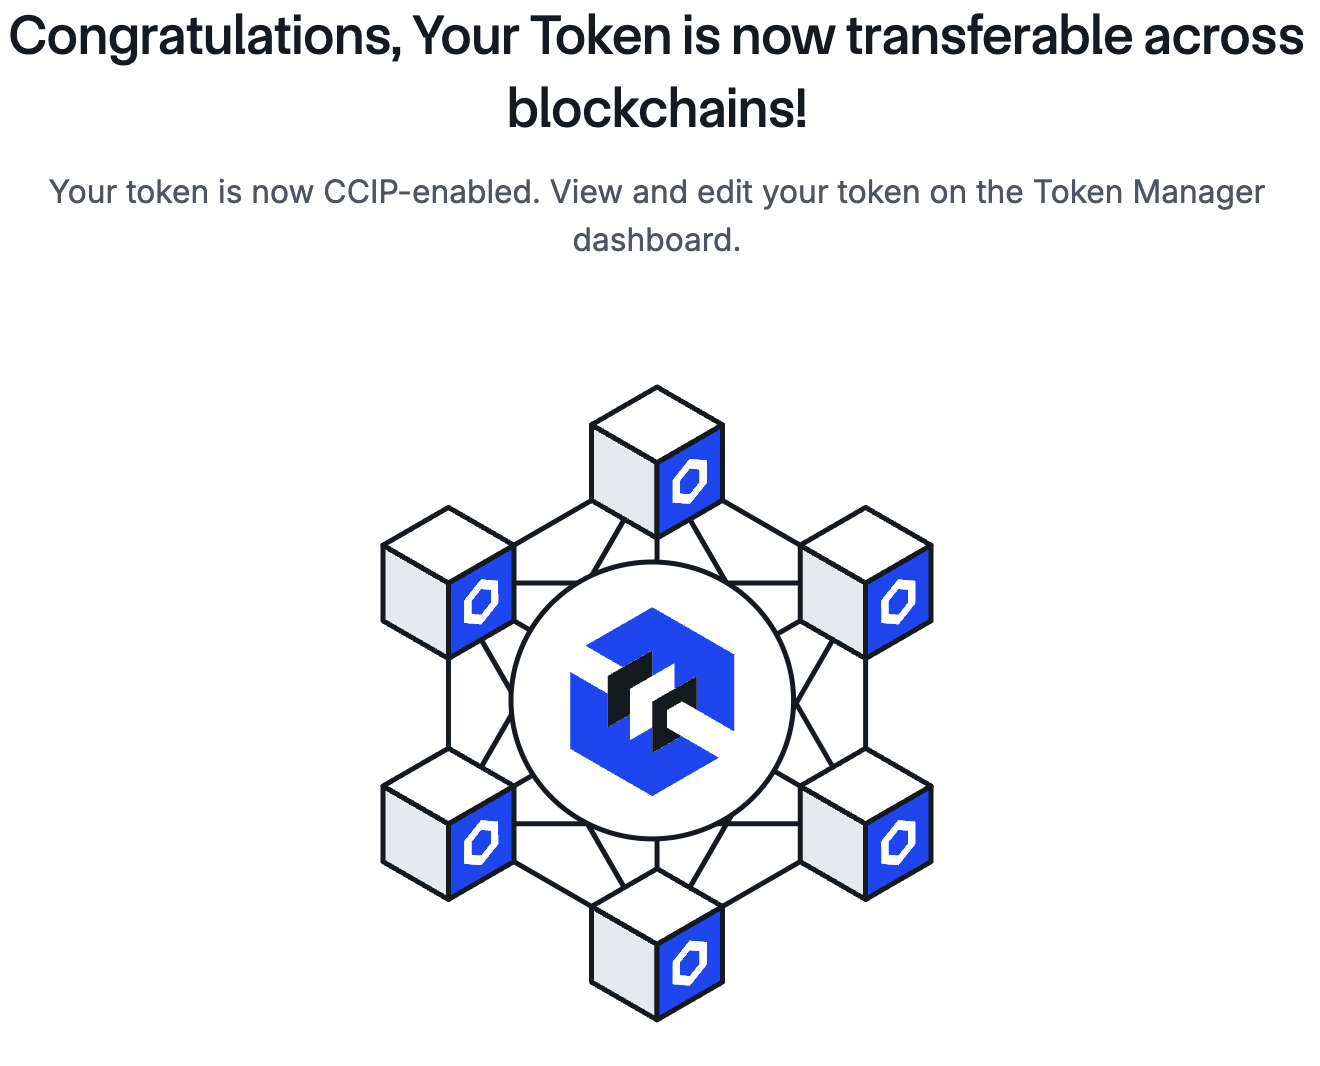
When everything is successfully set up for your token, you can view your new Token Page from the Token Manager Dashboard. It displays information about your CCT, enables configuration changes, and allows expansion to additional networks where you can deploy the token.
## [Add an existing token](https://docs.chain.link/ccip/tutorials/evm/token-manager\#add-an-existing-token)
If you have existing token(s) that you've already deployed, you can use the Token Manager to create and configure a token pool for the token, and optionally deploy your token on additional networks. Note that tokens deployed to additional networks are automatically configured to use the Burn and Mint mechanism.
1. On the **Details** page, enter the details for your token on each network where it has already been deployed. As you add each token contract address, the Token Manager displays validation checks for the token and the required admin registration functions in the contract.
Use the _\+ Add New Address_ link to add additional token deployments. When you've added all the token deployments that you want to add at this time, select the checkbox to confirm _These are all of the tokens I currently want to enable on CCIP_.
2. On the **Pools** page, you're prompted to select the token pool mechanism that's used to transfer value between networks — _Burn / Mint_ or _Lock / Release_. Depending on your token contract, you may have more than one option for _Burn / Mint_:
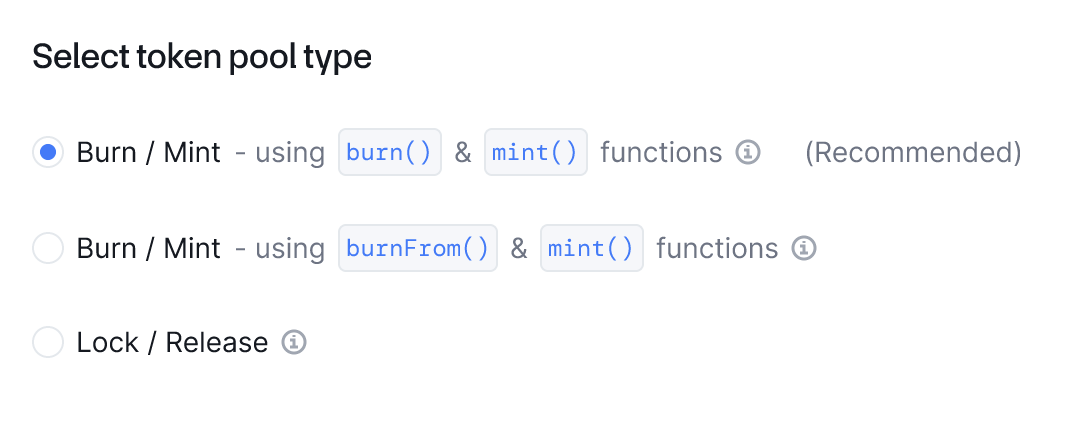
Before selecting a token pool type, be sure to review [CCIP token handling mechanisms](https://docs.chain.link/ccip/concepts/cross-chain-token/overview#token-handling-mechanisms).
3. On the **Networks** page, select the additional blockchain networks where you'd like to deploy your new token. For additional networks, Token Manager Wizard workflow automatically configures all tokens with the Burn & Mint mechanism. (Refer to the [token contract](https://github.com/smartcontractkit/chainlink/blob/contracts-ccip/v1.6.0-beta.0/contracts/src/v0.8/ccip/tokenAdminRegistry/TokenPoolFactory/FactoryBurnMintERC20.sol) and [token pool contract](https://github.com/smartcontractkit/chainlink/blob/develop/contracts/src/v0.8/ccip/pools/BurnMintTokenPool.sol) for the Burn & Mint mechanism.)
4. On the **Summary** page, each network you've selected appears along with an expandable list of the transactions the Token Manager will guide you through to deploy your token for each network.
If you selected more than two networks during the previous step, the _Remove_ links are active, allowing you to remove a network before proceeding. If you only have two networks selected, the _Remove_ links are intentionally not active. If you need to add more networks, navigate back to the **Networks** page.
5. The **Deploy** page displays the steps that you need to complete.
For the tokens you're adding, the Token Manager guides you through each of these steps per network:
- Deploy token pool for existing token
- Grant Burn / Mint privileges ( **manual step**)
- Register admin
- Accept admin role of your token pool
- Set the token pool address
- Accept ownership of the new token pool
For the other tokens in your network, the Token Manager also guides you through updating existing token pools to incorporate the tokens you're adding.
At each step, you are prompted to confirm the corresponding transactions in your wallet. When each step is complete for all the networks you selected, the Token Manager displays a message showing that your configuration was successful.
When everything is successfully set up for your token, you can view your new Token Page from the Token Manager Dashboard. It displays information about your CCT, enables configuration changes, and allows expansion to additional networks.
## [Token Manager Dashboard](https://docs.chain.link/ccip/tutorials/evm/token-manager\#token-manager-dashboard)
After you connect your wallet, you can see the Token Manager Dashboard:
- If you click **Add new token**, you enter the Token Manager Wizard which prompts you to deploy a new token or to add an existing token.
- If the wallet you connected to the dashboard is a Token Admin address, the Token Manager automatically populates your tokens in the dashboard.
- If you have saved partial progress in the Token Manager Wizard, your token displays in a draft state so you can return and finish deploying it later.
After you have deployed a new token or added an existing one, each token has its own page:
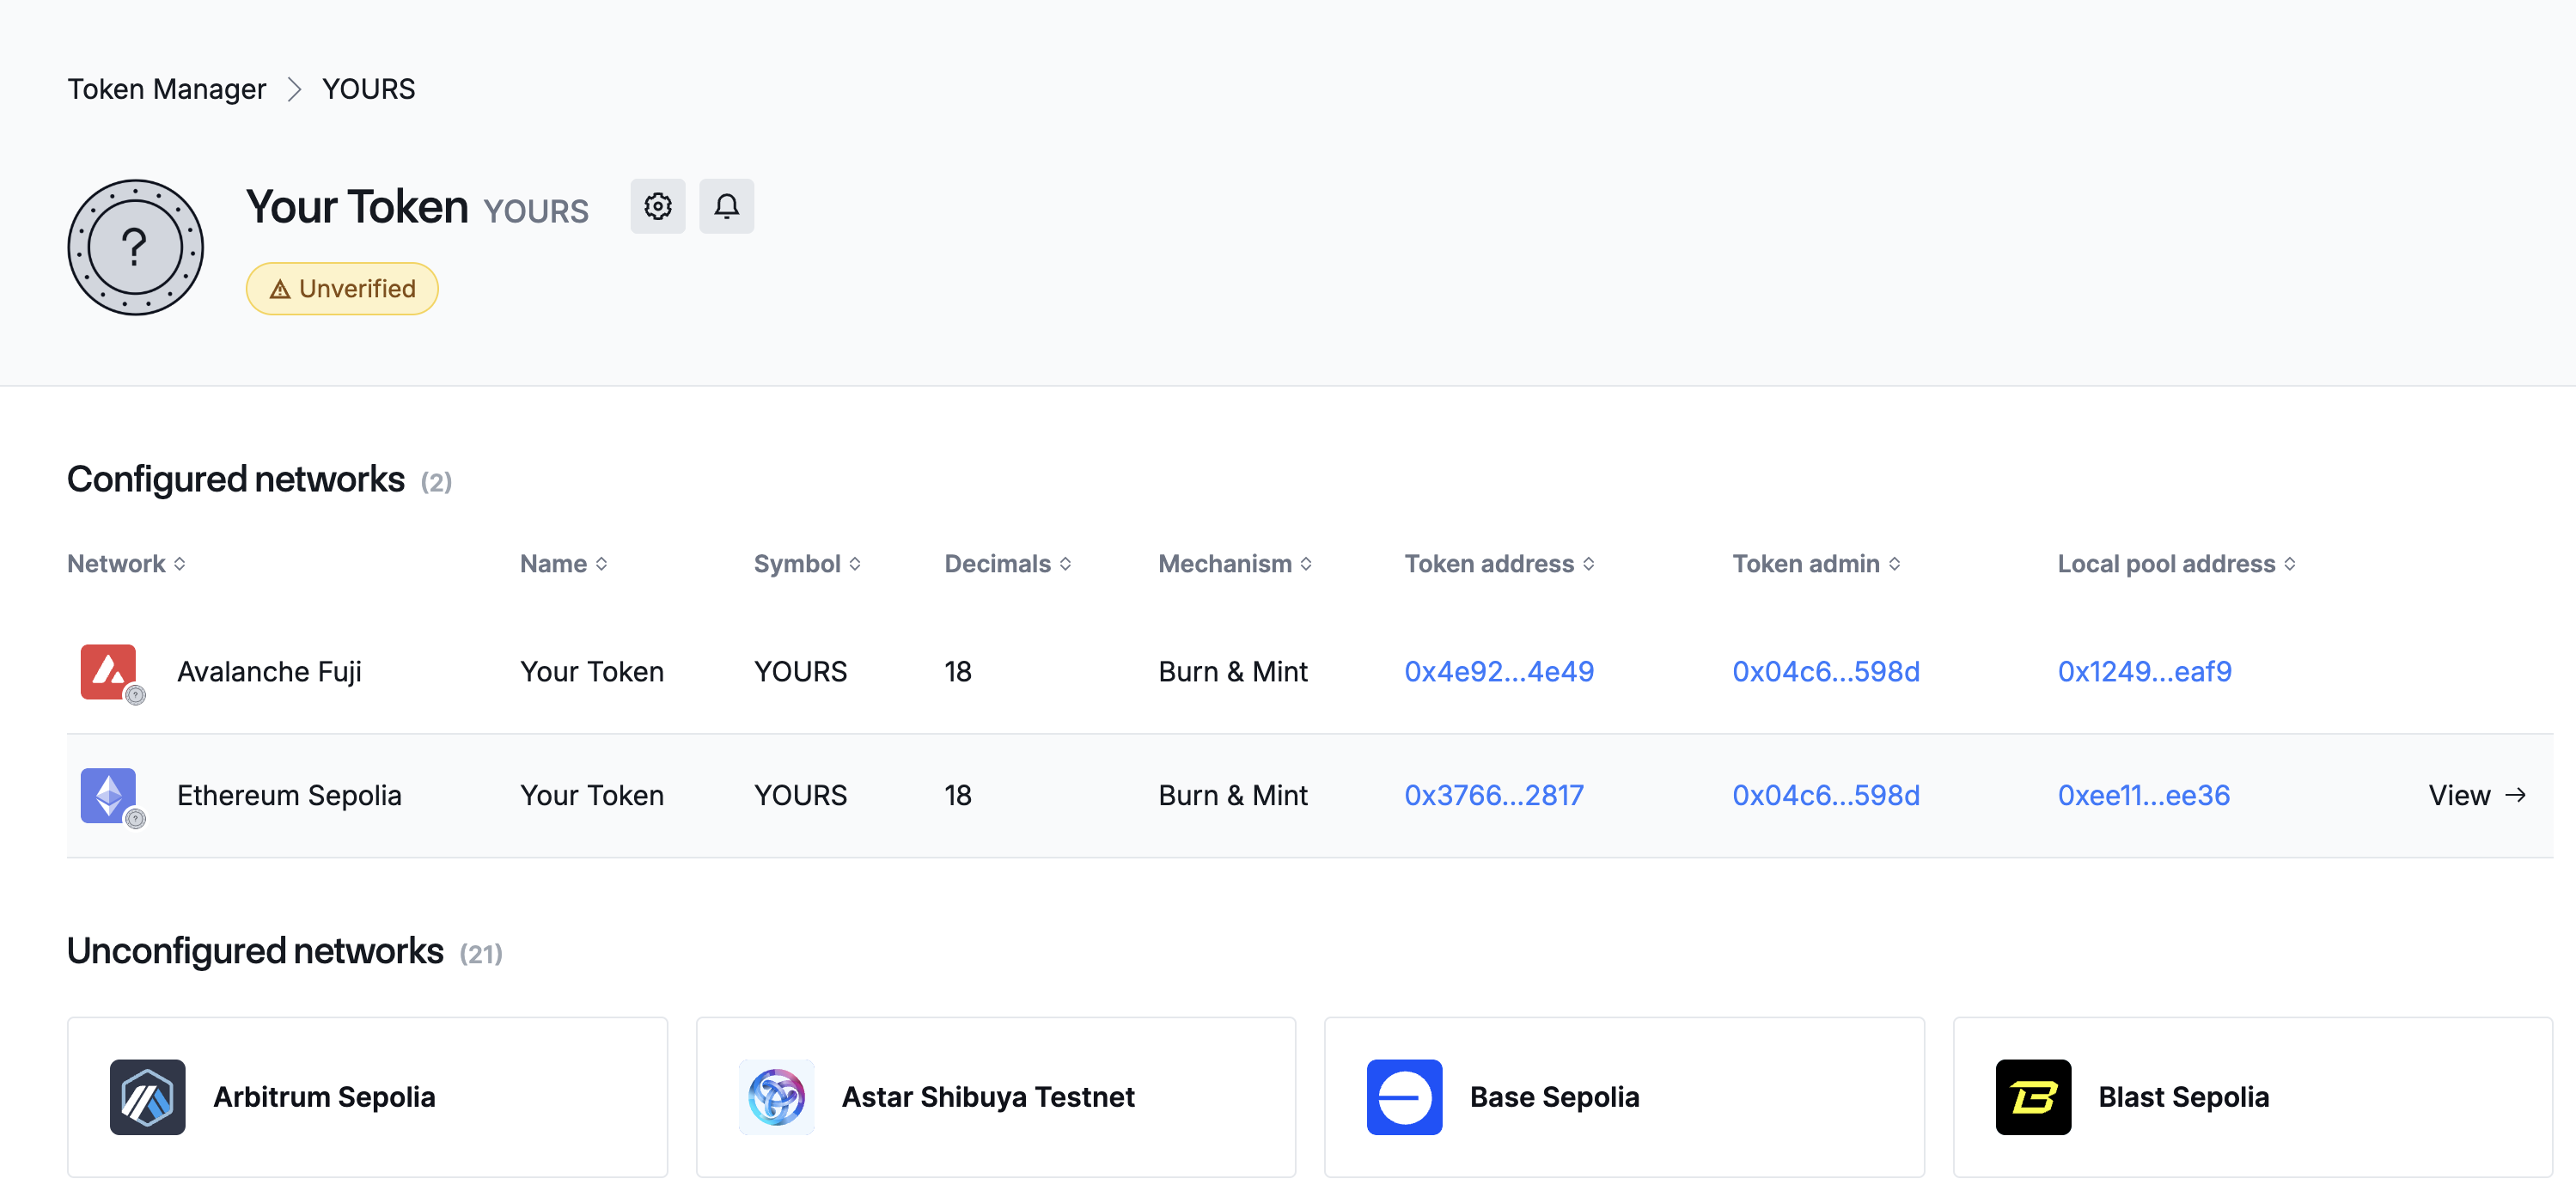
The token page shows both the configured and unconfigured networks.
- When you select any of the listed unconfigured networks, you can use the Token Manager Wizard to expand your token to those networks, either by deploying a new token or by adding an existing token and deploying a token pool.
- For configured networks, you can view details for each network-specific token, and you can expand a **Token Details** side panel with more information and admin actions. To expand the **Token Details** panel, click the _View_ link next to the configured network.
When expanded, the **Token Details** side panel provides more details about the inbound and outbound lanes for your token. If the connected wallet is a token admin or has permissions to update the token pool, the **Token Details** side panel also displays an **Actions** menu:
If you have the appropriate permissions, you can edit your token's inbound and outbound rate limits, edit the router contract address, and propose a new token administrator.
### [Managing token settings](https://docs.chain.link/ccip/tutorials/evm/token-manager\#managing-token-settings)
1. Connect your wallet and select your token in the Token Manager home page. A detailed page for your token displays, showing both configured and unconfigured networks.
2. To access the **Settings** page, select the gear icon next to your token's name:
### [Verifying your token](https://docs.chain.link/ccip/tutorials/evm/token-manager\#verifying-your-token)
You can request token verification through the Token Manager; when verification is granted, it allows the token to be listed on the CCIP Directory and ensures information is consistent across other CCIP apps, like CCIP Explorer.
If your token is unverified, an **Unverified** badge displays underneath the token's name at the top of the page. Be sure that all information is correct before your submission, as it requires a manual review process. If you need to make any further changes after submitting your request, you must use the [CCIP Contact Form](https://chain.link/ccip-contact?v=Token%20Manager%20support).
You can send a request for verification from the **Settings** page:
1. The _Token Details_ tab allows you to modify your token's name and ticker symbol with an off-chain transaction. You can also specify an avatar for your token. If you have made any changes in this tab, click **Save Changes**.
2. The _Project Details_ tab prompts you to fill in your project's name and URL, and a contact email address. This information is kept private. It's optional to fill out, but required if you're requesting token verification.
3. The _Verification_ tab has a **Verify my token** button that submits a verification request with the information you provided in the previous two tabs.
When your verification request is granted, the Token Manager will display a **Verified** badge on the token page.
## Get the latest Chainlink content straight to your inbox.
Email Address
## CCIP Service Limits
[iframe](https://www.googletagmanager.com/ns.html?id=GTM-N6DQ47T)
Chainlink CCIP is now officially live on Solana. [View lanes and tokens.](https://docs.chain.link/ccip/directory/mainnet/chain/solana-mainnet?utm_medium=referral&utm_source=chainlink-docs&utm_campaign=solana-ccip)
On this page
# [CCIP Service Limits (SVM)](https://docs.chain.link/ccip/service-limits/svm\#overview)
## [EVM to SVM](https://docs.chain.link/ccip/service-limits/svm\#evm-to-svm)
| Item | Description | Limit |
| --- | --- | --- |
| Maximum message data length | The total payload for the message (includes the user specified message.data as well as the accounts, Bitmap, token transfer data) | 640 bytes |
| Message execution compute units limit | User specified compute units limit. Mandatory to be set | 400,000 CU |
| Maximum number of tokens | Maximum number of distinct tokens a user can transfer in a single transaction. | 1 |
| Smart Execution time window | Maximum duration CCIP will attempt automatic execution of message | 8 hours |
| Token pool execution gas limit | Default compute units for TokenPool execution at the destination, ie., Solana | 150,000 CU |
| Out of Order execution | Parameter in the extraArgs of a CCIP message | Must be True |
## [SVM to EVM](https://docs.chain.link/ccip/service-limits/svm\#svm-to-evm)
| Item | Description | Limit |
| --- | --- | --- |
| Maximum message data length | data payload sent within the [CCIP message](https://docs.chain.link/ccip/api-reference/svm/v1.6.0/messages#svm2anymessage) | 400 bytes |
| Message execution gas limit | User specified gas limit. Mandatory to be set | 3,000,000 gas |
| Maximum number of tokens | Maximum number of distinct tokens a user can transfer in a single transaction. | 1 |
| Smart Execution time window | Maximum duration for the execution of a CCIP message | 8 hours |
| Token pool execution gas limit | Maximum gas for executing the combined steps in token pools during cross-chain transfers | 90,000 gas |
| Out of Order execution | Parameter in the extraArgs of a CCIP message | Must be True |
## Get the latest Chainlink content straight to your inbox.
Email Address
## Chainlink CCIP API
[iframe](https://www.googletagmanager.com/ns.html?id=GTM-N6DQ47T)
On this page
# [Chainlink CCIP API Reference Documentation (SVM)](https://docs.chain.link/ccip/api-reference/svm\#overview)
## [Available Versions](https://docs.chain.link/ccip/api-reference/svm\#available-versions)
### [Latest Release](https://docs.chain.link/ccip/api-reference/svm\#latest-release)
- **[CCIP v1.6.0](https://docs.chain.link/ccip/api-reference/svm/v1.6.0/)** (Current Version)
- Initial release for SVM-based blockchains (Solana)
- Cross-chain messaging from Solana to EVM and SVM chains
- Token transfers using SPL tokens
- Support for native SOL or SPL fee payments
- Configurable gas limits and out-of-order execution
## [Documentation Structure](https://docs.chain.link/ccip/api-reference/svm\#documentation-structure)
Each version includes detailed documentation for:
- Message Structures and Extra Args
- Router Instructions
- Events
- Error Handling
## Get the latest Chainlink content straight to your inbox.
Email Address
## Chainlink CCIP Tools
[iframe](https://www.googletagmanager.com/ns.html?id=GTM-N6DQ47T)
Chainlink CCIP is now officially live on Solana. [View lanes and tokens.](https://docs.chain.link/ccip/directory/mainnet/chain/solana-mainnet?utm_medium=referral&utm_source=chainlink-docs&utm_campaign=solana-ccip)
On this page
# [CCIP Tools](https://docs.chain.link/ccip/tools-resources/tools\#overview)
This page lists tools developed to assist with building and interacting with Chainlink CCIP.
## [CCIP Tools TS ( `ccip-tools-ts`)](https://docs.chain.link/ccip/tools-resources/tools\#ccip-tools-ts-ccip-tools-ts)
[GitHub Repository: smartcontractkit/ccip-tools-ts](https://github.com/smartcontractkit/ccip-tools-ts)
This is a TypeScript command-line interface (CLI) and library designed for interacting with deployed CCIP contracts on supported blockchains.
**Key Features:**
- **Query CCIP Data:** View details about specific CCIP messages using transaction hashes ( `show`).
- **Manual Execution:** Manually trigger the execution of CCIP messages on the destination chain ( `manualExec`).
- **Send Messages:** Construct and send new CCIP messages, including data and token transfers ( `send`).
- **Estimate Gas:** Calculate the estimated gas required for a CCIP message execution ( `estimateGas`).
- **Lane Information:** Inspect the configuration of specific CCIP lanes ( `lane`).
- **Token Discovery:** Check which tokens are supported for transfer on a given lane ( `getSupportedTokens`).
- **Debugging:** Parse raw EVM transaction data related to CCIP contracts ( `parseBytes`).
This tool is useful for debugging interactions, automating tasks, verifying configurations, and manually interacting with the CCIP protocol. It requires RPC endpoint configuration and wallet access (private key or Ledger) for certain commands.
## Get the latest Chainlink content straight to your inbox.
Email Address
## Optimize CCIP Gas Limits
[iframe](https://www.googletagmanager.com/ns.html?id=GTM-N6DQ47T)
Chainlink CCIP is now officially live on Solana. [View lanes and tokens.](https://docs.chain.link/ccip/directory/mainnet/chain/solana-mainnet?utm_medium=referral&utm_source=chainlink-docs&utm_campaign=solana-ccip)
On this page
# [Optimizing Gas Limit Settings in CCIP Messages](https://docs.chain.link/ccip/tutorials/evm/ccipreceive-gaslimit\#overview)
When constructing a [CCIP message](https://docs.chain.link/ccip/api-reference/evm/v1.6.0/client#evm2anymessage), it's crucial to set the gas limit accurately. The gas limit represents the maximum amount of gas consumed to execute the [`ccipReceive`](https://docs.chain.link/ccip/api-reference/evm/v1.6.0/ccip-receiver#ccipreceive) function on the CCIP Receiver, which influences the transaction fees for sending a CCIP message. Notably, unused gas is not reimbursed, making it essential to estimate the gas limit carefully:
- Setting the gas limit too low will cause the transaction to revert when CCIP calls `ccipReceive` on the CCIP Receiver, which requires a manual re-execution with an increased gas limit. For more details about this scenario, read the [Manual Execution](https://docs.chain.link/ccip/tutorials/evm/manual-execution) guide.
- Conversely, an excessively high gas limit leads to higher fees.
This tutorial shows you how to estimate the gas limit for the `ccipReceive` function using various methods. You will learn how to use a CCIP Receiver where the gas consumption of the `ccipReceive` function varies based on the input data. This example emphasizes the need for testing under diverse conditions. This tutorial includes tasks for the following environments:
1. **Local Environment**: Using [Hardhat](https://hardhat.org/) and [Foundry](https://book.getfoundry.sh/) on a local blockchain provides a swift initial gas estimate. However, different frameworks can yield different results and the local environment will not always be representative of your destination blockchain. Consider these figures to be preliminary estimates. Then, incorporate a buffer and conduct subsequent validations on a testnet.
2. **Testnet**: You can precisely determine the required gas limit by deploying your CCIP Sender and Receiver on a testnet and transmitting several CCIP messages with the previously estimated gas. Although this approach is more time-intensive, especially if testing across multiple blockchains, it offers enhanced accuracy.
3. **Offchain Methods**: Estimating gas with an offchain Web3 provider or tools like [Tenderly](https://docs.tenderly.co/) offers the most accurate and swift way to determine the needed gas limit.
These approaches will give you insights into accurately estimating the gas limit for the `ccipReceive` function, ensuring cost-effective CCIP transactions.
Before you begin, open a terminal, clone the [smart-contract-examples repository](https://github.com/smartcontractkit/smart-contract-examples), and navigate to the `smart-contract-examples/ccip/estimate-gas` directory.

```bash
git clone https://github.com/smartcontractkit/smart-contract-examples.git && \
cd smart-contract-examples/ccip/estimate-gas
```
## [Examine the code](https://docs.chain.link/ccip/tutorials/evm/ccipreceive-gaslimit\#examine-the-code)
The source code for the CCIP Sender and Receiver is located in the `contracts` directory for Hardhat projects and in the `src` directory for Foundry projects. The code includes detailed comments for clarity and is designed to ensure self-explanatory functionality. This section focuses on the `_ccipReceive` function:

```solidity
function _ccipReceive(Client.Any2EVMMessage memory any2EvmMessage) internal override {
uint256 iterations = abi.decode(any2EvmMessage.data, (uint256));
uint256 result = iterations;
uint256 maxIterations = iterations % 100;
for (uint256 i = 0; i < maxIterations; i++) {
result += i;
}
emit MessageReceived(
any2EvmMessage.messageId,
any2EvmMessage.sourceChainSelector,
abi.decode(any2EvmMessage.sender, (address)),
iterations,
maxIterations,
result
);
}
```
The `_ccipReceive` function operates as follows:
1. **Input Processing:** The function accepts a `Client.Any2EVMMessage`. The first step involves decoding the number of iterations from the message's data using ABI decoding.
2. **Logic Execution:** It initializes the `result` variable with the number of iterations. The function calculates `maxIterations` by taking the modulo of iterations with 100, which sets an upper limit for iteration. This step is a safeguard to ensure that the function does not run out of gas.
3. **Iteration:** The function executes a loop from 0 to `maxIterations`, simulating variable computational work based on the input data. This variability directly influences gas consumption.
4. **Event Emission:** Finally, an event `MessageReceived` is emitted.
This code shows how gas consumption for the `_ccipReceive` function can fluctuate in response to the input data, highlighting the necessity for thorough testing under different scenarios to determine the correct `gasLimit`.
## [Gas estimation in a local environment](https://docs.chain.link/ccip/tutorials/evm/ccipreceive-gaslimit\#gas-estimation-in-a-local-environment)
To facilitate testing within a local environment, you will use the [MockCCIPRouter](https://github.com/smartcontractkit/chainlink-ccip/blob/contracts-ccip-release/1.6.0/chains/evm/contracts/test/mocks/MockRouter.sol) contract. This contract serves as a mock implementation of the CCIP Router contract, enabling the local testing of CCIP Sender and Receiver contracts.
A notable feature of the `MockCCIPRouter` contract is its ability to emit a `MsgExecuted` event:

```solidity
event MsgExecuted(bool success, bytes retData, uint256 gassed))
```
This event reports the amount of gas consumed by the `ccipReceive` function.
### [Foundry](https://docs.chain.link/ccip/tutorials/evm/ccipreceive-gaslimit\#foundry)
#### [Prerequisites](https://docs.chain.link/ccip/tutorials/evm/ccipreceive-gaslimit\#prerequisites)
1. In your terminal, change to the `foundry` directory:

```bash
cd foundry
```
2. Ensure Foundry is [installed](https://book.getfoundry.sh/getting-started/installation).
3. Check the Foundry version:

```bash
forge --version
```
The output should be similar to the following:

```text
forge 0.2.0 (545cd0b 2024-03-14T00:20:00.210934000Z)
```
You need version 0.2.0 or above. Run `foundryup` to update Foundry if necessary.
4. Build your project:

```bash
forge build
```
The output should be similar to:

```text
[⠊] Compiling...
[⠔] Compiling 52 files with 0.8.19
[⠑] Solc 0.8.19 finished in 2.55s
Compiler run successful!
```
#### [Estimate gas](https://docs.chain.link/ccip/tutorials/evm/ccipreceive-gaslimit\#estimate-gas)
Located in the `test` directory, the `SendReceive.t.sol` test file assesses the gas consumption of the `ccipReceive` function. This file features a test case that sends a CCIP message to the `MockCCIPRouter` contract, which triggers the `MsgExecuted` event. This event provides insights into the gas requirements of the `ccipReceive` function by detailing the amount of gas consumed. The test case explores three scenarios to examine gas usage comprehensively across various operational conditions:
- **Baseline gas consumption:** This scenario runs `0` iteration to determine the baseline gas consumption, representing the least amount of gas required.
- **Average gas consumption:** This scenario runs `50` iterations to estimate the gas consumption under average operational conditions.
- **Peak gas consumption:** This scenario runs `99` iterations to estimate the peak gas consumption, marking the upper limit of gas usage.
To run the test, execute the following command:

```bash
forge test -vv --isolate
```
Output example:

```text
[⠊] Compiling...
[⠘] Compiling 52 files with 0.8.19
[⠃] Solc 0.8.19 finished in 2.72s
Compiler run successful!
Ran 3 tests for test/SendReceive.t.sol:SenderReceiverTest
[PASS] test_SendReceiveAverage() (gas: 125166)
Logs:
Number of iterations 50 - Gas used: 14740
[PASS] test_SendReceiveMax() (gas: 134501)
Logs:
Number of iterations 99 - Gas used: 24099
[PASS] test_SendReceiveMin() (gas: 115581)
Logs:
Number of iterations 0 - Gas used: 5190
Suite result: ok. 3 passed; 0 failed; 0 skipped; finished in 10.84ms (5.28ms CPU time)
Ran 1 test suite in 188.81ms (10.84ms CPU time): 3 tests passed, 0 failed, 0 skipped (3 total tests)
```
This table summarizes the gas usage for different iterations:
| Scenario | Number of iterations | Gas used |
| --- | --- | --- |
| Baseline gas consumption | 0 | 5190 |
| Average gas consumption | 50 | 14740 |
| Peak gas consumption | 99 | 24099 |
The output demonstrates that gas consumption increases with the number of iterations, peaking when the iteration count reaches `99`.
In the next section, you will compare these results with those obtained from a local Hardhat environment.
### [Hardhat](https://docs.chain.link/ccip/tutorials/evm/ccipreceive-gaslimit\#hardhat)
#### [Prerequisites](https://docs.chain.link/ccip/tutorials/evm/ccipreceive-gaslimit\#prerequisites-1)
1. In your terminal, navigate to the `hardhat` directory:

```bash
cd ../hardhat
```
2. Install the dependencies:

```bash
npm install
```
3. Set the password to encrypt your environment variables using the following command:

```bash
npx env-enc set-pw
```
4. Set the following environment variables to deploy contracts on testnets:
- `PRIVATE_KEY`: The private key for your testnet wallet. If you use MetaMask, follow the instructions to [Export a Private Key](https://support.metamask.io/hc/en-us/articles/360015289632-How-to-export-an-account-s-private-key). **Note:** Your private key is needed to sign any transactions you make such as making requests.
- `ETHEREUM_SEPOLIA_RPC_URL`: The RPC URL for Ethereum Sepolia testnet. You can sign up for a personal endpoint from [Alchemy](https://www.alchemy.com/), [Infura](https://www.infura.io/), or another node provider service.
- `AVALANCHE_FUJI_RPC_URL`: The RPC URL for Avalanche Fuji testnet. You can sign up for a personal endpoint from [Infura](https://www.infura.io/) or another node provider service.
- `ETHERSCAN_API_KEY`: An Ethereum explorer API key, used to verify your contract. Follow [this guide](https://docs.etherscan.io/getting-started/viewing-api-usage-statistics) to get one from Etherscan.
Input these variables using the following command:

```bash
npx env-enc set
```
5. Compile the contracts:

```bash
npx hardhat compile
```
The output should be similar to:

```text
Generating typings for: 31 artifacts in dir: typechain-types for target: ethers-v6
Successfully generated 114 typings!
Compiled 33 Solidity files successfully (evm target: paris).
```
#### [Estimate gas](https://docs.chain.link/ccip/tutorials/evm/ccipreceive-gaslimit\#estimate-gas-1)
Located in the `test` directory, the `Send-Receive.ts` test file is designed to evaluate the gas usage of the `ccipReceive` function. This file employs the same logic as the Foundry test file, featuring three scenarios varying by the number of iterations. The test case transmits a CCIP message to the `MockCCIPRouter` contract, triggering the `MsgExecuted` event. This event provides insights into the gas requirements of the `ccipReceive` function by detailing the amount of gas used.
To run the test, execute the following command:

```bash
npx hardhat test
```
Example of the output:

```text
Sender and Receiver
Final Gas Usage Report:
Number of iterations 0 - Gas used: 5168
Number of iterations 50 - Gas used: 14718
Number of iterations 99 - Gas used: 24077
✔ should CCIP message from sender to receiver (1716ms)
1 passing (2s)
```
This table summarizes the gas usage across different iterations:
| Scenario | Number of iterations | Gas used |
| --- | --- | --- |
| Baseline gas consumption | 0 | 5168 |
| Average gas consumption | 50 | 14718 |
| Peak gas consumption | 99 | 24077 |
The output demonstrates that gas consumption increases with the number of iterations, peaking when the iteration count reaches `99`.
### [Compare the results from Foundry and Hardhat](https://docs.chain.link/ccip/tutorials/evm/ccipreceive-gaslimit\#compare-the-results-from-foundry-and-hardhat)
This table summarizes the gas usage for different iterations from both Foundry and Hardhat:
| Scenario | Number of iterations | Gas used (Foundry) | Gas used (Hardhat) |
| --- | --- | --- | --- |
| Baseline gas consumption | 0 | 5190 | 5168 |
| Average gas consumption | 50 | 14740 | 14718 |
| Peak gas consumption | 99 | 24099 | 24077 |
Gas usage trends across different iterations are consistent between Foundry and Hardhat and increase with the number of iterations, reaching a peak at 99. However, slight variations in gas usage between the two environments at each iteration level demonstrate the importance of extending gas usage estimation beyond local environment testing. To accurately determine the appropriate gas limit, it is recommended to conduct additional validations on the target blockchain. Setting the gas limit with a buffer is advisable to account for differences between local environment estimations and actual gas usage on the target blockchain.
### [Estimate gas usage on your local environment](https://docs.chain.link/ccip/tutorials/evm/ccipreceive-gaslimit\#estimate-gas-usage-on-your-local-environment)
Now that you've locally estimated the gas usage of the `ccipReceive` function using the provided projects, you can apply the same approach to your own Foundry or Hardhat project. This section will guide you through estimating gas usage in your Foundry or Hardhat project.
#### [Estimate `ccipReceive` gas usage locally in your Foundry project](https://docs.chain.link/ccip/tutorials/evm/ccipreceive-gaslimit\#estimate-ccipreceive-gas-usage-locally-in-your-foundry-project)
To estimate the gas usage of the `ccipReceive` function within your own Foundry project, follow these steps:
1. Create a testing file in the `test` directory of your project and import the [`MockCCIPRouter`](https://github.com/smartcontractkit/chainlink-ccip/blob/contracts-ccip-release/1.6.0/chains/evm/contracts/test/mocks/MockRouter.sol) contract:

```solidity
import {MockCCIPRouter} from "@chainlink/contracts-ccip/contracts/test/mocks/MockRouter.sol";
```
**_Note_:** The `MockCCIPRouter` receives the CCIP message from your CCIP Sender, calls the `ccipReceive` function on your CCIP Receiver, and emits the `MsgExecuted` event with the gas used.
2. Inside the `setUp` function, deploy the `MockCCIPRouter` contract, and use its address to deploy your CCIP Sender and CCIP Receiver contracts. For more details, check this [example](https://github.com/smartcontractkit/smart-contract-examples/blob/main/ccip/estimate-gas/foundry/test/SendReceive.t.sol#L23).
3. In your test cases:
1. Before transmitting any CCIP messages, use `vm.recordLogs()` to start capturing events. For more details, check this [example](https://github.com/smartcontractkit/smart-contract-examples/blob/main/ccip/estimate-gas/foundry/test/SendReceive.t.sol#L39).
2. After sending the CCIP message, use `vm.getRecordedLogs()` to collect the recorded logs. For more details, check this [example](https://github.com/smartcontractkit/smart-contract-examples/blob/4b3800967e475ecd990fd417bec9960dd9ebe2af/ccip/estimate-gas/foundry/test/SendReceive.t.sol#L47C32-L47C52).
3. Parse the logs to find the `MsgExecuted(bool,bytes,uint256)` event and extract the gas used. For more details, check this [example](https://github.com/smartcontractkit/smart-contract-examples/blob/main/ccip/estimate-gas/foundry/test/SendReceive.t.sol#L53).
#### [Estimate `ccipReceive` gas usage locally in your Hardhat project](https://docs.chain.link/ccip/tutorials/evm/ccipreceive-gaslimit\#estimate-ccipreceive-gas-usage-locally-in-your-hardhat-project)
To estimate the gas usage of the `ccipReceive` function within your own Hardhat project, follow these steps:
1. Create a Solidity file in the `contracts` directory of your project and import the [`MockCCIPRouter`](https://github.com/smartcontractkit/chainlink-ccip/blob/contracts-ccip-release/1.6.0/chains/evm/contracts/test/mocks/MockRouter.sol) contract:

```solidity
import {MockCCIPRouter} from "@chainlink/contracts-ccip/contracts/test/mocks/MockRouter.sol";
```
**_Note_:** The `MockCCIPRouter` receives the CCIP message from your CCIP Sender, calls the `ccipReceive` function on your CCIP Receiver, and emits the `MsgExecuted` event with the gas used.
2. Create a testing file in your project's `test` directory.
3. Inside the `deployFixture` function, deploy the `MockCCIPRouter` contract and use its address to deploy your CCIP Sender and CCIP Receiver contracts. For more details, check this [example](https://github.com/smartcontractkit/smart-contract-examples/blob/4b3800967e475ecd990fd417bec9960dd9ebe2af/ccip/estimate-gas/hardhat/test/Send-Receive.ts#L14).
4. In your test cases:
1. Send the CCIP message to the `MockCCIPRouter` contract. For more details, check this [example](https://github.com/smartcontractkit/smart-contract-examples/blob/4b3800967e475ecd990fd417bec9960dd9ebe2af/ccip/estimate-gas/hardhat/test/Send-Receive.ts#L51).
2. Parse the logs to find the `MsgExecuted(bool,bytes,uint256)` event and extract the gas used. For more details, check this [example](https://github.com/smartcontractkit/smart-contract-examples/blob/main/ccip/estimate-gas/hardhat/test/Send-Receive.ts#L59).
## [Gas estimation on a testnet](https://docs.chain.link/ccip/tutorials/evm/ccipreceive-gaslimit\#gas-estimation-on-a-testnet)
To accurately validate your local environment's gas usage estimations, follow these steps:
1. Deploy and configure the CCIP Sender contract on the Avalanche Fuji testnet and the CCIP Receiver contract on the Ethereum Sepolia testnet.
2. Send several CCIP messages with the same number of iterations used in your local testing. For this purpose, use the `sendCCIPMessage.ts` script in the `scripts/testing` directory. This script includes a 10% buffer over the estimated gas usage to ensure a sufficient gas limit. Refer to the table below for the buffered gas limits for each iteration:
| Scenario | Number of iterations | Estimated gas usage (Hardhat) | Buffered gas limit (+10%) |
| --- | --- | --- | --- |
| Baseline gas consumption | 0 | 5168 | 5685 |
| Average gas consumption | 50 | 14718 | 16190 |
| Peak gas consumption | 99 | 24077 | 26485 |
3. Use [Tenderly](https://dashboard.tenderly.co/) to monitor and confirm that the transactions execute successfully within the buffered gas limits. Subsequently, compare the actual gas usage of the `ccipReceive` function on the Ethereum Sepolia testnet against the buffered limits to fine-tune the final gas limit.
This approach ensures that your gas limit settings are validated against real-world conditions on testnets, providing a more accurate and reliable estimation for deploying on live blockchains.
### [Deploy and configure the contracts](https://docs.chain.link/ccip/tutorials/evm/ccipreceive-gaslimit\#deploy-and-configure-the-contracts)
To deploy and configure the CCIP Sender contract on the Avalanche Fuji testnet and the CCIP Receiver contract on the Ethereum Sepolia testnet, follow the steps below. **Note**: Your account must have some ETH tokens on Ethereum Sepolia and AVAX tokens on Avalanche Fuji.
1. Deploy the CCIP Sender on the Avalanche Fuji testnet:

```bash
npx hardhat run scripts/deployment/deploySender.ts --network avalancheFuji
```
2. Deploy the CCIP Receiver on the Ethereum Sepolia testnet:

```bash
npx hardhat run scripts/deployment/deployReceiver.ts --network ethereumSepolia
```
3. Authorize the Sender to send messages to Ethereum Sepolia:

```bash
npx hardhat run scripts/configuration/allowlistingForSender.ts --network avalancheFuji
```
4. Authorize the Receiver to receive messages from the Sender:

```bash
npx hardhat run scripts/configuration/allowlistingForReceiver.ts --network ethereumSepolia
```
Upon completion, you will find the CCIP Sender and Receiver contracts deployed and configured on their respective testnets. Contract addresses are available in the `scripts/generatedData.json` file.
### [Send CCIP Messages](https://docs.chain.link/ccip/tutorials/evm/ccipreceive-gaslimit\#send-ccip-messages)
1. Send three CCIP messages with different numbers of iterations:

```bash
npx hardhat run scripts/testing/sendCCIPMessages.ts --network avalancheFuji
```
Example output:

```text
$ npx hardhat run scripts/testing/sendCCIPMessages.ts --network avalancheFuji
Approving 0x0b9d5D9136855f6FEc3c0993feE6E9CE8a297846 for 0x32A24e40851E19d1eD2a7E697d1a38228e9388a3. Allowance is 115792089237316195423570985008687907853269984665640564039457584007913129639935. Signer 0x9d087fC03ae39b088326b67fA3C788236645b717...
115792089237316195423570985008687907853269984665640564039457584007913129639935n
Number of iterations 0 - Gas limit: 5685 - Message Id: 0xf23b17366d69159ea7d502835c4178a1c1d1d6325edf3d91dca08f2c7a2900f7
Number of iterations 50 - Gas limit: 16190 - Message Id: 0x4b3a97f6ac959f67d769492ab3e0414e87fdd9c143228f9c538b22bb695ca728
Number of iterations 99 - Gas limit: 26485 - Message Id: 0x37d1867518c0f8c54ceb0c5507b46b8d44c6c53864218f448cba0234f8de867a
```
2. Open the [CCIP explorer](https://ccip.chain.link/), search each message by its ID, and wait for each message to be successfully transmitted ( `Status` in the explorer: `Success`).
For the example above, here are the destination transaction hashes:
| Message id | Ethereum Sepolia transaction hash |
| --- | --- |
| 0xf23b17366d69159ea7d502835c4178a1c1d1d6325edf3d91dca08f2c7a2900f7 | 0xf004eb6dab30b3cfb9d1d631c3f9832410b8d4b3179e65b85730563b67b1e689 |
| 0x4b3a97f6ac959f67d769492ab3e0414e87fdd9c143228f9c538b22bb695ca728 | 0xf004eb6dab30b3cfb9d1d631c3f9832410b8d4b3179e65b85730563b67b1e689 |
| 0x37d1867518c0f8c54ceb0c5507b46b8d44c6c53864218f448cba0234f8de867a | 0xf004eb6dab30b3cfb9d1d631c3f9832410b8d4b3179e65b85730563b67b1e689 |
**Note** that the Ethereum Sepolia transaction hash is the same for all the messages. This is because CCIP batched the messages.
### [Check the actual gas usage](https://docs.chain.link/ccip/tutorials/evm/ccipreceive-gaslimit\#check-the-actual-gas-usage)
1. Open [Tenderly](https://dashboard.tenderly.co/) and search for the [destination transaction hash](https://dashboard.tenderly.co/tx/sepolia/0xf004eb6dab30b3cfb9d1d631c3f9832410b8d4b3179e65b85730563b67b1e689).
2. Search for `_callWithExactGasSafeReturnData` with a payload containing your `messageId` (without `0x`). [Example](https://dashboard.tenderly.co/tx/sepolia/0xf004eb6dab30b3cfb9d1d631c3f9832410b8d4b3179e65b85730563b67b1e689?trace=0.8.4.2) for `0xf23b17366d69159ea7d502835c4178a1c1d1d6325edf3d91dca08f2c7a2900f7`.
3. Below the payload with your `messageId`, you will find the call trace from the Router to your Receiver contract. [Call trace example](https://dashboard.tenderly.co/tx/sepolia/0xf004eb6dab30b3cfb9d1d631c3f9832410b8d4b3179e65b85730563b67b1e689?trace=0.8.4.2.0).
4. Click on the _Debugger_ tab and you'll get the gas details:

```text
"gas":{
"gas_left":5685
"gas_used":5031
"total_gas_used":7994315
}
```
5. Note the `gas_left` is equal to the limit that is set in the `sendCCIPMessages.ts` script: `5685`. The `gas_used` is the actual gas used by the Receiver contract to process the message.
6. Repeating the same steps for the other two messages, we can summarize the output:
| Scenario | Number of iterations | Estimated gas usage (Hardhat) | Buffered gas limit (+10%) | Gas used on testnet |
| --- | --- | --- | --- | --- |
| Baseline gas consumption | 0 | 5168 | 5685 | 5031 |
| Average gas consumption | 50 | 14718 | 16190 | 14581 |
| Peak gas consumption | 99 | 24077 | 26485 | 23940 |
Testing on testnets has confirmed that a gas limit of 26,485 is adequate for the `ccipReceive` function to execute successfully under various conditions. However, it is important to note that gas usage may differ across testnets. Therefore, it is advisable to conduct similar validation efforts on the blockchain where you intend to deploy. Deploying and validating contracts across multiple testnets can be time-consuming. For efficiency, consider using [offchain methods](https://docs.chain.link/ccip/tutorials/evm/ccipreceive-gaslimit#offchain-methods) to estimate gas usage.
## [Offchain methods](https://docs.chain.link/ccip/tutorials/evm/ccipreceive-gaslimit\#offchain-methods)
This section guides you through estimating gas usage using two different offchain methods:
- A Web3 provider using the [ethers.js `estimateGas`](https://docs.ethers.org/v6/api/providers/#Provider-estimateGas) function.
- [Tenderly simulation API](https://docs.tenderly.co/reference/api#tag/Simulations/operation/simulateTransaction). The Tenderly simulation API provides a more accurate result (Read this [blog post](https://blog.tenderly.co/how-tenderly-enables-most-accurate-ethereum-gas-estimation/) to learn more) but you are limited to the blockchains supported by Tenderly.
These methods provide the most accurate and rapid means to determine the necessary gas limit for the `ccipReceive` function. You will use the same CCIP Receiver contract deployed on the Ethereum Sepolia testnet in the previous section.
### [Prerequisites](https://docs.chain.link/ccip/tutorials/evm/ccipreceive-gaslimit\#prerequisites-2)
1. In your terminal, navigate to the `offchain` directory:

```bash
cd ../offchain
```
2. Modify the `data.json` file to insert the deployed addresses of your Sender and Receiver contracts.
3. Install the dependencies:

```bash
npm install
```
4. Set the password to encrypt your environment variables:

```bash
npx env-enc set-pw
```
5. Set up the following environment variables:
- `ETHEREUM_SEPOLIA_RPC_URL`: The RPC URL for Ethereum Sepolia testnet. You can sign up for a personal endpoint from [Alchemy](https://www.alchemy.com/), [Infura](https://www.infura.io/), or another node provider service.
- `TENDERLY_ACCOUNT_SLUG`: This is one part of your Tenderly API URL. You can [find this value in your Tenderly account](https://docs.tenderly.co/account/projects/account-project-slug).
- `TENDERLY_PROJECT_SLUG`: This is one part of your Tenderly API URL. You can [find this value in your Tenderly account](https://docs.tenderly.co/account/projects/account-project-slug).
- `TENDERLY_ACCESS_KEY`: If you don't already have one, you can [generate a new access token](https://docs.tenderly.co/account/projects/how-to-generate-api-access-token).
Input these variables using the following command:

```bash
npx env-enc set
```
6. Generate [Typechain typings](https://www.npmjs.com/package/typechain) for the Receiver contract:

```bash
npm run generate-types
```
### [Introduction of the scripts](https://docs.chain.link/ccip/tutorials/evm/ccipreceive-gaslimit\#introduction-of-the-scripts)
The scripts are located in the `src` directory. Each script is self-explanatory and includes comprehensive comments to explain its functionality and usage. There are three scripts:
- `estimateGasProvider.ts`: This script uses the [`eth_estimateGas`](https://docs.alchemy.com/reference/eth-estimategas) Ethereum API to estimate the gas usage of the `ccipReceive` function. It simulates sending three CCIP messages to the Receiver contract with a varying number of iterations and estimates the gas usage using the [ethers.js `estimateGas`](https://docs.ethers.org/v6/api/providers/#Provider-estimateGas) function.
- `estimateGasTenderly.ts`: This script leverages the Tenderly `simulate` API to estimate the gas usage of the `ccipReceive` function. Similar to the previous script, it simulates sending three CCIP messages to the Receiver contract with different numbers of iterations and estimates the gas usage using the [Tenderly `simulate` API](https://docs.tenderly.co/reference/api#tag/Simulations/operation/simulateTransaction).
- `helper.ts`: This script contains helper functions used by the other scripts. The two main functions are:
- `buildTransactionData`: This function constructs a CCIP message for a specified number of iterations and then returns the transaction data.
- `estimateIntrinsicGas`: Exclusively called by the `estimateGasProvider.ts` script, this function estimates the intrinsic gas of a transaction. The intrinsic gas represents the minimum amount of gas required before executing a transaction. It is determined by the transaction data and the type of transaction. Since this gas is paid by the initiator of the transaction, we use this function to estimate the intrinsic gas and then deduct it from the total gas used to isolate the gas consumed by the `ccipReceive` function.
### [Estimate gas using a Web3 provider](https://docs.chain.link/ccip/tutorials/evm/ccipreceive-gaslimit\#estimate-gas-using-a-web3-provider)
Ethereum nodes implement the [`eth_estimateGas`](https://docs.alchemy.com/reference/eth-estimategas) Ethereum API to predict the gas required for a transaction's successful execution. To estimate the gas usage of the `ccipReceive` function, you can directly call the `eth_estimateGas` API via a Web3 provider or leverage a library like ethers.js, simplifying this interaction. This guide focuses on the [ethers.js `estimateGas`](https://docs.ethers.org/v6/api/providers/#Provider-estimateGas) function for gas estimation. To estimate the gas usage, execute the following command in your terminal:

```bash
npm run estimate-gas-provider
```
Example output:

```text
$ npm run estimate-gas-provider
> offchain-simulator@1.0.0 estimate-gas-provider
> ts-node src/estimateGasProvider.ts
Final Gas Usage Report:
Number of iterations 0 - Gas used: 5377
Number of iterations 50 - Gas used: 14946
Number of iterations 99 - Gas used: 24324
```
The estimate may exceed the actual gas used by the transaction for various reasons, including differences in node performance and EVM mechanics. For a more precise estimation, consider using Tenderly (see the next section for details).
### [Estimate gas using Tenderly](https://docs.chain.link/ccip/tutorials/evm/ccipreceive-gaslimit\#estimate-gas-using-tenderly)
To estimate the gas usage of the `ccipReceive` function using Tenderly, execute the following command:

```bash
npm run estimate-gas-tenderly
```
Example output:

```text
$ npm run estimate-gas-tenderly
> offchain-simulator@1.0.0 estimate-gas-tenderly
> ts-node src/estimateGasTenderly.ts
Final Gas Usage Report:
Number of iterations 0 - Gas used: 5031
Number of iterations 50 - Gas used: 14581
Number of iterations 99 - Gas used: 23940
```
### [Comparison](https://docs.chain.link/ccip/tutorials/evm/ccipreceive-gaslimit\#comparison)
The table below summarizes the gas estimations for different iterations using both Web3 provider and Tenderly:
| Scenario | Number of iterations | Gas estimated (Web3 provider) | Gas estimated (Tenderly) |
| --- | --- | --- | --- |
| Baseline gas consumption | 0 | 5377 | 5031 |
| Average gas consumption | 50 | 14946 | 14581 |
| Peak gas consumption | 99 | 24324 | 23940 |
The gas estimations from both Web3 provider and Tenderly are consistent across different iterations and align with actual testnet results. This demonstrates the accuracy and reliability of these offchain methods in estimating gas usage. However, you can notice that Tenderly provides more accurate results.
## [Conclusion](https://docs.chain.link/ccip/tutorials/evm/ccipreceive-gaslimit\#conclusion)
This tutorial has guided you through estimating the gas limit for the `ccipReceive` function using various methods. You have learned how to estimate gas usage in a local environment using Hardhat and Foundry, validate these estimations on testnets, and use offchain methods to estimate gas usage.
As we have explored various methods for estimating gas for the `ccipReceive` function, it is crucial to apply this knowledge effectively. Here are some targeted recommendations to enhance your approach to gas estimation:
1. **Comprehensive Testing:** Emphasize testing under diverse scenarios to ensure your gas estimations are robust. Different conditions can significantly affect gas usage, so covering as many cases as possible in your tests is crucial.
2. **Preliminary Local Estimates:** Local testing is a critical first step for estimating gas and ensuring your contracts function correctly under various scenarios. While Hardhat and Foundry facilitate development and testing, it's key to remember that these environments may not perfectly mirror your target blockchain's conditions. These initial estimates serve as valuable insights, guiding you toward more accurate gas limit settings when you proceed to testnet validations. Incorporating a buffer based on these preliminary results can help mitigate the risks of underestimating gas requirements due to environmental differences.
3. **Efficiency with Offchain Methods:** Since testing across different blockchains can be resource-intensive, leaning on offchain methods for gas estimation is invaluable. Tools such as Tenderly not only facilitate rapid and accurate gas usage insights on your target blockchains but also enable you to simulate the execution of the `ccipReceive` function on actual contracts deployed on mainnets. If Tenderly doesn't support a particular blockchain, a practical alternative is to use a Web3 provider that does support that chain, as illustrated in the [Estimate gas using a Web3 provider](https://docs.chain.link/ccip/tutorials/evm/ccipreceive-gaslimit#estimate-gas-using-a-web3-provider) section. This is particularly helpful when considering the diversity in gas metering rules across blockchains. This approach saves time and enhances the precision of your gas limit estimations, allowing for more cost-effective transactions from your dApp.
## Get the latest Chainlink content straight to your inbox.
Email Address
## Chainlink CCIP Best Practices
[iframe](https://www.googletagmanager.com/ns.html?id=GTM-N6DQ47T)
Chainlink CCIP is now officially live on Solana. [View lanes and tokens.](https://docs.chain.link/ccip/directory/mainnet/chain/solana-mainnet?utm_medium=referral&utm_source=chainlink-docs&utm_campaign=solana-ccip)
On this page
# [CCIP Best Practices](https://docs.chain.link/ccip/concepts/best-practices\#overview)
This section outlines recommended practices for using Chainlink CCIP effectively and securely.
- **[EVM Best Practices](https://docs.chain.link/ccip/concepts/best-practices/evm)**: Recommended guidelines for interacting with CCIP on EVM-compatible chains.
- **[SVM Best Practices](https://docs.chain.link/ccip/concepts/best-practices/svm)**: Recommended guidelines for interacting with CCIP on SVM-based chains like Solana.
## Get the latest Chainlink content straight to your inbox.
Email Address
## CCIP Architecture Overview
[iframe](https://www.googletagmanager.com/ns.html?id=GTM-N6DQ47T)
Chainlink CCIP is now officially live on Solana. [View lanes and tokens.](https://docs.chain.link/ccip/directory/mainnet/chain/solana-mainnet?utm_medium=referral&utm_source=chainlink-docs&utm_campaign=solana-ccip)
On this page
# [CCIP Architecture - Overview](https://docs.chain.link/ccip/concepts/architecture/overview\#overview)
CCIP is a cross-chain messaging protocol built on Chainlink and secured by its decentralized oracle networks (DONs). It provides the following core capabilities:
- **Token Transfers**: Transfer tokens to an externally owned account (EOA) or a receiving contract.
- **Data Transmission**: Send arbitrary data (i.e., bytes) to a receiving contract.
- **Programmable Token Transfers**: Transfer tokens along with instructions for handling them to a receiving contract (referred to as a programmable token transfer or PTT).
CCIP supports several token transfer mechanisms—including Burn-and-Mint, Lock-and-Mint, and Lock-and-Unlock—using a common interface. Token developers can enable permissionless cross-chain transfers of their tokens via the Chainlink CCT (Cross-Chain Token) standard (detailed documentation is available here). Additionally, CCIP includes an independent Risk Management Network (RMN) that provides layered security through a defense-in-depth approach.
## [High-level Architecture](https://docs.chain.link/ccip/concepts/architecture/overview\#high-level-architecture)
CCIP delivers cross-chain messages from a source chain to a destination chain by combining offchain consensus and onchain execution components. The architecture is composed of two primary layers:
1. **Offchain Architecture**
- Decentralized Oracle Network (DON) with nodes that perform distinct roles:
- Commit: Observes and validates source-chain events to build a consensus-based report.
- Execution: Validates pending messages and optimizes them for execution on the destination chain.
- Risk Management Network:
- Operating independently from the main DON, the Risk Management Network "blesses" the committed messages offchain by generating independent attestations. This additional step enhances overall security with a defense-in-depth design.
2. **Onchain Architecture**
- Router:
- Each blockchain has a single immutable Router contract that serves as the unified interface for users and decentralized applications (dApps).
- On the source blockchain, onramp functionality consists of:
- Providing fee estimates.
- Locking or burning tokens.
- Dispatching the message (data and/or tokens).
- On the destination blockchain, offramping functionality consists of:
- Accepting and verifying commit reports from the Committing DON.
- Validating Risk Management Network nodes signatures when receiving messages from the Executing DON.
- Releasing or minting tokens to the receiver.
- Routing the processed message to the designated receiver.
**Note:** These high-level descriptions outline the core principles of CCIP. The detailed architectures for offchain and onchain architecture—and variations across implementations (e.g., on Solana, the Router incorporates OnRamp functionalities)—can be found in the relevant documentation.

## Get the latest Chainlink content straight to your inbox.
Email Address
## Chainlink CCIP SDK
[iframe](https://www.googletagmanager.com/ns.html?id=GTM-N6DQ47T)
Chainlink CCIP is now officially live on Solana. [View lanes and tokens.](https://docs.chain.link/ccip/directory/mainnet/chain/solana-mainnet?utm_medium=referral&utm_source=chainlink-docs&utm_campaign=solana-ccip)
On this page
# [CCIP SDK](https://docs.chain.link/ccip/tools-resources/sdk\#overview)
The Chainlink CCIP **JavaScript SDK** provides developers with libraries and UI components to integrate CCIP functionality directly into their web applications for **EVM-compatible chains**.
This allows for the creation of custom user interfaces for initiating and managing cross-chain token transfers and messages via CCIP.
**GitHub Repository:** [smartcontractkit/ccip-javascript-sdk](https://github.com/smartcontractkit/ccip-javascript-sdk/tree/main)
## [Key Packages](https://docs.chain.link/ccip/tools-resources/sdk\#key-packages)
The SDK is composed of two main packages:
- **`@chainlink/ccip-js`**: A TypeScript library providing the core client logic for interacting with CCIP routers and managing cross-chain transfers.
- **`@chainlink/ccip-react-components`**: A set of pre-built, customizable React UI components built on top of `ccip-js`. These components help accelerate the development of CCIP-enabled frontends.
## [Use Cases](https://docs.chain.link/ccip/tools-resources/sdk\#use-cases)
- Embed a fully featured, stylable CCIP token bridge within your dApp.
- Build custom logic around CCIP transfers using the core `ccip-js` library.
- Monitor CCIP transaction status programmatically within your application.
## Get the latest Chainlink content straight to your inbox.
Email Address
## Chainlink CCIP Guide
[iframe](https://www.googletagmanager.com/ns.html?id=GTM-N6DQ47T)
Chainlink CCIP is now officially live on Solana. [View lanes and tokens.](https://docs.chain.link/ccip/directory/mainnet/chain/solana-mainnet?utm_medium=referral&utm_source=chainlink-docs&utm_campaign=solana-ccip)
On this page
# [Getting Started (EVM)](https://docs.chain.link/ccip/getting-started/evm\#overview)
A simple use case for Chainlink CCIP is sending data between smart contracts on different blockchains. This guide shows you how to deploy a CCIP sender contract and a CCIP receiver contract to two different blockchains and send data from the sender contract to the receiver contract. You pay the CCIP fees using LINK.
Fees can also be paid in alternative assets, which currently include the native gas tokens of the source blockchain and their ERC20 wrapped version. For example, you can pay ETH or WETH when you send transactions to the CCIP router on Ethereum and AVAX or WAVAX when you send transactions to the CCIP router on Avalanche.
## [Before you begin](https://docs.chain.link/ccip/getting-started/evm\#before-you-begin)
- If you are new to smart contract development, learn how to [Deploy Your First Smart Contract](https://docs.chain.link/quickstarts/deploy-your-first-contract) so you are familiar with the tools that are necessary for this guide:
- The [Solidity](https://soliditylang.org/) programming language
- The [MetaMask](https://metamask.io/) wallet
- The [Remix](https://remix.ethereum.org/) development environment
- Acquire testnet funds. This guide requires testnet AVAX and LINK on _Avalanche Fuji_. It also requires testnet ETH on _Ethereum Sepolia_. If you need to use different networks, you can find more faucets on the [LINK Token Contracts](https://docs.chain.link/resources/link-token-contracts) page.
- Go to [faucets.chain.link](https://faucets.chain.link/) to get your testnet tokens.
- Learn how to [Fund your contract with LINK](https://docs.chain.link/resources/fund-your-contract).
## [Deploy the sender contract](https://docs.chain.link/ccip/getting-started/evm\#deploy-the-sender-contract)
Deploy the `Sender.sol` contract on _Avalanche Fuji_. To see a detailed explanation of this contract, read the [Code Explanation](https://docs.chain.link/ccip/getting-started/evm#sender-code) section.
1. [Open the Sender.sol contract](https://remix.ethereum.org/#url=https://docs.chain.link/samples/CCIP/Sender.sol) in Remix.
[Open in Remix](https://remix.ethereum.org/#url=https://docs.chain.link/samples/CCIP/Sender.sol&autoCompile=true) [What is Remix?](https://docs.chain.link/getting-started/conceptual-overview#what-is-remix)
2. Compile the contract.
3. Deploy the sender contract on _Avalanche Fuji_:
1. Open MetaMask and select the _Avalanche Fuji_ network.
2. In Remix under the **Deploy & Run Transactions** tab, select _Injected Provider - MetaMask_ in the **Environment** list. Remix will use the MetaMask wallet to communicate with _Avalanche Fuji_.
3. Under the **Deploy** section, fill in the router address and the LINK token contract addresses for your specific blockchain. You can find both of these addresses on the [CCIP Directory](https://docs.chain.link/ccip/directory). The LINK token contract address is also listed on the [LINK Token Contracts](https://docs.chain.link/resources/link-token-contracts) page. For _Avalanche Fuji_, the router address is `0xF694E193200268f9a4868e4Aa017A0118C9a8177` and the LINK address is `0x0b9d5D9136855f6FEc3c0993feE6E9CE8a297846`.
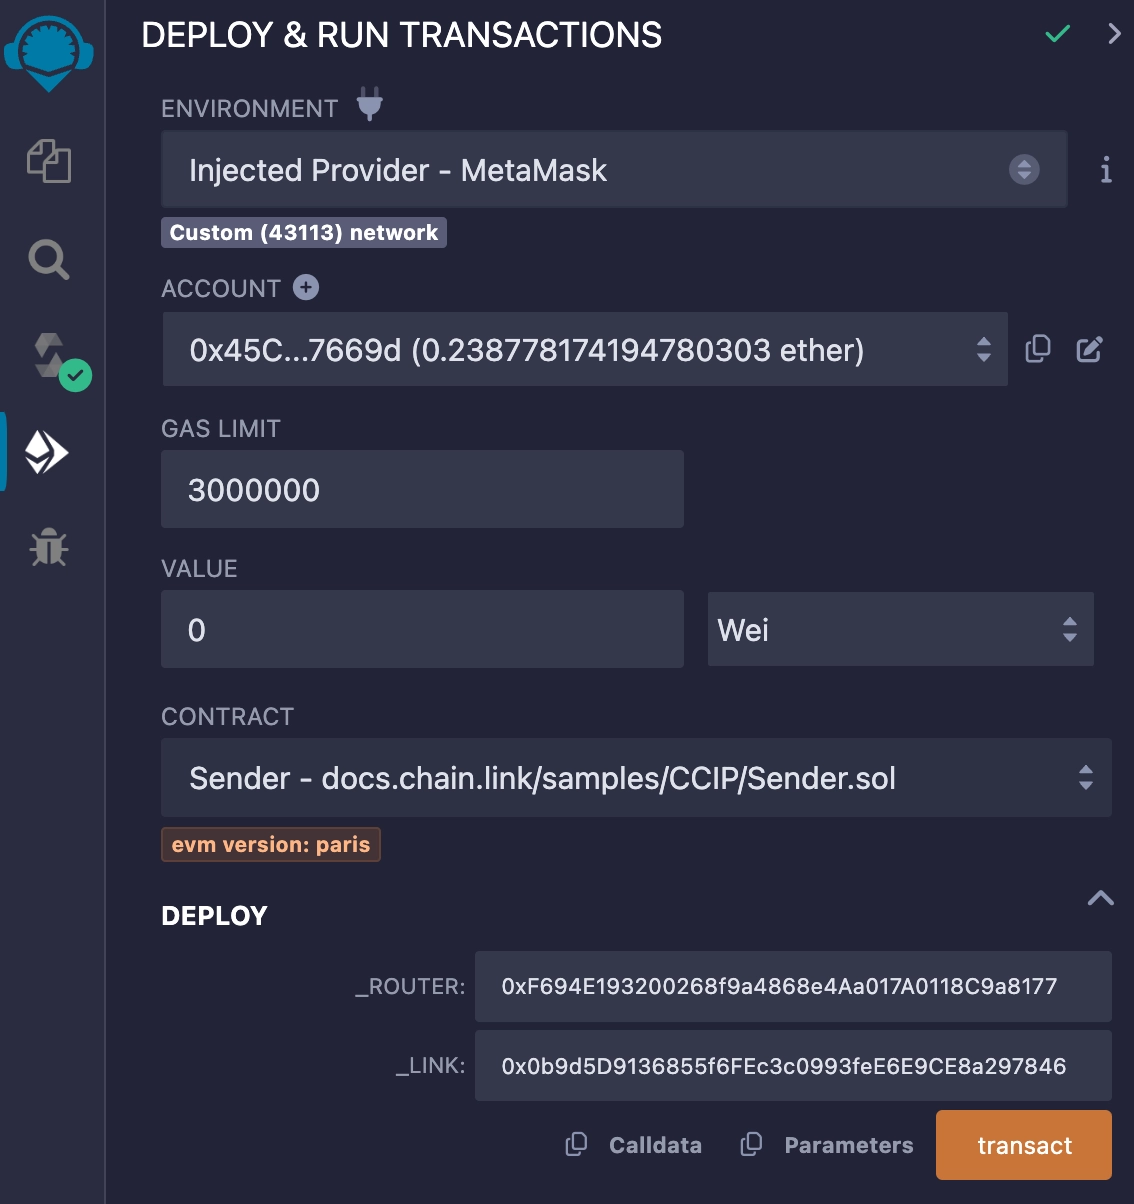
4. Click the **transact** button to deploy the contract. MetaMask prompts you to confirm the transaction. Check the transaction details to make sure you are deploying the contract to _Avalanche Fuji_.
5. After you confirm the transaction, the contract address appears in the **Deployed Contracts** list. Copy your contract address.
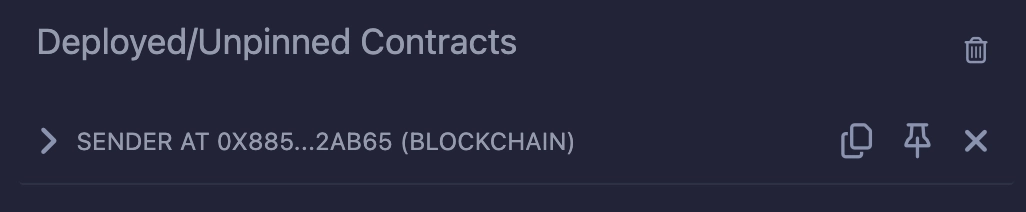
6. Open MetaMask and send `70` LINK to the contract address that you copied. Your contract will pay CCIP fees in LINK.
**Note:** This transaction fee is significantly higher than normal due to gas spikes on Sepolia. To run this example, you can get additional testnet LINK
from [faucets.chain.link](https://faucets.chain.link/) or use a supported testnet other than Sepolia.
## [Deploy the receiver contract](https://docs.chain.link/ccip/getting-started/evm\#deploy-the-receiver-contract)
Deploy the receiver contract on _Ethereum Sepolia_. You will use this contract to receive data from the sender that you deployed on _Avalanche Fuji_. To see a detailed explanation of this contract, read the [Code Explanation](https://docs.chain.link/ccip/getting-started/evm#receiver-code) section.
1. [Open the Receiver.sol](https://remix.ethereum.org/#url=https://docs.chain.link/samples/CCIP/Receiver.sol) contract in Remix.
[Open in Remix](https://remix.ethereum.org/#url=https://docs.chain.link/samples/CCIP/Receiver.sol&autoCompile=true) [What is Remix?](https://docs.chain.link/getting-started/conceptual-overview#what-is-remix)
2. Compile the contract.
3. Deploy the receiver contract on _Ethereum Sepolia_:
1. Open MetaMask and select the _Ethereum Sepolia_ network.
2. In Remix under the **Deploy & Run Transactions** tab, make sure the **Environment** is still set to _Injected Provider - MetaMask_.
3. Under the **Deploy** section, fill in the router address field. For _Ethereum Sepolia_, the Router address is `0x0BF3dE8c5D3e8A2B34D2BEeB17ABfCeBaf363A59`. You can find the addresses for each network on the [CCIP Directory](https://docs.chain.link/ccip/directory).
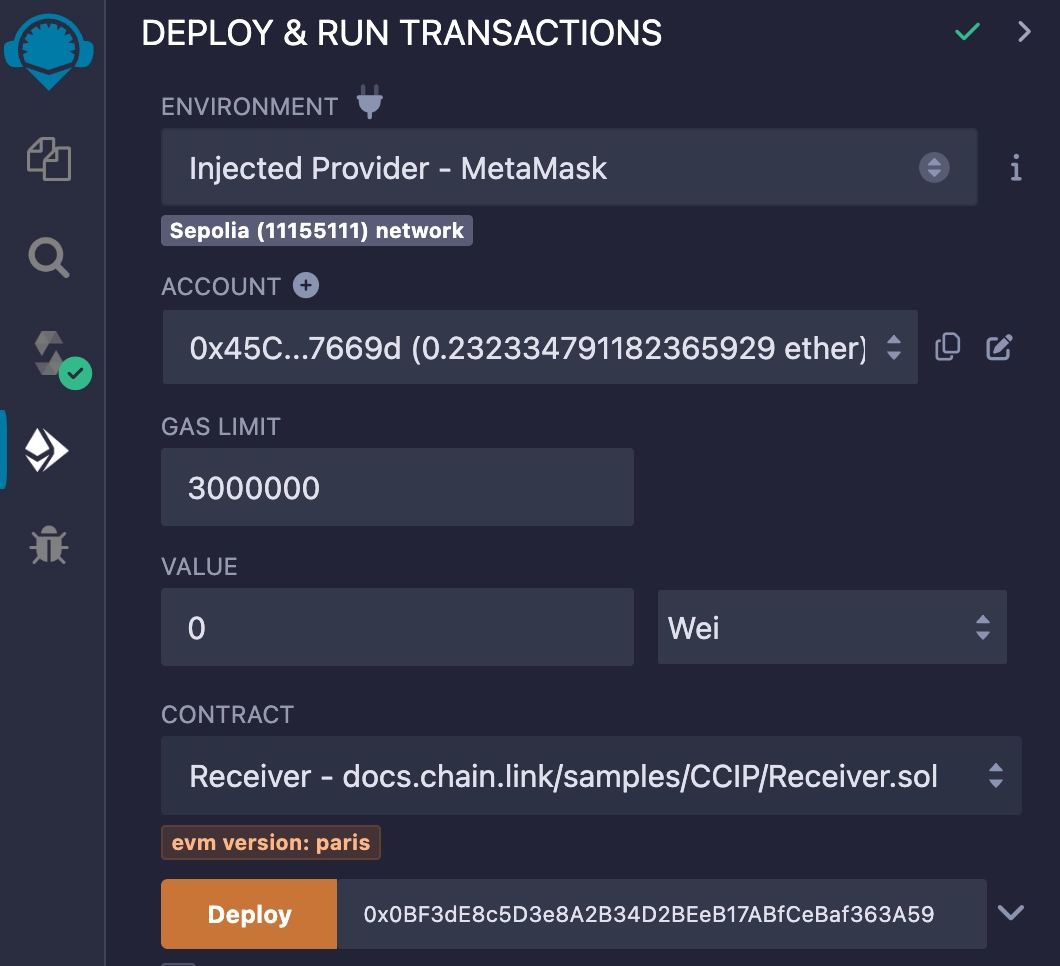
4. Click the **Deploy** button to deploy the contract. MetaMask prompts you to confirm the transaction. Check the transaction details to make sure you are deploying the contract to _Ethereum Sepolia_.
5. After you confirm the transaction, the contract address appears as the second item in the **Deployed Contracts** list. Copy this contract address.
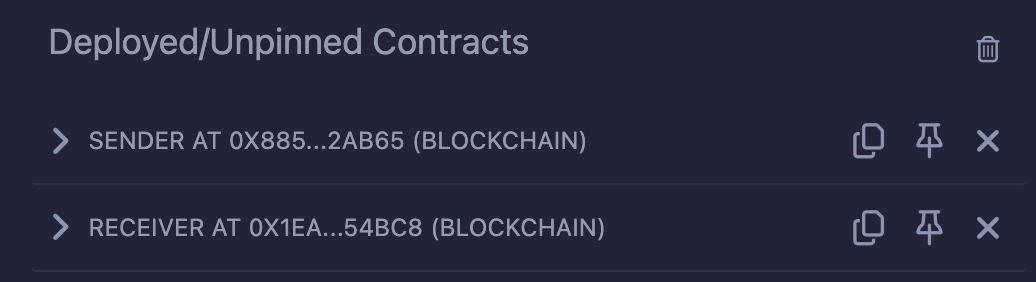
You now have one _sender_ contract on _Avalanche Fuji_ and one _receiver_ contract on _Ethereum Sepolia_. You sent `70` LINK to the _sender_ contract to pay the CCIP fees. Next, send data from the sender contract to the receiver contract.
## [Send data](https://docs.chain.link/ccip/getting-started/evm\#send-data)
Send a `Hello World!` string from your contract on _Avalanche Fuji_ to the contract you deployed on _Ethereum Sepolia_:
1. Open MetaMask and select the _Avalanche Fuji_ network.
2. In Remix under the **Deploy & Run Transactions** tab, expand the first contract in the **Deployed Contracts** section.
3. Expand the **sendMessage** function and fill in the following arguments:
| Argument | Description | Value ( _Ethereum Sepolia_) |
| --- | --- | --- |
| destinationChainSelector | CCIP Chain identifier of the target blockchain. You can find each network's chain selector on the [CCIP Directory](https://docs.chain.link/ccip/directory) | `16015286601757825753` |
| receiver | The destination smart contract address | Your deployed contract address |
| text | Any `string` | `Hello World!` |
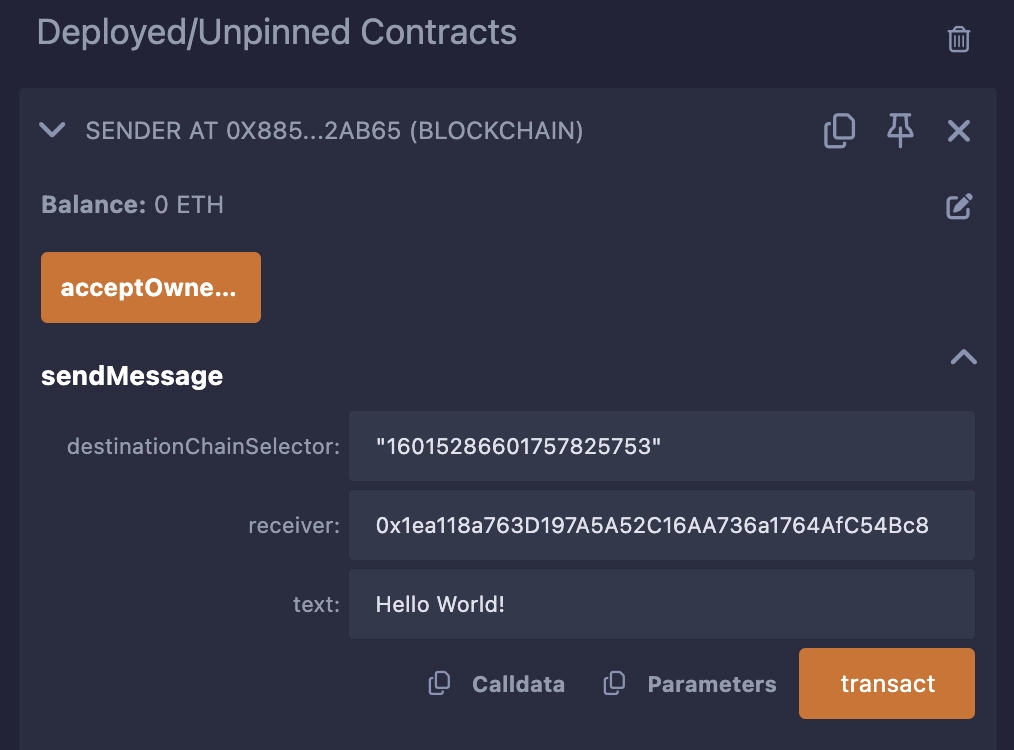
4. Click the **transact** button to run the function. MetaMask prompts you to confirm the transaction.
5. After the transaction is successful, note the transaction hash. Here is an [example](https://testnet.snowtrace.io/tx/0x113933ec9f1b2e795a1e2f564c9d452db92d3e9a150545712687eb546916e633) of a successful transaction on _Avalanche Fuji_.
After the transaction is finalized on the source chain, it will take a few minutes for CCIP to deliver the data to _Ethereum Sepolia_ and call the `ccipReceive` function on your receiver contract. You can use the [CCIP explorer](https://ccip.chain.link/) to see the status of your CCIP transaction and then read data stored by your receiver contract.
1. Open the [CCIP explorer](https://ccip.chain.link/) and use the transaction hash that you copied to search for your cross-chain transaction. The explorer provides several details about your request.
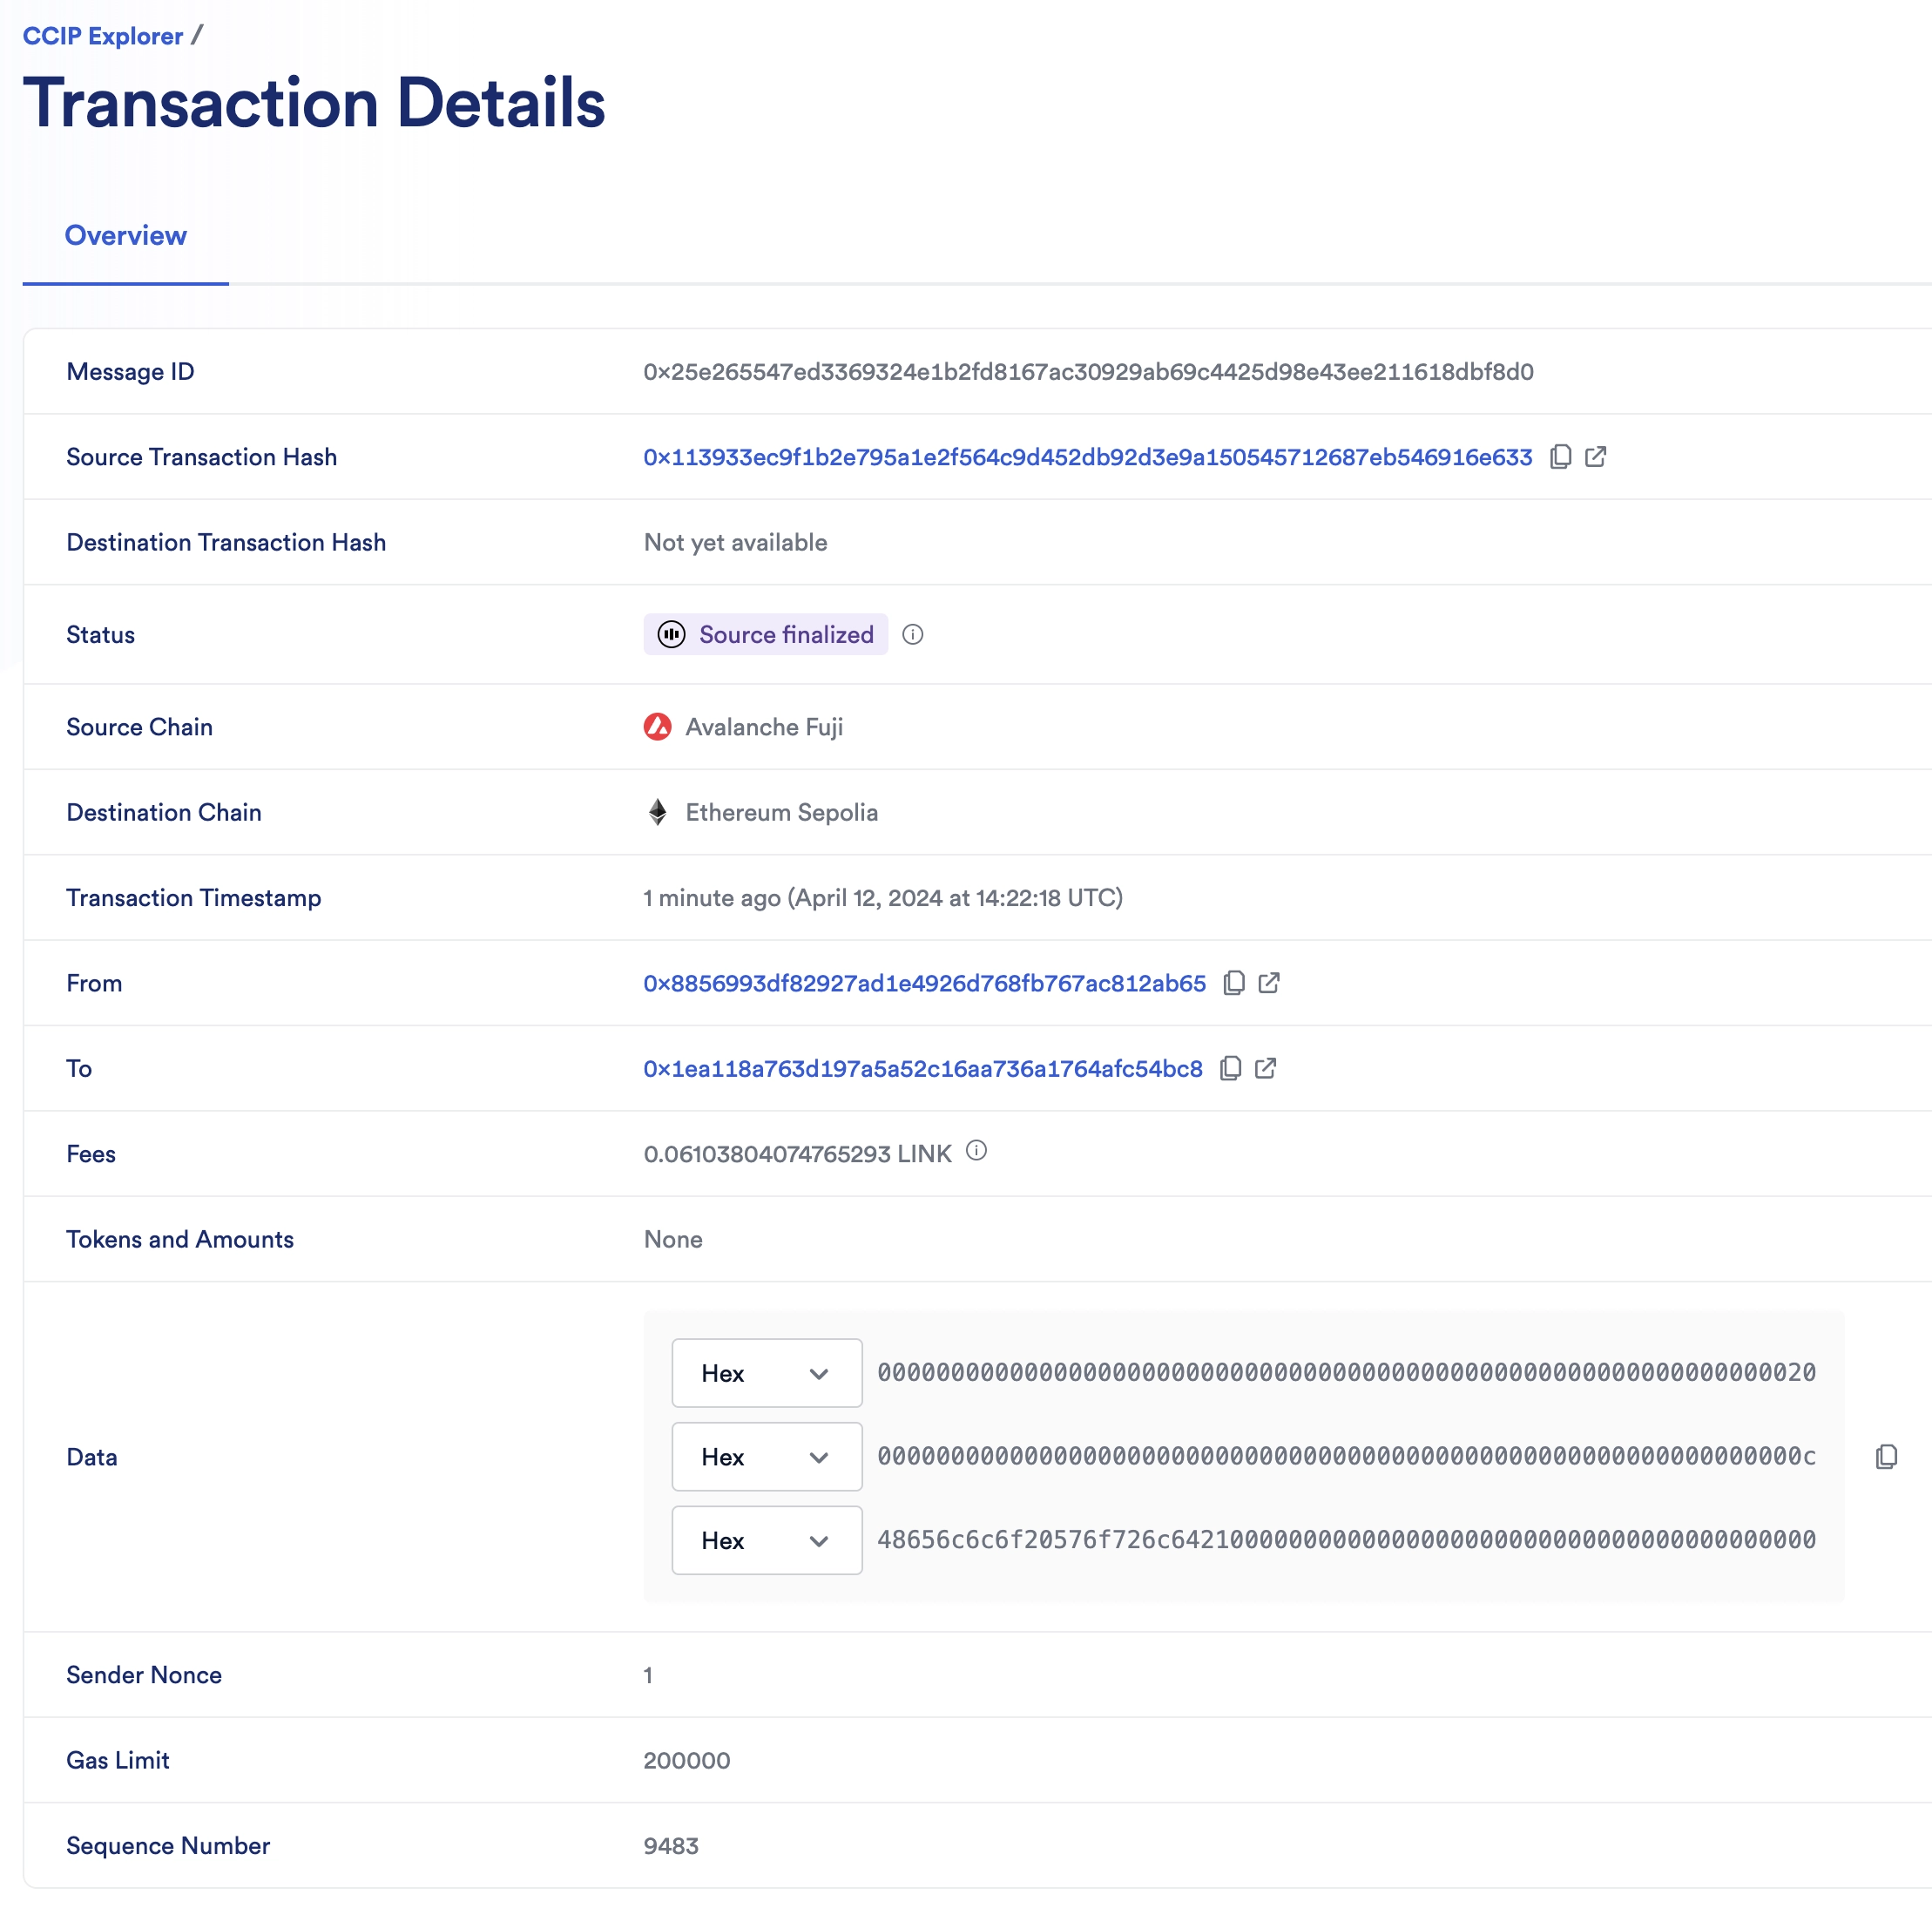
2. When the status of the transaction is marked with a "Success" status, the CCIP transaction and the destination transaction are complete.
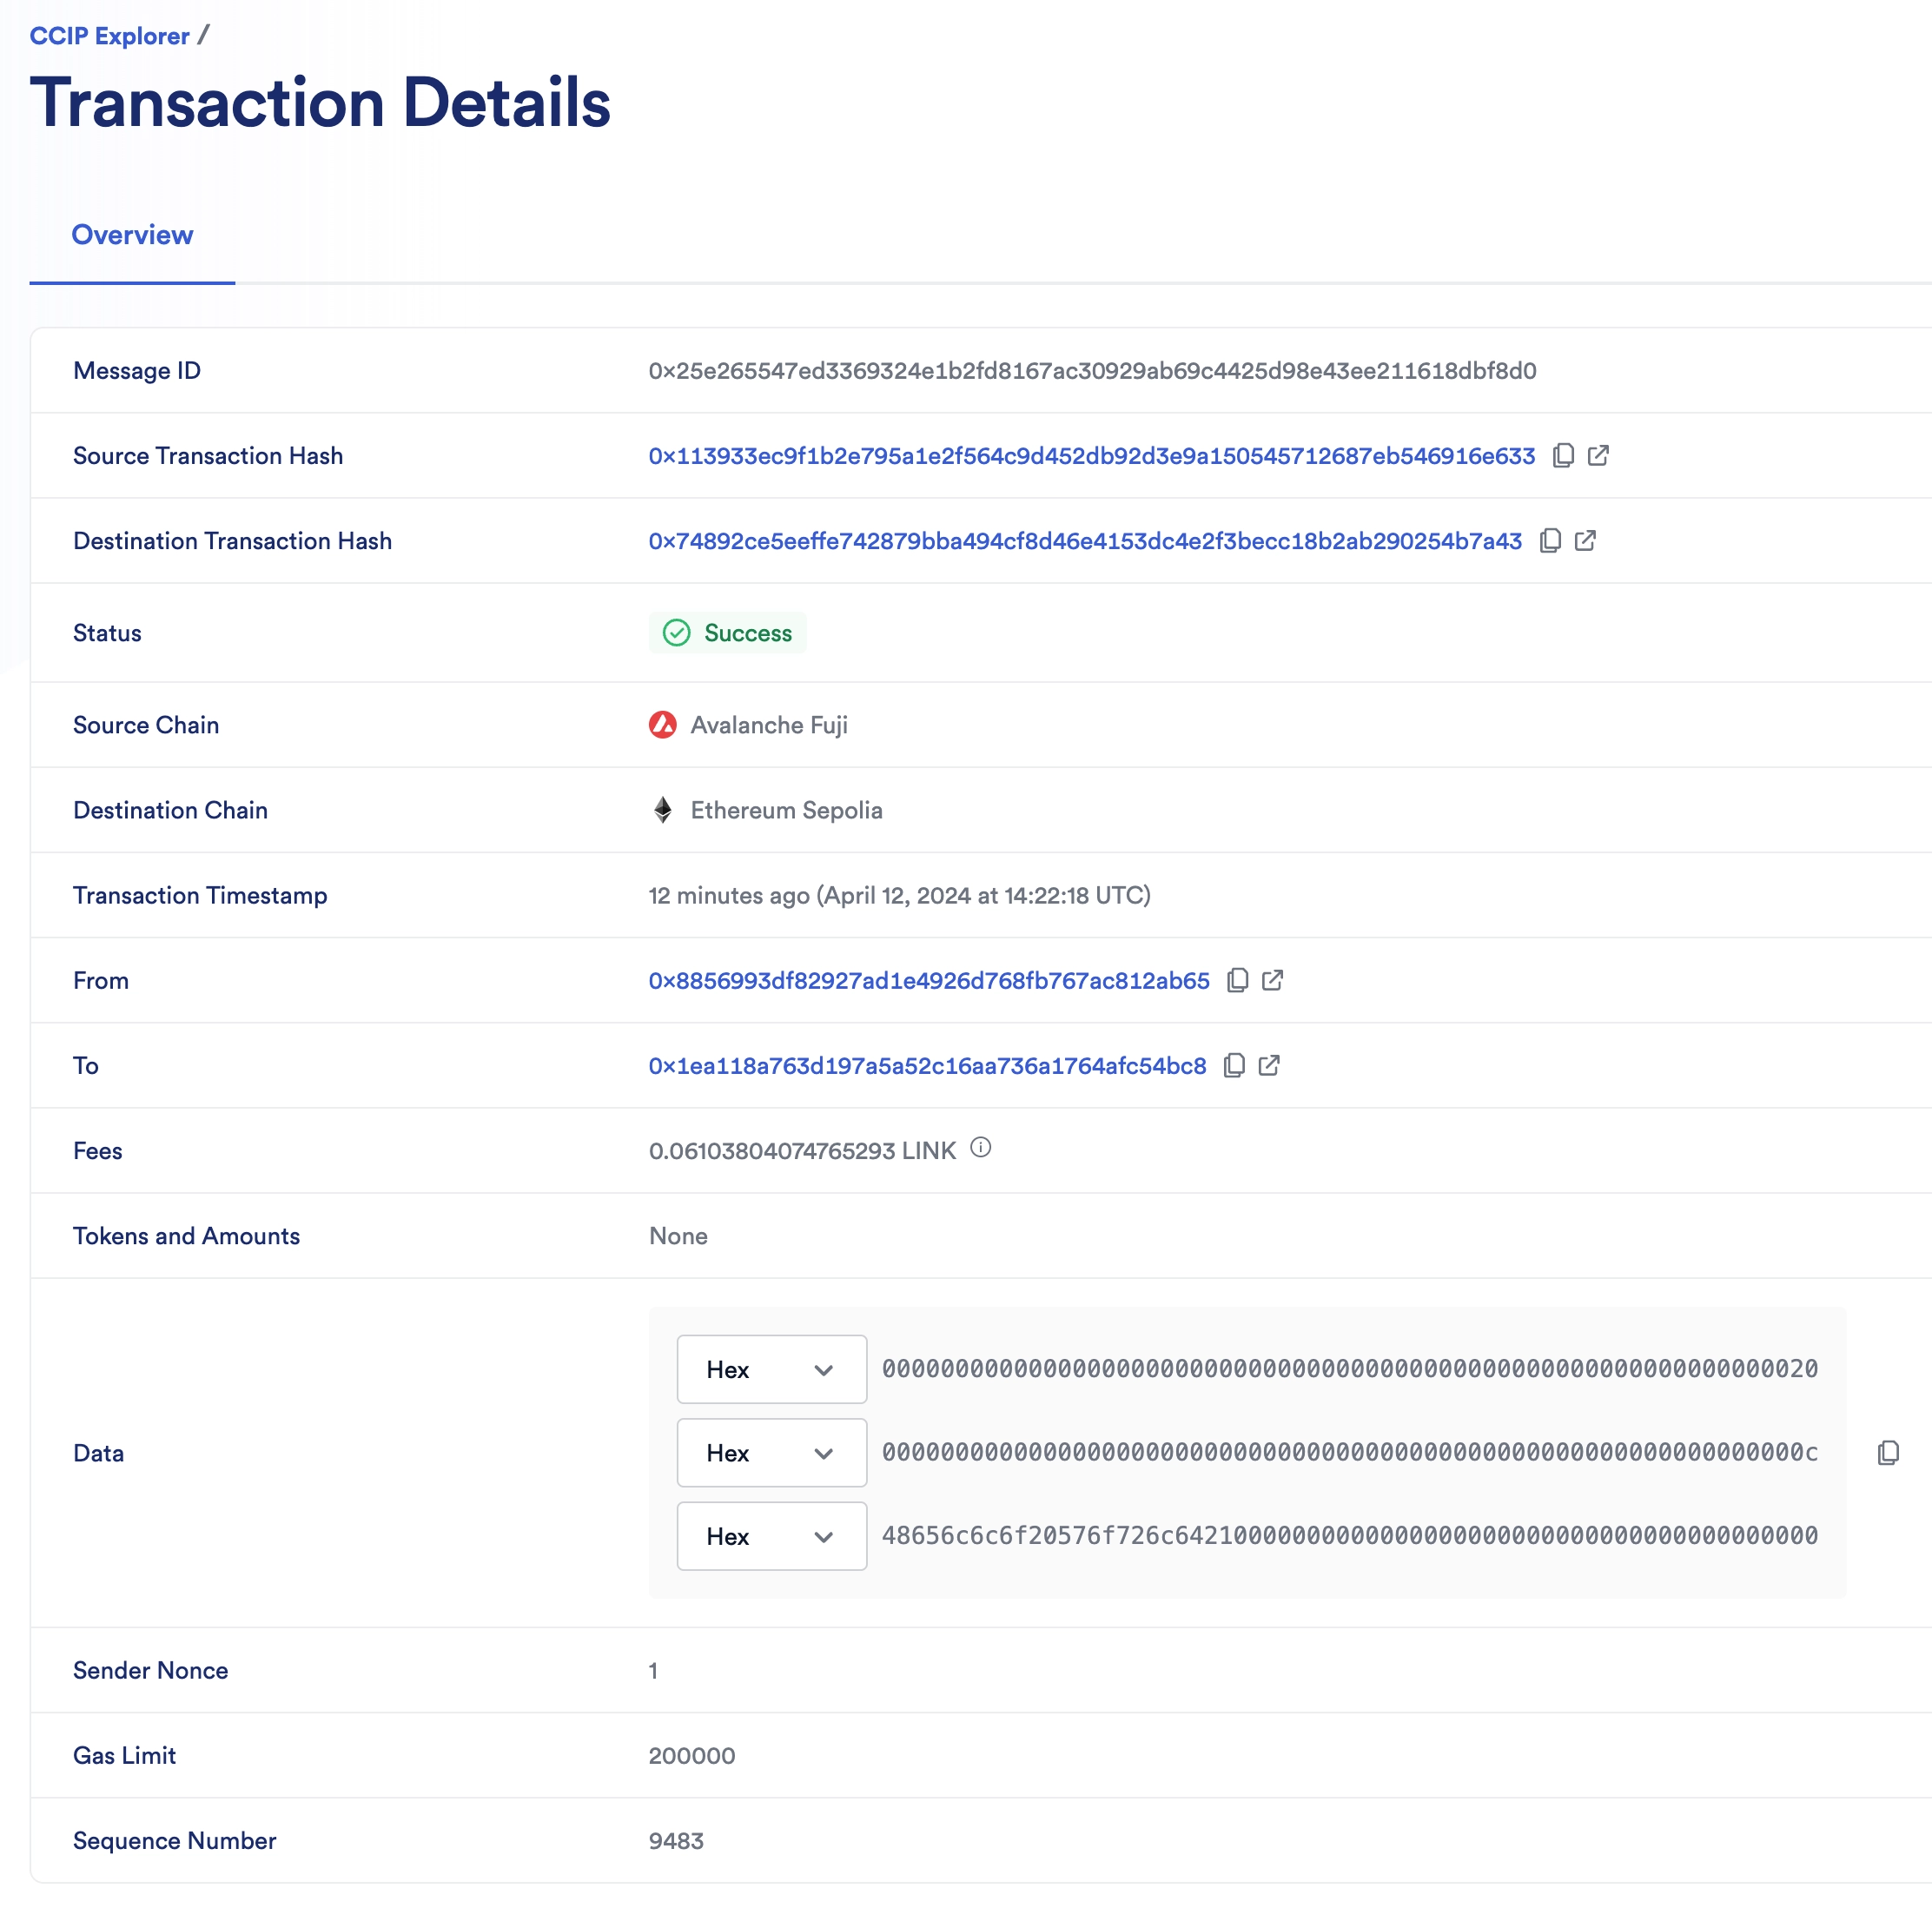
## [Read data](https://docs.chain.link/ccip/getting-started/evm\#read-data)
Read data stored by the receiver contract on _Ethereum Sepolia_:
1. Open MetaMask and select the _Ethereum Sepolia_ network.
2. In Remix under the **Deploy & Run Transactions** tab, expand the receiver contract deployed on _Ethereum Sepolia_.
3. Click the **getLastReceivedMessageDetails** function button to read the stored data. In this example, it is "Hello World!".
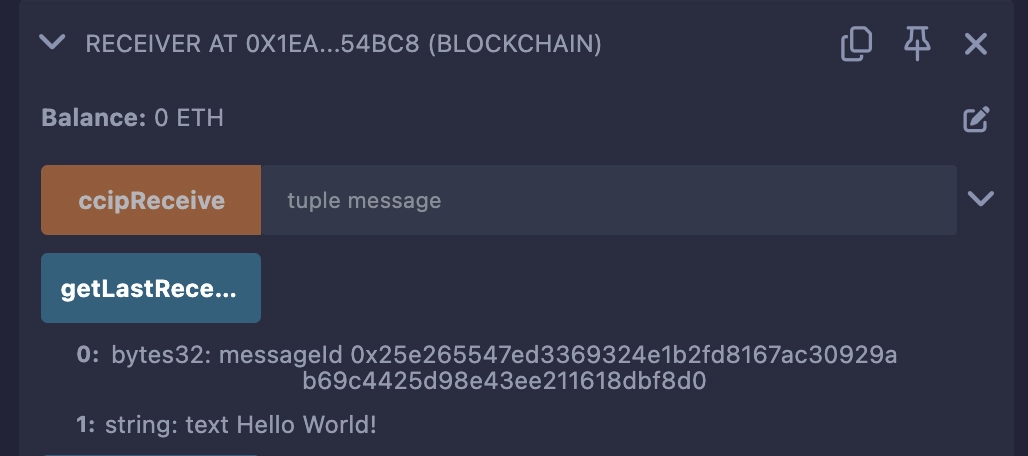
Congratulations! You just sent your first cross-chain data using CCIP. Next, examine the example code to learn how this contract works.
## [Examine the example code](https://docs.chain.link/ccip/getting-started/evm\#examine-the-example-code)
### [Sender code](https://docs.chain.link/ccip/getting-started/evm\#sender-code)
The smart contract in this tutorial is designed to interact with CCIP to send data. The contract code includes comments to clarify the various functions, events, and underlying logic. However, this section explains the key elements. You can see the full contract code below.

```solidity
// SPDX-License-Identifier: MIT
pragma solidity 0.8.24;
import {IRouterClient} from "@chainlink/contracts-ccip/contracts/interfaces/IRouterClient.sol";
import {OwnerIsCreator} from "@chainlink/contracts/src/v0.8/shared/access/OwnerIsCreator.sol";
import {Client} from "@chainlink/contracts-ccip/contracts/libraries/Client.sol";
import {LinkTokenInterface} from "@chainlink/contracts/src/v0.8/shared/interfaces/LinkTokenInterface.sol";
/**
* THIS IS AN EXAMPLE CONTRACT THAT USES HARDCODED VALUES FOR CLARITY.
* THIS IS AN EXAMPLE CONTRACT THAT USES UN-AUDITED CODE.
* DO NOT USE THIS CODE IN PRODUCTION.
*/
/// @title - A simple contract for sending string data across chains.
contract Sender is OwnerIsCreator {
// Custom errors to provide more descriptive revert messages.
error NotEnoughBalance(uint256 currentBalance, uint256 calculatedFees); // Used to make sure contract has enough balance.
// Event emitted when a message is sent to another chain.
event MessageSent(
bytes32 indexed messageId, // The unique ID of the CCIP message.
uint64 indexed destinationChainSelector, // The chain selector of the destination chain.
address receiver, // The address of the receiver on the destination chain.
string text, // The text being sent.
address feeToken, // the token address used to pay CCIP fees.
uint256 fees // The fees paid for sending the CCIP message.
);
IRouterClient private s_router;
LinkTokenInterface private s_linkToken;
/// @notice Constructor initializes the contract with the router address.
/// @param _router The address of the router contract.
/// @param _link The address of the link contract.
constructor(address _router, address _link) {
s_router = IRouterClient(_router);
s_linkToken = LinkTokenInterface(_link);
}
/// @notice Sends data to receiver on the destination chain.
/// @dev Assumes your contract has sufficient LINK.
/// @param destinationChainSelector The identifier (aka selector) for the destination blockchain.
/// @param receiver The address of the recipient on the destination blockchain.
/// @param text The string text to be sent.
/// @return messageId The ID of the message that was sent.
function sendMessage(
uint64 destinationChainSelector,
address receiver,
string calldata text
) external onlyOwner returns (bytes32 messageId) {
// Create an EVM2AnyMessage struct in memory with necessary information for sending a cross-chain message
Client.EVM2AnyMessage memory evm2AnyMessage = Client.EVM2AnyMessage({
receiver: abi.encode(receiver), // ABI-encoded receiver address
data: abi.encode(text), // ABI-encoded string
tokenAmounts: new Client.EVMTokenAmount[](0), // Empty array indicating no tokens are being sent
extraArgs: Client._argsToBytes(
// Additional arguments, setting gas limit and allowing out-of-order execution.
// Best Practice: For simplicity, the values are hardcoded. It is advisable to use a more dynamic approach
// where you set the extra arguments off-chain. This allows adaptation depending on the lanes, messages,
// and ensures compatibility with future CCIP upgrades. Read more about it here: https://docs.chain.link/ccip/concepts/best-practices/evm#using-extraargs
Client.GenericExtraArgsV2({
gasLimit: 200_000, // Gas limit for the callback on the destination chain
allowOutOfOrderExecution: true // Allows the message to be executed out of order relative to other messages from the same sender
})
),
// Set the feeToken address, indicating LINK will be used for fees
feeToken: address(s_linkToken)
});
// Get the fee required to send the message
uint256 fees = s_router.getFee(
destinationChainSelector,
evm2AnyMessage
);
if (fees > s_linkToken.balanceOf(address(this)))
revert NotEnoughBalance(s_linkToken.balanceOf(address(this)), fees);
// approve the Router to transfer LINK tokens on contract's behalf. It will spend the fees in LINK
s_linkToken.approve(address(s_router), fees);
// Send the message through the router and store the returned message ID
messageId = s_router.ccipSend(destinationChainSelector, evm2AnyMessage);
// Emit an event with message details
emit MessageSent(
messageId,
destinationChainSelector,
receiver,
text,
address(s_linkToken),
fees
);
// Return the message ID
return messageId;
}
}
```
[Open in Remix](https://remix.ethereum.org/#url=https://docs.chain.link/samples/CCIP/Sender.sol&autoCompile=true) [What is Remix?](https://docs.chain.link/getting-started/conceptual-overview#what-is-remix)
#### [Initializing the contract](https://docs.chain.link/ccip/getting-started/evm\#initializing-the-contract)
When deploying the contract, you define the router address and the LINK contract address of the blockchain where you choose to deploy the contract.
The router address provides functions that are required for this example:
- The `getFee` [function](https://docs.chain.link/ccip/api-reference/evm/v1.6.0/i-router-client#getfee) to estimate the CCIP fees.
- The `ccipSend` [function](https://docs.chain.link/ccip/api-reference/evm/v1.6.0/i-router-client#ccipsend) to send CCIP messages.
#### [Sending data](https://docs.chain.link/ccip/getting-started/evm\#sending-data)
The `sendMessage` function completes several operations:
1. Construct a CCIP-compatible message using the `EVM2AnyMessage` [struct](https://docs.chain.link/ccip/api-reference/evm/v1.6.0/client#evm2anymessage):
- The `receiver` address is encoded in bytes format to accommodate non-EVM destination blockchains with distinct address formats. The encoding is achieved through [abi.encode](https://docs.soliditylang.org/en/develop/abi-spec.html).
- The `data` is encoded from a string text to bytes using [abi.encode](https://docs.soliditylang.org/en/develop/abi-spec.html).
- The `tokenAmounts` is an array. Each element comprises a [struct](https://docs.chain.link/ccip/api-reference/evm/v1.6.0/client#evmtokenamount) that contains the token address and amount. In this example, the array is empty because no tokens are sent.
- The `extraArgs` specify the `gasLimit` for relaying the CCIP message to the recipient contract on the destination blockchain. In this example, the `gasLimit` is set to `200000`.
- The `feeToken` designates the token address used for CCIP fees. Here, `address(linkToken)` signifies payment in LINK.
2. Compute the fees by invoking the router's `getFee` [function](https://docs.chain.link/ccip/api-reference/evm/v1.6.0/i-router-client#getfee).
3. Ensure that your contract balance in LINK is enough to cover the fees.
4. Grant the router contract permission to deduct the fees from the contract's LINK balance.
5. Dispatch the CCIP message to the destination chain by executing the router's `ccipSend` [function](https://docs.chain.link/ccip/api-reference/evm/v1.6.0/i-router-client#ccipsend).
### [Receiver code](https://docs.chain.link/ccip/getting-started/evm\#receiver-code)
The smart contract in this tutorial is designed to interact with CCIP to receive data. The contract code includes comments to clarify the various functions, events, and underlying logic. However, this section explains the key elements. You can see the full contract code below.

```solidity
// SPDX-License-Identifier: MIT
pragma solidity 0.8.24;
import {Client} from "@chainlink/contracts-ccip/contracts/libraries/Client.sol";
import {CCIPReceiver} from "@chainlink/contracts-ccip/contracts/applications/CCIPReceiver.sol";
/**
* THIS IS AN EXAMPLE CONTRACT THAT USES HARDCODED VALUES FOR CLARITY.
* THIS IS AN EXAMPLE CONTRACT THAT USES UN-AUDITED CODE.
* DO NOT USE THIS CODE IN PRODUCTION.
*/
/// @title - A simple contract for receiving string data across chains.
contract Receiver is CCIPReceiver {
// Event emitted when a message is received from another chain.
event MessageReceived(
bytes32 indexed messageId, // The unique ID of the message.
uint64 indexed sourceChainSelector, // The chain selector of the source chain.
address sender, // The address of the sender from the source chain.
string text // The text that was received.
);
bytes32 private s_lastReceivedMessageId; // Store the last received messageId.
string private s_lastReceivedText; // Store the last received text.
/// @notice Constructor initializes the contract with the router address.
/// @param router The address of the router contract.
constructor(address router) CCIPReceiver(router) {}
/// handle a received message
function _ccipReceive(
Client.Any2EVMMessage memory any2EvmMessage
) internal override {
s_lastReceivedMessageId = any2EvmMessage.messageId; // fetch the messageId
s_lastReceivedText = abi.decode(any2EvmMessage.data, (string)); // abi-decoding of the sent text
emit MessageReceived(
any2EvmMessage.messageId,
any2EvmMessage.sourceChainSelector, // fetch the source chain identifier (aka selector)
abi.decode(any2EvmMessage.sender, (address)), // abi-decoding of the sender address,
abi.decode(any2EvmMessage.data, (string))
);
}
/// @notice Fetches the details of the last received message.
/// @return messageId The ID of the last received message.
/// @return text The last received text.
function getLastReceivedMessageDetails()
external
view
returns (bytes32 messageId, string memory text)
{
return (s_lastReceivedMessageId, s_lastReceivedText);
}
}
```
[Open in Remix](https://remix.ethereum.org/#url=https://docs.chain.link/samples/CCIP/Receiver.sol&autoCompile=true) [What is Remix?](https://docs.chain.link/getting-started/conceptual-overview#what-is-remix)
#### [Initializing the contract](https://docs.chain.link/ccip/getting-started/evm\#initializing-the-contract-1)
When you deploy the contract, you define the router address. The receiver contract inherits from the [CCIPReceiver.sol](https://docs.chain.link/ccip/api-reference/evm/v1.6.0/ccip-receiver) contract, which uses the router address.
#### [Receiving data](https://docs.chain.link/ccip/getting-started/evm\#receiving-data)
On the destination blockchain:
1. The CCIP Router invokes the `ccipReceive` [function](https://docs.chain.link/ccip/api-reference/evm/v1.6.0/ccip-receiver#ccipreceive). **Note**: This function is protected by the `onlyRouter` [modifier](https://docs.chain.link/ccip/api-reference/evm/v1.6.0/ccip-receiver#onlyrouter), which ensures that only the router can call the receiver contract.
2. The `ccipReceive` [function](https://docs.chain.link/ccip/api-reference/evm/v1.6.0/ccip-receiver#ccipreceive) calls an internal function `_ccipReceive` [function](https://docs.chain.link/ccip/api-reference/evm/v1.6.0/ccip-receiver#_ccipreceive). The receiver contract implements this function.
3. This `_ccipReceive` [function](https://docs.chain.link/ccip/api-reference/evm/v1.6.0/ccip-receiver#_ccipreceive) expects an `Any2EVMMessage` [struct](https://docs.chain.link/ccip/api-reference/evm/v1.6.0/client#any2evmmessage) that contains the following values:
- The CCIP `messageId`.
- The `sourceChainSelector`.
- The `sender` address in bytes format. The sender is a contract deployed on an EVM-compatible blockchain, so the address is decoded from bytes to an Ethereum address using the [ABI specification](https://docs.soliditylang.org/en/v0.8.20/abi-spec.html).
- The `data` is also in bytes format. A `string` is expected, so the data is decoded from bytes to a string using the [ABI specification](https://docs.soliditylang.org/en/v0.8.20/abi-spec.html).
## What's next
- [\> Learn how to transfer tokens](https://docs.chain.link/ccip/tutorials/evm/transfer-tokens-from-contract)
- [\> Learn how to transfer tokens and send data in a single CCIP transaction](https://docs.chain.link/ccip/tutorials/evm/programmable-token-transfers)
- [\> Transfer Tokens Between EOAs](https://docs.chain.link/ccip/tutorials/evm/offchain/transfer-tokens-from-eoa)
- [\> Learn how to send arbitrary data over CCIP](https://docs.chain.link/ccip/tutorials/evm/send-arbitrary-data)
- [\> CCIP Directory](https://docs.chain.link/ccip/directory)
## Get the latest Chainlink content straight to your inbox.
Email Address
## Cross-Chain Communication Tutorials
[iframe](https://www.googletagmanager.com/ns.html?id=GTM-N6DQ47T)
Chainlink CCIP is now officially live on Solana. [View lanes and tokens.](https://docs.chain.link/ccip/directory/mainnet/chain/solana-mainnet?utm_medium=referral&utm_source=chainlink-docs&utm_campaign=solana-ccip)
On this page
# [CCIP Tutorials: SVM to EVM](https://docs.chain.link/ccip/tutorials/svm/source\#overview)
This section provides comprehensive guides and tutorials for implementing cross-chain communication from Solana Virtual Machine (SVM) chains to Ethereum Virtual Machine (EVM) chains using Chainlink's Cross-Chain Interoperability Protocol (CCIP).
## [Getting Started](https://docs.chain.link/ccip/tutorials/svm/source\#getting-started)
Before implementing specific use cases, it's important to set up your environment and understand the fundamental concepts:
- [Building CCIP Messages from SVM to EVM](https://docs.chain.link/ccip/tutorials/svm/source/build-messages) \- Learn the core message structure, required parameters, and implementation details for all message types
- [Prerequisites for SVM to EVM Tutorials](https://docs.chain.link/ccip/tutorials/svm/source/prerequisites) \- Set up your development environment with Solana CLI tools, wallets, token accounts, and delegations
## [Tutorials by Use Case](https://docs.chain.link/ccip/tutorials/svm/source\#tutorials-by-use-case)
Depending on your specific needs, choose the appropriate tutorial:
- [Token Transfers](https://docs.chain.link/ccip/tutorials/svm/source/token-transfers) \- Send tokens from Solana to EVM chains without executing code on the destination
## Get the latest Chainlink content straight to your inbox.
Email Address
## Chainlink CCIP Offchain Tutorials
[iframe](https://www.googletagmanager.com/ns.html?id=GTM-N6DQ47T)
Chainlink CCIP is now officially live on Solana. [View lanes and tokens.](https://docs.chain.link/ccip/directory/mainnet/chain/solana-mainnet?utm_medium=referral&utm_source=chainlink-docs&utm_campaign=solana-ccip)
On this page
# [CCIP Offchain tutorials](https://docs.chain.link/ccip/tutorials/evm/offchain\#overview)
These tutorials focus on direct interaction between Externally Owned Accounts (EOAs) and the [CCIP Router](https://docs.chain.link/ccip/concepts/architecture/onchain/evm/components#router).
## [Tutorials](https://docs.chain.link/ccip/tutorials/evm/offchain\#tutorials)
- [Transfer Tokens between EOAs](https://docs.chain.link/ccip/tutorials/evm/offchain/transfer-tokens-from-eoa): Learn how to transfer tokens between Externally Owned Accounts (EOAs) across different blockchains, using Chainlink CCIP.
- [Checking CCIP Message Status Off-Chain](https://docs.chain.link/ccip/tutorials/evm/offchain/get-status-offchain): Learn how to verify the status of Chainlink CCIP messages offchain using JavaScript.
## Get the latest Chainlink content straight to your inbox.
Email Address
## Chainlink CCIP API
[iframe](https://www.googletagmanager.com/ns.html?id=GTM-N6DQ47T)
Chainlink CCIP is now officially live on Solana. [View lanes and tokens.](https://docs.chain.link/ccip/directory/mainnet/chain/solana-mainnet?utm_medium=referral&utm_source=chainlink-docs&utm_campaign=solana-ccip)
On this page
# [Chainlink CCIP API Reference Documentation (EVM)](https://docs.chain.link/ccip/api-reference/evm\#overview)
## [Available Versions](https://docs.chain.link/ccip/api-reference/evm\#available-versions)
### [Latest Release](https://docs.chain.link/ccip/api-reference/evm\#latest-release)
- **[CCIP v1.6.0](https://docs.chain.link/ccip/api-reference/evm/v1.6.0/)** (Current Version)
- Added support for SVM (Solana Virtual Machine) chains
- **[CCIP v1.5.1](https://docs.chain.link/ccip/api-reference/evm/v1.5.1/)**
- Added support for tokens with different decimals across chains
- Enhanced token pool upgrades to support multiple active pools, ensuring in-flight messages remain deliverable during upgrades
- Added decimal validation and overflow protection
- Upgraded token pool access control from OwnerIsCreator to Ownable2StepMsgSender for better security
- Introduced BurnMintERC20 contract for easy token deployment and cross-chain expansion
- Configurable decimals and max supply
- Built-in CCIP admin support
- Role-based access control for minting and burning
### [Previous Versions](https://docs.chain.link/ccip/api-reference/evm\#previous-versions)
- **[CCIP v1.5.0](https://docs.chain.link/ccip/api-reference/evm/v1.5.0/)** (Legacy Version)
- Base implementation
- Cross-chain:
- Send arbitrary data
- Transfer tokens
- Programmable Token Transfers
- [Cross-Chain Token (CCT) standard](https://docs.chain.link/ccip/concepts/cross-chain-token/overview)
- ⚠️ We recommend upgrading to v1.5.1 for latest features
## [Documentation Structure](https://docs.chain.link/ccip/api-reference/evm\#documentation-structure)
Each version includes detailed documentation for:
- Core Contracts (Router, Receiver)
- Token Pool Implementations
- Registry Components
- Interface Definitions
- Library Definitions
- Error Handling
## Get the latest Chainlink content straight to your inbox.
Email Address
## CCIP Manual Execution
[iframe](https://www.googletagmanager.com/ns.html?id=GTM-N6DQ47T)
## Chainlink CCIP SDK
[iframe](https://www.googletagmanager.com/ns.html?id=GTM-N6DQ47T)
Chainlink CCIP is now officially live on Solana. [View lanes and tokens.](https://docs.chain.link/ccip/directory/mainnet/chain/solana-mainnet?utm_medium=referral&utm_source=chainlink-docs&utm_campaign=solana-ccip)
On this page
# [Using the CCIP JavaScript SDK](https://docs.chain.link/ccip/ccip-javascript-sdk\#overview)
The [CCIP JavaScript SDK](https://github.com/smartcontractkit/ccip-javascript-sdk/tree/main) is a tool that helps you to simplify management of cross-chain token transfers, and to integrate CCIP with the frontend of your own app.
The CCIP JavaScript SDK includes two packages:
- [`ccip-js`](https://github.com/smartcontractkit/ccip-javascript-sdk/blob/main/packages/ccip-js/README.md): A TypeScript library that provides a client for managing cross-chain token transfers that use CCIP routers. This package allows you to manage the steps you need to prepare before sending a CCIP message, as well as checking the transfer status afterward.
- [`ccip-react-components`](https://github.com/smartcontractkit/ccip-javascript-sdk/blob/main/packages/ccip-react-components/README.md): A set of prebuilt ready-to-use UI components built on top of `ccip-js`. This package includes the following features:
- Customize injected wallet providers (MetaMask and Coinbase Wallet)
- Specify preselected chains and tokens that will display as defaults when the component loads
- Customize the UI theme
- Configure allowlists and deny lists for which chains can be used, and which chains can be used as a sources or destinations for cross-chain transfers
Using both packages together, you can add a fully featured CCIP bridge to your app that can be styled to match your app design.
You can also use the `ccip-js` package on its own — for example, to build a backend application. The features of the CCIP-JS package include:
- _Token approvals_: Approve tokens for cross-chain transfers.
- _Allowance checks_: Retrieve the allowance for token transfers.
- _Rate limits_: Get rate refill limits for lanes.
- _Fee calculation_: Calculate the fee required for transfers.
- _Token transfers_: Transfer tokens across chains.
- _Transfer status_: Retrieve the status of a transfer by transaction hash.
## [Install and run the SDK](https://docs.chain.link/ccip/ccip-javascript-sdk\#install-and-run-the-sdk)
1. [Install `pnpm`](https://pnpm.io/installation).
2. Clone the `ccip-javascript-sdk` repo and navigate to the root directory of the `ccip-javascript-sdk` project:

```sh
git clone https://github.com/smartcontractkit/ccip-javascript-sdk.git && cd ccip-javascript-sdk
```
3. From the project root, run one of the following commands to install the SDK:
Install SDK and run example appInstall SDK only

```sh
pnpm install
pnpm build
pnpm dev-example
```

```sh
pnpm install
```
- `pnpm dev-example` runs an example NextJS app locally. Navigate to [http://localhost:3000](http://localhost:3000/) in your browser.
## [Run an example app](https://docs.chain.link/ccip/ccip-javascript-sdk\#run-an-example-app)
The example Next.js app included with the CCIP JavaScript SDK demonstrates the SDK's functionalities within an interactive web application, allowing you to see its features in action.
To get started:
1. Launch the app by using the following commands:

```sh
pnpm build
pnpm dev-example
```
2. In your browser, navigate to [http://localhost:3000/](http://localhost:3000/) to see the interactive app:
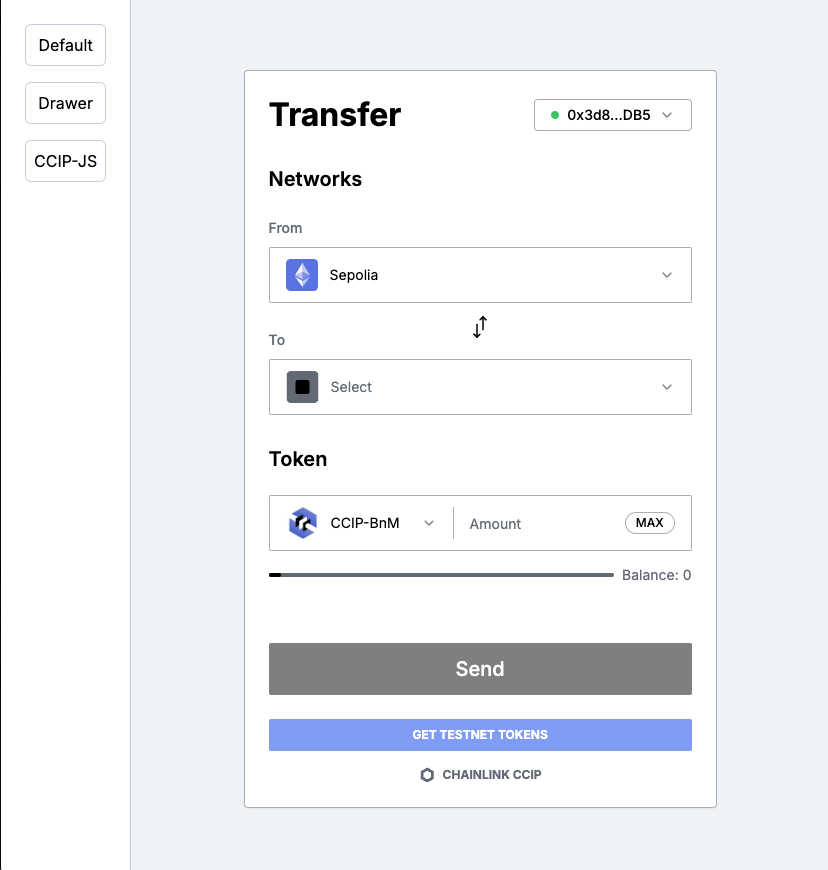
## [Review a basic UI example](https://docs.chain.link/ccip/ccip-javascript-sdk\#review-a-basic-ui-example)
This basic UI example shows a basic token list configuration with CCIP-BnM and CCIP-LnM test tokens, and it lists the testnets you want to use with each one. This example also includes a basic frontend configuration.
Review the reference documentation:
- Listing tokens in [`tokensList`](https://github.com/smartcontractkit/ccip-javascript-sdk/tree/main/packages/ccip-react-components#tokens)
- Configuring the frontend components in [`Config`](https://github.com/smartcontractkit/ccip-javascript-sdk/tree/main/packages/ccip-react-components#config)
- Configuring a [theme for frontend styling](https://github.com/smartcontractkit/ccip-javascript-sdk/tree/main/packages/ccip-react-components#theme)
Review the basic UI example below:

```ts
import 'ccip-react-components/dist/style.css';
import { CCIPWidget, Config, Token } from 'ccip-react-components';
import { sepolia, optimismSepolia } from 'viem/chains';
const tokensList: Token[] = [\
{\
symbol: 'CCIP-BnM',\
address: {\
[arbitrumSepolia.id]:'0xA8C0c11bf64AF62CDCA6f93D3769B88BdD7cb93D',\
[avalancheFuji.id]: '0xD21341536c5cF5EB1bcb58f6723cE26e8D8E90e4',\
[baseSepolia.id]: '0x88A2d74F47a237a62e7A51cdDa67270CE381555e',\
[bscTestnet.id]: '0xbFA2ACd33ED6EEc0ed3Cc06bF1ac38d22b36B9e9',\
[optimismSepolia.id]: '0x8aF4204e30565DF93352fE8E1De78925F6664dA7',\
[polygonAmoy.id]: '0xcab0EF91Bee323d1A617c0a027eE753aFd6997E4',\
[sepolia.id]: '0xFd57b4ddBf88a4e07fF4e34C487b99af2Fe82a05'\
},\
logoURL: 'https://smartcontract.imgix.net/tokens/ccip-bnm.webp?auto=compress%2Cformat',\
tags: ['chainlink', 'default']\
},\
{\
symbol: 'CCIP-LnM',\
address: {\
[optimismSepolia.id]: '0x044a6B4b561af69D2319A2f4be5Ec327a6975D0a',\
[sepolia.id]: '0x466D489b6d36E7E3b824ef491C225F5830E81cC1'\
},\
logoURL: 'https://smartcontract.imgix.net/tokens/ccip-lnm.webp?auto=compress%2Cformat',\
tags: ['chainlink', 'default']\
}\
];
const config: Config = {
theme: {
pallette: {
background: '#FFFFFF',
border: '#B3B7C0',
text: '#000000',
}
shape: {
radius: 6
},
}
};
;
```
### [Theme configuration](https://docs.chain.link/ccip/ccip-javascript-sdk\#theme-configuration)
You can customize the component's theme to be in line with your app design. These are all the options available for theme configuration:

```ts
import { Config } from 'ccip-react-components';
const config: Config = { theme:
{
/** Define the app colors in HEX format */
palette?: {
/** Titles color and primary button background, default #000000 */
primary?: string;
/** Background color, default '#FFFFFF' */
background?: string;
/** Border color, default '#B3B7C0' */
border?: string;
/** Text color, default '#000000' */
text?: string;
/** Secondary text, inactive and placeholders color, default '#6D7480' */
muted?: string;
/** Input fields background color, default '#FFFFFF' */
input?: string;
/** Popovers, dropdowns and select fields background color, default '#F5F7FA' */
popover?: string;
/** Selected field from a dropdown background color, default '#D7DBE0' */
selected?: string;
/** Warning text color, default '#F7B955' */
warning?: string;
/** Warning text background color, default '#FFF5E0' */
warningBackground?: string;
};
shape?: {
/** Border radius size in px default 6 */
radius?: number;
};
};}
```
## [Review a CCIP-JS example](https://docs.chain.link/ccip/ccip-javascript-sdk\#review-a-ccip-js-example)
This example uses the `ccip-js` package and covers the following steps:
- Initialize CCIP-JS Client for mainnet
- Approve tokens for transfer
- Get fee for the transfer
- Send the transfer through CCIP using one of the following options for fee payment:
- Using the native token fee
- Using the provided supported token for fee payment
Review the [reference documentation](https://github.com/smartcontractkit/ccip-javascript-sdk/tree/main/packages/ccip-js#api-reference) for `ccip-js`.
### [Review the code](https://docs.chain.link/ccip/ccip-javascript-sdk\#review-the-code)

```ts
import * as CCIP from "@chainlink/ccip-js"
import { createWalletClient, custom } from "viem"
import { mainnet } from "viem/chains"
// Initialize CCIP-JS Client for mainnet
const ccipClient = CCIP.createClient()
const publicClient = createPublicClient({
chain: mainnet,
transport: http(),
})
const walletClient = createWalletClient({
chain: mainnet,
transport: custom(window.ethereum!),
})
// Approve Router to transfer tokens on user's behalf
const { txHash, txReceipt } = await ccipClient.approveRouter({
client: walletClient,
routerAddress: "0xabcdefabcdefabcdefabcdefabcdefabcdefabcdef",
tokenAddress: "0xabcdefabcdefabcdefabcdefabcdefabcdefabcdef",
amount: 1000000000000000000n,
waitForReceipt: true,
})
console.log(`Transfer approved. Transaction hash: ${txHash}. Transaction receipt: ${txReceipt}`)
// Get fee for the transfer
const fee = await ccipClient.getFee({
client: publicClient,
routerAddress: "0xabcdefabcdefabcdefabcdefabcdefabcdefabcdef",
tokenAddress: "0xabcdefabcdefabcdefabcdefabcdefabcdefabcdef",
amount: 1000000000000000000n,
destinationAccount: "0x1234567890abcdef1234567890abcdef12345678",
destinationChainSelector: "1234",
})
console.log(`Fee: ${fee.toLocaleString()}`)
// Variant 1: Transfer via CCIP using native token fee
const { txHash, messageId } = await client.transferTokens({
client: walletClient,
routerAddress: "0xabcdefabcdefabcdefabcdefabcdefabcdefabcdef",
tokenAddress: "0xabcdefabcdefabcdefabcdefabcdefabcdefabcdef",
amount: 1000000000000000000n,
destinationAccount: "0x1234567890abcdef1234567890abcdef12345678",
destinationChainSelector: "1234",
})
console.log(`Transfer success. Transaction hash: ${txHash}. Message ID: ${messageId}`)
// Variant 2: Transfer via CCIP using the provided supported token for fee payment
const { txHash, messageId } = await client.transferTokens({
client: walletClient,
routerAddress: "0xabcdefabcdefabcdefabcdefabcdefabcdefabcdef",
tokenAddress: "0xabcdefabcdefabcdefabcdefabcdefabcdefabcdef",
amount: 1000000000000000000n,
destinationAccount: "0x1234567890abcdef1234567890abcdef12345678",
destinationChainSelector: "1234",
feeTokenAddress: "0xabcdefabcdefabcdefabcdefabcdefabcdefabcdef",
})
```
## [Build packages](https://docs.chain.link/ccip/ccip-javascript-sdk\#build-packages)
Optionally, if you need to modify the packages and use your modified version, follow these instructions to build the packages:
You can use `pnpm build` to build both packages together. If you're building each package individually, make sure to build the `build-ccip-js` package before you build the `ccip-react-components` package. The React components depend on the JS package.
1. Build the `build-ccip-js` package:

```sh
pnpm i -w
pnpm build-ccip-js
```
2. Build the `ccip-react-components` package:

```sh
pnpm build-components
```
3. Update the `ccip-react-components` package to use the local `ccip-js` version by modifying the `packages/ccip-react-components/package.json` file. Replace the `@chainlink/ccip-js` dependency with the workspace reference:

```plaintext
"@chainlink/ccip-js": "workspace:*"
```
4. Update the `examples/nextjs` app to use both local `ccip-js` and `ccip-react-components` versions by modifying the `examples/nextjs/package.json` file. Replace the `@chainlink/ccip-js` and `@chainlink/ccip-react-components` dependencies with these relative paths:

```plaintext
"@chainlink/ccip-js": "link:../../packages/ccip-js",
"@chainlink/ccip-react-components": "link:../../packages/ccip-react-components",
```
## Get the latest Chainlink content straight to your inbox.
Email Address
## CCIP Service Limits
[iframe](https://www.googletagmanager.com/ns.html?id=GTM-N6DQ47T)
Chainlink CCIP is now officially live on Solana. [View lanes and tokens.](https://docs.chain.link/ccip/directory/mainnet/chain/solana-mainnet?utm_medium=referral&utm_source=chainlink-docs&utm_campaign=solana-ccip)
On this page
# [CCIP Service Limits](https://docs.chain.link/ccip/service-limits/evm\#overview)
## [Mainnet](https://docs.chain.link/ccip/service-limits/evm\#mainnet)
| Item | Description | Limit |
| --- | --- | --- |
| Maximum message `data` length | `data` payload sent within the [CCIP message](https://docs.chain.link/ccip/api-reference/evm/v1.6.0/client#evm2anymessage) | 30 kilobytes |
| Message Execution Gas Limit | User specified [gas limit](https://docs.chain.link/ccip/api-reference/evm/v1.6.0/client#genericextraargsv2)
Exception: Lanes originating from CORN have a maximum gas limit of 500,000. | 3,000,000 |
| Maximum number of tokens | Maximum number of distinct tokens a user can transfer in a single transaction. | 1 |
| Token Pool Execution Gas Limit | Maximum gas for executing the combined steps in token pools during cross-chain transfers, including: (1) `balanceOf` check before minting/releasing, (2) `releaseOrMint` function, and (3) `balanceOf` check after minting/releasing. For more details on building custom token pools and handling gas constraints, refer to the [Token Pools documentation](https://docs.chain.link/ccip/concepts/cross-chain-token/evm/token-pools#common-requirements). | 90,000 |
## [Testnet](https://docs.chain.link/ccip/service-limits/evm\#testnet)
| Item | Description | Limit |
| --- | --- | --- |
| Maximum message `data` length | `data` payload sent within the [CCIP message](https://docs.chain.link/ccip/api-reference/evm/v1.6.0/client#evm2anymessage) | 30 kilobytes |
| Message Execution Gas Limit | User specified [gas limit](https://docs.chain.link/ccip/api-reference/evm/v1.6.0/client#genericextraargsv2)
Exception: Lanes originating from CORN have a maximum gas limit of 500,000. | 3,000,000 |
| Maximum number of tokens | Maximum number of distinct tokens a user can transfer in a single transaction | 1 |
| Token Pool Execution Gas Limit | Maximum gas for executing the combined steps in token pools during cross-chain transfers, including: (1) `balanceOf` check before minting/releasing, (2) `releaseOrMint` function, and (3) `balanceOf` check after minting/releasing. For more details on building custom token pools and handling gas constraints, refer to the [Token Pools documentation](https://docs.chain.link/ccip/concepts/cross-chain-token/evm/token-pools#common-requirements). | 90,000 |
## Get the latest Chainlink content straight to your inbox.
Email Address
## CCIP Tutorials Overview
[iframe](https://www.googletagmanager.com/ns.html?id=GTM-N6DQ47T)
Chainlink CCIP is now officially live on Solana. [View lanes and tokens.](https://docs.chain.link/ccip/directory/mainnet/chain/solana-mainnet?utm_medium=referral&utm_source=chainlink-docs&utm_campaign=solana-ccip)
On this page
# [CCIP Tutorials: EVM to SVM](https://docs.chain.link/ccip/tutorials/svm/destination\#overview)
This section provides comprehensive guides and tutorials for implementing cross-chain communication from Ethereum Virtual Machine (EVM) chains to Solana Virtual Machine (SVM) chains using Chainlink's Cross-Chain Interoperability Protocol (CCIP).
## [Getting Started](https://docs.chain.link/ccip/tutorials/svm/destination\#getting-started)
Before implementing specific use cases, it's important to understand the fundamental concepts and message structure for EVM to SVM communication:
- [Building CCIP Messages from EVM to SVM](https://docs.chain.link/ccip/tutorials/svm/destination/build-messages) \- Learn the core message structure, required parameters, and implementation details for all message types
## [Tutorials by Use Case](https://docs.chain.link/ccip/tutorials/svm/destination\#tutorials-by-use-case)
Depending on your specific needs, choose the appropriate tutorial:
- [Token Transfers](https://docs.chain.link/ccip/tutorials/svm/destination/token-transfers) \- Send tokens from EVM chains to Solana wallets without program execution
- [Arbitrary Messaging](https://docs.chain.link/ccip/tutorials/svm/destination/arbitrary-messaging) \- Send data from EVM chains to trigger program execution on Solana
## Get the latest Chainlink content straight to your inbox.
Email Address
## Chainlink CCIP Onchain Architecture
[iframe](https://www.googletagmanager.com/ns.html?id=GTM-N6DQ47T)
Chainlink CCIP is now officially live on Solana. [View lanes and tokens.](https://docs.chain.link/ccip/directory/mainnet/chain/solana-mainnet?utm_medium=referral&utm_source=chainlink-docs&utm_campaign=solana-ccip)
On this page
# [Onchain Architecture](https://docs.chain.link/ccip/concepts/architecture/onchain\#overview)
This section details the onchain components of the CCIP architecture, covering both EVM-compatible chains and SVM-based chains such as Solana.
- **[EVM Architecture](https://docs.chain.link/ccip/concepts/architecture/onchain/evm/)**: Learn about the onchain components specific to EVM environments.
- **[SVM Architecture](https://docs.chain.link/ccip/concepts/architecture/onchain/svm/)**: Explore the onchain programs and components specific for SVM environments.
## Get the latest Chainlink content straight to your inbox.
Email Address
[iframe](https://td.doubleclick.net/td/rul/346357746?random=1747983037308&cv=11&fst=1747983037308&fmt=3&bg=ffffff&guid=ON&async=1&gcl_ctr=1>m=45be55l1v891173849z8847174275za200zb847174275&gcd=13l3l3l3l1l1&dma=0&tag_exp=101509157~102938614~103116026~103130498~103130500~103200004~103233427~103252644~103252646~103301114~103301116~104481633~104481635&ptag_exp=101509157~103116026~103130498~103130500~103200004~103233427~103252644~103252646~103301114~103301116~104481633~104481635&u_w=1280&u_h=1024&url=https%3A%2F%2Fdocs.chain.link%2Fccip%2Fconcepts%2Farchitecture%2Fonchain&_ng=1&label=_duuCKn_k4cYEPL_k6UB&hn=www.googleadservices.com&frm=0&tiba=Onchain%20Architecture%20%7C%20Chainlink%20Documentation&value=0&bttype=purchase&npa=0&pscdl=noapi&auid=1393905897.1747983037&uaa=x86&uab=64&uafvl=Chromium%3B136.0.7103.113%7CGoogle%2520Chrome%3B136.0.7103.113%7CNot.A%252FBrand%3B99.0.0.0&uamb=0&uam=&uap=Linux%20x86_64&uapv=6.6.72&uaw=0&ec_mode=a&fledge=1&capi=1&_tu=Cg&em=tv.1&ct_cookie_present=0)
## CCIP Execution Latency
[iframe](https://www.googletagmanager.com/ns.html?id=GTM-N6DQ47T)
Chainlink CCIP is now officially live on Solana. [View lanes and tokens.](https://docs.chain.link/ccip/directory/mainnet/chain/solana-mainnet?utm_medium=referral&utm_source=chainlink-docs&utm_campaign=solana-ccip)
On this page
# [CCIP Execution Latency](https://docs.chain.link/ccip/ccip-execution-latency\#overview)
## [CCIP transaction lifecycle](https://docs.chain.link/ccip/ccip-execution-latency\#ccip-transaction-lifecycle)
As depicted in the [CCIP detailed architecture](https://docs.chain.link/ccip/concepts/architecture/overview) section, the CCIP transaction lifecycle involves multiple stages from the source blockchain to the destination blockchain:
**Source blockchain:**
1. A sender contract or externally owned account (EOA) sends a CCIP message.
2. The transaction is included in a block and processed by "network participants" (validators in PoS and miners in PoW blockchains).
3. The Committing Decentralized Oracle Network (DON) waits for the block containing the transaction to achieve finality.
**Destination blockchain:**
1. After finality is reached on the source blockchain, the Committing DON relays the Merkle root of a batch of finalized messages to the OffRamp contract on the destination chain.
2. The Risk Management Network verifies and blesses the committed Merkle root on the destination chain, confirming the integrity of the Merkle root and the messages it authenticates.
3. The Executing DON executes the message on the destination chain. If the execution cost on the destination chain is within an acceptable range, the message is executed promptly after being blessed by the Risk Management Network.
The combined latencies of each step in the transaction lifecycle on both the source and destination blockchains impact the total end-to-end execution time for a CCIP transaction. Because different blockchains have unique optimizations for their consensus mechanisms, block sizes, and block times, some blockchains are faster at processing transactions than others. However, various factors can lead to variation in transaction times, including when transferring between the same pair of blockchains:
- **Finality:** Finality is the assurance that past transactions included onchain are extremely difficult or impossible to revert. Finality varies across different blockchains. Some blockchains offer instant finality, while others require multiple block confirmations.
- **Network Congestion:** Network congestion occurs when the volume of transactions exceeds the capacity of the blockchain network, leading to delays in transaction processing. Multiple factors can contribute to network congestion, such as high transaction volumes, increased adoption of blockchain technologies, and events like token launches.
- **Gas Price:** Network participants often prioritize transactions with higher gas prices. If a low gas price is set for a transaction, it can take longer to process than one with a higher gas price, especially during network congestion.
Waiting for finality on the source blockchain is crucial when transacting across multiple networks, as it helps ensure that actions taken on the destination blockchain are based on transactions on the source blockchain that are extremely difficult or impossible to revert. Because the time to achieve finality varies across blockchains and significantly impacts the total CCIP execution latency, the following sections will focus on explaining the different types of finality and how CCIP approaches source chain security on each supported blockchain.
## [Finality](https://docs.chain.link/ccip/ccip-execution-latency\#finality)
Different blockchains employ various consensus mechanisms, leading to different types of finality. This affects users, as even once a transaction is onchain, they must often wait for it to be considered finalized (a time period that varies by blockchain). Finality with blockchains can primarily be categorized into two main types: **probabilistic** finality and **deterministic** finality:
- **Probabilistic finality** is mainly used by Proof-of-Work blockchains and is not the main subject of this article.
- **Deterministic finality** is widely used in most smart contract enabled blockchains that Chainlink CCIP is integrated with today.
### [Types of Deterministic Finality](https://docs.chain.link/ccip/ccip-execution-latency\#types-of-deterministic-finality)
#### [Finality on L1 PoA/PoS Chains](https://docs.chain.link/ccip/ccip-execution-latency\#finality-on-l1-poapos-chains)
Typically, Proof of Authority / Proof of Stake (PoA/PoS) chains use a deterministic model to determine when a block/transaction is considered final. The consensus protocol utilized in such a system is usually designed to be Byzantine Fault Tolerant (BFT). This means that under the assumption that some subset (usually between 51% - 67%) of the participating nodes/stake are honest, and there are no errors in the protocol's implementation, the system works as expected and finality assurances are upheld.
**Examples:**
- **Ethereum's PoS:** Ethereum PoS achieves Byzantine Fault Tolerance (BFT) through economic constraints. Ethereum PoS manages finality using "checkpoint" blocks. The first block in each epoch is designated as a checkpoint. Validators vote on pairs of checkpoints. When two-thirds of the total staked ETH validators agree on the validity of the pair, the earlier of the two checkpoints becomes finalized. To revert a finalized block, an attacker would have to burn at least one-third of the total staked ether, making such an attack extremely costly and difficult to achieve.
- **Comet BFT (Cosmos Hub Network):** Comet BFT is a Byzantine Fault Tolerant (BFT) consensus algorithm designed to provide instant finality. It achieves BFT by ensuring that consensus can be reached as long as more than two-thirds of validators are honest. Once these validators confirm a block, it is immediately considered final and irreversible.
- **Avalanche:** Avalanche uses a random sampling of validators who repeatedly vote on transactions. This process continues until enough validators agree, achieving sub-second finality.
- **BNB Chain:** BNB Chain uses a combination of Proof of Staked Authority (PoSA) and Byzantine Fault Tolerance (BFT) algorithms to finalize transactions. If two-thirds or more of the validators vote as expected, it takes an average of 2.5 blocks to finalize a transaction.
#### [Finality on L2s](https://docs.chain.link/ccip/ccip-execution-latency\#finality-on-l2s)
Layer 2 blockchains, or L2s, are implementations of blockchain systems built on top of existing blockchains (known as Layer 1, or L1) to improve scalability and reduce transaction costs. While they operate independently, L2s are designed to inherit the security of the underlying Layer 1 blockchain: L2s post periodic checkpoints to the underlying blockchain they are built on top of, settling their state and providing stronger finality guarantees than what is provided by their native model.
**Optimistic Rollups:**
Most of the popular optimistic rollups that exist today are run through a centralized sequencer. The sequencer is responsible for ordering incoming transactions, including them in blocks, batching them together and posting them as a bundle to the underlying blockchain they settle on. These bundles serve as commitments and once posted provide more certainty on the finalized state of the rollup. Given that the sequencer is centralized, users are faced with the choice to trust that it won't change the order of the transactions or wait until these commitments are posted to the underlying L1 blockchain.
The optimistic model means that the commitment is valid by default when it is posted to the Layer 1 (L1) blockchain. This is why optimistic rollups typically provide a challenge period, during which a commitment can be challenged if it turns out to be fraudulent. If a challenge is successful, the commitment is replaced and the rollup state is updated to the correct one.
**The typical lifecycle of an optimistic rollup transaction is:**
1. Transaction is included in an L2 block by the sequencer.
2. Transaction is included in a batch that is committed to the L1.
3. Challenge period during which a batch can be challenged if it's invalid - usually lasts a week or more.
4. Transaction is finalized on the L1 - at this point it is considered irreversible.
In the popular optimistic rollup implementations that exist (e.g. OP, Arbitrum, etc.), a commitment can only be challenged if it contains an invalid state root. If the commitment is a valid continuation of the L2, it cannot be challenged. Therefore, seeing a commitment and verifying that it is valid is sufficient certainty for most users to assume finality on this type of L2s, as long as they trust the finality guarantees of the underlying L1. Importantly, this guarantee is supported by waiting for the commitment to the L1 to be finalized according to the L1's finality model.
**ZK Rollups:**
Similarly to optimistic rollups, most popular ZK rollups that exist today are run through a centralized sequencer. The ZK rollup sequencer is also responsible for ordering incoming transactions, including them in blocks, batching them together and posting them as a bundle to the underlying L1 blockchain they settle on. However, in the case of ZK rollups, they also post a validity proof with each batch that is automatically verified onchain on the underlying L1. This validity proof removes the need for a challenge period like on optimistic rollups.
**The typical lifecycle of a ZK rollup transaction is:**
1. Transaction is included in an L2 block by the sequencer.
2. Transaction is included in a batch that is committed to the L1.
3. Validity proof is posted on the L1 that proves the commitment from step 2.
4. Transaction is finalized on the L1.
5. Transaction is considered irreversible. In many cases this happens after a considerable rollup-specific "safety delay" (12-24 hours) from the previous step, which is expected to be reduced as the technology matures.
### [How CCIP Determines Finality](https://docs.chain.link/ccip/ccip-execution-latency\#how-ccip-determines-finality)
The end-to-end transaction times of CCIP messages depend largely on the time-to-finality of the source blockchain. Different blockchains have varying finality types, leading to different times to reach finality. This section explains how CCIP determines finality for different blockchains.
#### [Finality Tag](https://docs.chain.link/ccip/ccip-execution-latency\#finality-tag)
Blockchains with deterministic finality often use a finality tag to indicate when a block is considered final. The finality tag delineates which blocks are finalized, offering a standardized way to determine transaction finality.
- After The Merge, Ethereum shifted to an epoch-based process in PoS, where finality is achieved when two-thirds of validators agree on block finalization over two epochs (64 slots, approximately 12.8 minutes). The Ethereum team introduced the finality tag to provide a default block parameter in specific [JSON-RPC calls](https://ethereum.org/en/developers/docs/apis/json-rpc/), delineating finalized blocks without ambiguity. The finality tag is supported by various Ethereum clients, including Geth.
- Other blockchains have adopted similar finality tags to indicate finalized blocks.
#### [Block Depth](https://docs.chain.link/ccip/ccip-execution-latency\#block-depth)
In some cases, CCIP relies on block depth to determine when a transaction can be considered final. The block depth refers to the number of successive blocks added after the one containing a given transaction. CCIP uses a sufficient number of blocks to consider the transaction most likely safe from reorgs. There are three cases where CCIP would use block depth:
- Blockchains with probabilistic finality.
- Blockchains with deterministic finality but without a finality tag: In some cases, blockchains have deterministic finality but do not provide a finality tag.
- Blockchains with deterministic finality but slow finality times: In some cases, deterministic finality can take a significant amount of time to reach, leading to a poor user experience.
### [Finality by blockchain](https://docs.chain.link/ccip/ccip-execution-latency\#finality-by-blockchain)
This section provides an overview of the finality methods CCIP uses to determine finality for each currently supported blockchain. The table below lists each blockchain and its finality method—whether it uses a finality tag or block depth (with the number of blocks specified for block depth)—and the estimated time required to achieve finality.
| Source Blockchain | Finality Method | Estimated Time for Finality |
| --- | --- | --- |
| Apechain | Finality tag | 50 minutes |
| Arbitrum | Finality tag | 17 minutes |
| Astar | Finality tag | 35 seconds |
| Avalanche | Finality tag | < 1 second |
| Base | Finality tag | 18 minutes |
| Berachain | Finality tag | 7 seconds |
| BitLayer | [Block depth](https://docs.chain.link/ccip/ccip-execution-latency#block-depth) (21 blocks) | 1 minute |
| Blast | Finality tag | 20 minutes |
| BNB | Finality tag | 5 seconds |
| Bob | Finality tag | 2 hours |
| B² | Finality tag | 20 minutes |
| Celo | Finality tag | < 1 second |
| Core | [Block depth](https://docs.chain.link/ccip/ccip-execution-latency#block-depth) (7 blocks) | 1 minute |
| Corn | Finality tag | 12 hours |
| Cronos | Finality tag | 1 second |
| Cronos zkEVM | Finality tag | 31 hours |
| Ethereum | Finality tag | 15 minutes |
| Fraxtal | Finality tag | 30 minutes |
| Gnosis | Finality tag | 3 minutes |
| Hashkey | Finality tag | 1 hour |
| Ink | Finality tag | 2 hours |
| Kroma | Finality tag | 25 minutes |
| Linea | [Block depth](https://docs.chain.link/ccip/ccip-execution-latency#block-depth) (600 blocks) | 20 minutes |
| Mantle | Finality tag | 28 minutes |
| Metis | Finality tag | 2 hours |
| Mind Network | Finality tag | 1 hour |
| Mode | Finality tag | 37 minutes |
| OP | Finality tag | 20 minutes |
| Polygon | Finality tag | 2 minutes |
| Polygon zkEVM | Finality tag | 2 hours |
| Ronin | Finality tag | 10 seconds |
| Scroll | Finality tag | 1 hour |
| Sei | Finality tag | 1 second |
| Soneium | Finality tag | 27 minutes |
| Sonic | [Block depth](https://docs.chain.link/ccip/ccip-execution-latency#block-depth) (10 blocks) | 7 seconds |
| Shibarium | Finality tag | 1 minute |
| Treasure | Finality tag | 7 hours |
| Unichain | Finality tag | 24 minutes |
| Wemix | Finality tag | < 1 second |
| Worldchain | Finality tag | 40 minutes |
| XLayer | Finality tag | 1 hour |
| Zircuit | Finality tag | 21 minutes |
| ZKsync | [Block depth](https://docs.chain.link/ccip/ccip-execution-latency#block-depth) (1200 blocks) | 20 minutes |
This page provides details on the expected latency for a cross-chain transaction using CCIP, covering the different stages of transaction processing and the factors that influence overall execution times.
For a comprehensive understanding of CCIP's architecture and how messages flow through the system, refer to the [CCIP detailed architecture](https://docs.chain.link/ccip/concepts/architecture/overview) documentation.
## Get the latest Chainlink content straight to your inbox.
Email Address
## Chainlink CCIP Manual Execution
[iframe](https://www.googletagmanager.com/ns.html?id=GTM-N6DQ47T)
Chainlink CCIP is now officially live on Solana. [View lanes and tokens.](https://docs.chain.link/ccip/directory/mainnet/chain/solana-mainnet?utm_medium=referral&utm_source=chainlink-docs&utm_campaign=solana-ccip)
On this page
# [CCIP Manual Execution](https://docs.chain.link/ccip/concepts/manual-execution\#overview)
In general, messages are successfully delivered and processed via CCIP as described in the [Architecture](https://docs.chain.link/ccip/concepts/architecture) page. However, some exceptional conditions might require users to manually execute the transaction on the destination blockchain:
- The receiver contract on the destination blockchain reverted due to an unhandled exception such as a logical error.
- For token pools, if the combined execution of the required functions ( `balanceOf` checks and `releaseOrMint`) exceeds the default gas limit of **90,000 gas** on the destination blockchain, CCIP execution will fail. Read the Token pools [common requirements](https://docs.chain.link/ccip/concepts/cross-chain-token/evm/token-pools#common-requirements) to learn more.
- The receiver contract on the destination blockchain reverted due to the gas limit being insufficient to execute the triggered function (Note: The gas limit value is set in the [extraArgs](https://docs.chain.link/ccip/api-reference/evm/v1.6.0/client#genericextraargsv2) param of the message).
The flowchart below displays the process of a cross-chain transaction, detailing the steps involved in the manual execution:
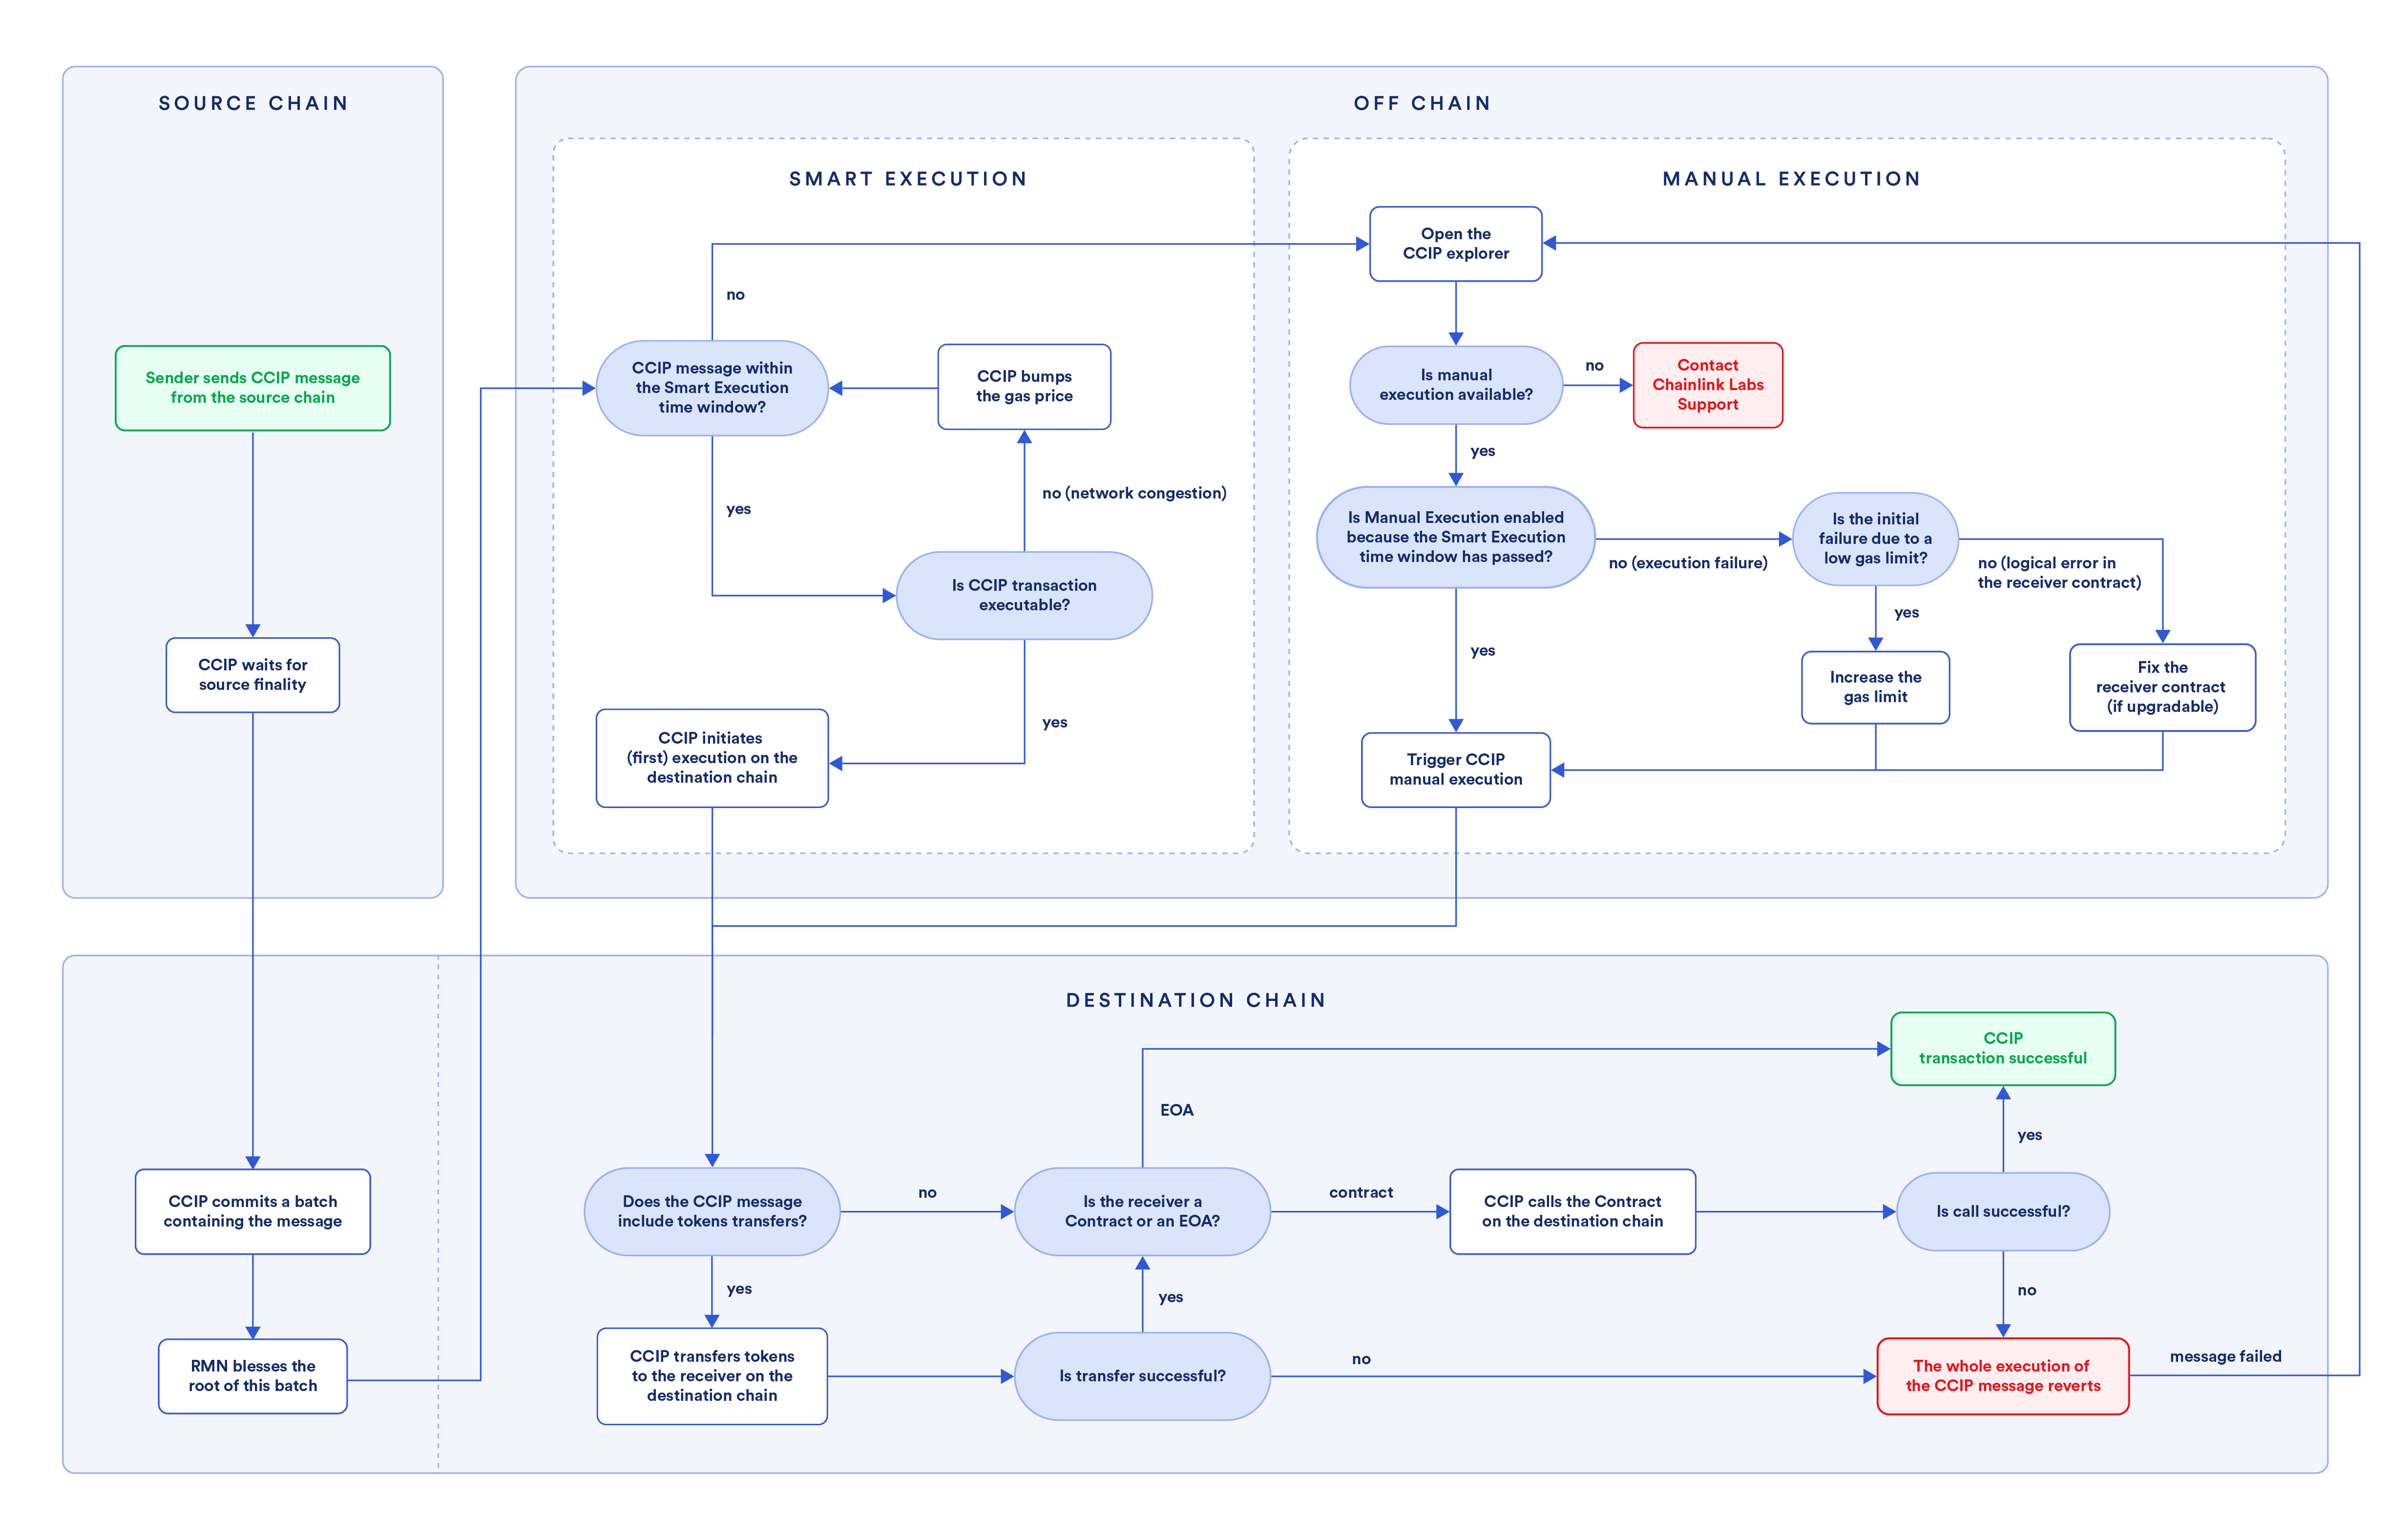
## [CCIP execution](https://docs.chain.link/ccip/concepts/manual-execution\#ccip-execution)
1. A sender contract or EOA initiates a CCIP message on the source blockchain.
2. [CCIP Committing DON](https://docs.chain.link/ccip/concepts/architecture/offchain/overview#commit-ocr-process) awaits [finality](https://docs.chain.link/ccip/concepts/architecture/key-concepts#blockchain-finality) on the source blockchain.
3. Post finality, the [CCIP Committing DON](https://docs.chain.link/ccip/concepts/architecture/offchain/overview#commit-ocr-process) assembles a batch of eligible transactions, computes a Merkle root, and records it to the OffRamp contract on the destination blockchain.
4. After successful verification, the [Risk Management Network](https://docs.chain.link/ccip/concepts/architecture/offchain/risk-management-network) blesses the committed Merkle root.
5. After the committed Merkle root is blessed, the [CCIP Executing DON](https://docs.chain.link/ccip/concepts/architecture/offchain/overview#executing-ocr-process) proceeds with the execution on the destination blockchain.
6. The execution on the destination blockchain works as follows:
1. If the message involves token transfers, the tokens are first transferred to the receiver. **Important:** If the combined execution of the required functions ( `balanceOf` checks of the the token contract and `releaseOrMint` of the token pool contract) exceeds the default gas limit of **90,000 gas** on the destination blockchain, CCIP execution will fail, and the transaction will become eligible for manual execution. It is highly recommended to design your token pools to stay within this gas limit to avoid execution failure. Read the Token Pools [common requirements](https://docs.chain.link/ccip/concepts/cross-chain-token/evm/token-pools#common-requirements) to learn more.
- If the receiver is an EOA, then this transaction is considered complete with no further processing.
- If the receiver is a smart contract, the [ccipReceive](https://docs.chain.link/ccip/api-reference/evm/v1.6.0/ccip-receiver#ccipreceive) function is invoked after the token transfer. The ccipReceive function processes the CCIP message and any user-specified logic in the receiver contract. The execution of the CCIP message is atomic (all or none). If the ccipReceive function successfully executes, then all aspects of the transaction are complete, and there is no revert. If, however, there is an issue in the receiver execution due to insufficient gas limit or unhandled exceptions, the attempted token transfer will also revert. The transaction then becomes eligible for manual execution.
2. If the message does not involve token transfers, only arbitrary messaging, and the receiver execution fails due to gas limits or unhandled exceptions, the transaction becomes eligible for manual execution.
## [Manual execution](https://docs.chain.link/ccip/concepts/manual-execution\#manual-execution)
As described above, a CCIP message becomes eligible for manual execution for various reasons. Manual execution means that a user has to manually trigger the execution of the destination transaction after the issue that caused manual execution has been resolved.
When a CCIP message is eligible for manual execution, the [CCIP explorer](https://ccip.chain.link/) shows the following information:
- _Ready for manual execution_ status
- The possibility to override the gas limit and a _Trigger Manual Execution_ button
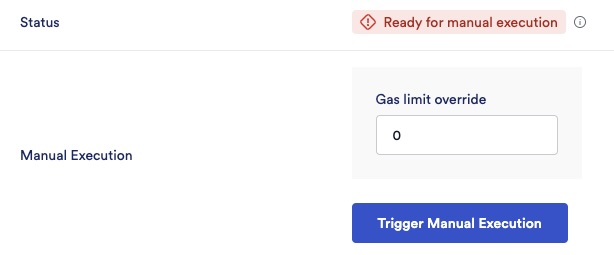
Depending on the situation, you can take one of the following steps:
- Insufficient gas limit: The executor can connect their wallet, override the gas limit parameter, increase the gas limit for this particular execution, and trigger a manual execution. If this new gas limit override is sufficient, the transaction will go through successfully. **Note:** This gas limit override applies only to this manually executed transaction.
- Unhandled exception (logical error) in the receiver contract: If the receiver contract is [upgradeable](https://blog.chain.link/upgradable-smart-contracts/), developers must correct the logic, re-deploy the logic contract, and then manually execute the same transaction. If the receiver contract is not upgradeable, developers must deploy a new receiver contract, and then users can send a new CCIP message. Non-upgradable contracts will not benefit from manual execution. **Note:** Always make sure to test your smart contracts thoroughly. As a best practice, implement fallback mechanisms in the CCIP receiver contracts to manage unhandled exceptions gracefully. Read the [Defensive example](https://docs.chain.link/ccip/tutorials/evm/programmable-token-transfers-defensive) to learn more.
When manual execution is initiated, a Merkle proof is generated for the message to be executed. During execution, the CCIP explorer submits the Merkle proof and the new gas limit (if the initial failure was due to a low gas limit). This Merkle proof is verified by the [OffRamp contract](https://docs.chain.link/ccip/concepts/architecture/onchain/evm/components#offramp) against the Merkle root in the OffRamp contract, and that was blessed by the [Risk Management Network](https://docs.chain.link/ccip/concepts/architecture/offchain/risk-management-network). This mirrors the automated execution performed by the [CCIP Executing DON](https://docs.chain.link/ccip/concepts/architecture/offchain/overview#executing-ocr-process), with the addition that the execution is resubmitted using the gas limit you provide.
## [Frequently asked questions](https://docs.chain.link/ccip/concepts/manual-execution\#frequently-asked-questions)
1. **Can anyone execute a transaction on the CCIP explorer even if they are not the initiator of the transaction?**
Yes, any EOA can manually execute a CCIP message that is eligible for manual execution. However, the executing account must have sufficient native gas tokens (such as ETH on Ethereum or POL on Polygon) to cover the gas costs associated with the delivery of the CCIP message.
2. **If a user sends multiple messages and the first message isn't successfully delivered and goes into a _manual execution_ mode, does that mean all subsequent messages from the user will also be stuck?**
It depends. If a message goes into manual execution mode due to receiver errors (unhandled exceptions or gas limit issues), subsequent messages don't get automatically blocked, unless they would encounter the same error. However, suppose a message goes into manual execution mode after the Smart Execution time window expires (currently 8 hours). In that case, subsequent messages must wait for the first message to be processed to maintain the default sequence.
3. **If the maximum gas limit is 3M (3,000,000) on mainnet, but it turns out that the destination blockchain requires more than that, will an override of > 3M still work?**
Yes, but only for this execution. This works because the gas limit for this execution instance isn't passing through the CCIP validation for the gas limit, for which the CCIP executing DON pays the gas. However, if you consistently need more than 3M for your use case, please reach out to us via this [contact form](https://chain.link/ccip-contact).
4. What should I do if my token pool's gas consumption exceeds the 90,000 gas limit on the destination blockchain?
If your token pool's combined execution—including the `balanceOf` function calls before and after minting/releasing, and the `releaseOrMint` function—consumes more than **90,000 gas** on the destination blockchain, CCIP execution will fail. It's highly recommended to optimize your token and token pool contracts to stay within this limit. However, if you cannot optimize further and consistently require more gas, please [contact](https://chain.link/ccip-contact?v=Tokens:%20Gas%20limit%20update) Chainlink Labs to request assistance.
1. **Will Chainlink Labs reimburse us for manual execution fees?**
Since most manual execution situations are due to insufficient gas limit or an unhandled exception in the receiver contract, Chainlink Labs does not reimburse these fees. If you are a dApp developer, please ensure you test thoroughly to avoid manual executions to the extent possible.
2. **Do I have to manually execute via the CCIP explorer? Are there any other ways to do this?**
The CCIP explorer provides the easiest way to execute manually. It handles all the complexity of submitting the Merkle proof needed for successful transaction execution.
3. **How do I know if my receiver error is due to a gas limit issue or an unhandled exception?**
If you see a _ReceiverError_ with a revert reason as empty (0x), this is likely due to a gas limit issue. You can look at the transaction trace for the destination transaction on a tool such as [Tenderly](https://tenderly.co/), and you will likely see an _out of gas_ reason mentioned in such cases. Determine the gas limit that would work for your transaction and manually override it. Read the [manual execution](https://docs.chain.link/ccip/tutorials/evm/manual-execution) tutorial to analyze an example of an exception due to a low gas limit.
4. **How can I write contracts that avoid manual execution situations in the first place?**
- Test thoroughly to ensure logical conditions for all paths are gracefully handled in your receiver contract.
- Set a gas limit that works for complex execution paths, not just the simplest ones. Read the [best practices](https://docs.chain.link/ccip/concepts/best-practices/evm#setting-gaslimit) for gas estimation.
- Refer to the [Defensive example](https://docs.chain.link/ccip/tutorials/evm/programmable-token-transfers-defensive) tutorial for an example of how to design a programmable token transfer that handles errors gracefully.
5. **My transaction meets one of the conditions to trigger manual execution, but I do not see this option on the CCIP explorer. How am I supposed to execute this manually?**
This should not happen, but in the unlikely scenario that it does, please submit a support ticket as shown below. Include the CCIP Message ID, your preferred contact details, and a detailed description of the issue you faced. This will help us assist you more effectively.
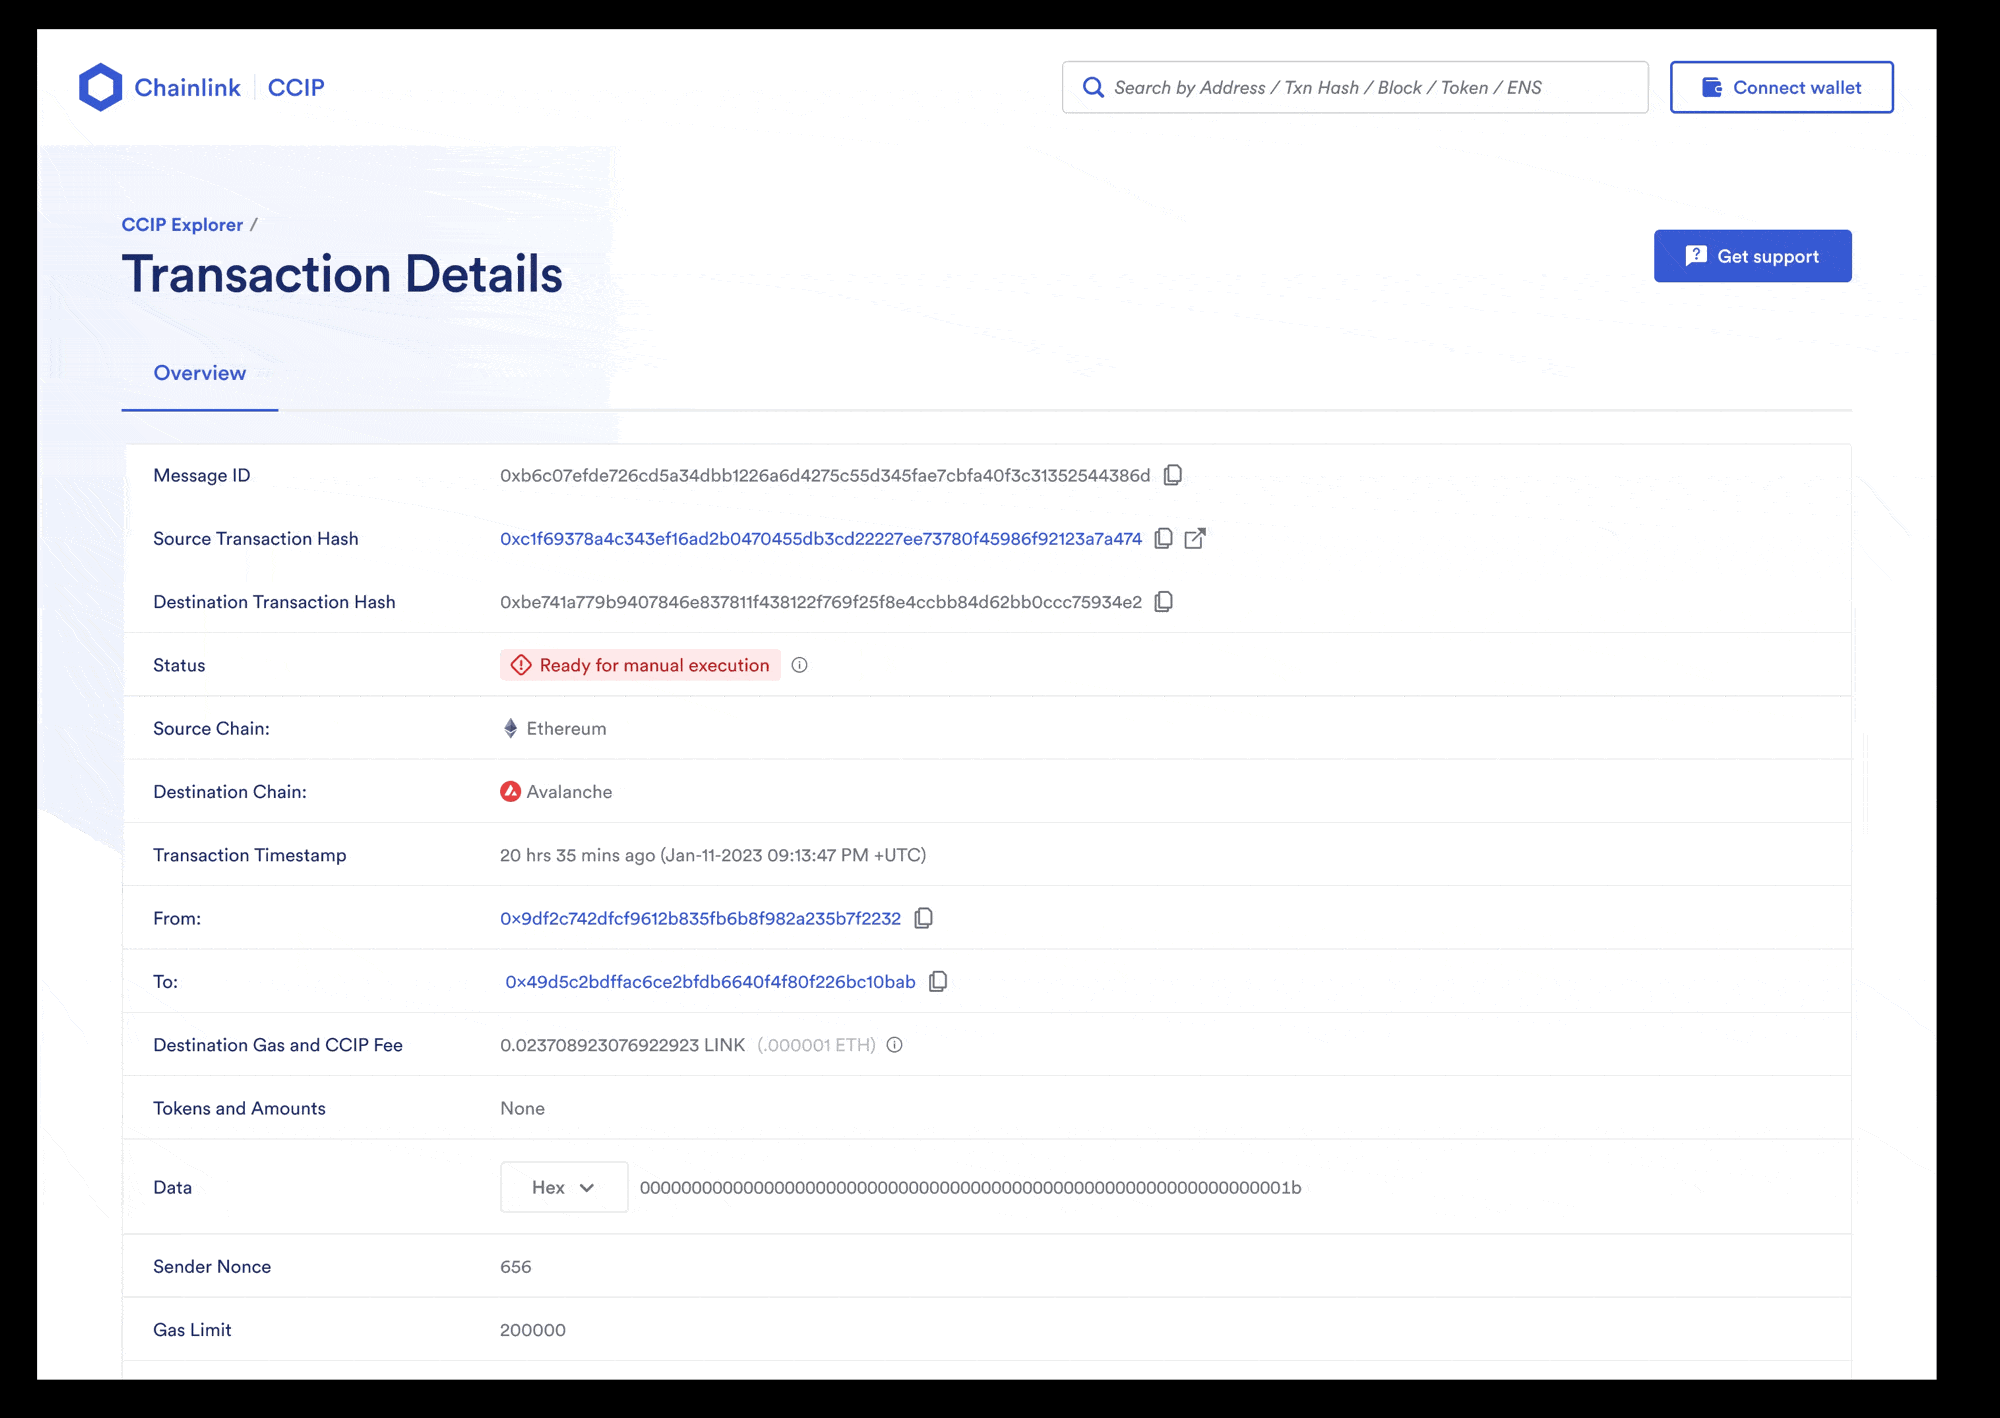
## What's next
- [\> Manual execution guide](https://docs.chain.link/ccip/tutorials/evm/manual-execution)
- [\> Learn CCIP best practices](https://docs.chain.link/ccip/concepts/best-practices)
## Get the latest Chainlink content straight to your inbox.
Email Address
## CCIP Receivers on Solana
[iframe](https://www.googletagmanager.com/ns.html?id=GTM-N6DQ47T)
Chainlink CCIP is now officially live on Solana. [View lanes and tokens.](https://docs.chain.link/ccip/directory/mainnet/chain/solana-mainnet?utm_medium=referral&utm_source=chainlink-docs&utm_campaign=solana-ccip)
On this page
# [Implementing CCIP Receivers](https://docs.chain.link/ccip/tutorials/svm/receivers\#overview)
# [Implementing CCIP Receivers for Solana](https://docs.chain.link/ccip/tutorials/svm/receivers\#implementing-ccip-receivers-for-solana)
This reference guide explains the key components and security patterns required for building Solana programs that can receive cross-chain messages via Chainlink's Cross-Chain Interoperability Protocol (CCIP).
## [Introduction](https://docs.chain.link/ccip/tutorials/svm/receivers\#introduction)
A CCIP Receiver is a Solana program that implements the [`ccip_receive`](https://docs.chain.link/ccip/api-reference/svm/v1.6.0/receiver#ccip_receive) instruction, allowing it to process incoming cross-chain messages. It can handle both arbitrary data payloads and/or token transfers, serving as the destination endpoint for CCIP messages.
## [Security Architecture](https://docs.chain.link/ccip/tutorials/svm/receivers\#security-architecture)
To build a secure CCIP receiver program, you need to understand how it interacts with the core CCIP programs.
Your receiver program interacts with two external CCIP components:
Architectural ComponentsSecurity Model
The security model relies on three critical validations:
1. **Authority Validation**
- Verify the calling authority
- is a legitimate Offramp PDA
- This prevents unauthorized programs from sending fake messages
2. **Router Validation**
- Verify the Offramp is authorized by the Router
- This ensures only trusted Offramps approved by the Router can deliver messages
3. **Optional Sender Validation**
- Optionally validate the source chain and sender address
- This provides an additional layer of security by restricting which sources can send messages
The CCIP security architecture consists of:
1. **Receiver Program** (your SVM program)
- Implements the [`ccip_receive`](https://docs.chain.link/ccip/api-reference/svm/v1.6.0/receiver#ccip_receive) instruction
- Validates that messages come from an authorized OffRamp program
2. **CCIP Router**
- Central coordinator of cross-chain communication
- Manages allowed OffRamps
- Creates PDAs that verify OffRamp authorization
3. **CCIP Offramp**
- Delivers messages to the receiver program
- Uses a specific PDA to sign transactions calling your program
## [Core Components of a CCIP Receiver](https://docs.chain.link/ccip/tutorials/svm/receivers\#core-components-of-a-ccip-receiver)
A complete CCIP Receiver implementation contains several key components, each serving a specific purpose in the cross-chain messaging system.
### [Message Structure](https://docs.chain.link/ccip/tutorials/svm/receivers\#message-structure)
CCIP messages follow a standardized structure that your program must be prepared to receive:

```rust
#[derive(Debug, Clone, AnchorSerialize, AnchorDeserialize)]
pub struct Any2SVMMessage {
pub message_id: [u8; 32],
pub source_chain_selector: u64,
pub sender: Vec,
pub data: Vec,
pub token_amounts: Vec,
}
#[derive(Debug, Clone, AnchorSerialize, AnchorDeserialize, Default)]
pub struct SVMTokenAmount {
pub token: Pubkey,
pub amount: u64, // solana local token amount
}
```
These structures contain:
- `message_id`: A unique identifier for the message
- `source_chain_selector`: The chain ID of the source chain
- `sender`: The address of the sender on the source chain
- `data`: The arbitrary data payload
- `token_amounts`: An array of tokens and amounts being transferred
### [The CcipReceive Context](https://docs.chain.link/ccip/tutorials/svm/receivers\#the-ccipreceive-context)
The account context for the `ccip_receive` instruction is the most critical security component of your program. It must follow this exact pattern:

```rust
#[derive(Accounts, Debug)]
#[instruction(message: Any2SVMMessage)]
pub struct CcipReceive<'info> {
// Offramp CPI signer PDA must be first.
#[account(\
seeds = [EXTERNAL_EXECUTION_CONFIG_SEED, crate::ID.as_ref()],\
bump,\
seeds::program = offramp_program.key(),\
)]
pub authority: Signer<'info>,
/// CHECK offramp program: exists only to derive the allowed offramp PDA
pub offramp_program: UncheckedAccount<'info>,
/// CHECK PDA of the router program verifying the signer is an allowed offramp.
#[account(\
owner = state.router @ CcipReceiverError::InvalidCaller,\
seeds = [\
ALLOWED_OFFRAMP,\
message.source_chain_selector.to_le_bytes().as_ref(),\
offramp_program.key().as_ref()\
],\
bump,\
seeds::program = state.router,\
)]
pub allowed_offramp: UncheckedAccount<'info>,
// Program-specific accounts follow...
#[account(\
seeds = [STATE],\
bump,\
)]
pub state: Account<'info, BaseState>,
// Additional program accounts as needed...
}
```
### [Program State](https://docs.chain.link/ccip/tutorials/svm/receivers\#program-state)
Your program needs state accounts to store configuration information, most importantly the router address:

```rust
#[account]
#[derive(InitSpace, Default, Debug)]
pub struct BaseState {
pub owner: Pubkey,
pub proposed_owner: Pubkey,
pub router: Pubkey,
}
```
This is a basic example of state storage, but your program can have more complex state structures with additional data. The critical requirement is that the state must store the router address for verification of the `allowed_offramp` PDA.
### [Extending the CcipReceive Context](https://docs.chain.link/ccip/tutorials/svm/receivers\#extending-the-ccipreceive-context)
While the first three accounts in the CcipReceive context are mandatory and must follow the exact security pattern shown above, **you must extend this structure with additional program-specific accounts** based on your specific use case.
These additional accounts will be provided when your program is called through the CCIP Offramp. In your `ccip_receive` instruction, you should validate these accounts according to your application's security requirements before using them.
### [The `ccip_receive` Instruction](https://docs.chain.link/ccip/tutorials/svm/receivers\#the-ccip_receive-instruction)
The core instruction that implements the CCIP receiver interface:

```rust
/// This instruction is called by the CCIP Offramp to execute the CCIP message.
/// The method name needs to be ccip_receive with Anchor encoding.
/// If not using Anchor, the discriminator needs to be [0x0b, 0xf4, 0x09, 0xf9, 0x2c, 0x53, 0x2f, 0xf5]
pub fn ccip_receive(ctx: Context, message: Any2SVMMessage) -> Result<()> {
// Process message data
if !message.data.is_empty() {
// Custom data processing logic here
}
// Process token transfers
if !message.token_amounts.is_empty() {
// Custom token handling logic here
}
// Emit event for tracking
emit!(MessageReceived {
message_id: message.message_id,
source_chain_selector: message.source_chain_selector,
sender: message.sender.clone(),
});
Ok(())
}
```
## [Security Considerations](https://docs.chain.link/ccip/tutorials/svm/receivers\#security-considerations)
Building secure CCIP Receivers requires attention to several key areas:
### [Caller Validation](https://docs.chain.link/ccip/tutorials/svm/receivers\#caller-validation)
The most critical security aspect is validating that the caller is a legitimate CCIP Offramp. This is handled by the account constraints in the `CcipReceive` context:

```rust
// Offramp CPI signer PDA must be first.
#[account(\
seeds = [EXTERNAL_EXECUTION_CONFIG_SEED, crate::ID.as_ref()],\
bump,\
seeds::program = offramp_program.key(),\
)]
pub authority: Signer<'info>,
```
This constraint ensures that the transaction is signed by a PDA derived from the offramp program using a specific seed. Only the legitimate CCIP Offramp can produce this signature.
### [Router Authorization](https://docs.chain.link/ccip/tutorials/svm/receivers\#router-authorization)
The second critical validation is ensuring that the offramp is authorized by the CCIP Router:

```rust
#[account(\
owner = state.router @ CcipReceiverError::InvalidCaller,\
seeds = [\
ALLOWED_OFFRAMP,\
message.source_chain_selector.to_le_bytes().as_ref(),\
offramp_program.key().as_ref()\
],\
bump,\
seeds::program = state.router,\
)]
pub allowed_offramp: UncheckedAccount<'info>,
```
This validates that:
1. The `allowed_offramp` PDA exists and is owned by the router program
2. The PDA is derived using the correct seeds that include the source chain and offramp program ID
3. This proves the router has authorized this specific offramp for this specific source chain
### [Optional Sender Validation](https://docs.chain.link/ccip/tutorials/svm/receivers\#optional-sender-validation)
For additional security, you can implement sender validation:

```rust
// Optional additional validation in ccip_receive
pub fn ccip_receive(ctx: Context, message: Any2SVMMessage) -> Result<()> {
// Verify sender is approved (if implementing allowlist)
let is_approved = is_sender_approved(
ctx.accounts.state,
message.source_chain_selector,
&message.sender
);
require!(is_approved, CcipReceiverError::InvalidChainAndSender);
// Continue with message processing...
Ok(())
}
```
### [Message Deduplication](https://docs.chain.link/ccip/tutorials/svm/receivers\#message-deduplication)
To prevent replay attacks, consider tracking processed message IDs:

```rust
// In your ccip_receive instruction:
// Check if message has already been processed
let is_duplicate = ctx.accounts.processed_messages
.messages
.contains(&message.message_id);
require!(!is_duplicate, CcipReceiverError::DuplicateMessage);
// Record the message ID to prevent reprocessing
ctx.accounts.processed_messages.messages.push(message.message_id);
if ctx.accounts.processed_messages.messages.len() > MAX_STORED_MESSAGES {
ctx.accounts.processed_messages.messages.remove(0);
}
```
## [Token Handling for Receivers](https://docs.chain.link/ccip/tutorials/svm/receivers\#token-handling-for-receivers)
CCIP receivers that handle tokens need to understand how tokens are delivered and how to properly manage them.
### [Token Delivery Process](https://docs.chain.link/ccip/tutorials/svm/receivers\#token-delivery-process)
When tokens are sent via CCIP to a Solana program:
1. The tokens are initially delivered to a token account specified as the `tokenReceiver` in the CCIP message
2. For programmatic token transfers, this `tokenReceiver` must be a PDA that your program has authority over
3. Your program must implement the logic to handle the received tokens
### [Token Admin PDA](https://docs.chain.link/ccip/tutorials/svm/receivers\#token-admin-pda)
Create a dedicated PDA to serve as your program's token administrator:

```rust
#[account(\
init,\
seeds = [TOKEN_ADMIN_SEED],\
bump,\
payer = authority,\
space = ANCHOR_DISCRIMINATOR,\
)]
/// CHECK: CPI signer for tokens
pub token_admin: UncheckedAccount<'info>,
```
This token\_admin PDA should:
1. Be initialized during program setup
2. Be used as the authority for token accounts that will receive CCIP tokens
3. Sign token transfer instructions (e.g., for forwarding tokens to their final destination)
### [remaining\_accounts](https://docs.chain.link/ccip/tutorials/svm/receivers\#remaining_accounts)
For each token being transferred, your `remaining_accounts` typically needs:
1. `token_mint`: The mint account of the token
2. `source_token_account`: The account that received tokens from CCIP
3. `token_admin`: Your program's PDA with authority over the source account
4. `recipient_token_account`: The final destination for the tokens
5. `token_program`: The SPL Token program (Token or Token-2022)
**Note**: The pattern may vary depending on your specific implementation needs.
## [Best Practices](https://docs.chain.link/ccip/tutorials/svm/receivers\#best-practices)
When implementing CCIP Receivers, follow these best practices:
1. **Follow the Security Pattern**: Always use the exact account validation pattern shown in the `CcipReceive` context
2. **Store the Router Address**: Store and validate the router address to ensure only allowed offramps can call your program
3. **Handle Token Security**: Use PDAs with proper token authority for receiving and managing tokens
4. **Consider Message Deduplication**: Track message IDs to prevent replaying the same message
5. **Implement Proper Error Handling**: Use specific error codes and messages for better debugging and security
6. **Use Events for Tracking**: Emit events when processing messages to facilitate off-chain tracking and indexing
7. **Test Thoroughly**: Test your receiver with various message types, token amounts, and edge cases
## [Example Implementation](https://docs.chain.link/ccip/tutorials/svm/receivers\#example-implementation)
For a complete, audited reference implementation of a CCIP Receiver, you can examine the [example-ccip-receiver](https://github.com/smartcontractkit/chainlink-ccip/tree/contracts-ccip-release/1.6.0/chains/solana/contracts/programs/example-ccip-receiver) in the Chainlink CCIP repository. This example demonstrates all the security patterns and best practices covered in this guide and can serve as a starting point for your own implementation.
## Get the latest Chainlink content straight to your inbox.
Email Address
## Chainlink CCIP API
[iframe](https://www.googletagmanager.com/ns.html?id=GTM-N6DQ47T)
Chainlink CCIP is now officially live on Solana. [View lanes and tokens.](https://docs.chain.link/ccip/directory/mainnet/chain/solana-mainnet?utm_medium=referral&utm_source=chainlink-docs&utm_campaign=solana-ccip)
On this page
# [CCIP v1.5.0 API Reference](https://docs.chain.link/ccip/api-reference/evm/v150\#overview)
## [API References](https://docs.chain.link/ccip/api-reference/evm/v150\#api-references)
### [Core Components](https://docs.chain.link/ccip/api-reference/evm/v150\#core-components)
- [Client](https://docs.chain.link/ccip/api-reference/evm/v1.5.0/client) \- Library providing structs and types for building CCIP messages
- [CCIPReceiver](https://docs.chain.link/ccip/api-reference/evm/v1.5.0/ccip-receiver) \- Base contract for receiving CCIP messages
- [IRouterClient](https://docs.chain.link/ccip/api-reference/evm/v1.5.0/i-router-client) \- Interface for sending messages through CCIP
- [Pool](https://docs.chain.link/ccip/api-reference/evm/v1.5.0/pool) \- Library providing token pool functions for cross-chain operations
### [Token Pools](https://docs.chain.link/ccip/api-reference/evm/v150\#token-pools)
- [TokenPool](https://docs.chain.link/ccip/api-reference/evm/v1.5.0/token-pool) \- Base abstract class defining common functionality for all token pools
- [BurnMintTokenPoolAbstract](https://docs.chain.link/ccip/api-reference/evm/v1.5.0/burn-mint-token-pool-abstract) \- Abstract contract for burn/mint token handling
- [BurnMintTokenPool](https://docs.chain.link/ccip/api-reference/evm/v1.5.0/burn-mint-token-pool) \- Implementation using `burn(amount)` for token burning
- [BurnFromMintTokenPool](https://docs.chain.link/ccip/api-reference/evm/v1.5.0/burn-from-mint-token-pool) \- Implementation using `burnFrom(address, amount)` for token burning
- [LockReleaseTokenPool](https://docs.chain.link/ccip/api-reference/evm/v1.5.0/lock-release-token-pool) \- Implementation for locking and releasing tokens on their native chain
### [Registry Components](https://docs.chain.link/ccip/api-reference/evm/v150\#registry-components)
- [TokenAdminRegistry](https://docs.chain.link/ccip/api-reference/evm/v1.5.0/token-admin-registry) \- Contract for storing token pool configurations
- [RegistryModuleOwnerCustom](https://docs.chain.link/ccip/api-reference/evm/v1.5.0/registry-module-owner-custom) \- Registry module for token admin registration
### [Error Handling](https://docs.chain.link/ccip/api-reference/evm/v150\#error-handling)
- [Errors](https://docs.chain.link/ccip/api-reference/evm/v1.5.0/errors) \- Comprehensive list of CCIP error codes and their descriptions
## Get the latest Chainlink content straight to your inbox.
Email Address
## Chainlink Token Manager
[iframe](https://www.googletagmanager.com/ns.html?id=GTM-N6DQ47T)
Chainlink CCIP is now officially live on Solana. [View lanes and tokens.](https://docs.chain.link/ccip/directory/mainnet/chain/solana-mainnet?utm_medium=referral&utm_source=chainlink-docs&utm_campaign=solana-ccip)
On this page
# [CCIP Token Manager](https://docs.chain.link/ccip/tools-resources/token-manager\#overview)
The CCIP Token Manager is a web interface designed to simplify the deployment, configuration, and management of Cross-Chain Tokens for use with Chainlink CCIP.
It provides guided workflows for token developers, abstracting away much of the complexity involved in setting up tokens for cross-chain transfers.
**Access the Token Manager:**
- **Mainnet:** [https://tokenmanager.chain.link/](https://tokenmanager.chain.link/)
- **Testnet:** [https://test.tokenmanager.chain.link/](https://test.tokenmanager.chain.link/)
## [Key Features & Workflows](https://docs.chain.link/ccip/tools-resources/token-manager\#key-features--workflows)
- **Deploy New Tokens**: Guides users through deploying a new token contract from scratch and configuring it for CCIP, primarily using the Burn & Mint mechanism.
- **Enable Existing Tokens**: Assists in making already-deployed tokens cross-chain capable by deploying and configuring the necessary CCIP token pool contracts.
- **Configuration Management**: Allows token administrators (once connected via wallet) to manage certain token pool settings, such as rate limits.
- **Admin Role Management**: Facilitates the process of registering and accepting administrative roles for token pools.
- **Token Verification**: Provides a process to request token verification for listing in the CCIP Directory.
- **Dashboard View**: Offers a dashboard to view and manage tokens associated with the connected wallet.
## Get the latest Chainlink content straight to your inbox.
Email Address
## Chainlink CCIP API
[iframe](https://www.googletagmanager.com/ns.html?id=GTM-N6DQ47T)
Chainlink CCIP is now officially live on Solana. [View lanes and tokens.](https://docs.chain.link/ccip/directory/mainnet/chain/solana-mainnet?utm_medium=referral&utm_source=chainlink-docs&utm_campaign=solana-ccip)
On this page
# [CCIP v1.6.0 API Reference](https://docs.chain.link/ccip/api-reference/evm/v160\#overview)
## [API References](https://docs.chain.link/ccip/api-reference/evm/v160\#api-references)
### [Core Components](https://docs.chain.link/ccip/api-reference/evm/v160\#core-components)
- [CCIPReceiver](https://docs.chain.link/ccip/api-reference/evm/v1.6.0/ccip-receiver) \- Base contract for receiving CCIP messages
- [Client](https://docs.chain.link/ccip/api-reference/evm/v1.6.0/client) \- Library providing structs and types for building CCIP messages
- [IRouterClient](https://docs.chain.link/ccip/api-reference/evm/v1.6.0/i-router-client) \- Interface for sending messages through CCIP
- [Pool](https://docs.chain.link/ccip/api-reference/evm/v1.6.0/pool) \- Library providing token pool functions for cross-chain operations
- [RateLimiter](https://docs.chain.link/ccip/api-reference/evm/v1.6.0/rate-limiter) \- Contract for managing rate limits on token transfers
- [TypeAndVersion](https://docs.chain.link/ccip/api-reference/evm/v1.6.0/i-type-and-version) \- Interface for contract versioning
### [Token Pools](https://docs.chain.link/ccip/api-reference/evm/v160\#token-pools)
- [BurnFromMintTokenPool](https://docs.chain.link/ccip/api-reference/evm/v1.6.0/burn-from-mint-token-pool) \- Implementation using `burnFrom(address, amount)` for token burning
- [BurnMintERC20](https://docs.chain.link/ccip/api-reference/evm/v1.6.0/burn-mint-erc20) \- Implementation for burning and minting ERC20 tokens
- [BurnMintTokenPool](https://docs.chain.link/ccip/api-reference/evm/v1.6.0/burn-mint-token-pool) \- Implementation using `burn(amount)` for token burning
- [BurnMintTokenPoolAbstract](https://docs.chain.link/ccip/api-reference/evm/v1.6.0/burn-mint-token-pool-abstract) \- Abstract contract for burn/mint token handling
- [LockReleaseTokenPool](https://docs.chain.link/ccip/api-reference/evm/v1.6.0/lock-release-token-pool) \- Implementation for locking and releasing tokens on their native chain
- [TokenPool](https://docs.chain.link/ccip/api-reference/evm/v1.6.0/token-pool) \- Base abstract class defining common functionality for all token pools
### [Access Control](https://docs.chain.link/ccip/api-reference/evm/v160\#access-control)
- [Ownable2Step](https://docs.chain.link/ccip/api-reference/evm/v1.6.0/ownable-2-step) \- Base contract implementing secure two-step ownership transfer
- [Ownable2StepMsgSender](https://docs.chain.link/ccip/api-reference/evm/v1.6.0/ownable-2-step-msg-sender) \- Extension of Ownable2Step that sets msg.sender as initial owner
### [Registry Components](https://docs.chain.link/ccip/api-reference/evm/v160\#registry-components)
- [RegistryModuleOwnerCustom](https://docs.chain.link/ccip/api-reference/evm/v1.6.0/registry-module-owner-custom) \- Registry module for token admin registration
- [TokenAdminRegistry](https://docs.chain.link/ccip/api-reference/evm/v1.6.0/token-admin-registry) \- Contract for storing token pool configurations
### [Error Handling](https://docs.chain.link/ccip/api-reference/evm/v160\#error-handling)
- [Errors](https://docs.chain.link/ccip/api-reference/evm/v1.6.0/errors) \- Comprehensive list of CCIP error codes and their descriptions
## Get the latest Chainlink content straight to your inbox.
Email Address
## Cross-Chain Token Standard
[iframe](https://www.googletagmanager.com/ns.html?id=GTM-N6DQ47T)
Chainlink CCIP is now officially live on Solana. [View lanes and tokens.](https://docs.chain.link/ccip/directory/mainnet/chain/solana-mainnet?utm_medium=referral&utm_source=chainlink-docs&utm_campaign=solana-ccip)
On this page
# [Cross-Chain Token Standard](https://docs.chain.link/ccip/concepts/cross-chain-token\#overview)
This section explains the Cross-Chain Token (CCT) standard, a Chainlink CCIP feature enabling secure and reliable cross-chain token transfers. Learn how to make your tokens compatible with CCIP.
- **[Overview](https://docs.chain.link/ccip/concepts/cross-chain-token/overview)**: Get a high-level summary of the CCT standard and its benefits.
- **[EVM Tokens](https://docs.chain.link/ccip/concepts/cross-chain-token/evm/)**: Guidance for integrating tokens on EVM-compatible blockchains.
- **[SVM Tokens](https://docs.chain.link/ccip/concepts/cross-chain-token/svm/)**: Guidance for integrating tokens on SVM-based blockchains like Solana.
## Get the latest Chainlink content straight to your inbox.
Email Address
## Cross-Chain dApp Best Practices
[iframe](https://www.googletagmanager.com/ns.html?id=GTM-N6DQ47T)
Chainlink CCIP is now officially live on Solana. [View lanes and tokens.](https://docs.chain.link/ccip/directory/mainnet/chain/solana-mainnet?utm_medium=referral&utm_source=chainlink-docs&utm_campaign=solana-ccip)
On this page
# [CCIP Best Practices (SVM)](https://docs.chain.link/ccip/concepts/best-practices/svm\#overview)
Before you deploy your cross-chain dApps to mainnet, make sure that your dApps follow the best practices in this document. You are responsible for thoroughly reviewing your code and applying best practices to ensure that your cross-chain dApps are secure and reliable. If you have a unique use case for CCIP that might involve additional cross-chain risk, [contact the Chainlink Labs Team](https://chain.link/ccip-contact) before deploying your application to mainnet.
## [Verify destination chain](https://docs.chain.link/ccip/concepts/best-practices/svm\#verify-destination-chain)
Before calling the router's `ccip_send` [instruction](https://docs.chain.link/ccip/api-reference/svm/v1.6.0/router#ccip_send), ensure your code verifies that the destination chain is supported by the CCIP Router. Sending messages to unsupported chains will fail and potentially waste transaction fees.
You can programmatically verify destination chain support using Solana PDAs (Program Derived Addresses). Here below is a JavaScript example of how to verify destination chain support:

```javascript
import { Connection, PublicKey } from "@solana/web3.js"
/**
* Verifies if a destination chain is supported by the CCIP Router
*
* @param {Connection} connection - Solana connection object
* @param {string} routerProgramId - The CCIP Router program ID
* @param {BigInt} destinationChainSelector - Chain selector to verify
* @returns {Promise} - Whether the chain is supported
*/
async function isDestinationChainSupported(connection, routerProgramId, destinationChainSelector) {
// Convert chain selector to little-endian buffer (Solana standard)
const chainSelectorBuffer = Buffer.alloc(8)
chainSelectorBuffer.writeBigUInt64LE(BigInt(destinationChainSelector))
// Derive the PDA for this destination chain
// The Router stores chain state in PDAs with seed ["dest_chain_state", chainSelector]
const [destChainPda] = PublicKey.findProgramAddressSync(
[Buffer.from("dest_chain_state"), chainSelectorBuffer],
new PublicKey(routerProgramId)
)
// If the account exists, the chain is supported
const accountInfo = await connection.getAccountInfo(destChainPda)
return accountInfo !== null
}
```
## [Verify source chain](https://docs.chain.link/ccip/concepts/best-practices/svm\#verify-source-chain)
When implementing the `ccip_receive` [method](https://docs.chain.link/ccip/api-reference/svm/v1.6.0/receiver#ccip_receive) in a program residing on the destination chain, ensure to verify the source chain of the incoming CCIP message. This verification ensures that CCIP messages can only be received from trusted source chains.
## [Verify sender](https://docs.chain.link/ccip/concepts/best-practices/svm\#verify-sender)
When implementing the [`ccip_receive`](https://docs.chain.link/ccip/api-reference/svm/v1.6.0/receiver#ccip_receive) instruction in a program residing on the destination chain, it's important to validate the sender of the incoming CCIP message. This check ensures that CCIP messages are received only from trusted sender addresses.
**Note**: Depending on your use case, this verification might not always be necessary.
## [Verify authority and allowed offramp](https://docs.chain.link/ccip/concepts/best-practices/svm\#verify-authority-and-allowed-offramp)
When you implement the [`ccip_receive`](https://docs.chain.link/ccip/api-reference/svm/v1.6.0/receiver#ccip_receive) instruction in the program residing on the destination chain, validate that the `authority` account is the correct Offramp CPI signer PDA and that `allowed_offramp` is the correct PDA owned by the router program. This verification ensures that only the authorized CCIP Offramp program can call the `ccip_receive` function.
**Example in Rust**:

```rust
#[derive(Accounts)]
#[instruction(message: Any2SVMMessage)]
pub struct CcipReceive<'info> {
// Offramp CPI signer PDA must be first
#[account(\
seeds = [EXTERNAL_EXECUTION_CONFIG_SEED, crate::ID.as_ref()],\
bump,\
seeds::program = offramp_program.key(),\
)]
pub authority: Signer<'info>,
/// CHECK: Offramp program exists only to derive the allowed offramp PDA
pub offramp_program: UncheckedAccount<'info>,
/// CHECK: PDA owned by the router program verifying this is an allowed offramp
#[account(\
owner = state.router @ CcipReceiverError::InvalidCaller,\
seeds = [\
ALLOWED_OFFRAMP,\
message.source_chain_selector.to_le_bytes().as_ref(),\
offramp_program.key().as_ref()\
],\
bump,\
seeds::program = state.router,\
)]
pub allowed_offramp: UncheckedAccount<'info>,
// Your state account containing the router address
#[account(seeds = [STATE_SEED], bump)]
pub state: Account<'info, ProgramState>,
// Additional accounts as needed
// ...
}
```
## [Using `extra_args`](https://docs.chain.link/ccip/concepts/best-practices/svm\#using-extra_args)
The `extra_args` parameter provides chain-specific configuration for cross-chain messaging. It controls execution parameters on the destination chain, including resource allocation and message ordering guarantees.
### [Parameter Selection](https://docs.chain.link/ccip/concepts/best-practices/svm\#parameter-selection)
When sending a CCIP message, you must select the appropriate `extra_args` structure based on your destination chain:
- `SVMExtraArgsV1`: For Solana and other SVM-based destinations
- `EVMExtraArgsV2`: For Ethereum and other EVM-based destinations
For the full parameter specification, refer to the [CCIP API Reference](https://docs.chain.link/ccip/api-reference/svm/v1.6.0/messages#extra-args).
### [Setting `compute_units` (SVM destinations)](https://docs.chain.link/ccip/concepts/best-practices/svm\#setting-compute_units-svm-destinations)
The `compute_units` parameter specifies the maximum Solana compute budget (in units) that the CCIP OffRamp can use when executing the `ccip_receive()` instruction on the destination program. This parameter directly affects fee calculation since higher compute budgets require more resources.
**Best Practices:**
- **For Program Receivers**: Set sufficient compute units for your program logic execution; any unused units are not refunded.
- **For Wallet Receivers**: When transferring tokens directly to a wallet with no `ccip_receive()` implementation, set `compute_units` to `0` since no program execution is needed.
- **For Compute Unit Estimation**: Test your receiver program under varying conditions to determine optimal values. Consider:
- Message size and complexity
- Token transfer operations
- Program execution paths
- Additional accounts referenced
### [Setting `accountIsWritableBitmap`](https://docs.chain.link/ccip/concepts/best-practices/svm\#setting-accountiswritablebitmap)
When using the `SVMExtraArgsV1` structure, the `accountIsWritableBitmap` field specifies which additional accounts in your message should be marked as writable:
- This is a 64-bit bitmap where each bit position corresponds to an account in the `accounts` array.
- Set the corresponding bit to `1` to mark an account as writable (bit 0 for the first account, bit 1 for the second, etc.).
- Must be provided in little-endian format for Solana compatibility.
### [Setting `tokenReceiver`](https://docs.chain.link/ccip/concepts/best-practices/svm\#setting-tokenreceiver)
The `tokenReceiver` parameter in `SVMExtraArgsV1` specifies which Solana account will receive the tokens:
#### [When Receiving at Wallet Addresses](https://docs.chain.link/ccip/concepts/best-practices/svm\#when-receiving-at-wallet-addresses)
When sending tokens to an end-user wallet:
- Set `tokenReceiver` to the user's wallet address (base58 encoded)
- Do NOT use an Associated Token Account (ATA) - use the wallet address directly
- The CCIP infrastructure will automatically derive the proper ATA on the recipient's behalf

```javascript
// Example: Setting tokenReceiver to a user's wallet
tokenReceiver: "EPUjBP3Xf76K1VKsDSc6GupBWE8uykNksCLJgXZn87CB" // Recipient wallet
```
#### [When Receiving at Program Addresses](https://docs.chain.link/ccip/concepts/best-practices/svm\#when-receiving-at-program-addresses)
When sending tokens to a Solana program:
- Set `tokenReceiver` to a Program Derived Address (PDA) that the program has authority over
- The PDA must be derived using seeds that the program recognizes
- The program must include logic to handle and manage the received tokens

```javascript
// Example: Setting tokenReceiver to a PDA the program controls
tokenReceiver: "57y3NXjkiAzP5Gw9WuUwzJMJbJQAHH6jUYBQfZdTE5zJ" // PDA with program authority
```
In Solana's security model, programs cannot directly control tokens unless they have authority over the token account:
1. **Program Derived Addresses (PDAs)** must be derived from the program's ID using specified seeds
2. Only the program that created the PDA can sign as that PDA
3. Without proper authority, the program cannot transfer, burn, or otherwise manipulate the tokens
#### [For Data-Only Messages](https://docs.chain.link/ccip/concepts/best-practices/svm\#for-data-only-messages)
When sending only data (no tokens):
- Set `tokenReceiver` to the default Solana PublicKey ( `11111111111111111111111111111111`)
- This is required even though no tokens are being transferred
### [Setting `allowOutOfOrderExecution`](https://docs.chain.link/ccip/concepts/best-practices/svm\#setting-allowoutoforderexecution)
The `allowOutOfOrderExecution` parameter controls message ordering guarantees:
- `true`: Messages may be processed out of sequence relative to other messages from the same sender
- `false`: Messages are processed in the exact sequence they were sent
## [Evaluate the security and reliability of the networks that you use](https://docs.chain.link/ccip/concepts/best-practices/svm\#evaluate-the-security-and-reliability-of-the-networks-that-you-use)
Although CCIP has been thoroughly reviewed and audited, inherent risks might still exist based on your use case, the blockchain networks where you deploy your programs, and the network conditions on those blockchains.
## [Review and audit your code](https://docs.chain.link/ccip/concepts/best-practices/svm\#review-and-audit-your-code)
Before securing value with programs that implement CCIP interfaces and routers, ensure that your code is secure and reliable. If you have a unique use case for CCIP that might involve additional cross-chain risk, [contact the Chainlink Labs Team](https://chain.link/ccip-contact) before deploying your application to mainnet.
## [Soak test your dApps](https://docs.chain.link/ccip/concepts/best-practices/svm\#soak-test-your-dapps)
Be aware of the [Service Limits and Rate Limits for Supported Networks](https://docs.chain.link/ccip/directory). Before you provide access to end users or secure value, soak test your cross-chain dApps. Ensure that your dApps can operate within these limits and operate correctly during usage spikes or unfavorable network conditions.
## [Monitor your dApps](https://docs.chain.link/ccip/concepts/best-practices/svm\#monitor-your-dapps)
When you build applications that depend on CCIP, include monitoring and safeguards to protect against the negative impact of extreme market events, possible malicious activity on your dApp, potential delays, and outages.
Create your own monitoring alerts based on deviations from normal activity. This will notify you when potential issues occur so you can respond to them.
## [Multi-Signature Authorities](https://docs.chain.link/ccip/concepts/best-practices/svm\#multi-signature-authorities)
Multi-signature authorities enhance security by requiring multiple signatures to authorize transactions.
### [Threshold configuration](https://docs.chain.link/ccip/concepts/best-practices/svm\#threshold-configuration)
Set an optimal threshold for signers based on the trust level of participants and the required security.
### [Role-based access control](https://docs.chain.link/ccip/concepts/best-practices/svm\#role-based-access-control)
Assign roles with specific permissions to different signers, limiting access to critical operations to trusted individuals.
### [Hardware wallet integration](https://docs.chain.link/ccip/concepts/best-practices/svm\#hardware-wallet-integration)
Use hardware wallets for signers to safeguard private keys from online vulnerabilities. Ensure that these devices are secure and regularly updated.
### [Regular audits and updates](https://docs.chain.link/ccip/concepts/best-practices/svm\#regular-audits-and-updates)
Conduct periodic audits of signer access and authority settings. Update the multisig setup as necessary, especially when personnel changes occur.
### [Emergency recovery plans](https://docs.chain.link/ccip/concepts/best-practices/svm\#emergency-recovery-plans)
Implement procedures for recovering from lost keys or compromised accounts, such as a predefined recovery multisig or recovery key holders.
### [Transaction review process](https://docs.chain.link/ccip/concepts/best-practices/svm\#transaction-review-process)
Establish a standard process for reviewing and approving transactions, which can include a waiting period for large transfers to mitigate risks.
### [Documentation and training](https://docs.chain.link/ccip/concepts/best-practices/svm\#documentation-and-training)
Maintain thorough documentation of multisig operations and provide training for all signers to ensure familiarity with processes and security protocols.
## Get the latest Chainlink content straight to your inbox.
Email Address
## Manual Token Transfer Execution
[iframe](https://www.googletagmanager.com/ns.html?id=GTM-N6DQ47T)
Chainlink CCIP is now officially live on Solana. [View lanes and tokens.](https://docs.chain.link/ccip/directory/mainnet/chain/solana-mainnet?utm_medium=referral&utm_source=chainlink-docs&utm_campaign=solana-ccip)
On this page
# [Manual Execution](https://docs.chain.link/ccip/tutorials/evm/manual-execution\#overview)
This tutorial is similar to the [programmable token transfers example](https://docs.chain.link/ccip/tutorials/evm/programmable-token-transfers). It demonstrates the use of Chainlink CCIP for transferring tokens and arbitrary data between smart contracts on different blockchains. A distinctive feature of this tutorial is that we intentionally set a very low gas limit when using CCIP to send our message. This low gas limit is designed to cause the execution on the destination chain to fail, providing an opportunity to demonstrate the manual execution feature. Here's how you will proceed:
1. Initiate a Transfer: You'll transfer tokens and arbitrary data from your source contract on Avalanche Fuji to a receiver contract on Ethereum Sepolia. You will notice that the CCIP message has a very low gas limit, causing the execution on the receiver contract to fail.
2. Failure of CCIP Message Delivery: Once the transaction is finalized on the source chain (Avalanche Fuji), CCIP will deliver your message to the receiver contract on the destination chain (Ethereum Sepolia). You can follow the progress of your transaction using the [CCIP explorer](https://ccip.chain.link/). Here, you'll observe that the execution on the receiver contract failed due to the low gas limit.
3. Manual Execution via CCIP Explorer: Using the [CCIP explorer](https://ccip.chain.link/), you will override the previously set gas limit and retry the execution. This process is referred to as _manual execution_.
4. Confirm Successful Execution: After manually executing the transaction with an adequate gas limit, you'll see that the status of your CCIP message is updated to successful. This indicates that the tokens and data were correctly transferred to the receiver contract.
## [Before you begin](https://docs.chain.link/ccip/tutorials/evm/manual-execution\#before-you-begin)
1. You should understand how to write, compile, deploy, and fund a smart contract. If you need to brush up on the basics, read this [tutorial](https://docs.chain.link/quickstarts/deploy-your-first-contract), which will guide you through using the [Solidity programming language](https://soliditylang.org/), interacting with the [MetaMask wallet](https://metamask.io/) and working within the [Remix Development Environment](https://remix.ethereum.org/).
2. Your account must have some AVAX and LINK tokens on _Avalanche Fuji_ and ETH tokens on _Ethereum Sepolia_. Learn how to [Acquire testnet LINK](https://docs.chain.link/resources/acquire-link).
3. Check the [CCIP Directory](https://docs.chain.link/ccip/directory) to confirm that the tokens you will transfer are supported for your lane. In this example, you will transfer tokens from _Avalanche Fuji_ to _Ethereum Sepolia_ so check the list of supported tokens [here](https://docs.chain.link/ccip/directory/testnet/chain/avalanche-fuji-testnet).
4. Learn how to [acquire CCIP test tokens](https://docs.chain.link/ccip/test-tokens#mint-test-tokens). Following this guide, you should have CCIP-BnM tokens, and CCIP-BnM should appear in the list of your tokens in MetaMask.
5. Learn how to [fund your contract](https://docs.chain.link/resources/fund-your-contract). This guide shows how to fund your contract in LINK, but you can use the same guide for funding your contract with any ERC20 tokens as long as they appear in the list of tokens in MetaMask.
6. Follow the previous tutorial: [_Transfer Tokens with Data_](https://docs.chain.link/ccip/tutorials/evm/programmable-token-transfers) to learn how to make programmable token transfers using CCIP.
7. Create a free account on [Tenderly](https://tenderly.co/). You will use Tenderly to investigate the failed execution of the receiver contract.
## [Tutorial](https://docs.chain.link/ccip/tutorials/evm/manual-execution\#tutorial)
In this tutorial, you'll send a text _string_ and CCIP-BnM tokens between smart contracts on _Avalanche Fuji_ and _Ethereum Sepolia_ using CCIP and pay transaction fees in LINK. The tutorial demonstrates setting a deliberately low gas limit in the CCIP message, causing initial execution failure on the receiver contract. You will then:
1. Use the [CCIP explorer](https://ccip.chain.link/) to increase the gas limit.
2. Manually retry the execution.
3. Observe successful execution after the gas limit adjustment.

```solidity
// SPDX-License-Identifier: MIT
pragma solidity 0.8.24;
import {IRouterClient} from "@chainlink/contracts-ccip/contracts/interfaces/IRouterClient.sol";
import {OwnerIsCreator} from "@chainlink/contracts/src/v0.8/shared/access/OwnerIsCreator.sol";
import {Client} from "@chainlink/contracts-ccip/contracts/libraries/Client.sol";
import {CCIPReceiver} from "@chainlink/contracts-ccip/contracts/applications/CCIPReceiver.sol";
import {IERC20} from "@chainlink/contracts/src/v0.8/vendor/openzeppelin-solidity/v4.8.3/contracts/token/ERC20/IERC20.sol";
import {SafeERC20} from "@chainlink/contracts/src/v0.8/vendor/openzeppelin-solidity/v4.8.3/contracts/token/ERC20/utils/SafeERC20.sol";
/**
* THIS IS AN EXAMPLE CONTRACT THAT USES HARDCODED VALUES FOR CLARITY.
* THIS IS AN EXAMPLE CONTRACT THAT USES UN-AUDITED CODE.
* DO NOT USE THIS CODE IN PRODUCTION.
*/
/// @title - A simple messenger contract for transferring/receiving tokens and data across chains.
contract ProgrammableTokenTransfersLowGasLimit is CCIPReceiver, OwnerIsCreator {
using SafeERC20 for IERC20;
// Custom errors to provide more descriptive revert messages.
error NotEnoughBalance(uint256 currentBalance, uint256 calculatedFees); // Used to make sure contract has enough balance to cover the fees.
error NothingToWithdraw(); // Used when trying to withdraw Ether but there's nothing to withdraw.
error DestinationChainNotAllowed(uint64 destinationChainSelector); // Used when the destination chain has not been allowlisted by the contract owner.
error SourceChainNotAllowed(uint64 sourceChainSelector); // Used when the source chain has not been allowlisted by the contract owner.
error SenderNotAllowed(address sender); // Used when the sender has not been allowlisted by the contract owner.
// Event emitted when a message is sent to another chain.
event MessageSent(
bytes32 indexed messageId, // The unique ID of the CCIP message.
uint64 indexed destinationChainSelector, // The chain selector of the destination chain.
address receiver, // The address of the receiver on the destination chain.
string text, // The text being sent.
address token, // The token address that was transferred.
uint256 tokenAmount, // The token amount that was transferred.
address feeToken, // the token address used to pay CCIP fees.
uint256 fees // The fees paid for sending the message.
);
// Event emitted when a message is received from another chain.
event MessageReceived(
bytes32 indexed messageId, // The unique ID of the CCIP message.
uint64 indexed sourceChainSelector, // The chain selector of the source chain.
address sender, // The address of the sender from the source chain.
string text, // The text that was received.
address token, // The token address that was transferred.
uint256 tokenAmount // The token amount that was transferred.
);
bytes32 private s_lastReceivedMessageId; // Store the last received messageId.
address private s_lastReceivedTokenAddress; // Store the last received token address.
uint256 private s_lastReceivedTokenAmount; // Store the last received amount.
string private s_lastReceivedText; // Store the last received text.
// Mapping to keep track of allowlisted destination chains.
mapping(uint64 => bool) public allowlistedDestinationChains;
// Mapping to keep track of allowlisted source chains.
mapping(uint64 => bool) public allowlistedSourceChains;
// Mapping to keep track of allowlisted senders.
mapping(address => bool) public allowlistedSenders;
IERC20 private s_linkToken;
/// @notice Constructor initializes the contract with the router address.
/// @param _router The address of the router contract.
/// @param _link The address of the link contract.
constructor(address _router, address _link) CCIPReceiver(_router) {
s_linkToken = IERC20(_link);
}
/// @dev Modifier that checks if the chain with the given destinationChainSelector is allowlisted.
/// @param _destinationChainSelector The selector of the destination chain.
modifier onlyAllowlistedDestinationChain(uint64 _destinationChainSelector) {
if (!allowlistedDestinationChains[_destinationChainSelector])
revert DestinationChainNotAllowed(_destinationChainSelector);
_;
}
/// @dev Modifier that checks if the chain with the given sourceChainSelector is allowlisted and if the sender is allowlisted.
/// @param _sourceChainSelector The selector of the destination chain.
/// @param _sender The address of the sender.
modifier onlyAllowlisted(uint64 _sourceChainSelector, address _sender) {
if (!allowlistedSourceChains[_sourceChainSelector])
revert SourceChainNotAllowed(_sourceChainSelector);
if (!allowlistedSenders[_sender]) revert SenderNotAllowed(_sender);
_;
}
/// @dev Updates the allowlist status of a destination chain for transactions.
/// @notice This function can only be called by the owner.
/// @param _destinationChainSelector The selector of the destination chain to be updated.
/// @param allowed The allowlist status to be set for the destination chain.
function allowlistDestinationChain(
uint64 _destinationChainSelector,
bool allowed
) external onlyOwner {
allowlistedDestinationChains[_destinationChainSelector] = allowed;
}
/// @dev Updates the allowlist status of a source chain
/// @notice This function can only be called by the owner.
/// @param _sourceChainSelector The selector of the source chain to be updated.
/// @param allowed The allowlist status to be set for the source chain.
function allowlistSourceChain(
uint64 _sourceChainSelector,
bool allowed
) external onlyOwner {
allowlistedSourceChains[_sourceChainSelector] = allowed;
}
/// @dev Updates the allowlist status of a sender for transactions.
/// @notice This function can only be called by the owner.
/// @param _sender The address of the sender to be updated.
/// @param allowed The allowlist status to be set for the sender.
function allowlistSender(address _sender, bool allowed) external onlyOwner {
allowlistedSenders[_sender] = allowed;
}
/// @notice Sends data and transfer tokens to receiver on the destination chain.
/// @notice Pay for fees in LINK.
/// @notice the gasLimit is set to 20_000 on purpose to force the execution to fail on the destination chain
/// @dev Assumes your contract has sufficient LINK to pay for CCIP fees.
/// @param _destinationChainSelector The identifier (aka selector) for the destination blockchain.
/// @param _receiver The address of the recipient on the destination blockchain.
/// @param _text The string data to be sent.
/// @param _token token address.
/// @param _amount token amount.
/// @return messageId The ID of the CCIP message that was sent.
function sendMessagePayLINK(
uint64 _destinationChainSelector,
address _receiver,
string calldata _text,
address _token,
uint256 _amount
)
external
onlyOwner
onlyAllowlistedDestinationChain(_destinationChainSelector)
returns (bytes32 messageId)
{
// Set the token amounts
Client.EVMTokenAmount[]
memory tokenAmounts = new Client.EVMTokenAmount[](1);
tokenAmounts[0] = Client.EVMTokenAmount({
token: _token,
amount: _amount
});
// Create an EVM2AnyMessage struct in memory with necessary information for sending a cross-chain message
// address(linkToken) means fees are paid in LINK
Client.EVM2AnyMessage memory evm2AnyMessage = Client.EVM2AnyMessage({
receiver: abi.encode(_receiver), // ABI-encoded receiver address
data: abi.encode(_text), // ABI-encoded string
tokenAmounts: tokenAmounts, // The amount and type of token being transferred
extraArgs: Client._argsToBytes(
// Additional arguments, setting gas limit and allowing out-of-order execution.
// Best Practice: For simplicity, the values are hardcoded. It is advisable to use a more dynamic approach
// where you set the extra arguments off-chain. This allows adaptation depending on the lanes, messages,
// and ensures compatibility with future CCIP upgrades. Read more about it here: https://docs.chain.link/ccip/concepts/best-practices/evm#using-extraargs
Client.GenericExtraArgsV2({
gasLimit: 20_000, // Gas limit for the callback on the destination chain
allowOutOfOrderExecution: true // Allows the message to be executed out of order relative to other messages from the same sender
})
),
// Set the feeToken to a LINK token address
feeToken: address(s_linkToken)
});
// Initialize a router client instance to interact with cross-chain router
IRouterClient router = IRouterClient(this.getRouter());
// Get the fee required to send the CCIP message
uint256 fees = router.getFee(_destinationChainSelector, evm2AnyMessage);
if (fees > s_linkToken.balanceOf(address(this)))
revert NotEnoughBalance(s_linkToken.balanceOf(address(this)), fees);
// approve the Router to transfer LINK tokens on contract's behalf. It will spend the fees in LINK
s_linkToken.approve(address(router), fees);
// approve the Router to spend tokens on contract's behalf. It will spend the amount of the given token
IERC20(_token).approve(address(router), _amount);
// Send the message through the router and store the returned message ID
messageId = router.ccipSend(_destinationChainSelector, evm2AnyMessage);
// Emit an event with message details
emit MessageSent(
messageId,
_destinationChainSelector,
_receiver,
_text,
_token,
_amount,
address(s_linkToken),
fees
);
// Return the message ID
return messageId;
}
/**
* @notice Returns the details of the last CCIP received message.
* @dev This function retrieves the ID, text, token address, and token amount of the last received CCIP message.
* @return messageId The ID of the last received CCIP message.
* @return text The text of the last received CCIP message.
* @return tokenAddress The address of the token in the last CCIP received message.
* @return tokenAmount The amount of the token in the last CCIP received message.
*/
function getLastReceivedMessageDetails()
public
view
returns (
bytes32 messageId,
string memory text,
address tokenAddress,
uint256 tokenAmount
)
{
return (
s_lastReceivedMessageId,
s_lastReceivedText,
s_lastReceivedTokenAddress,
s_lastReceivedTokenAmount
);
}
/// handle a received message
function _ccipReceive(
Client.Any2EVMMessage memory any2EvmMessage
)
internal
override
onlyAllowlisted(
any2EvmMessage.sourceChainSelector,
abi.decode(any2EvmMessage.sender, (address))
) // Make sure source chain and sender are allowlisted
{
s_lastReceivedMessageId = any2EvmMessage.messageId; // fetch the messageId
s_lastReceivedText = abi.decode(any2EvmMessage.data, (string)); // abi-decoding of the sent text
// Expect one token to be transferred at once, but you can transfer several tokens.
s_lastReceivedTokenAddress = any2EvmMessage.destTokenAmounts[0].token;
s_lastReceivedTokenAmount = any2EvmMessage.destTokenAmounts[0].amount;
emit MessageReceived(
any2EvmMessage.messageId,
any2EvmMessage.sourceChainSelector, // fetch the source chain identifier (aka selector)
abi.decode(any2EvmMessage.sender, (address)), // abi-decoding of the sender address,
abi.decode(any2EvmMessage.data, (string)),
any2EvmMessage.destTokenAmounts[0].token,
any2EvmMessage.destTokenAmounts[0].amount
);
}
/// @notice Allows the owner of the contract to withdraw all tokens of a specific ERC20 token.
/// @dev This function reverts with a 'NothingToWithdraw' error if there are no tokens to withdraw.
/// @param _beneficiary The address to which the tokens will be sent.
/// @param _token The contract address of the ERC20 token to be withdrawn.
function withdrawToken(
address _beneficiary,
address _token
) public onlyOwner {
// Retrieve the balance of this contract
uint256 amount = IERC20(_token).balanceOf(address(this));
// Revert if there is nothing to withdraw
if (amount == 0) revert NothingToWithdraw();
IERC20(_token).safeTransfer(_beneficiary, amount);
}
}
```
[Open in Remix](https://remix.ethereum.org/#url=https://docs.chain.link/samples/CCIP/ProgrammableTokenTransfersLowGasLimit.sol&autoCompile=true) [What is Remix?](https://docs.chain.link/getting-started/conceptual-overview#what-is-remix)
### [Deploy your contracts](https://docs.chain.link/ccip/tutorials/evm/manual-execution\#deploy-your-contracts)
To use this contract:
1. [Open the contract in Remix](https://remix.ethereum.org/#url=https://docs.chain.link/samples/CCIP/ProgrammableTokenTransfersLowGasLimit.sol).
2. Compile your contract.
3. Deploy, fund your sender contract on _Avalanche Fuji_ and enable sending messages to _Ethereum Sepolia_:
1. Open MetaMask and select the network _Avalanche Fuji_.
2. In Remix IDE, click on _Deploy & Run Transactions_ and select _Injected Provider - MetaMask_ from the environment list. Remix will then interact with your MetaMask wallet to communicate with _Avalanche Fuji_.
3. Fill in your blockchain's router and LINK contract addresses. The router address can be found on the [CCIP Directory](https://docs.chain.link/ccip/directory) and the LINK contract address on the [LINK token contracts page](https://docs.chain.link/resources/link-token-contracts). For _Avalanche Fuji_:
- The router address is `0xF694E193200268f9a4868e4Aa017A0118C9a8177`,
- The LINK contract address is `0x0b9d5D9136855f6FEc3c0993feE6E9CE8a297846`.
4. Click the **transact** button. After you confirm the transaction, the contract address appears on the _Deployed Contracts_ list.
Note your contract address.
5. Open MetaMask and fund your contract with CCIP-BnM tokens. You can transfer `0.002` _CCIP-BnM_ to your contract.
6. Open MetaMask and fund your contract with LINK tokens. You can transfer `70` _LINK_ to your contract. In this example, LINK is used to pay the CCIP fees.
**Note:** This transaction fee is significantly higher than normal due to gas spikes on Sepolia. To run this example, you can get additional testnet LINK
from [faucets.chain.link](https://faucets.chain.link/) or use a supported testnet other than Sepolia.
7. Enable your contract to send CCIP messages to _Ethereum Sepolia_:
1. In Remix IDE, under _Deploy & Run Transactions_, open the list of transactions of your smart contract deployed on _Avalanche Fuji_.
2. Call the `allowlistDestinationChain` with `16015286601757825753` as the destination chain selector, and `true` as allowed. Each chain selector is found on the [CCIP Directory](https://docs.chain.link/ccip/directory).
4. Deploy your receiver contract on _Ethereum Sepolia_ and enable receiving messages from your sender contract:
1. Open MetaMask and select the network _Ethereum Sepolia_.
2. In Remix IDE, under _Deploy & Run Transactions_, make sure the environment is still _Injected Provider - MetaMask_.
3. Fill in your blockchain's router and LINK contract addresses. The router address can be found on the [CCIP Directory](https://docs.chain.link/ccip/directory) and the LINK contract address on the [LINK token contracts page](https://docs.chain.link/resources/link-token-contracts). For _Ethereum Sepolia_:
- The router address is `0x0BF3dE8c5D3e8A2B34D2BEeB17ABfCeBaf363A59`,
- The LINK contract address is `0x779877A7B0D9E8603169DdbD7836e478b4624789`.
4. Click the **transact** button. After you confirm the transaction, the contract address appears on the _Deployed Contracts_ list.
Note your contract address.
5. Enable your contract to receive CCIP messages from _Avalanche Fuji_:
1. In Remix IDE, under _Deploy & Run Transactions_, open the list of transactions of your smart contract deployed on _Ethereum Sepolia_.
2. Call the `allowlistSourceChain` with `14767482510784806043` as the source chain selector, and `true` as allowed. Each chain selector is found on the [CCIP Directory](https://docs.chain.link/ccip/directory).
6. Enable your contract to receive CCIP messages from the contract that you deployed on _Avalanche Fuji_:
1. In Remix IDE, under _Deploy & Run Transactions_, open the list of transactions of your smart contract deployed on _Ethereum Sepolia_.
2. Call the `allowlistSender` with the contract address of the contract that you deployed on _Avalanche Fuji_, and `true` as allowed.
At this point, you have one _sender_ contract on _Avalanche Fuji_ and one _receiver_ contract on _Ethereum Sepolia_. As security measures, you enabled the sender contract to send CCIP messages to _Ethereum Sepolia_ and the receiver contract to receive CCIP messages from the sender and _Avalanche Fuji_.
### [Transfer and Receive tokens and data and pay in LINK](https://docs.chain.link/ccip/tutorials/evm/manual-execution\#transfer-and-receive-tokens-and-data-and-pay-in-link)
You will transfer _0.001 CCIP-BnM_ and a text. The CCIP fees for using CCIP will be paid in LINK.
1. Send a string data with tokens from _Avalanche Fuji_:
1. Open MetaMask and select the network _Avalanche Fuji_.
2. In Remix IDE, under _Deploy & Run Transactions_, open the list of transactions of your smart contract deployed on _Avalanche Fuji_.
3. Fill in the arguments of the _**sendMessagePayLINK**_ function:
| Argument | Value and Description |
| --- | --- |
| \_destinationChainSelector | `16015286601757825753`
CCIP Chain identifier of the destination blockchain ( _Ethereum Sepolia_ in this example). You can find each chain selector on the [CCIP Directory](https://docs.chain.link/ccip/directory). |
| \_receiver | Your receiver contract address at _Ethereum Sepolia_.
The destination contract address. |
| \_text | `Hello World!`
Any `string` |
| \_token | `0xD21341536c5cF5EB1bcb58f6723cE26e8D8E90e4`
The _CCIP-BnM_ contract address at the source chain ( _Avalanche Fuji_ in this example). You can find all the addresses for each supported blockchain on the [CCIP Directory](https://docs.chain.link/ccip/directory). |
| \_amount | `1000000000000000`
The token amount ( _0.001 CCIP-BnM_). |
4. Click on `transact` and confirm the transaction on MetaMask.
5. After the transaction is successful, record the transaction hash. Here is an [example](https://testnet.snowtrace.io/tx/0xfb7e1eea5335c018589166b1ac597b618a92899d99ec4d1b1079e147cde81d9b) of a transaction on _Avalanche Fuji_.
2. Open the [CCIP explorer](https://ccip.chain.link/) and search your cross-chain transaction using the transaction hash. Note that the _Gas Limit_ is _20000_. In this example, the CCIP message ID is _0xf8dc098c832332ac59ccc73ee00b480975d8f122a2265c90a1ccc2cd52268770_.
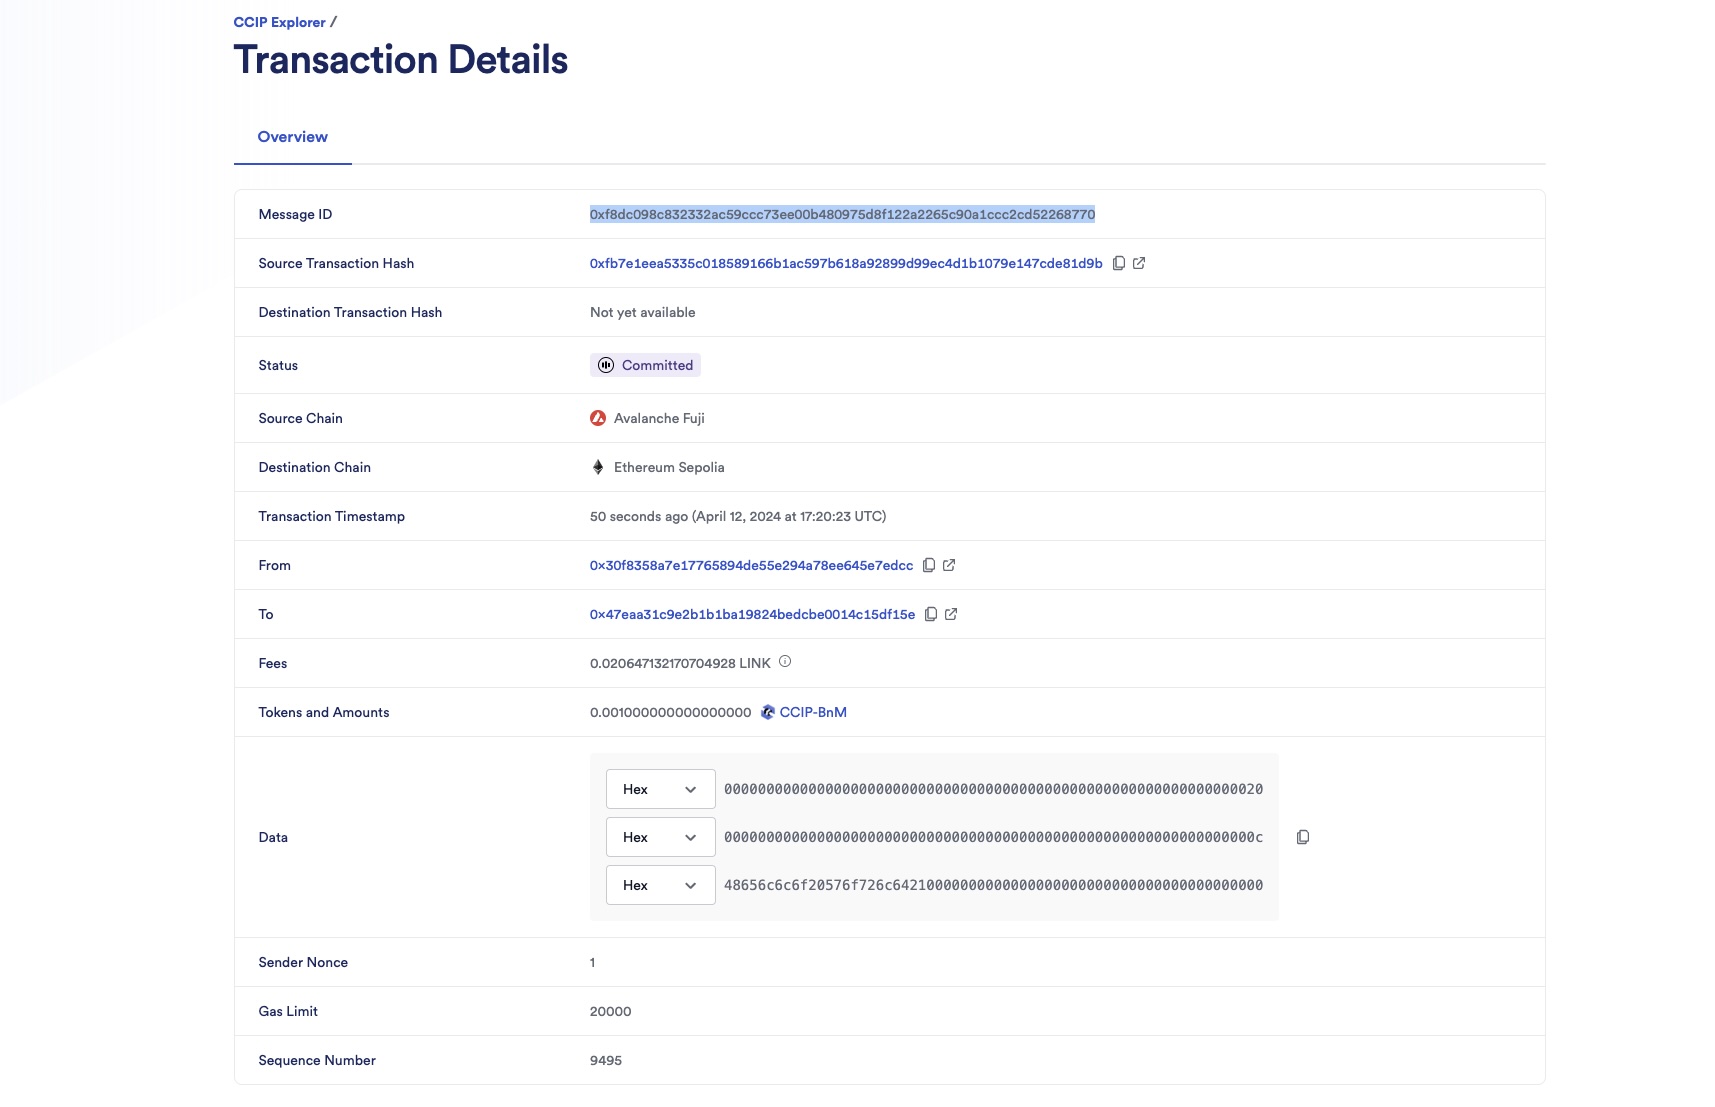
3. After a few minutes, the status will be updated to _Ready for manual execution_ indicating that CCIP could not successfully deliver the message due to the initial low gas limit. At this stage, you have the option to override the gas limit.
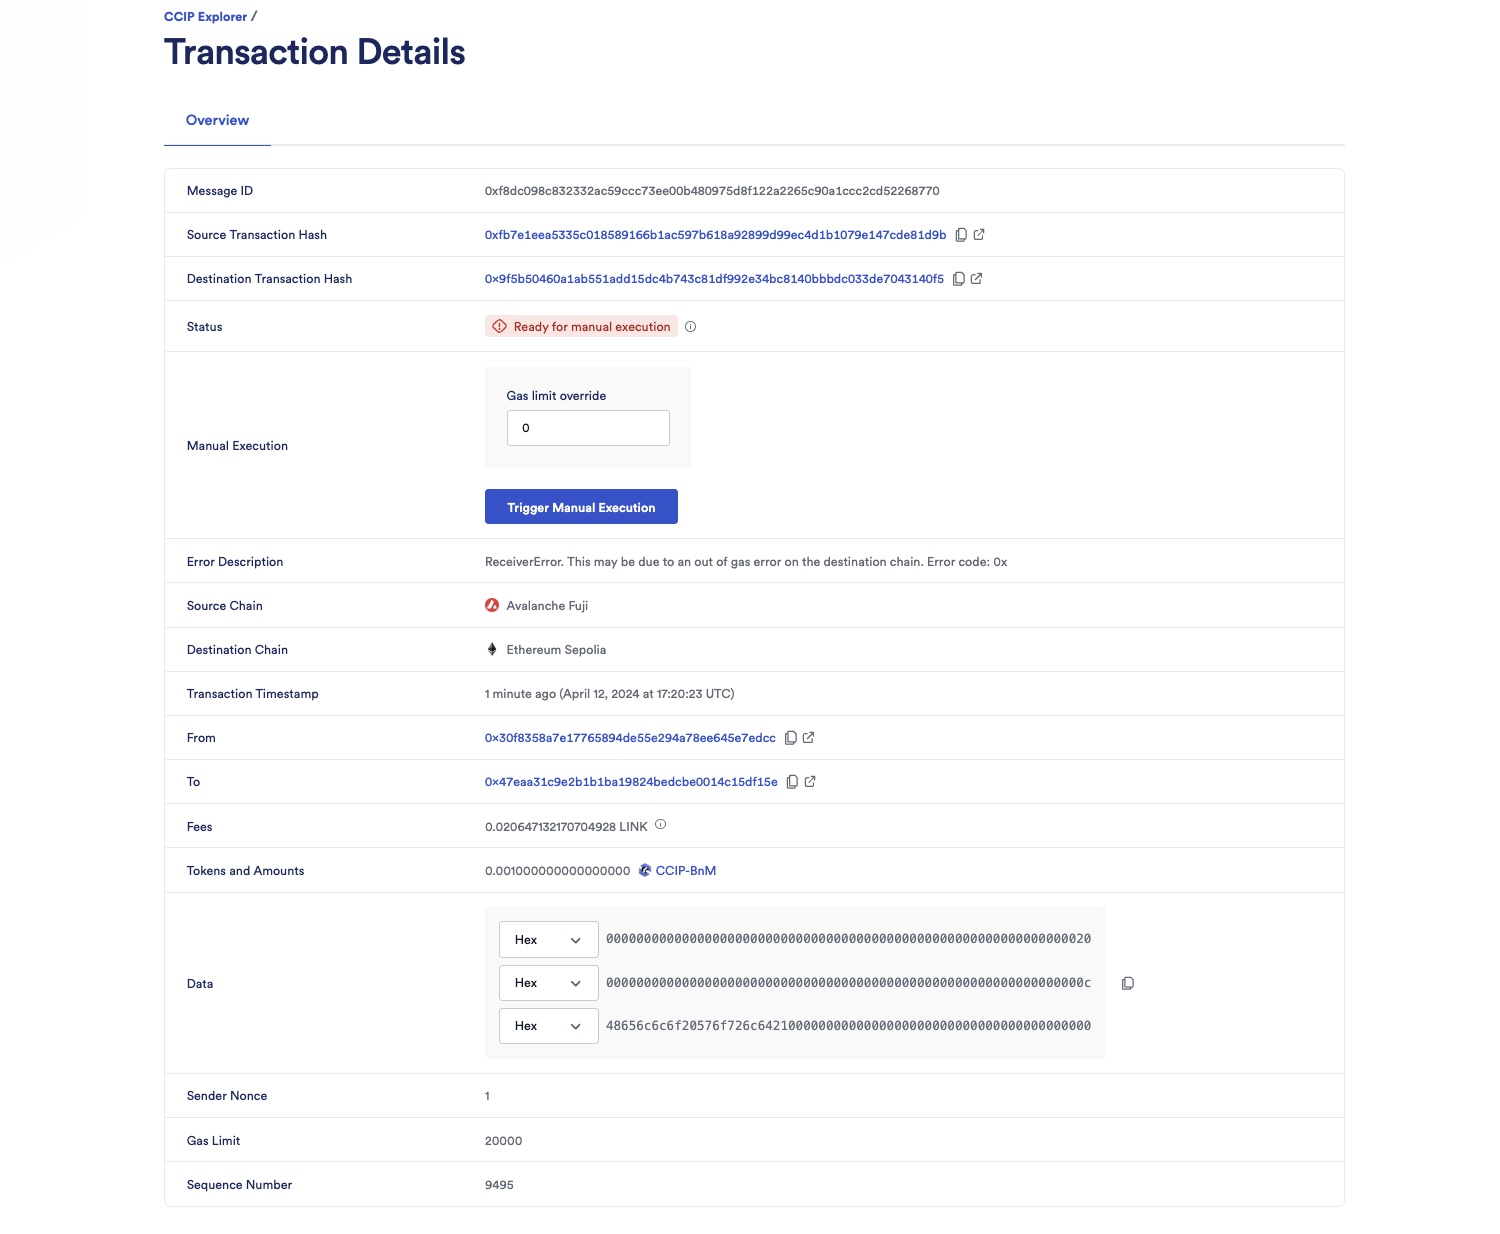
4. You can also confirm that the CCIP message was not delivered to the receiver contract on the destination chain:
1. Open MetaMask and select the network _Ethereum Sepolia_.
2. In Remix IDE, under _Deploy & Run Transactions_, open the list of transactions of your smart contract deployed on _Ethereum Sepolia_.
3. Call the `getLastReceivedMessageDetails` function.

4. Observe that the returned data is empty: the received messageId is _0x0000000000000000000000000000000000000000000000000000000000000000_, indicating no message was received. Additionally, the received text field is empty, the token address is the default _0x0000000000000000000000000000000000000000_, and the token amount shows as _0_.
### [Manual execution](https://docs.chain.link/ccip/tutorials/evm/manual-execution\#manual-execution)
#### [Investigate the root cause of receiver contract execution failure](https://docs.chain.link/ccip/tutorials/evm/manual-execution\#investigate-the-root-cause-of-receiver-contract-execution-failure)
To determine if a low gas limit is causing the failure in the receiver contract's execution, consider the following methods:
- Error analysis: Examine the error description in the CCIP explorer. An error labeled _ReceiverError. This may be due to an out of gas error on the destination chain. Error code: 0x_, often indicates a low gas issue.
- Advanced Investigation Tool: For a comprehensive analysis, employ a sophisticated tool like [Tenderly](https://tenderly.co/). Tenderly can provide detailed insights into the transaction processes, helping to pinpoint the exact cause of the failure.
To use [Tenderly](https://tenderly.co/):
1. Copy the destination transaction hash from the CCIP explorer. In this example, the destination transaction hash is _0x9f5b50460a1ab551add15dc4b743c81df992e34bc8140bbbdc033de7043140f5_.
2. Open Tenderly and search for your transaction. You should see an interface similar to the following:
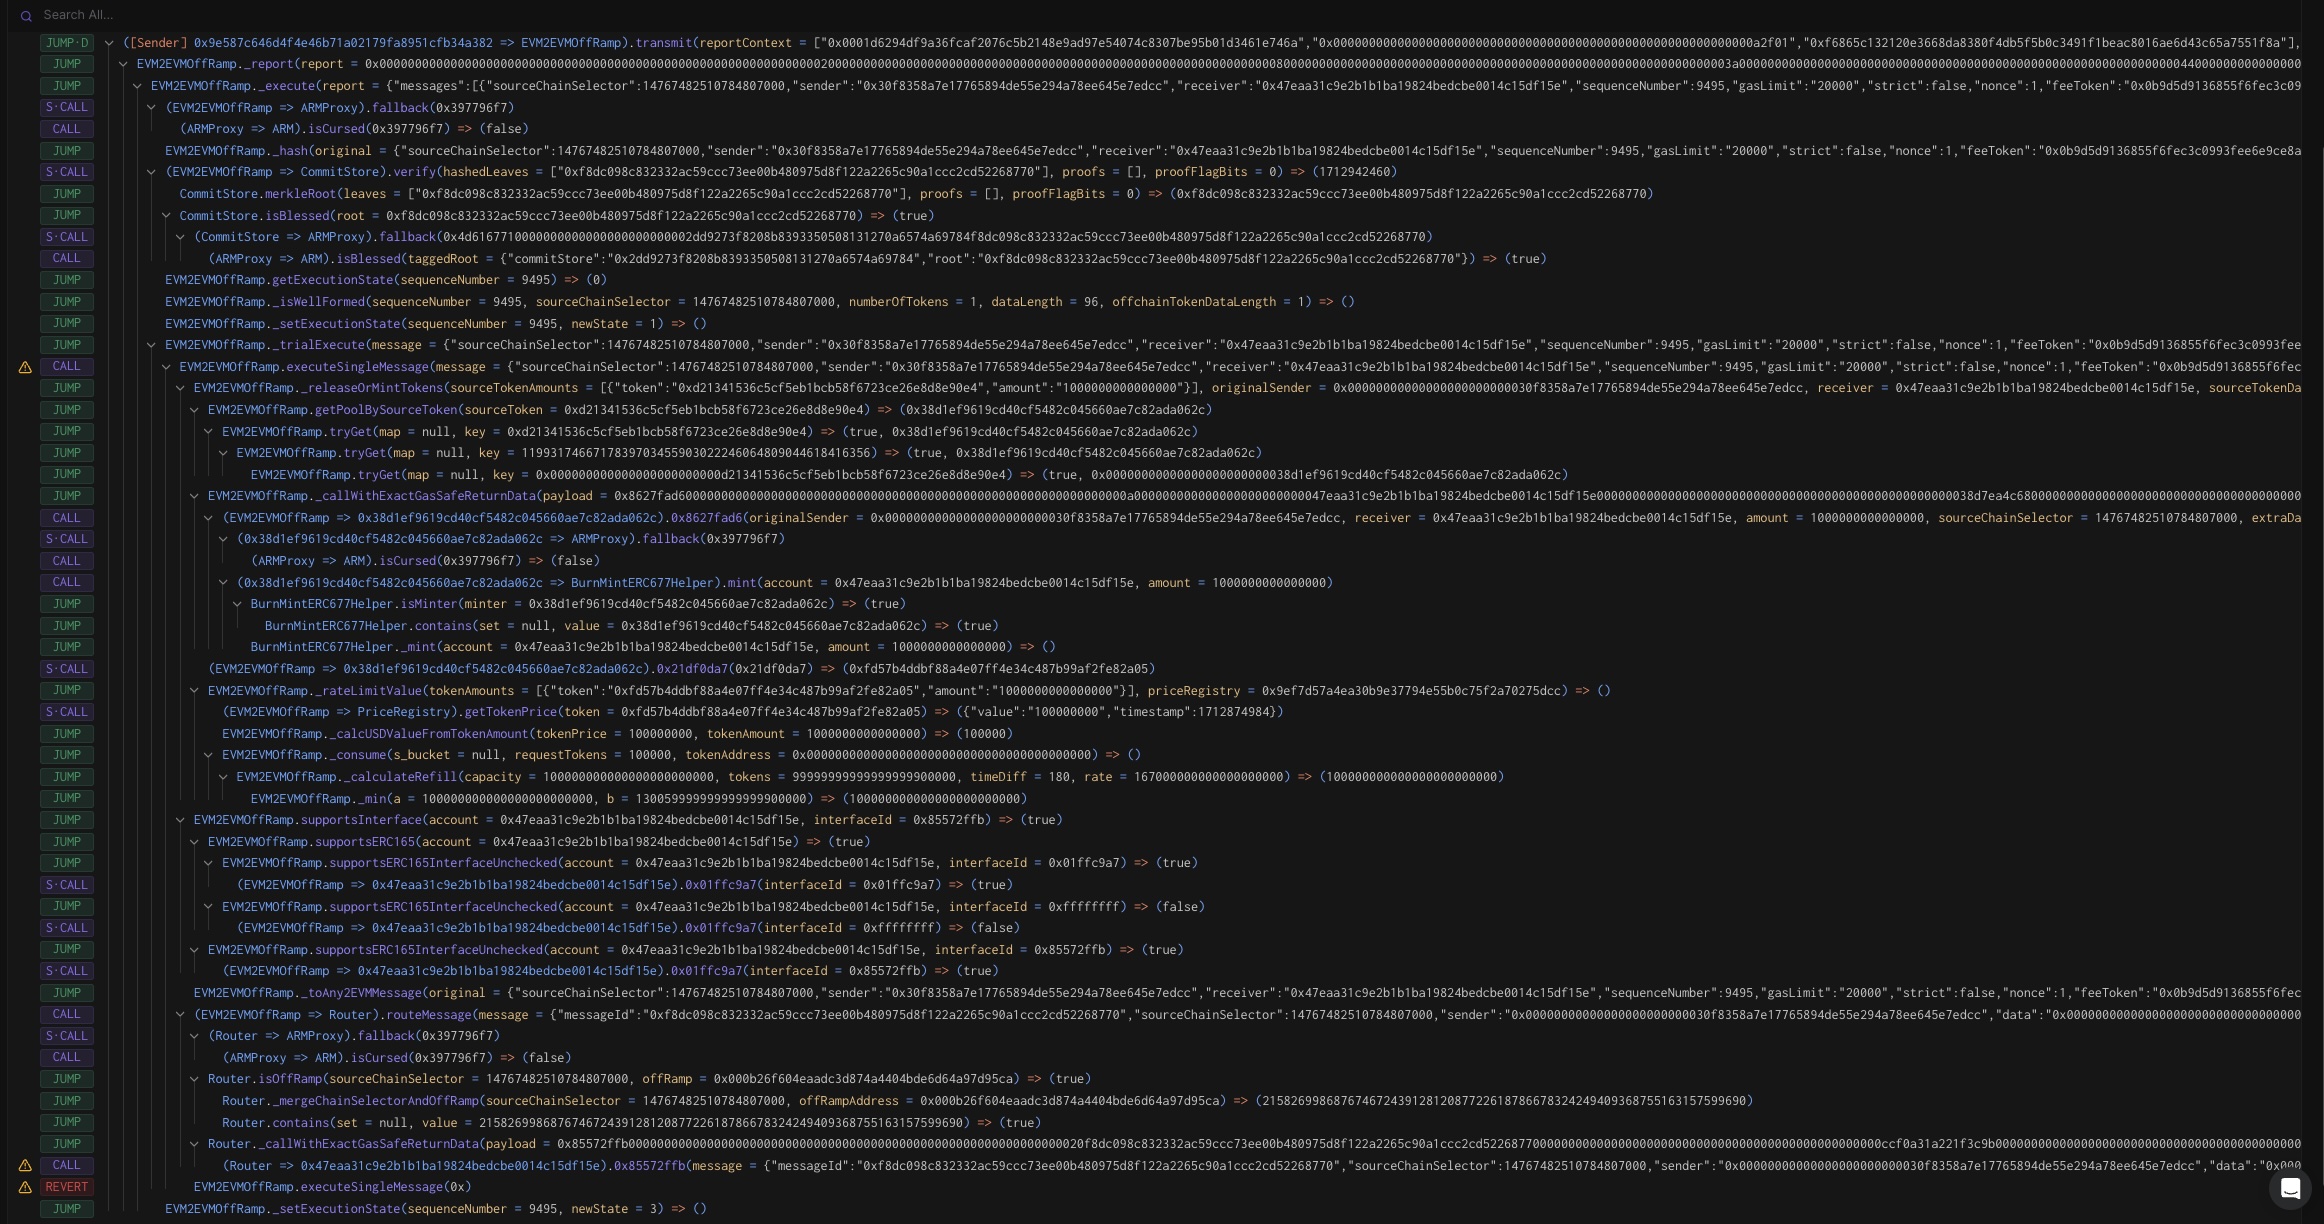
3. Enable _Full Trace_ then click on _Reverts_.

4. Notice the _out of gas_ error in the receiver contract. In this example, the receiver contract is _0x47EAa31C9e2B1B1Ba19824BedcbE0014c15df15e_.
#### [Trigger manual execution](https://docs.chain.link/ccip/tutorials/evm/manual-execution\#trigger-manual-execution)
You will increase the gas limit and trigger manual execution:
1. In the [CCIP explorer](https://ccip.chain.link/), connect your wallet, set the _Gas limit override_ to `200000`, and click on _Trigger Manual Execution_.
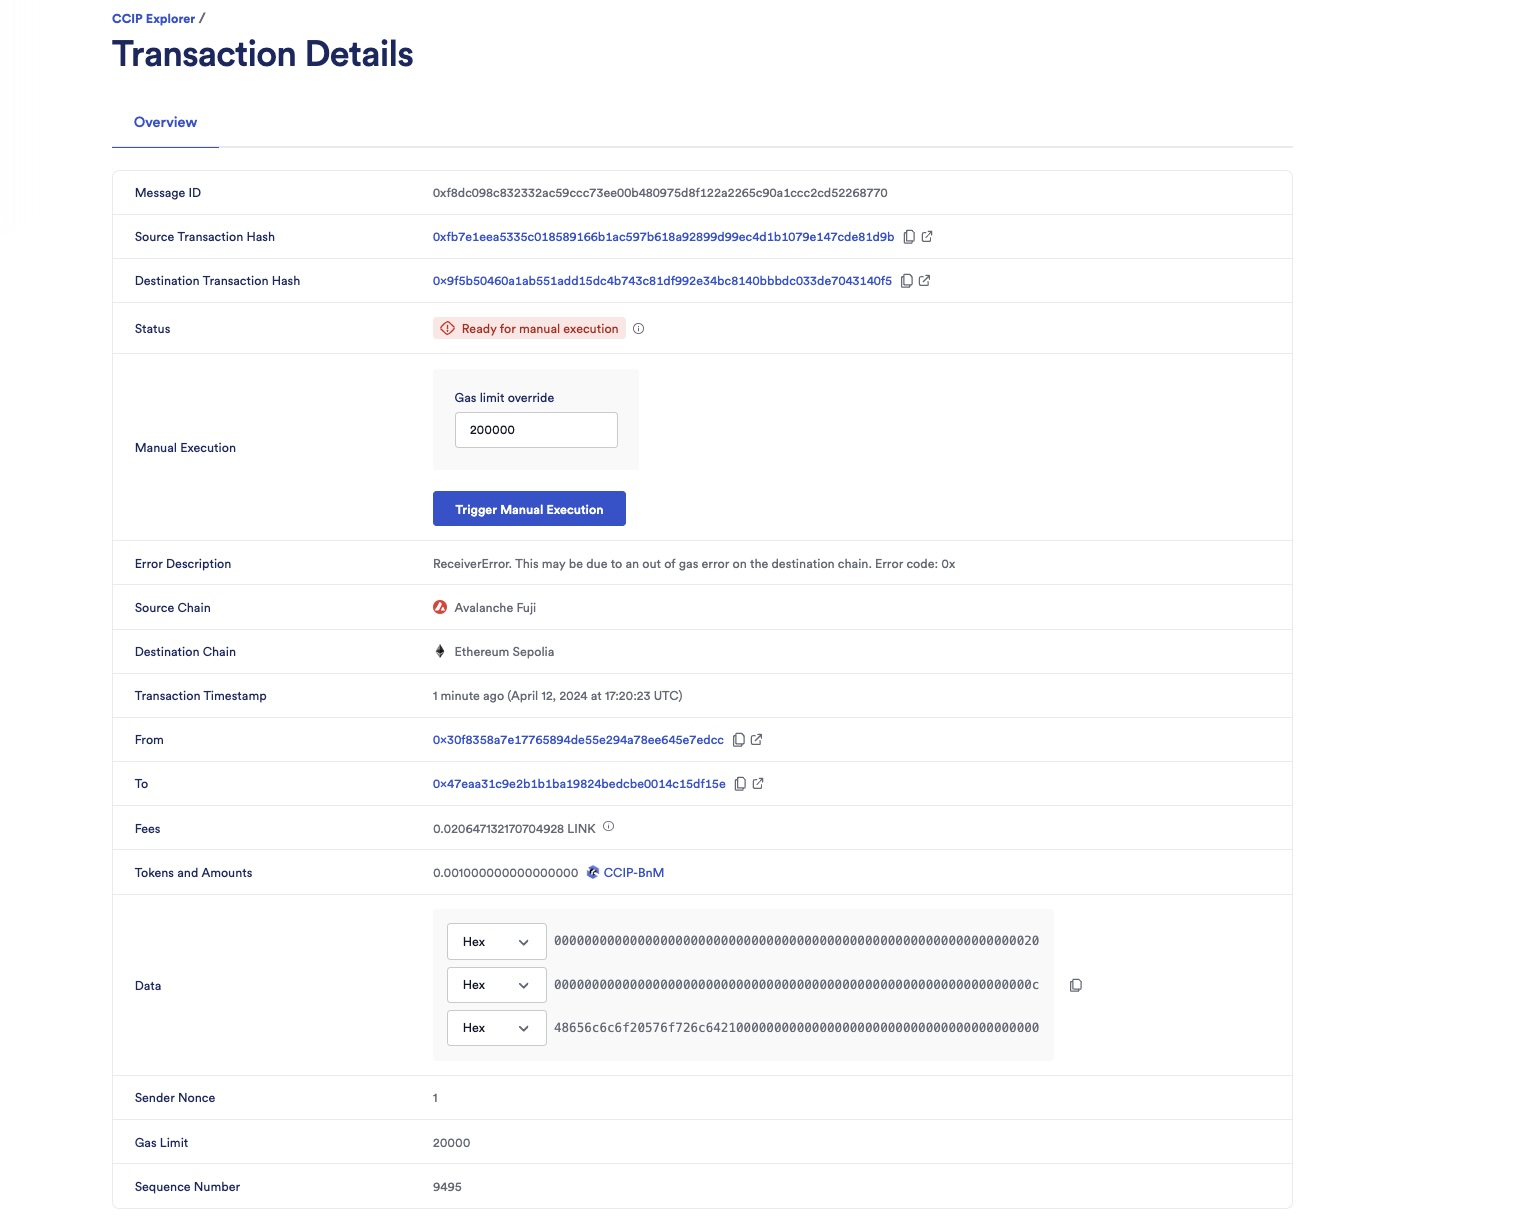
2. After you confirm the transaction on Metamask, the CCIP explorer shows you a confirmation screen.
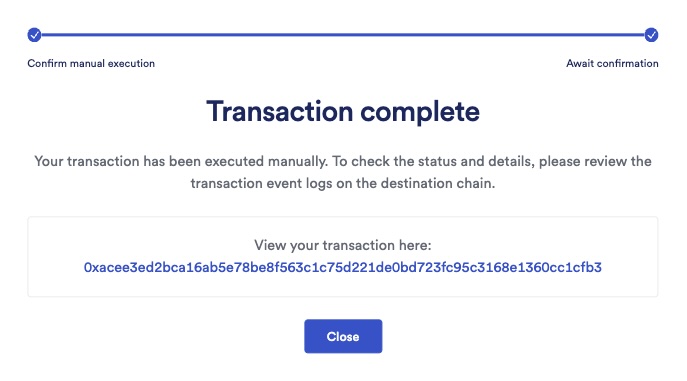
3. Click on the _Close_ button and observe the status marked as _Success_.
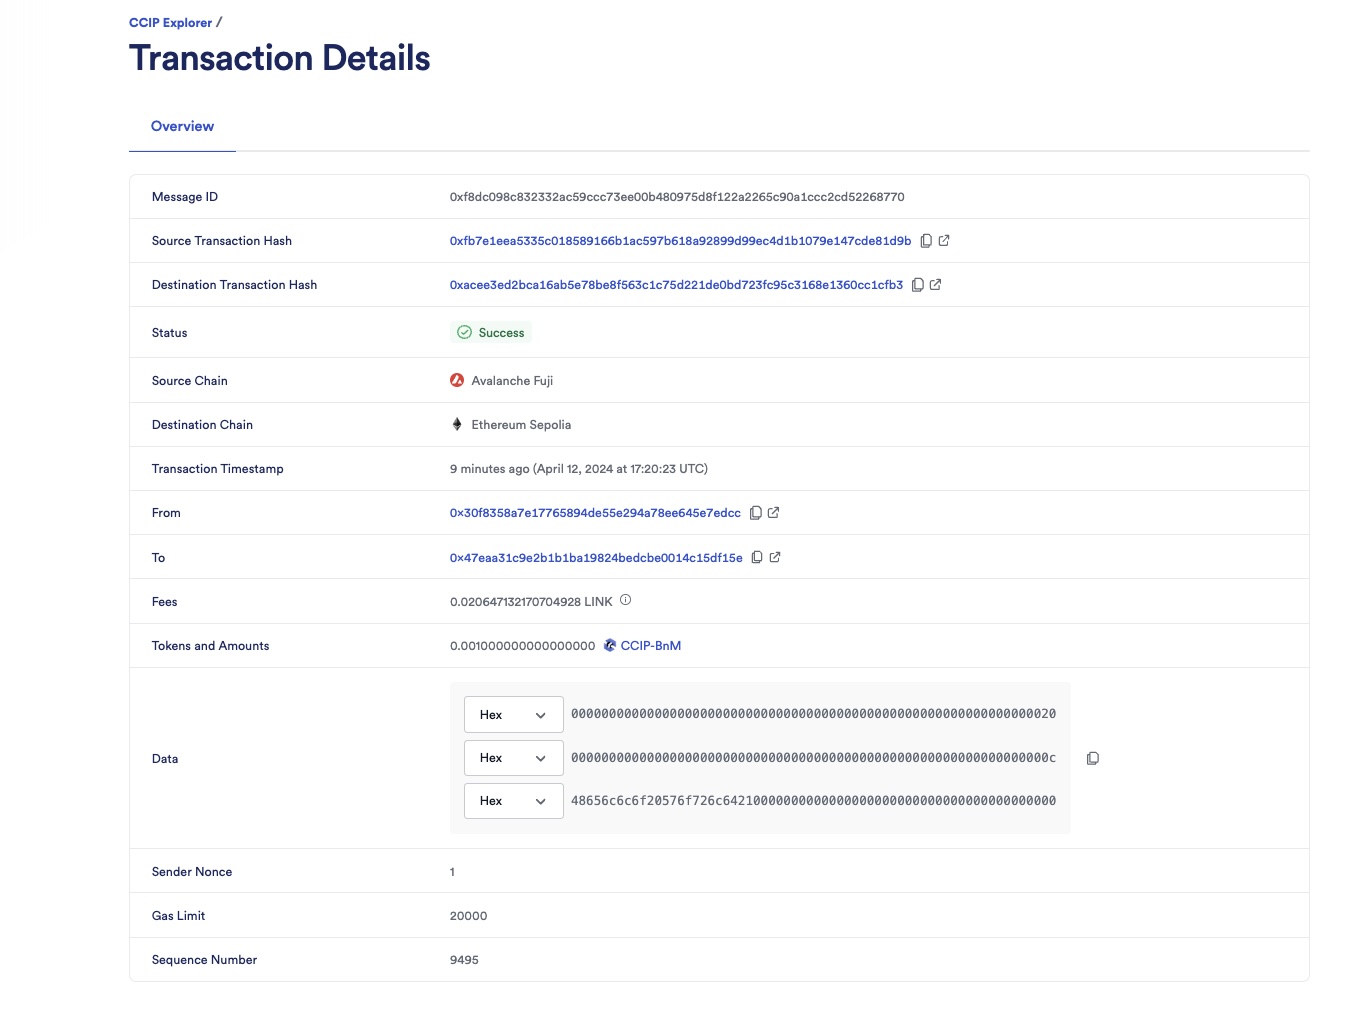
4. Check the receiver contract on the destination chain:
1. Open MetaMask and select the network _Ethereum Sepolia_.
2. In Remix IDE, under _Deploy & Run Transactions_, open the list of transactions of your smart contract deployed on _Ethereum Sepolia_.
3. Call the `getLastReceivedMessageDetails` function.

4. Notice the received messageId is _0xf8dc098c832332ac59ccc73ee00b480975d8f122a2265c90a1ccc2cd52268770_, the received text is _Hello World!_, the token address is _0xFd57b4ddBf88a4e07fF4e34C487b99af2Fe82a05_ (CCIP-BnM token address on _Ethereum Sepolia_) and the token amount is 1000000000000000 (0.001 CCIP-BnM).
**Note**: These example contracts are designed to work bi-directionally. As an exercise, you can use them to transfer tokens and data from _Avalanche Fuji_ to _Ethereum Sepolia_ and from _Ethereum Sepolia_ back to _Avalanche Fuji_.
## [Explanation](https://docs.chain.link/ccip/tutorials/evm/manual-execution\#explanation)
The smart contract used in this tutorial is configured to use CCIP for transferring and receiving tokens with data, similar to the contract in the [_Transfer Tokens with Data_](https://docs.chain.link/ccip/tutorials/evm/programmable-token-transfers#explanation) section of that tutorial.
A key distinction in this tutorial is the intentional setup of a low gas limit of `20,000` for building the CCIP message. This specific gas limit setting is expected to fail the message delivery on the receiver contract in the destination chain:

```solidity
Client.EVMExtraArgsV2({
gasLimit: 20_000
allowOutOfOrderExecution: true
})
```
## What's next
- [\> Learn how to handle errors gracefully when making CCIP transactions](https://docs.chain.link/ccip/tutorials/evm/programmable-token-transfers-defensive)
- [\> See example cross-chain dApps and tools](https://docs.chain.link/ccip/examples)
- [\> CCIP Directory](https://docs.chain.link/ccip/directory)
- [\> Learn CCIP best practices](https://docs.chain.link/ccip/concepts/best-practices/evm)
## Get the latest Chainlink content straight to your inbox.
Email Address
## Chainlink CCIP Overview
[iframe](https://www.googletagmanager.com/ns.html?id=GTM-N6DQ47T)
Chainlink CCIP is now officially live on Solana. [View lanes and tokens.](https://docs.chain.link/ccip/directory/mainnet/chain/solana-mainnet?utm_medium=referral&utm_source=chainlink-docs&utm_campaign=solana-ccip)
On this page
# [Offchain Architecture - Overview](https://docs.chain.link/ccip/concepts/architecture/offchain/overview\#overview)
CCIP's offchain architecture includes the following:
- **Decentralized Oracle Networks (DONs)**: Running offchain consensus using the Offchain Reporting Protocol (OCR).
- **Risk Management Network (RMN)**: Enhancing security through a defense-in-depth design.
- **Interaction Components**: Managing communication between the CCIP DONs and the RMN.
## [Components](https://docs.chain.link/ccip/concepts/architecture/offchain/overview\#components)
### [CCIP Decentralized Oracle Networks](https://docs.chain.link/ccip/concepts/architecture/offchain/overview\#ccip-decentralized-oracle-networks)
With the CCIP v1.6 architecture, there is a single DON called the Role DON that includes all participating nodes. Two OCR plugins run on these nodes:
1. **Commit OCR Plugin**
- Coordinates observations from multiple source chains.
- Requests blessings from the RMN (when applicable) and posts a Commit Report on the destination chain.
2. **Executing OCR Plugin**
- Monitors pending executions on the destination chain.
- Verifies events on the source chain and executes messages accordingly.
**Note**: For simplicity, we sometimes refer to the nodes running the Commit OCR Plugin as the Committing DON and those running the Executing OCR Plugin as the Executing DON. However, these are not separate oracle networks; they are subsets of the same Role DON, distinguished solely by their assigned roles.
### [Risk Management Network](https://docs.chain.link/ccip/concepts/architecture/offchain/overview\#risk-management-network)
The Risk Management Network (RMN) is a unique architectural feature of CCIP that reinforces system security through a defense-in-depth approach. Key aspects include:
- **Separate Implementation**: RMN runs a minimal, separate implementation of the Chainlink node software, which uses a different programming language than the primary CCIP system. This design provides an extra layer of independent attestation, enhancing overall security.
- **Distinct Node Operators**: A dedicated set of node operators—separate from those managing the core CCIP DONs—participates in RMN functions.
- **Blessing Mechanism**: On blockchains where RMN blessing is enabled, RMN nodes "bless" CCIP messages by providing independent attestations of the source chain observation.
### [Interaction](https://docs.chain.link/ccip/concepts/architecture/offchain/overview\#interaction)
- **Commit OCR and RMN Blessings**: The Commit OCR plugin interacts directly with RMN nodes to query for observations and receive independent RMN blessings. These blessings serve as attestations of the validity of source chain observations and are used to form a consolidated set of merkle roots.
- **Configuration and Role Validation**: The roles of nodes are defined and managed on the "Home Chain" (i.e., Ethereum) through specific contracts. Each node software reads from these contracts to verify that nodes are authorized for their roles.
- The **CCIP Home** contract contains the configuration required to bootstrap the CCIP network (Role DON) and includes both chain-level and Role DON-level details.
- The **RMN Home** contract maintains the configuration for RMN nodes.
## [Role DON: Diagram and Explanation](https://docs.chain.link/ccip/concepts/architecture/offchain/overview\#role-don-diagram-and-explanation)
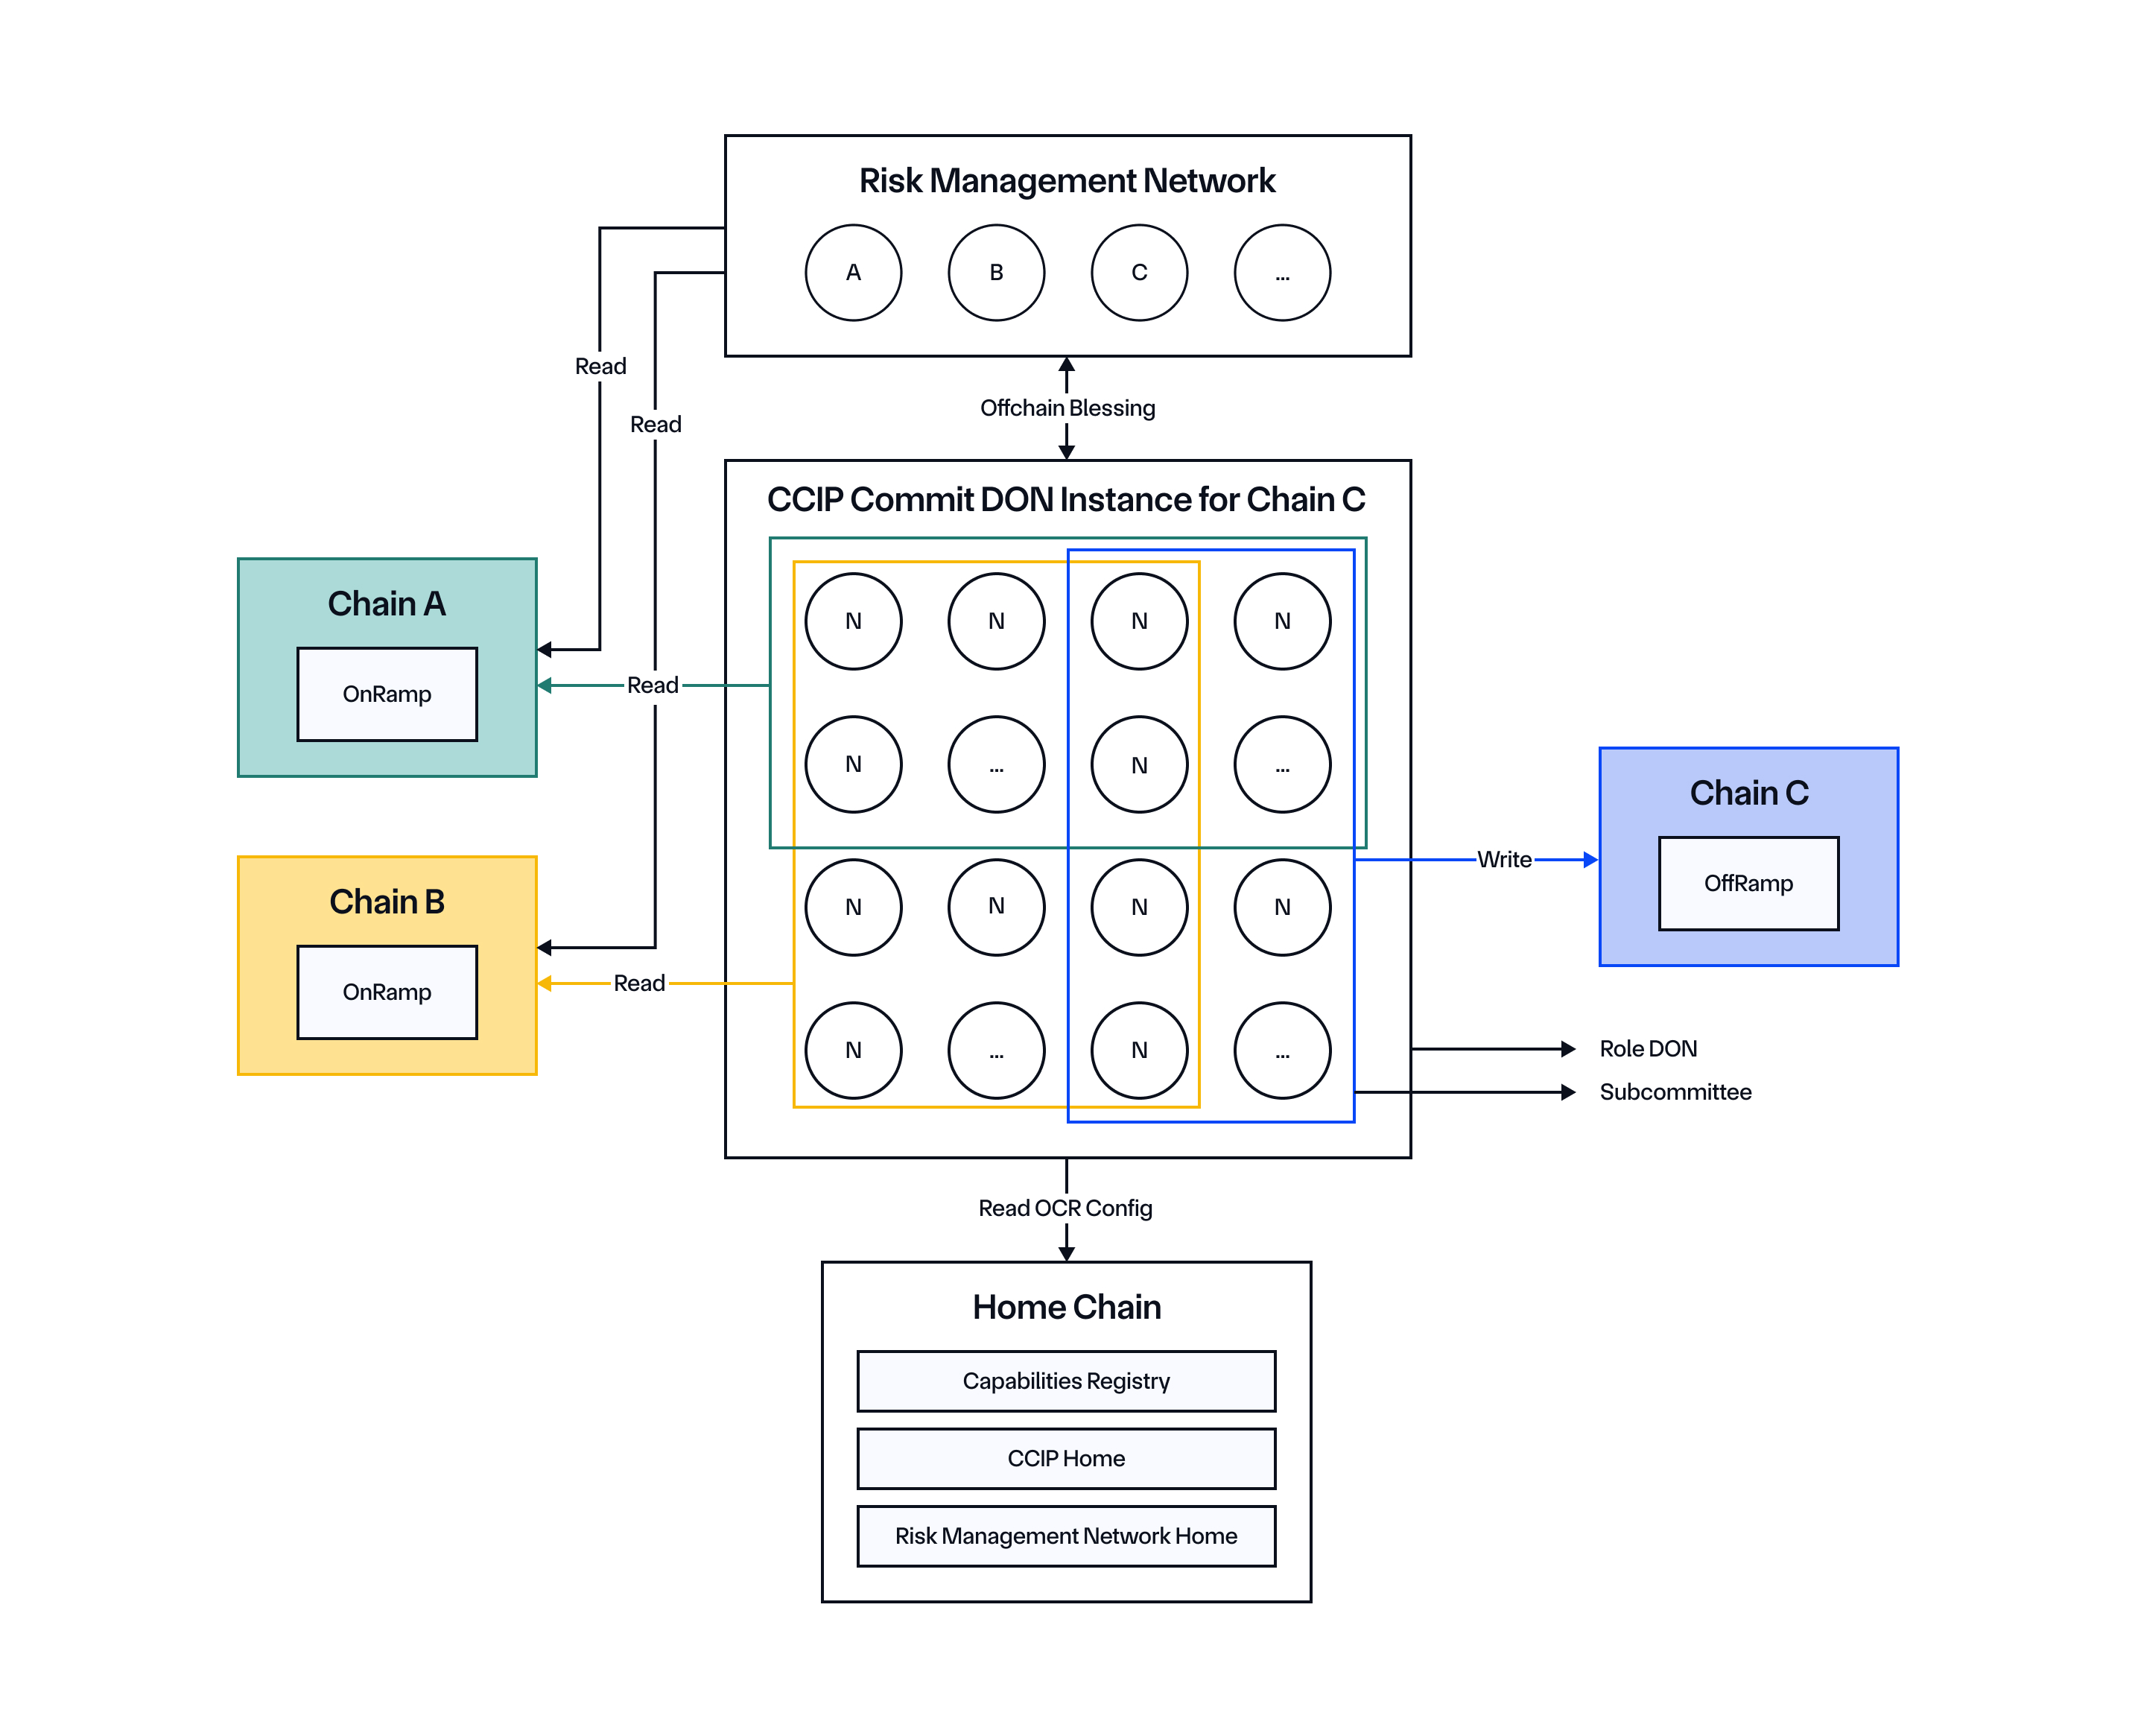
Let's take an example from the diagram above to understand the key components. The diagram shows a Commit OCR instance configured for a destination chain (Chain C). Key details include:
- **Commit Role DON**
- Represents all participating nodes.
- Within the Role DON, a specific group of nodes—sometimes called a "sub-committee"—may be assigned chain-specific roles.
- **Chain-Specific Roles** (as illustrated)
- **Green Rectangle**: Nodes observe Chain A (i.e., they read from Chain A).
- **Orange Rectangle**: Nodes observe Chain B.
- **Blue Rectangle**: Nodes write commit reports to Chain C.
- **Overlap**: Note that groups may overlap. For example, the four nodes in the bottom-left corner of the Role DON might not connect to Chain A or Chain C, demonstrating flexibility in node participation.
- **Interaction with RMN**: The Commit OCR interacts with RMN nodes to receive RMN blessings. These blessings act as independent attestations of the validity of source chain observations and are used to form a consolidated set of merkle roots.
- **Configuration and Role Validation**:
- Node roles are configured on the Home Chain (i.e., Ethereum) through specific contracts.
- The node software reads from the **CCIP Home** and **RMN Home** contracts to verify that each node is authorized for its role—whether for making observations or providing RMN blessings.
## [High Level Flow](https://docs.chain.link/ccip/concepts/architecture/offchain/overview\#high-level-flow)
Below are the high-level steps for the Commit OCR process and the Executing OCR process.
### [Commit OCR Process](https://docs.chain.link/ccip/concepts/architecture/offchain/overview\#commit-ocr-process)
- **Observation Phase**
- Each subcommittee reading from a source chain reaches consensus on the range of messages to build a merkle root.
- A minimum threshold of valid observations is required for consensus.
- **Report Building Phase**
- For source chains where RMN blessing is enabled, the leader of the OCR round queries the RMN nodes for the defined message ranges.
- RMN nodes return independently constructed merkle roots for these ranges.
- After validating the returned merkle roots, the leader sends the consolidated set of merkle roots to the RMN for signatures (a single signature may cover multiple merkle roots).
- **Query Phase**
- The leader shares the Commit Report (which may include RMN signatures) with the rest of the nodes in the Role DON for validation.
- Invalid observations are dropped and the remaining valid ones must meet the threshold to achieve consensus among the nodes.
- **Reporting Phase**
- A subcommittee of nodes writing to the destination chain submits the final Commit Report onchain.
- The report may include merkle roots from multiple sources—some of which have RMN signatures.
- Additionally, the Commit plugin posts price reports for fee tokens, so the Commit Report can contain a combination of merkle roots and price reports.
### [Executing OCR Process](https://docs.chain.link/ccip/concepts/architecture/offchain/overview\#executing-ocr-process)
- **Pending Execution Check**
- The subcommittee connected to the destination chain checks for pending executions that have been committed via a Commit Report.
- **Validation and Optimization**:
- The DON coordinates to validate the corresponding source chain events for these pending executions.
- Once validated, the Executing DON optimizes the set of messages to be batched for execution. This optimization considers factors such as the gas limit and specific nuances of the destination chain.
- **Execution**:
- The message (or batch of messages) is executed on the destination chain.
## Get the latest Chainlink content straight to your inbox.
Email Address
## Token Manager Guide
[iframe](https://www.googletagmanager.com/ns.html?id=GTM-N6DQ47T)
Chainlink CCIP is now officially live on Solana. [View lanes and tokens.](https://docs.chain.link/ccip/directory/mainnet/chain/solana-mainnet?utm_medium=referral&utm_source=chainlink-docs&utm_campaign=solana-ccip)
On this page
# [Using the Token Manager](https://docs.chain.link/ccip/tutorials/evm/token-manager\#overview)
The Token Manager allows token developers to deploy, configure, and manage Cross-Chain Tokens (CCTs) in a simplified web interface. The process involves deploying tokens and token pools, registering administrative roles, and configuring token pools to enable secure token transfers using CCIP.
The Token Manager guides you through two workflows:
- **Deploy a new token from scratch**: This is the more beginner-friendly workflow that guides you through the entire process step-by-step, starting by creating a token from scratch.
- **Enable an existing token to go cross-chain**: This is a more advanced workflow for token developers who have already deployed their token and want to add cross-chain capabilities.
If you prefer to manage your deployments and configurations programmatically, refer to the [Cross-Chain Tokens](https://docs.chain.link/ccip/tutorials/cross-chain-tokens) guides available for Remix, Hardhat and Foundry.
You can also use the [CCIP JavaScript SDK](https://docs.chain.link/ccip/ccip-javascript-sdk) to add a fully featured CCIP bridge to your app that can be styled to match your app design.
After enabling your tokens, you can also use Transporter to perform transfers and import tokens with the contract address. Use [test.transporter.io](https://test.transporter.io/) for testnet or [transporter.io](https://transporter.io/) for mainnet.
## [Limitations](https://docs.chain.link/ccip/tutorials/evm/token-manager\#limitations)
Currently, the following advanced features are not yet supported in Token Manager:
- **Token pool replacements and upgrades for existing tokens**. This capability will be added in a subsequent update. To learn more about the process of replacing and upgrading existing token pools, review the [CCIP token pool upgradability](https://docs.chain.link/ccip/concepts/cross-chain-token/evm/upgradability) section.
- **Deployment of token pools that use the [Lock and Unlock mechanism](https://docs.chain.link/ccip/concepts/cross-chain-token/overview#token-handling-mechanisms)**. The Token Manager Wizard automatically configures all tokens with the Burn & Mint mechanism. (Refer to the [Burn & Mint token contract](https://github.com/smartcontractkit/chainlink/blob/contracts-ccip/v1.6.0-beta.0/contracts/src/v0.8/ccip/tokenAdminRegistry/TokenPoolFactory/FactoryBurnMintERC20.sol) and [Burn & Mint token pool contract](https://github.com/smartcontractkit/chainlink/blob/contracts-ccip/v1.6.0-beta.0/contracts/src/v0.8/ccip/pools/BurnMintTokenPool.sol) for the Burn & Mint mechanism.)
- Deployment or enablement of custom token pools is not yet supported.
## [Getting started](https://docs.chain.link/ccip/tutorials/evm/token-manager\#getting-started)
The Token Manager includes both testnet and mainnet functionality. It is highly recommended to test and perform any operations on testnet before mainnet.
Before you can deploy a new token or add an existing token, you need to connect and authorize your wallet.
1. Open the Token Manager using the appropriate link for your use case:
- For testnet, use [https://test.tokenmanager.chain.link](https://test.tokenmanager.chain.link/).
- For mainnet, use [https://tokenmanager.chain.link/](https://tokenmanager.chain.link/)
2. Connect your wallet using the **Connect wallet** button in the upper right corner. The following wallets are supported:
- Metamask (EOA)
- Coinbase wallet (EOA)
- WalletConnect (EOA & Safe)
- Rabby wallet (EOA & Safe)
3. After your wallet is connected, authorize the use of your wallet by clicking **Authorize** and complete the subsequent authorization flow for your wallet type. If you are connecting a Safe wallet, authorization is key to enabling permissioned actions on a per user basis; such as initiating transactions, updating off-chain data, and inviting collaborators.
## [Deploy a new token](https://docs.chain.link/ccip/tutorials/evm/token-manager\#deploy-a-new-token)
1. Once wallet connection and authorization is complete, click **Add new token** under the **My tokens** section of the Token Manager Dashboard.
2. In the Token Manager Wizard, select **Deploy a new token** and click **Continue** in the lower right corner.

1. On the **Details** page, enter the details for the first network you're configuring for your token deployment:
- Select the network in the **Network** dropdown field.
- Fill in the **Name** and **Symbol** fields to give your token its name and ticker symbol. For example, "Your Token" and "YOURS" respectively.
- Click **Continue**.

2. On the **Settings** page, configure your token's supply:
- Setting a supply cap is optional — toggle the button to enable it and specify an amount. The supply cap sets a maximum limit for the total number of tokens that can ever be minted for the token you're creating.
- Specify an amount of tokens to mint during this initial deployment step.
- Click **Continue**.

3. On the **Networks** page, select the additional blockchain network(s) where you'd like to deploy your new token and click **Continue**.

4. On the **Owners** page, confirm the accounts that will be taking actions on each network. Click **Continue**.

The default account is the currently connected wallet. However, you can have different accounts for each network depending on who you want to be the owner.
5. On the **Summary** page, you can review your upcoming deployments and transactions. Each network you've selected appears along with an expandable list of the transactions the Token Manager will guide you through to deploy your token for each network:

Make sure that your wallet contains gas tokens for each network where you're deploying your token, in order to pay for the deployment transactions.
If you selected more than two networks during the previous step, the _Remove_ links are active, allowing you to remove a network before proceeding. If you only have two networks selected, the _Remove_ links are intentionally not active. If you need to add more networks, navigate back to the **Networks** page.
6. The **Deploy** page displays the steps that you need to complete for each network:
- Deploy token and pool
- Accept admin role
- Accept token ownership
- Accept pool ownership

After the **Deploy token and pool** step is completed, you can initiate the other steps all at the same time by clicking **Accept** under each step. While these steps run concurrently, each step separately prompts you to confirm the corresponding transactions in your wallet.
Once all of the steps for one network have been initiated, you can switch to the other network and repeat the same process. You do not have to wait for the first network deploy process to be complete before initiating the second network deploy process.
When the deploy process is complete for all the networks you selected, the Token Manager marks them all as **Done**:

Click **Continue**. The Token Manager displays a message showing that your configuration was successful:

When everything is successfully set up for your token, you can view your new Token Page from the Token Manager Dashboard. It displays information about your CCT, enables configuration changes, and allows expansion to additional networks where you can deploy the token.
## [Add an existing token](https://docs.chain.link/ccip/tutorials/evm/token-manager\#add-an-existing-token)
If you have existing token(s) that you've already deployed, you can use the Token Manager to create and configure a token pool for the token, and optionally deploy your token on additional networks. Note that tokens deployed to additional networks are automatically configured to use the Burn and Mint mechanism.
1. On the **Details** page, enter the details for your token on each network where it has already been deployed. As you add each token contract address, the Token Manager displays validation checks for the token and the required admin registration functions in the contract.
Use the _\+ Add New Address_ link to add additional token deployments. When you've added all the token deployments that you want to add at this time, select the checkbox to confirm _These are all of the tokens I currently want to enable on CCIP_.
2. On the **Pools** page, you're prompted to select the token pool mechanism that's used to transfer value between networks — _Burn / Mint_ or _Lock / Release_. Depending on your token contract, you may have more than one option for _Burn / Mint_:

Before selecting a token pool type, be sure to review [CCIP token handling mechanisms](https://docs.chain.link/ccip/concepts/cross-chain-token/overview#token-handling-mechanisms).
3. On the **Networks** page, select the additional blockchain networks where you'd like to deploy your new token. For additional networks, Token Manager Wizard workflow automatically configures all tokens with the Burn & Mint mechanism. (Refer to the [token contract](https://github.com/smartcontractkit/chainlink/blob/contracts-ccip/v1.6.0-beta.0/contracts/src/v0.8/ccip/tokenAdminRegistry/TokenPoolFactory/FactoryBurnMintERC20.sol) and [token pool contract](https://github.com/smartcontractkit/chainlink/blob/develop/contracts/src/v0.8/ccip/pools/BurnMintTokenPool.sol) for the Burn & Mint mechanism.)
4. On the **Summary** page, each network you've selected appears along with an expandable list of the transactions the Token Manager will guide you through to deploy your token for each network.
If you selected more than two networks during the previous step, the _Remove_ links are active, allowing you to remove a network before proceeding. If you only have two networks selected, the _Remove_ links are intentionally not active. If you need to add more networks, navigate back to the **Networks** page.
5. The **Deploy** page displays the steps that you need to complete.
For the tokens you're adding, the Token Manager guides you through each of these steps per network:
- Deploy token pool for existing token
- Grant Burn / Mint privileges ( **manual step**)
- Register admin
- Accept admin role of your token pool
- Set the token pool address
- Accept ownership of the new token pool
For the other tokens in your network, the Token Manager also guides you through updating existing token pools to incorporate the tokens you're adding.
At each step, you are prompted to confirm the corresponding transactions in your wallet. When each step is complete for all the networks you selected, the Token Manager displays a message showing that your configuration was successful.
When everything is successfully set up for your token, you can view your new Token Page from the Token Manager Dashboard. It displays information about your CCT, enables configuration changes, and allows expansion to additional networks.
## [Token Manager Dashboard](https://docs.chain.link/ccip/tutorials/evm/token-manager\#token-manager-dashboard)
After you connect your wallet, you can see the Token Manager Dashboard:

- If you click **Add new token**, you enter the Token Manager Wizard which prompts you to deploy a new token or to add an existing token.
- If the wallet you connected to the dashboard is a Token Admin address, the Token Manager automatically populates your tokens in the dashboard.
- If you have saved partial progress in the Token Manager Wizard, your token displays in a draft state so you can return and finish deploying it later.
After you have deployed a new token or added an existing one, each token has its own page:

The token page shows both the configured and unconfigured networks.
- When you select any of the listed unconfigured networks, you can use the Token Manager Wizard to expand your token to those networks, either by deploying a new token or by adding an existing token and deploying a token pool.
- For configured networks, you can view details for each network-specific token, and you can expand a **Token Details** side panel with more information and admin actions. To expand the **Token Details** panel, click the _View_ link next to the configured network.
When expanded, the **Token Details** side panel provides more details about the inbound and outbound lanes for your token. If the connected wallet is a token admin or has permissions to update the token pool, the **Token Details** side panel also displays an **Actions** menu:

If you have the appropriate permissions, you can edit your token's inbound and outbound rate limits, edit the router contract address, and propose a new token administrator.
### [Managing token settings](https://docs.chain.link/ccip/tutorials/evm/token-manager\#managing-token-settings)
1. Connect your wallet and select your token in the Token Manager home page. A detailed page for your token displays, showing both configured and unconfigured networks.
2. To access the **Settings** page, select the gear icon next to your token's name:

### [Verifying your token](https://docs.chain.link/ccip/tutorials/evm/token-manager\#verifying-your-token)
You can request token verification through the Token Manager; when verification is granted, it allows the token to be listed on the CCIP Directory and ensures information is consistent across other CCIP apps, like CCIP Explorer.
If your token is unverified, an **Unverified** badge displays underneath the token's name at the top of the page. Be sure that all information is correct before your submission, as it requires a manual review process. If you need to make any further changes after submitting your request, you must use the [CCIP Contact Form](https://chain.link/ccip-contact?v=Token%20Manager%20support).
You can send a request for verification from the **Settings** page:

1. The _Token Details_ tab allows you to modify your token's name and ticker symbol with an off-chain transaction. You can also specify an avatar for your token. If you have made any changes in this tab, click **Save Changes**.
2. The _Project Details_ tab prompts you to fill in your project's name and URL, and a contact email address. This information is kept private. It's optional to fill out, but required if you're requesting token verification.
3. The _Verification_ tab has a **Verify my token** button that submits a verification request with the information you provided in the previous two tabs.
When your verification request is granted, the Token Manager will display a **Verified** badge on the token page.
## Get the latest Chainlink content straight to your inbox.
Email Address
## Test Chainlink CCIP Locally
[iframe](https://www.googletagmanager.com/ns.html?id=GTM-N6DQ47T)
Chainlink CCIP is now officially live on Solana. [View lanes and tokens.](https://docs.chain.link/ccip/directory/mainnet/chain/solana-mainnet?utm_medium=referral&utm_source=chainlink-docs&utm_campaign=solana-ccip)
On this page
# [Test CCIP Locally](https://docs.chain.link/ccip/tutorials/evm/test-ccip-locally\#overview)
[Chainlink Local](https://github.com/smartcontractkit/chainlink-local) provides a comprehensive set of tools and libraries to test your smart contracts with CCIP locally. By using Chainlink Local, you can quickly set up a local testing environment, simulate Chainlink services, and debug your contracts before deploying them to actual testnets.
## [Why Use Chainlink Local?](https://docs.chain.link/ccip/tutorials/evm/test-ccip-locally\#why-use-chainlink-local)
Testing your smart contracts locally can save you a significant amount of time and effort. With Chainlink Local, you can:
- **Quickly identify and fix issues**: Debug your contracts in a controlled environment before deploying them to testnets.
- **Save time and resources**: Reduce the need for repeated deployments to testnets, speeding up the development process.
## [Guides for Different Environments](https://docs.chain.link/ccip/tutorials/evm/test-ccip-locally\#guides-for-different-environments)
### [Foundry](https://docs.chain.link/ccip/tutorials/evm/test-ccip-locally\#foundry)
For Foundry users, the following guides will help you set up and test your CCIP smart contracts locally:
[Foundry Guides for Chainlink Local](https://docs.chain.link/chainlink-local/build/ccip/foundry)
### [Hardhat](https://docs.chain.link/ccip/tutorials/evm/test-ccip-locally\#hardhat)
For Hardhat users, the following guides provide step-by-step instructions to integrate and test CCIP smart contracts locally:
[Hardhat Guides for Chainlink Local](https://docs.chain.link/chainlink-local/build/ccip/hardhat)
### [RemixIDE](https://docs.chain.link/ccip/tutorials/evm/test-ccip-locally\#remixide)
For users who prefer RemixIDE, these guides will assist you in setting up and testing your CCIP smart contracts locally within the Remix environment:
[RemixIDE Guides for Chainlink Local](https://docs.chain.link/chainlink-local/build/ccip/remix)
## Get the latest Chainlink content straight to your inbox.
Email Address
## BONE Token Overview
[iframe](https://www.googletagmanager.com/ns.html?id=GTM-N6DQ47T)
Chainlink CCIP is now officially live on Solana. [View lanes and tokens.](https://docs.chain.link/ccip/directory/mainnet/chain/solana-mainnet?utm_medium=referral&utm_source=chainlink-docs&utm_campaign=solana-ccip)
On this page
[CCIP Directory](https://docs.chain.link/ccip/directory/mainnet) [BONE](https://docs.chain.link/ccip/directory/mainnet/token/BONE)


# BONEBONE SHIBASWAP
Listed Networks (19)

| Network | Name | Symbol | Decimals | Token address | Token pool type | Token pool address |
| --- | --- | --- | --- | --- | --- | --- |
| Arbitrum One | BONE SHIBASWAP | BONE | 18 | [0x387090...16f15D](https://explorer.arbitrum.io/address/0x387090cDEa72d6Ab1598394d45c5B3e05616f15D "0x387090cDEa72d6Ab1598394d45c5B3e05616f15D") | Burn/Mint | [0x2d08A8...1e2460](https://explorer.arbitrum.io/address/0x2d08A8979C9aE629a22dE33A884aF58bC31e2460 "0x2d08A8979C9aE629a22dE33A884aF58bC31e2460") |
| Astar | BONE SHIBASWAP | BONE | 18 | [0xe785f7...9D57B9](https://astar.blockscout.com/address/0xe785f763d30f583EE6666Fa0e84f8bc32E9D57B9 "0xe785f763d30f583EE6666Fa0e84f8bc32E9D57B9") | Burn/Mint | [0xb88784...17A1A3](https://astar.blockscout.com/address/0xb88784Ff6fF162D3CD338627eBc171b08B17A1A3 "0xb88784Ff6fF162D3CD338627eBc171b08B17A1A3") |
| Avalanche | BONE SHIBASWAP | BONE | 18 | [0xec0CA5...D604fa](https://snowtrace.io/address/0xec0CA5d2F362A826fa8F53C89A5Ce1C17CD604fa "0xec0CA5d2F362A826fa8F53C89A5Ce1C17CD604fa") | Burn/Mint | [0x932406...e03739](https://snowtrace.io/address/0x932406A77B3cfd3EF845c7f2999Bae933Ae03739 "0x932406A77B3cfd3EF845c7f2999Bae933Ae03739") |
| Base | BONE SHIBASWAP | BONE | 18 | [0x88B81F...CC9449](https://basescan.org/address/0x88B81FD1753FEF7bbFf3BbC65E4Ba73a28CC9449 "0x88B81FD1753FEF7bbFf3BbC65E4Ba73a28CC9449") | Burn/Mint | [0x37Bbd2...1F8416](https://basescan.org/address/0x37Bbd2052751c42Dc0C2A7A02A140FDE6A1F8416 "0x37Bbd2052751c42Dc0C2A7A02A140FDE6A1F8416") |
| Blast | BONE SHIBASWAP | BONE | 18 | [0xe18863...C5dFd2](https://blastscan.io/address/0xe1886337D2ecBdB48A9dE8a68e8dEa2Ba9C5dFd2 "0xe1886337D2ecBdB48A9dE8a68e8dEa2Ba9C5dFd2") | Burn/Mint | [0x795411...e49Ff0](https://blastscan.io/address/0x795411Fe0C1f88B30D18F5061589Afd140e49Ff0 "0x795411Fe0C1f88B30D18F5061589Afd140e49Ff0") |
| BNB Chain | BONE SHIBASWAP | BONE | 18 | [0xF54391...2FA1fd](https://bscscan.com/address/0xF543915698bf89BD6d429adC79577d75DA2FA1fd "0xF543915698bf89BD6d429adC79577d75DA2FA1fd") | Burn/Mint | [0x20Dacf...3e6E69](https://bscscan.com/address/0x20Dacf037b437854926CAee12BfbEbAB123e6E69 "0x20Dacf037b437854926CAee12BfbEbAB123e6E69") |
| Celo | BONE SHIBASWAP | BONE | 18 | [0xD301a9...1e704E](https://celoscan.io/address/0xD301a90cb3C7a9253305af30D92dd2C1FD1e704E "0xD301a90cb3C7a9253305af30D92dd2C1FD1e704E") | Burn/Mint | [0x6d5676...bDaE72](https://celoscan.io/address/0x6d567695bA1e375e2F994181Aa997328c0bDaE72 "0x6d567695bA1e375e2F994181Aa997328c0bDaE72") |
| Ethereum | BONE SHIBASWAP | BONE | 18 | [0x981303...8218d9](https://etherscan.io/address/0x9813037ee2218799597d83D4a5B6F3b6778218d9 "0x9813037ee2218799597d83D4a5B6F3b6778218d9") | Lock/Release | [0xc75aCd...7478f8](https://etherscan.io/address/0xc75aCdceF4c679eaCb7a8CF1eF486B9Cf77478f8 "0xc75aCdceF4c679eaCb7a8CF1eF486B9Cf77478f8") |
| Gnosis | BONE SHIBASWAP | BONE | 18 | [0x50E23d...945027](https://gnosis.blockscout.com/address/0x50E23d57309C61eab3D3d1EfE5DC02A36f945027 "0x50E23d57309C61eab3D3d1EfE5DC02A36f945027") | Burn/Mint | [0x934254...71F9Da](https://gnosis.blockscout.com/address/0x9342547460E0BE4C9559caE9cfF5E0772371F9Da "0x9342547460E0BE4C9559caE9cfF5E0772371F9Da") |
| Linea | BONE SHIBASWAP | BONE | 18 | [0xDd2D32...A889f5](https://lineascan.build/address/0xDd2D32Fea6e166fA53DEe5c1584456c0e8A889f5 "0xDd2D32Fea6e166fA53DEe5c1584456c0e8A889f5") | Burn/Mint | [0xee83E6...8C486D](https://lineascan.build/address/0xee83E603b755889ceB652F3D8af3C735a98C486D "0xee83E603b755889ceB652F3D8af3C735a98C486D") |
| Mantle | BONE SHIBASWAP | BONE | 18 | [0x79a7d4...0C2e03](https://mantlescan.xyz/address/0x79a7d4EF9870474F18A88524Bf2349393B0C2e03 "0x79a7d4EF9870474F18A88524Bf2349393B0C2e03") | Burn/Mint | [0x691435...fcA8Fd](https://mantlescan.xyz/address/0x691435ED2282052a064B8748BA2E3C7eeefcA8Fd "0x691435ED2282052a064B8748BA2E3C7eeefcA8Fd") |
| Metis Andromeda | BONE SHIBASWAP | BONE | 18 | [0x32aF44...53aFD4](https://andromeda-explorer.metis.io/address/0x32aF448529b5067f9E4aBf9764ecfcE97d53aFD4 "0x32aF448529b5067f9E4aBf9764ecfcE97d53aFD4") | Burn/Mint | [0x476e07...F2Ba4A](https://andromeda-explorer.metis.io/address/0x476e0714DE6Fcf0d009Eb4c4E8a8DB325BF2Ba4A "0x476e0714DE6Fcf0d009Eb4c4E8a8DB325BF2Ba4A") |
| Mode | BONE SHIBASWAP | BONE | 18 | [0x2F0B60...021f0a](https://explorer.mode.network/address/0x2F0B60F0e269dc01132bdCcdD48Bb8CF33021f0a "0x2F0B60F0e269dc01132bdCcdD48Bb8CF33021f0a") | Burn/Mint | [0x2B96db...247e16](https://explorer.mode.network/address/0x2B96db391d0f35f821e53De72508237492247e16 "0x2B96db391d0f35f821e53De72508237492247e16") |
| OP Mainnet | BONE SHIBASWAP | BONE | 18 | [0x4A7961...F14113](https://optimistic.etherscan.io/address/0x4A7961249E49642474f9161f245Fc52D59F14113 "0x4A7961249E49642474f9161f245Fc52D59F14113") | Burn/Mint | [0x67Df63...a18aC0](https://optimistic.etherscan.io/address/0x67Df6368177C950914C0F634d1a003a6caa18aC0 "0x67Df6368177C950914C0F634d1a003a6caa18aC0") |
| Polygon | BONE SHIBASWAP | BONE | 18 | [0x563579...4Fc5D3](https://polygonscan.com/address/0x56357929B7d7720ac19ad55c923E85EdAC4Fc5D3 "0x56357929B7d7720ac19ad55c923E85EdAC4Fc5D3") | Burn/Mint | [0x1cdFc3...0Fc28C](https://polygonscan.com/address/0x1cdFc3B0fE64bb943829063D16ff7f835c0Fc28C "0x1cdFc3B0fE64bb943829063D16ff7f835c0Fc28C") |
| Scroll | BONE SHIBASWAP | BONE | 18 | [0x010c6F...4795D2](https://scrollscan.com/address/0x010c6F656E06f12BB3b115FCBC9ca282654795D2 "0x010c6F656E06f12BB3b115FCBC9ca282654795D2") | Burn/Mint | [0x7f3997...6082B6](https://scrollscan.com/address/0x7f399748490c25E32D3b8aaE4f0322c6466082B6 "0x7f399748490c25E32D3b8aaE4f0322c6466082B6") |
| Wemix | BONE SHIBASWAP | BONE | 18 | [0xc4B60B...dB2A4F](https://wemixscan.com/address/0xc4B60B24F644282aaF6739bc7eb1888C69dB2A4F "0xc4B60B24F644282aaF6739bc7eb1888C69dB2A4F") | Burn/Mint | [0xd17E72...130F5D](https://wemixscan.com/address/0xd17E7239feEF68Ac9fdeC962F8cCbEcb3E130F5D "0xd17E7239feEF68Ac9fdeC962F8cCbEcb3E130F5D") |
| Zircuit | BONE SHIBASWAP | BONE | 18 | [0x235354...E0dB8e](https://explorer.zircuit.com/address/0x23535421f6e13F2084684BB052F58d1b33E0dB8e "0x23535421f6e13F2084684BB052F58d1b33E0dB8e") | Burn/Mint | [0x9ecde6...C11831](https://explorer.zircuit.com/address/0x9ecde69DF43aDd57AA60949e6Db5AC7b6DC11831 "0x9ecde69DF43aDd57AA60949e6Db5AC7b6DC11831") |
| ZKsync | BONE SHIBASWAP | BONE | 18 | [0xeF7634...F72aa0](https://explorer.zksync.io/address/0xeF76346aBA1F8c671BA6F51cCb47e93b4BF72aa0 "0xeF76346aBA1F8c671BA6F51cCb47e93b4BF72aa0") | Burn/Mint | [0x37cB2B...371022](https://explorer.zksync.io/address/0x37cB2B7A45F8d17936EBaBB4Ed95dE61f5371022 "0x37cB2B7A45F8d17936EBaBB4Ed95dE61f5371022") |
## Get the latest Chainlink content straight to your inbox.
Email Address
[iframe](https://td.doubleclick.net/td/rul/346357746?random=1747983055098&cv=11&fst=1747983055098&fmt=3&bg=ffffff&guid=ON&async=1&gcl_ctr=1>m=45be55l1v891173849z8847174275za201zb847174275&gcd=13l3l3l3l1l1&dma=0&tag_exp=101509157~103116026~103130495~103130497~103200004~103211513~103233427~103252644~103252646~103301114~103301116~104481633~104481635&ptag_exp=101509157~103116026~103130495~103130497~103200004~103233427~103252644~103252646~103301114~103301116~104481633~104481635&u_w=1280&u_h=1024&url=https%3A%2F%2Fdocs.chain.link%2Fccip%2Fdirectory%2Fmainnet%2Ftoken%2FBONE&_ng=1&label=_duuCKn_k4cYEPL_k6UB&hn=www.googleadservices.com&frm=0&tiba=CCIP%20Supported%20Tokens%20-%20BONE%20%7C%20Chainlink%20Documentation&value=0&bttype=purchase&npa=0&pscdl=noapi&auid=495201793.1747983055&uaa=x86&uab=64&uafvl=Chromium%3B136.0.7103.113%7CGoogle%2520Chrome%3B136.0.7103.113%7CNot.A%252FBrand%3B99.0.0.0&uamb=0&uam=&uap=Linux%20x86_64&uapv=6.6.72&uaw=0&fledge=1&capi=1&_tu=Cg&ct_cookie_present=0)
## SolvBTC Token Overview
[iframe](https://www.googletagmanager.com/ns.html?id=GTM-N6DQ47T)
Chainlink CCIP is now officially live on Solana. [View lanes and tokens.](https://docs.chain.link/ccip/directory/mainnet/chain/solana-mainnet?utm_medium=referral&utm_source=chainlink-docs&utm_campaign=solana-ccip)
On this page
[CCIP Directory](https://docs.chain.link/ccip/directory/mainnet) [SolvBTC](https://docs.chain.link/ccip/directory/mainnet/token/SolvBTC)


# SolvBTCSolv BTC
Listed Networks (14)

| Network | Name | Symbol | Decimals | Token address | Token pool type | Token pool address |
| --- | --- | --- | --- | --- | --- | --- |
| Arbitrum One | Solv BTC | SolvBTC | 18 | [0x3647c5...DBBDC0](https://explorer.arbitrum.io/address/0x3647c54c4c2C65bC7a2D63c0Da2809B399DBBDC0 "0x3647c54c4c2C65bC7a2D63c0Da2809B399DBBDC0") | Burn/Mint | [0x4f628a...00C173](https://explorer.arbitrum.io/address/0x4f628aF99578da6A481851779Fa297A35500C173 "0x4f628aF99578da6A481851779Fa297A35500C173") |
| Avalanche | Solv BTC | SolvBTC | 18 | [0xbc78D8...81a777](https://snowtrace.io/address/0xbc78D84Ba0c46dFe32cf2895a19939c86b81a777 "0xbc78D84Ba0c46dFe32cf2895a19939c86b81a777") | Burn/Mint | [0xc929ad...8261D9](https://snowtrace.io/address/0xc929ad75B72593967DE83E7F7Cda0493458261D9 "0xc929ad75B72593967DE83E7F7Cda0493458261D9") |
| Base | Solv BTC | SolvBTC | 18 | [0x3B86Ad...EE931f](https://basescan.org/address/0x3B86Ad95859b6AB773f55f8d94B4b9d443EE931f "0x3B86Ad95859b6AB773f55f8d94B4b9d443EE931f") | Burn/Mint | [0x2315f2...Bfb750](https://basescan.org/address/0x2315f2A36af9dd75B7a4E1c6c53B11767eBfb750 "0x2315f2A36af9dd75B7a4E1c6c53B11767eBfb750") |
| BNB Chain | Solv BTC | SolvBTC | 18 | [0x4aae82...8cBCf7](https://bscscan.com/address/0x4aae823a6a0b376De6A78e74eCC5b079d38cBCf7 "0x4aae823a6a0b376De6A78e74eCC5b079d38cBCf7") | Burn/Mint | [0x99D94f...97CA17](https://bscscan.com/address/0x99D94f528CeA3eE1791ab7B476A1FACb4297CA17 "0x99D94f528CeA3eE1791ab7B476A1FACb4297CA17") |
| BOB | Solv BTC | SolvBTC | 18 | [0x541FD7...dF8B77](https://explorer.gobob.xyz/address/0x541FD749419CA806a8bc7da8ac23D346f2dF8B77 "0x541FD749419CA806a8bc7da8ac23D346f2dF8B77") | Burn/Mint | [0x6c2310...35DC32](https://explorer.gobob.xyz/address/0x6c2310D68F21C024FF66Cc52e65220112F35DC32 "0x6c2310D68F21C024FF66Cc52e65220112F35DC32") |
| Ethereum | Solv BTC | SolvBTC | 18 | [0x7A56E1...652F97](https://etherscan.io/address/0x7A56E1C57C7475CCf742a1832B028F0456652F97 "0x7A56E1C57C7475CCf742a1832B028F0456652F97") | Burn/Mint | [0x3300f2...EC8dF3](https://etherscan.io/address/0x3300f27EDEeEB59CC4C4203785406cBEAfEC8dF3 "0x3300f27EDEeEB59CC4C4203785406cBEAfEC8dF3") |
| Ink | Solv BTC | SolvBTC | 18 | [0xaE4EFb...924cB3](https://explorer.inkonchain.com/address/0xaE4EFbc7736f963982aACb17EFA37fCBAb924cB3 "0xaE4EFbc7736f963982aACb17EFA37fCBAb924cB3") | Burn/Mint | [0xf49f81...52140c](https://explorer.inkonchain.com/address/0xf49f81b3d2F2a79b706621FA2D5934136352140c "0xf49f81b3d2F2a79b706621FA2D5934136352140c") |
| Linea | Solv BTC | SolvBTC | 18 | [0x541FD7...dF8B77](https://lineascan.build/address/0x541FD749419CA806a8bc7da8ac23D346f2dF8B77 "0x541FD749419CA806a8bc7da8ac23D346f2dF8B77") | Burn/Mint | [0x99D94f...97CA17](https://lineascan.build/address/0x99D94f528CeA3eE1791ab7B476A1FACb4297CA17 "0x99D94f528CeA3eE1791ab7B476A1FACb4297CA17") |
| Polygon | Solv BTC | SolvBTC | 18 | [0xaE4EFb...924cB3](https://polygonscan.com/address/0xaE4EFbc7736f963982aACb17EFA37fCBAb924cB3 "0xaE4EFbc7736f963982aACb17EFA37fCBAb924cB3") | Burn/Mint | [0x0809FC...080475](https://polygonscan.com/address/0x0809FC59B735e0aa90448514bBbEe0C75A080475 "0x0809FC59B735e0aa90448514bBbEe0C75A080475") |
| Sei Network | Solv BTC | SolvBTC | 18 | [0x541FD7...dF8B77](https://seitrace.com/address/0x541FD749419CA806a8bc7da8ac23D346f2dF8B77?chain=pacific-1 "0x541FD749419CA806a8bc7da8ac23D346f2dF8B77") | Burn/Mint | [0x4b75FE...a3F624](https://seitrace.com/address/0x4b75FE6e4a53A510AbC39c7328B0b06E74a3F624?chain=pacific-1 "0x4b75FE6e4a53A510AbC39c7328B0b06E74a3F624") |
| Solana | SolvBTC | SolvBTC | 8 | [SoLvHDFV...tFKZvW](https://explorer.solana.com/address/SoLvHDFVstC74Jr9eNLTDoG4goSUsn1RENmjNtFKZvW "SoLvHDFVstC74Jr9eNLTDoG4goSUsn1RENmjNtFKZvW") | Burn/Mint | [2a6KLcDk...fcBon4](https://explorer.solana.com/address/2a6KLcDkvoTVWmPDQhc15earc6hU4uwEyBQrmRfcBon4 "2a6KLcDkvoTVWmPDQhc15earc6hU4uwEyBQrmRfcBon4") |
| Soneium | Solv BTC | SolvBTC | 18 | [0x541FD7...dF8B77](https://soneium.blockscout.com/address/0x541FD749419CA806a8bc7da8ac23D346f2dF8B77 "0x541FD749419CA806a8bc7da8ac23D346f2dF8B77") | Burn/Mint | [0x6c2310...35DC32](https://soneium.blockscout.com/address/0x6c2310D68F21C024FF66Cc52e65220112F35DC32 "0x6c2310D68F21C024FF66Cc52e65220112F35DC32") |
| Sonic | Solv BTC | SolvBTC | 18 | [0x541FD7...dF8B77](https://sonicscan.org/address/0x541FD749419CA806a8bc7da8ac23D346f2dF8B77 "0x541FD749419CA806a8bc7da8ac23D346f2dF8B77") | Burn/Mint | [0x62FD93...dCdB73](https://sonicscan.org/address/0x62FD93Fc58D94eE253542ECD5C23467F65dCdB73 "0x62FD93Fc58D94eE253542ECD5C23467F65dCdB73") |
| ZKsync | Solv BTC | SolvBTC | 18 | [0x74eD17...B3A5b1](https://explorer.zksync.io/address/0x74eD17608cc2B5f30a59d6aF07C9aD1B1aB3A5b1 "0x74eD17608cc2B5f30a59d6aF07C9aD1B1aB3A5b1") | Burn/Mint | [0xCd627a...20f33f](https://explorer.zksync.io/address/0xCd627aA160A6fA45Eb793D19Ef54f5062F20f33f "0xCd627aA160A6fA45Eb793D19Ef54f5062F20f33f") |
## Get the latest Chainlink content straight to your inbox.
Email Address
## Cross-Chain Token Tutorials
[iframe](https://www.googletagmanager.com/ns.html?id=GTM-N6DQ47T)
On this page
# [Cross-Chain Token (CCT) Tutorials](https://docs.chain.link/ccip/tutorials/evm/cross-chain-tokens\#overview)
Before diving into the [tutorials](https://docs.chain.link/ccip/tutorials/evm/cross-chain-tokens#tutorials), it's important first to understand the overall procedure for enabling your tokens in CCIP. This procedure involves deploying tokens and token pools, registering administrative roles, and configuring token pools to enable secure token transfers using CCIP. The diagram below outlines the entire process:
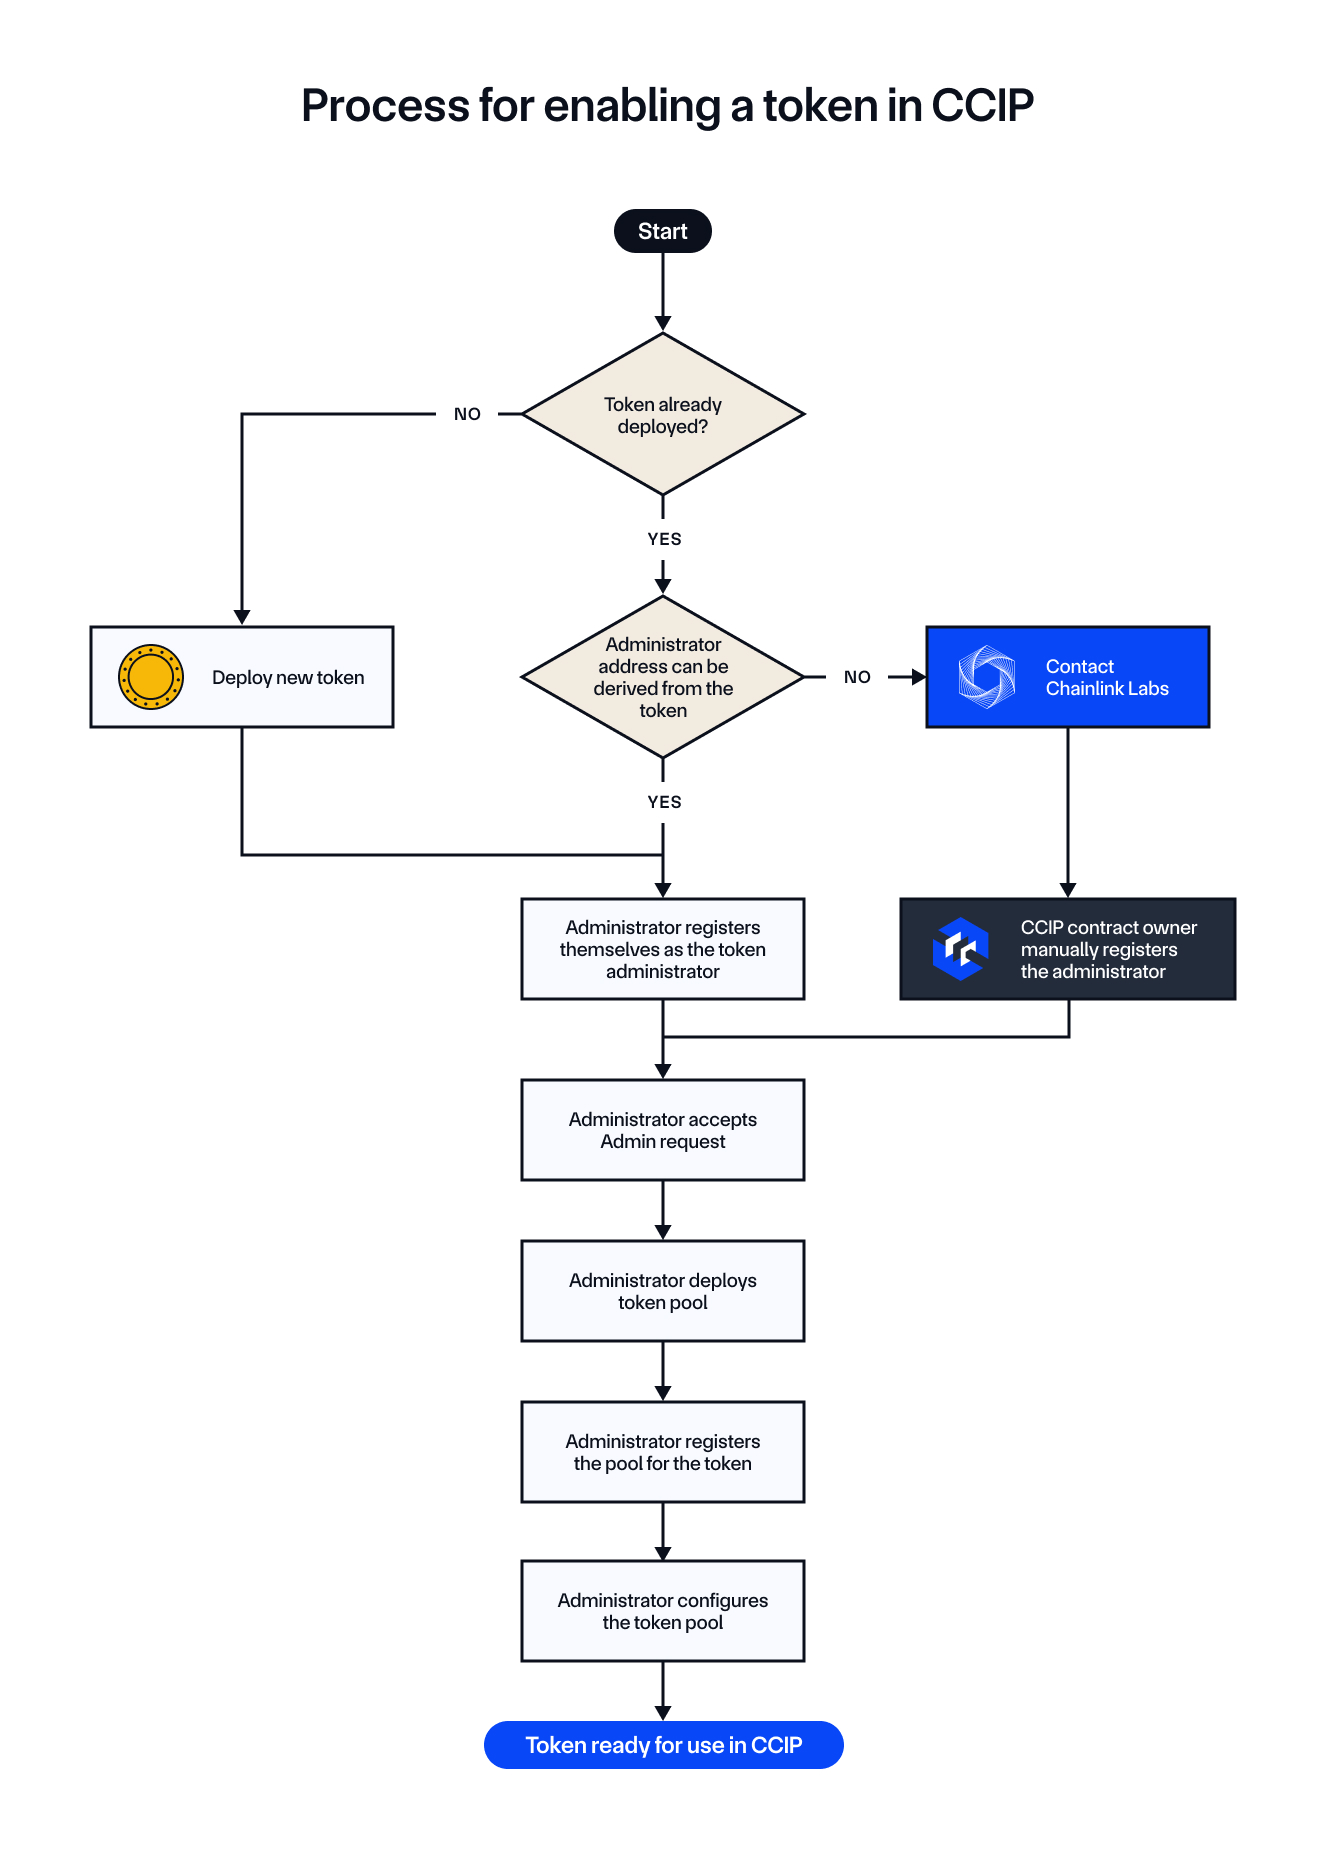
### [Understanding the Procedure](https://docs.chain.link/ccip/tutorials/evm/cross-chain-tokens\#understanding-the-procedure)
The steps in the diagram highlight the flow of actions needed to enable a token for cross-chain transfers. These steps will be the foundation of the tutorials. Whether you're working with an Externally Owned Account (EOA) or a **Smart Account** (such as one using a multisig scheme), the overall logic remains the same. You'll follow the same process to enable cross-chain token transfers, configure pools, and register administrative roles.
In the following tutorials, we will walk through each step of the process to give you hands-on experience, from deploying your token to registering and configuring token pools. The process will apply equally whether you use an EOA or a Smart Account (such as with multisig transactions), ensuring flexibility across different account types.
### [Key Steps to Keep in Mind:](https://docs.chain.link/ccip/tutorials/evm/cross-chain-tokens\#key-steps-to-keep-in-mind)
1. **Token Deployment**: If the token is not yet deployed, you'll deploy an [ERC20-compatible token](https://docs.chain.link/ccip/concepts/cross-chain-token/evm/tokens).
2. **Admin Registration**: The token administrator must be registered in the [`TokenAdminRegistry`](https://docs.chain.link/ccip/api-reference/evm/v1.6.0/token-admin-registry) via self-service.
3. **Pool Deployment and Configuration**: [Token pools](https://docs.chain.link/ccip/concepts/cross-chain-token/evm/token-pools#common-requirements) are deployed, linked to tokens, and configured to manage cross-chain token transfers.
The tutorials will implement the logic of this process, which involves deploying and configuring token pools and registering administrative roles, step-by-step.
## [Tutorials](https://docs.chain.link/ccip/tutorials/evm/cross-chain-tokens\#tutorials)
- [Deploy Using Remix IDE](https://docs.chain.link/ccip/tutorials/evm/cross-chain-tokens/register-from-eoa-remix): Learn how to deploy and register cross-chain tokens using only your browser and Remix IDE.
- No development environment setup required
- Great for quick testing and learning
- [Register from an EOA (Burn & Mint)](https://docs.chain.link/ccip/tutorials/evm/cross-chain-tokens/register-from-eoa-burn-mint-hardhat): Learn how to register a cross-chain token with the **Burn & Mint** mechanism using an EOA.
- [Hardhat version](https://docs.chain.link/ccip/tutorials/evm/cross-chain-tokens/register-from-eoa-burn-mint-hardhat)
- [Foundry version](https://docs.chain.link/ccip/tutorials/evm/cross-chain-tokens/register-from-eoa-burn-mint-foundry)
- [Register from an EOA (Lock & Mint)](https://docs.chain.link/ccip/tutorials/evm/cross-chain-tokens/register-from-eoa-lock-mint-hardhat): Learn how to register a cross-chain token with the **Lock & Mint** mechanism using an EOA.
- [Hardhat version](https://docs.chain.link/ccip/tutorials/evm/cross-chain-tokens/register-from-eoa-lock-mint-hardhat)
- [Foundry version](https://docs.chain.link/ccip/tutorials/evm/cross-chain-tokens/register-from-eoa-lock-mint-foundry)
- [Set Token Pool Rate Limits](https://docs.chain.link/ccip/tutorials/evm/cross-chain-tokens/update-rate-limiters-hardhat): Learn how to set rate limits for token pools to control cross-chain token transfers.
- [Hardhat version](https://docs.chain.link/ccip/tutorials/evm/cross-chain-tokens/update-rate-limiters-hardhat)
- [Foundry version](https://docs.chain.link/ccip/tutorials/evm/cross-chain-tokens/update-rate-limiters-foundry)
- [Register from a Safe (Burn & Mint)](https://docs.chain.link/ccip/tutorials/evm/cross-chain-tokens/register-from-safe-burn-mint-hardhat): Learn how to register a cross-chain token with the **Burn & Mint** mechanism using a Safe Smart Account.
- [Hardhat version](https://docs.chain.link/ccip/tutorials/evm/cross-chain-tokens/register-from-safe-burn-mint-hardhat)
## Get the latest Chainlink content straight to your inbox.
Email Address
## Send Arbitrary Data
[iframe](https://www.googletagmanager.com/ns.html?id=GTM-N6DQ47T)
On this page
# Send Arbitrary Data
In this tutorial, you will use Chainlink CCIP to send data between smart contracts on different blockchains. First, you will pay for the CCIP fees on the source blockchain using LINK. Then, you will use the same contract to pay CCIP fees in native gas tokens. For example, you would use ETH on Ethereum or AVAX on Avalanche.
## [Before you begin](https://docs.chain.link/ccip/tutorials/evm/send-arbitrary-data\#before-you-begin)
- You should understand how to write, compile, deploy, and fund a smart contract. If you need to brush up on the basics, read this [tutorial](https://docs.chain.link/quickstarts/deploy-your-first-contract), which will guide you through using the [Solidity programming language](https://soliditylang.org/), interacting with the [MetaMask wallet](https://metamask.io/) and working within the [Remix Development Environment](https://remix.ethereum.org/).
- Your account must have some AVAX tokens on _Avalanche Fuji_ and ETH tokens on _Ethereum Sepolia_.
- Learn how to [Acquire testnet LINK](https://docs.chain.link/resources/acquire-link) and [Fund your contract with LINK](https://docs.chain.link/resources/fund-your-contract).
## [Tutorial](https://docs.chain.link/ccip/tutorials/evm/send-arbitrary-data\#tutorial)
In this tutorial, you will send a _string_ text between smart contracts on _Avalanche Fuji_ and _Ethereum Sepolia_ using CCIP. First, you will pay [CCIP fees in LINK](https://docs.chain.link/ccip/tutorials/evm/send-arbitrary-data#send-data-and-pay-in-link), then you will pay [CCIP fees in native gas](https://docs.chain.link/ccip/tutorials/evm/send-arbitrary-data#send-data-and-pay-in-native).
```solidity
// SPDX-License-Identifier: MIT
pragma solidity 0.8.24;
import {IRouterClient} from "@chainlink/contracts-ccip/contracts/interfaces/IRouterClient.sol";
import {OwnerIsCreator} from "@chainlink/contracts/src/v0.8/shared/access/OwnerIsCreator.sol";
import {Client} from "@chainlink/contracts-ccip/contracts/libraries/Client.sol";
import {CCIPReceiver} from "@chainlink/contracts-ccip/contracts/applications/CCIPReceiver.sol";
import {IERC20} from "@chainlink/contracts/src/v0.8/vendor/openzeppelin-solidity/v4.8.3/contracts/token/ERC20/IERC20.sol";
import {SafeERC20} from "@chainlink/contracts/src/v0.8/vendor/openzeppelin-solidity/v4.8.3/contracts/token/ERC20/utils/SafeERC20.sol";
/**
* THIS IS AN EXAMPLE CONTRACT THAT USES HARDCODED VALUES FOR CLARITY.
* THIS IS AN EXAMPLE CONTRACT THAT USES UN-AUDITED CODE.
* DO NOT USE THIS CODE IN PRODUCTION.
*/
/// @title - A simple messenger contract for sending/receiving string data across chains.
contract Messenger is CCIPReceiver, OwnerIsCreator {
using SafeERC20 for IERC20;
// Custom errors to provide more descriptive revert messages.
error NotEnoughBalance(uint256 currentBalance, uint256 calculatedFees); // Used to make sure contract has enough balance.
error NothingToWithdraw(); // Used when trying to withdraw Ether but there's nothing to withdraw.
error FailedToWithdrawEth(address owner, address target, uint256 value); // Used when the withdrawal of Ether fails.
error DestinationChainNotAllowlisted(uint64 destinationChainSelector); // Used when the destination chain has not been allowlisted by the contract owner.
error SourceChainNotAllowlisted(uint64 sourceChainSelector); // Used when the source chain has not been allowlisted by the contract owner.
error SenderNotAllowlisted(address sender); // Used when the sender has not been allowlisted by the contract owner.
error InvalidReceiverAddress(); // Used when the receiver address is 0.
// Event emitted when a message is sent to another chain.
event MessageSent(
bytes32 indexed messageId, // The unique ID of the CCIP message.
uint64 indexed destinationChainSelector, // The chain selector of the destination chain.
address receiver, // The address of the receiver on the destination chain.
string text, // The text being sent.
address feeToken, // the token address used to pay CCIP fees.
uint256 fees // The fees paid for sending the CCIP message.
);
// Event emitted when a message is received from another chain.
event MessageReceived(
bytes32 indexed messageId, // The unique ID of the CCIP message.
uint64 indexed sourceChainSelector, // The chain selector of the source chain.
address sender, // The address of the sender from the source chain.
string text // The text that was received.
);
bytes32 private s_lastReceivedMessageId; // Store the last received messageId.
string private s_lastReceivedText; // Store the last received text.
// Mapping to keep track of allowlisted destination chains.
mapping(uint64 => bool) public allowlistedDestinationChains;
// Mapping to keep track of allowlisted source chains.
mapping(uint64 => bool) public allowlistedSourceChains;
// Mapping to keep track of allowlisted senders.
mapping(address => bool) public allowlistedSenders;
IERC20 private s_linkToken;
/// @notice Constructor initializes the contract with the router address.
/// @param _router The address of the router contract.
/// @param _link The address of the link contract.
constructor(address _router, address _link) CCIPReceiver(_router) {
s_linkToken = IERC20(_link);
}
/// @dev Modifier that checks if the chain with the given destinationChainSelector is allowlisted.
/// @param _destinationChainSelector The selector of the destination chain.
modifier onlyAllowlistedDestinationChain(uint64 _destinationChainSelector) {
if (!allowlistedDestinationChains[_destinationChainSelector])
revert DestinationChainNotAllowlisted(_destinationChainSelector);
_;
}
/// @dev Modifier that checks if the chain with the given sourceChainSelector is allowlisted and if the sender is allowlisted.
/// @param _sourceChainSelector The selector of the destination chain.
/// @param _sender The address of the sender.
modifier onlyAllowlisted(uint64 _sourceChainSelector, address _sender) {
if (!allowlistedSourceChains[_sourceChainSelector])
revert SourceChainNotAllowlisted(_sourceChainSelector);
if (!allowlistedSenders[_sender]) revert SenderNotAllowlisted(_sender);
_;
}
/// @dev Modifier that checks the receiver address is not 0.
/// @param _receiver The receiver address.
modifier validateReceiver(address _receiver) {
if (_receiver == address(0)) revert InvalidReceiverAddress();
_;
}
/// @dev Updates the allowlist status of a destination chain for transactions.
function allowlistDestinationChain(
uint64 _destinationChainSelector,
bool allowed
) external onlyOwner {
allowlistedDestinationChains[_destinationChainSelector] = allowed;
}
/// @dev Updates the allowlist status of a source chain for transactions.
function allowlistSourceChain(
uint64 _sourceChainSelector,
bool allowed
) external onlyOwner {
allowlistedSourceChains[_sourceChainSelector] = allowed;
}
/// @dev Updates the allowlist status of a sender for transactions.
function allowlistSender(address _sender, bool allowed) external onlyOwner {
allowlistedSenders[_sender] = allowed;
}
/// @notice Sends data to receiver on the destination chain.
/// @notice Pay for fees in LINK.
/// @dev Assumes your contract has sufficient LINK.
/// @param _destinationChainSelector The identifier (aka selector) for the destination blockchain.
/// @param _receiver The address of the recipient on the destination blockchain.
/// @param _text The text to be sent.
/// @return messageId The ID of the CCIP message that was sent.
function sendMessagePayLINK(
uint64 _destinationChainSelector,
address _receiver,
string calldata _text
)
external
onlyOwner
onlyAllowlistedDestinationChain(_destinationChainSelector)
validateReceiver(_receiver)
returns (bytes32 messageId)
{
// Create an EVM2AnyMessage struct in memory with necessary information for sending a cross-chain message
Client.EVM2AnyMessage memory evm2AnyMessage = _buildCCIPMessage(
_receiver,
_text,
address(s_linkToken)
);
// Initialize a router client instance to interact with cross-chain router
IRouterClient router = IRouterClient(this.getRouter());
// Get the fee required to send the CCIP message
uint256 fees = router.getFee(_destinationChainSelector, evm2AnyMessage);
if (fees > s_linkToken.balanceOf(address(this)))
revert NotEnoughBalance(s_linkToken.balanceOf(address(this)), fees);
// approve the Router to transfer LINK tokens on contract's behalf. It will spend the fees in LINK
s_linkToken.approve(address(router), fees);
// Send the CCIP message through the router and store the returned CCIP message ID
messageId = router.ccipSend(_destinationChainSelector, evm2AnyMessage);
// Emit an event with message details
emit MessageSent(
messageId,
_destinationChainSelector,
_receiver,
_text,
address(s_linkToken),
fees
);
// Return the CCIP message ID
return messageId;
}
/// @notice Sends data to receiver on the destination chain.
/// @notice Pay for fees in native gas.
/// @dev Assumes your contract has sufficient native gas tokens.
/// @param _destinationChainSelector The identifier (aka selector) for the destination blockchain.
/// @param _receiver The address of the recipient on the destination blockchain.
/// @param _text The text to be sent.
/// @return messageId The ID of the CCIP message that was sent.
function sendMessagePayNative(
uint64 _destinationChainSelector,
address _receiver,
string calldata _text
)
external
onlyOwner
onlyAllowlistedDestinationChain(_destinationChainSelector)
validateReceiver(_receiver)
returns (bytes32 messageId)
{
// Create an EVM2AnyMessage struct in memory with necessary information for sending a cross-chain message
Client.EVM2AnyMessage memory evm2AnyMessage = _buildCCIPMessage(
_receiver,
_text,
address(0)
);
// Initialize a router client instance to interact with cross-chain router
IRouterClient router = IRouterClient(this.getRouter());
// Get the fee required to send the CCIP message
uint256 fees = router.getFee(_destinationChainSelector, evm2AnyMessage);
if (fees > address(this).balance)
revert NotEnoughBalance(address(this).balance, fees);
// Send the CCIP message through the router and store the returned CCIP message ID
messageId = router.ccipSend{value: fees}(
_destinationChainSelector,
evm2AnyMessage
);
// Emit an event with message details
emit MessageSent(
messageId,
_destinationChainSelector,
_receiver,
_text,
address(0),
fees
);
// Return the CCIP message ID
return messageId;
}
/// handle a received message
function _ccipReceive(
Client.Any2EVMMessage memory any2EvmMessage
)
internal
override
onlyAllowlisted(
any2EvmMessage.sourceChainSelector,
abi.decode(any2EvmMessage.sender, (address))
) // Make sure source chain and sender are allowlisted
{
s_lastReceivedMessageId = any2EvmMessage.messageId; // fetch the messageId
s_lastReceivedText = abi.decode(any2EvmMessage.data, (string)); // abi-decoding of the sent text
emit MessageReceived(
any2EvmMessage.messageId,
any2EvmMessage.sourceChainSelector, // fetch the source chain identifier (aka selector)
abi.decode(any2EvmMessage.sender, (address)), // abi-decoding of the sender address,
abi.decode(any2EvmMessage.data, (string))
);
}
/// @notice Construct a CCIP message.
/// @dev This function will create an EVM2AnyMessage struct with all the necessary information for sending a text.
/// @param _receiver The address of the receiver.
/// @param _text The string data to be sent.
/// @param _feeTokenAddress The address of the token used for fees. Set address(0) for native gas.
/// @return Client.EVM2AnyMessage Returns an EVM2AnyMessage struct which contains information for sending a CCIP message.
function _buildCCIPMessage(
address _receiver,
string calldata _text,
address _feeTokenAddress
) private pure returns (Client.EVM2AnyMessage memory) {
// Create an EVM2AnyMessage struct in memory with necessary information for sending a cross-chain message
return
Client.EVM2AnyMessage({
receiver: abi.encode(_receiver), // ABI-encoded receiver address
data: abi.encode(_text), // ABI-encoded string
tokenAmounts: new Client.EVMTokenAmount[](0), // Empty array as no tokens are transferred
extraArgs: Client._argsToBytes(
// Additional arguments, setting gas limit and allowing out-of-order execution.
// Best Practice: For simplicity, the values are hardcoded. It is advisable to use a more dynamic approach
// where you set the extra arguments off-chain. This allows adaptation depending on the lanes, messages,
// and ensures compatibility with future CCIP upgrades. Read more about it here: https://docs.chain.link/ccip/concepts/best-practices/evm#using-extraargs
Client.GenericExtraArgsV2({
gasLimit: 200_000, // Gas limit for the callback on the destination chain
allowOutOfOrderExecution: true // Allows the message to be executed out of order relative to other messages from the same sender
})
),
// Set the feeToken to a feeTokenAddress, indicating specific asset will be used for fees
feeToken: _feeTokenAddress
});
}
/// @notice Fetches the details of the last received message.
/// @return messageId The ID of the last received message.
/// @return text The last received text.
function getLastReceivedMessageDetails()
external
view
returns (bytes32 messageId, string memory text)
{
return (s_lastReceivedMessageId, s_lastReceivedText);
}
/// @notice Fallback function to allow the contract to receive Ether.
/// @dev This function has no function body, making it a default function for receiving Ether.
/// It is automatically called when Ether is sent to the contract without any data.
receive() external payable {}
/// @notice Allows the contract owner to withdraw the entire balance of Ether from the contract.
/// @dev This function reverts if there are no funds to withdraw or if the transfer fails.
/// It should only be callable by the owner of the contract.
/// @param _beneficiary The address to which the Ether should be sent.
function withdraw(address _beneficiary) public onlyOwner {
// Retrieve the balance of this contract
uint256 amount = address(this).balance;
// Revert if there is nothing to withdraw
if (amount == 0) revert NothingToWithdraw();
// Attempt to send the funds, capturing the success status and discarding any return data
(bool sent, ) = _beneficiary.call{value: amount}("");
// Revert if the send failed, with information about the attempted transfer
if (!sent) revert FailedToWithdrawEth(msg.sender, _beneficiary, amount);
}
/// @notice Allows the owner of the contract to withdraw all tokens of a specific ERC20 token.
/// @dev This function reverts with a 'NothingToWithdraw' error if there are no tokens to withdraw.
/// @param _beneficiary The address to which the tokens will be sent.
/// @param _token The contract address of the ERC20 token to be withdrawn.
function withdrawToken(
address _beneficiary,
address _token
) public onlyOwner {
// Retrieve the balance of this contract
uint256 amount = IERC20(_token).balanceOf(address(this));
// Revert if there is nothing to withdraw
if (amount == 0) revert NothingToWithdraw();
IERC20(_token).safeTransfer(_beneficiary, amount);
}
}
```
[Open in Remix](https://remix.ethereum.org/#url=https://docs.chain.link/samples/CCIP/Messenger.sol&autoCompile=true) [What is Remix?](https://docs.chain.link/getting-started/conceptual-overview#what-is-remix)
### [Deploy your contracts](https://docs.chain.link/ccip/tutorials/evm/send-arbitrary-data\#deploy-your-contracts)
To use this contract:
1. [Open the contract in Remix](https://remix.ethereum.org/#url=https://docs.chain.link/samples/CCIP/Messenger.sol).
2. Compile your contract.
3. Deploy your sender contract on _Avalanche Fuji_ and enable sending messages to _Ethereum Sepolia_:
1. Open MetaMask and select the network _Avalanche Fuji_.
2. In Remix IDE, click on _Deploy & Run Transactions_ and select _Injected Provider - MetaMask_ from the environment list. Remix will then interact with your MetaMask wallet to communicate with _Avalanche Fuji_.
3. Fill in the router address and the link address for your network. You can find the router address on the [CCIP Directory](https://docs.chain.link/ccip/directory) and the LINK token address on the [LINK Token contracts page](https://docs.chain.link/resources/link-token-contracts?parent=ccip). For _Avalanche Fuji_:
- The router address is `0xF694E193200268f9a4868e4Aa017A0118C9a8177`,
- The LINK contract address is `0x0b9d5D9136855f6FEc3c0993feE6E9CE8a297846`.
4. Click on _transact_. After you confirm the transaction, the contract address appears on the _Deployed Contracts_ list.
Note your contract address.
5. Enable your contract to send CCIP messages to _Ethereum Sepolia_:
1. In Remix IDE, under _Deploy & Run Transactions_, open the list of transactions of your smart contract deployed on _Avalanche Fuji_.
2. Call the `allowlistDestinationChain` with `16015286601757825753` as the destination chain selector, and `true` as allowed. Each chain selector is found on the [CCIP Directory](https://docs.chain.link/ccip/directory).
4. Deploy your receiver contract on _Ethereum Sepolia_ and enable receiving messages from your sender contract:
1. Open MetaMask and select the network _Ethereum Sepolia_.
2. In Remix IDE, under _Deploy & Run Transactions_, make sure the environment is still _Injected Provider - MetaMask_.
3. Fill in the router address and the LINK address for your network. You can find the router address on the [CCIP Directory](https://docs.chain.link/ccip/directory) and the LINK contract address on the [LINK token contracts page](https://docs.chain.link/resources/link-token-contracts). For _Ethereum Sepolia_:
- The router address is `0x0BF3dE8c5D3e8A2B34D2BEeB17ABfCeBaf363A59`,
- The LINK contract address is `0x779877A7B0D9E8603169DdbD7836e478b4624789`.
4. Click on _transact_. After you confirm the transaction, the contract address appears on the _Deployed Contracts_ list.
Note your contract address.
5. Enable your contract to receive CCIP messages from _Avalanche Fuji_:
1. In Remix IDE, under _Deploy & Run Transactions_, open the list of transactions of your smart contract deployed on _Ethereum Sepolia_.
2. Call the `allowlistSourceChain` with `14767482510784806043` as the source chain selector, and `true` as allowed. Each chain selector is found on the [CCIP Directory](https://docs.chain.link/ccip/directory).
6. Enable your contract to receive CCIP messages from the contract that you deployed on _Avalanche Fuji_:
1. In Remix IDE, under _Deploy & Run Transactions_, open the list of transactions of your smart contract deployed on _Ethereum Sepolia_.
2. Call the `allowlistSender` with the contract address of the contract that you deployed on _Avalanche Fuji_, and `true` as allowed.
At this point, you have one _sender_ contract on _Avalanche Fuji_ and one _receiver_ contract on _Ethereum Sepolia_. As security measures, you enabled the sender contract to send CCIP messages to _Ethereum Sepolia_ and the receiver contract to receive CCIP messages from the sender and _Avalanche Fuji_. **Note**: Another security measure enforces that only the router can call the `_ccipReceive` function. Read the [explanation](https://docs.chain.link/ccip/tutorials/evm/send-arbitrary-data#explanation) section for more details.
### [Send data and pay in LINK](https://docs.chain.link/ccip/tutorials/evm/send-arbitrary-data\#send-data-and-pay-in-link)
You will use CCIP to send a text. The CCIP fees for using CCIP will be paid in LINK. Read this [explanation](https://docs.chain.link/ccip/tutorials/evm/send-arbitrary-data#sending-data-and-pay-in-link) for a detailed description of the code example.
1. Open MetaMask and connect to _Avalanche Fuji_. Fund your contract with LINK tokens. You can transfer `70` _LINK_ to your contract. In this example, LINK is used to pay the CCIP fees.
**Note:** This transaction fee is significantly higher than normal due to gas spikes on Sepolia. To run this example, you can get additional testnet LINK
from [faucets.chain.link](https://faucets.chain.link/) or use a supported testnet other than Sepolia.
2. Send "Hello World!" from _Avalanche Fuji_:
1. Open MetaMask and select the network _Avalanche Fuji_.
2. In Remix IDE, under _Deploy & Run Transactions_, open the list of transactions of your smart contract deployed on _Avalanche Fuji_.
3. Fill in the arguments of the _**sendMessagePayLINK**_ function:
| Argument | Description | Value ( _Ethereum Sepolia_) |
| --- | --- | --- |
| \_destinationChainSelector | CCIP Chain identifier of the target blockchain. You can find each network's chain selector on the [CCIP Directory](https://docs.chain.link/ccip/directory) | `16015286601757825753` |
| \_receiver | The destination smart contract address | Your deployed receiver contract address |
| \_text | any `string` | `Hello World!` |
4. Click on `transact` and confirm the transaction on MetaMask.
5. Once the transaction is successful, note the transaction hash. Here is an [example](https://testnet.snowtrace.io/tx/0x233d2d882e6cfe736c982d58a33021d2f4f6b96e0cfd2c7a874cf2eb63790aa1) of a transaction on _Avalanche Fuji_.
3. Open the [CCIP explorer](https://ccip.chain.link/) and search your cross-chain transaction using the transaction hash.
4. The CCIP transaction is completed once the status is marked as "Success". **Note**: In this example, the CCIP message ID is _0x28a804fa891bde8fb4f6617931187e1033a128c014aa76465911613588bc306f_.
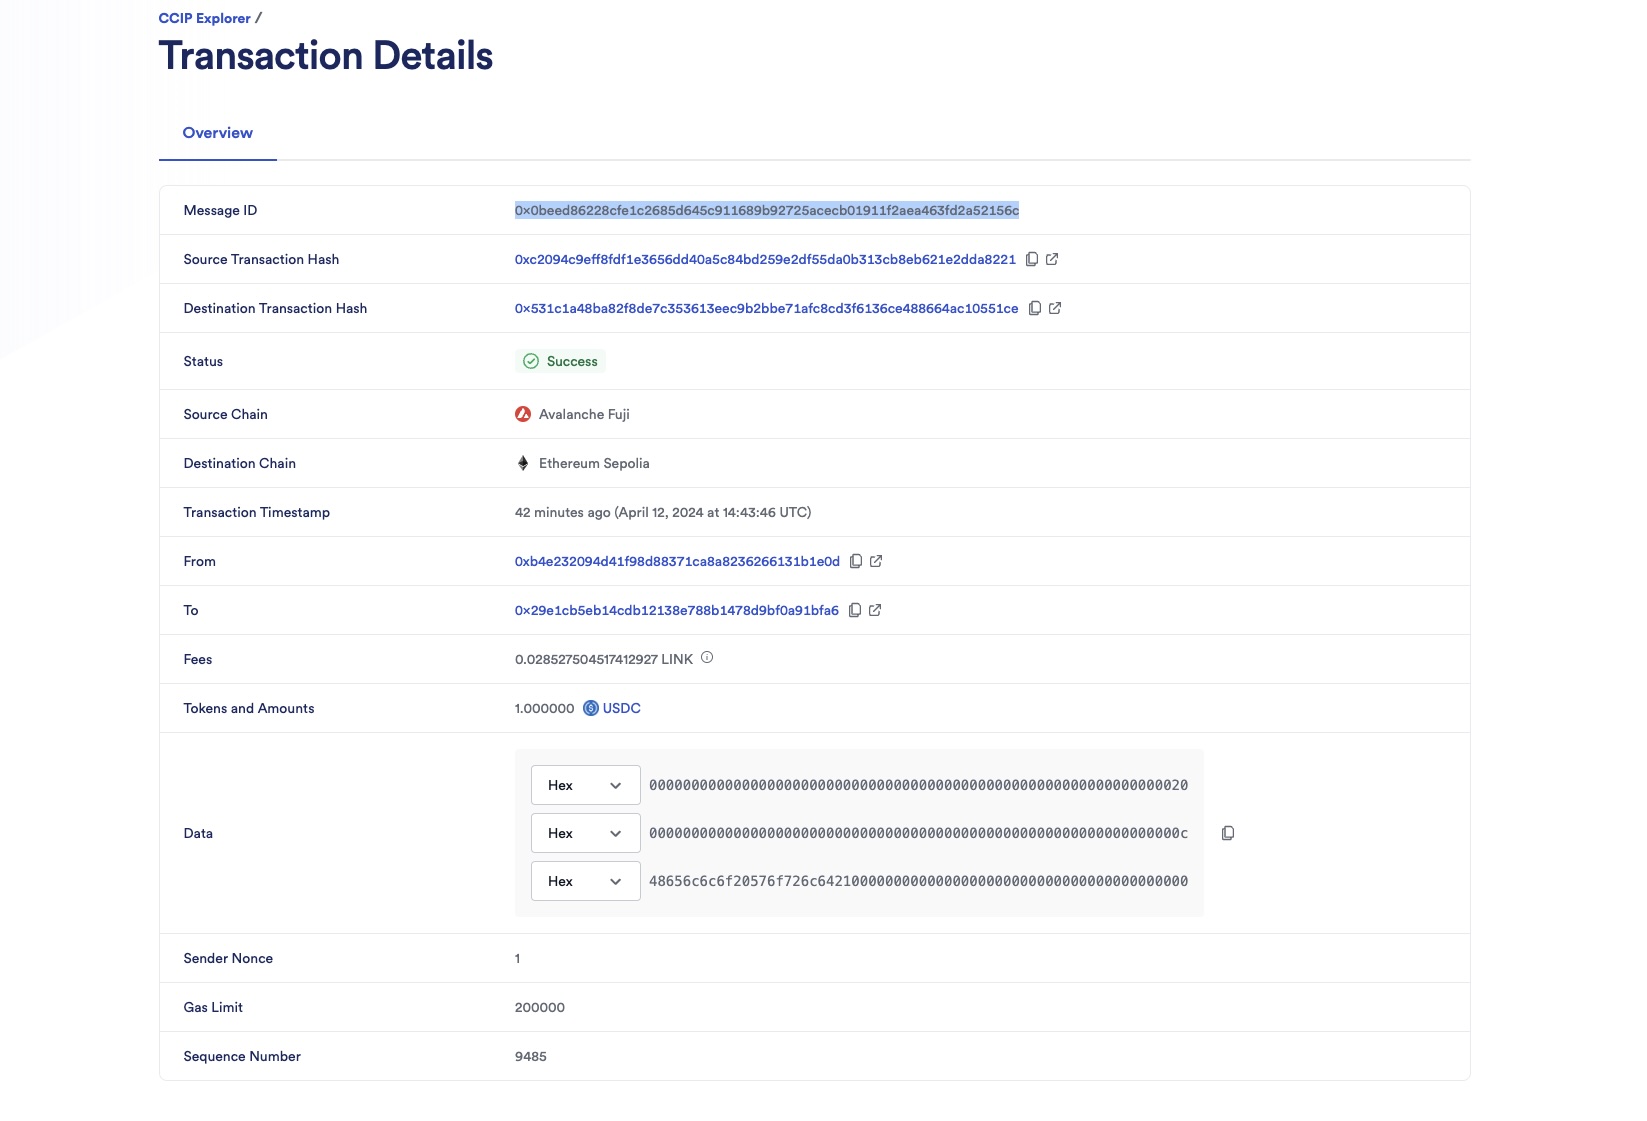
5. Check the receiver contract on the destination chain:
1. Open MetaMask and select the network _Ethereum Sepolia_.
2. In Remix IDE, under _Deploy & Run Transactions_, open the list of transactions of your smart contract deployed on _Ethereum Sepolia_.
3. Call the `getLastReceivedMessageDetails`.

4. Notice the received text is the one you sent, "Hello World!" and the message ID is the one you expect _0x28a804fa891bde8fb4f6617931187e1033a128c014aa76465911613588bc306f_.
**Note**: These example contracts are designed to work bi-directionally. As an exercise, you can use them to send data from _Avalanche Fuji_ to _Ethereum Sepolia_ and from _Ethereum Sepolia_ back to _Avalanche Fuji_.
### [Send data and pay in native](https://docs.chain.link/ccip/tutorials/evm/send-arbitrary-data\#send-data-and-pay-in-native)
You will use CCIP to send a text. The CCIP fees for using CCIP will be paid in native gas. Read this [explanation](https://docs.chain.link/ccip/tutorials/evm/send-arbitrary-data#sending-data-and-pay-in-native) for a detailed description of the code example.
1. Open MetaMask and connect to _Avalanche Fuji_. Fund your contract with AVAX. You can transfer `1` _AVAX_ to your contract. In this example, AVAX is used to pay the CCIP fees.
2. Send "Hello World!" from _Avalanche Fuji_:
1. Open MetaMask and select the network _Avalanche Fuji_.
2. In Remix IDE, under _Deploy & Run Transactions_, open the list of transactions of your smart contract deployed on _Avalanche Fuji_.
3. Fill in the arguments of the _**sendMessagePayNative**_ function:
| Argument | Description | Value ( _Ethereum Sepolia_) |
| --- | --- | --- |
| \_destinationChainSelector | CCIP Chain identifier of the target blockchain. You can find each network's chain selector on the [CCIP Directory](https://docs.chain.link/ccip/directory) | `16015286601757825753` |
| \_receiver | The destination smart contract address | Your deployed receiver contract address |
| \_text | any `string` | `Hello World!` |
4. Click on `transact` and confirm the transaction on MetaMask.
5. Once the transaction is successful, note the transaction hash. Here is an [example](https://testnet.snowtrace.io/tx/0x5cb5ea9b1631f62148105d67b780b56fce66db398667276ea498104b7896ffee) of a transaction on _Avalanche Fuji_.
3. Open the [CCIP explorer](https://ccip.chain.link/) and search your cross-chain transaction using the transaction hash.
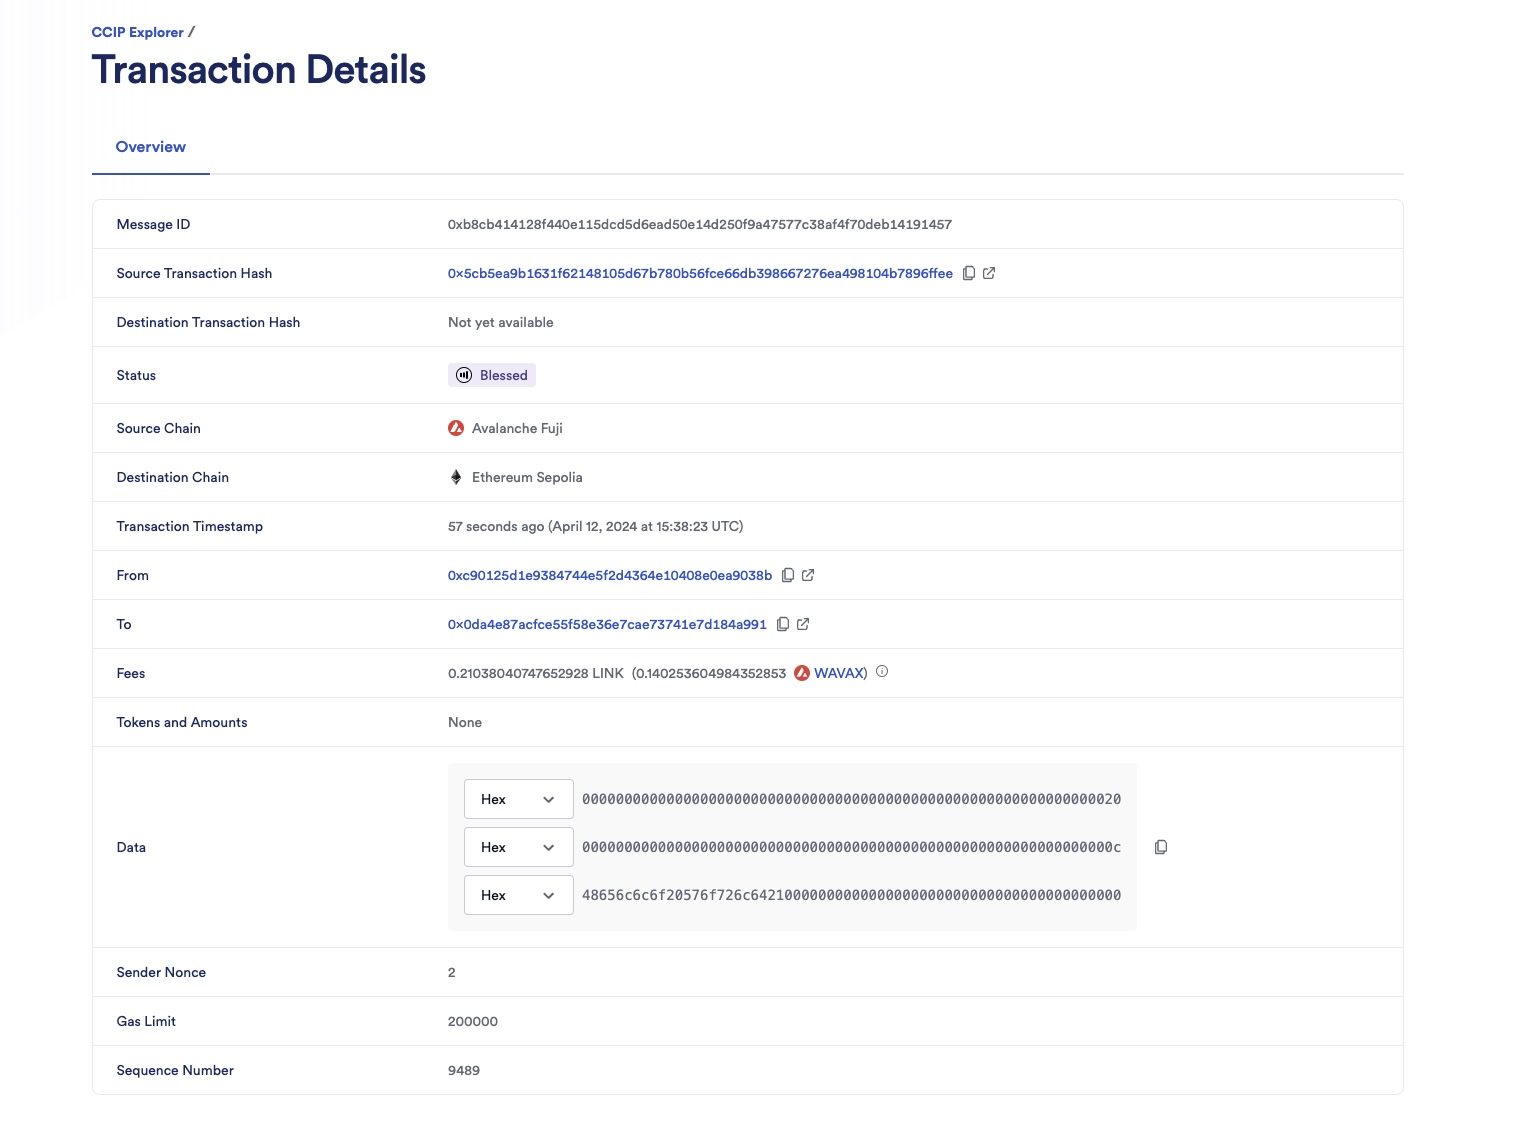
4. The CCIP transaction is completed once the status is marked as "Success". In this example, the CCIP message ID is _0xb8cb414128f440e115dcd5d6ead50e14d250f9a47577c38af4f70deb14191457_. Note that CCIP fees are denominated in LINK. Even if CCIP fees are paid using native gas tokens, node operators will be paid in LINK.
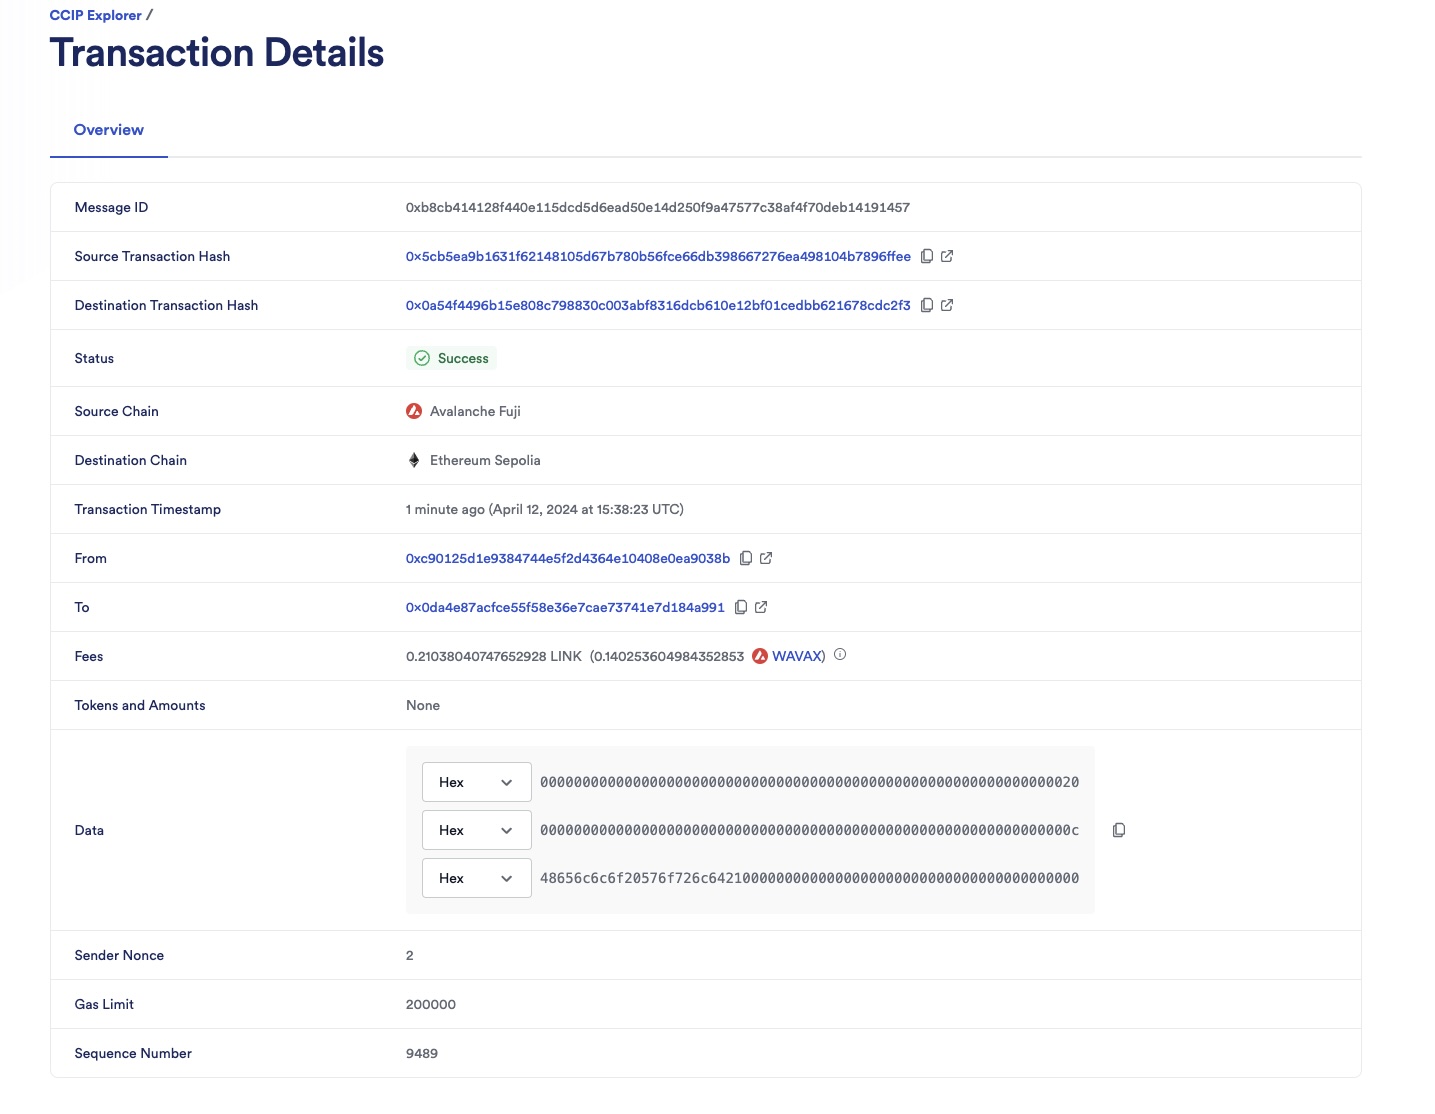
5. Check the receiver contract on the destination chain:
1. Open MetaMask and select the network _Ethereum Sepolia_.
2. In Remix IDE, under _Deploy & Run Transactions_, open the list of transactions of your smart contract deployed on _Ethereum Sepolia_.
3. Call the `getLastReceivedMessageDetails`.

4. Notice the received text is the one you sent, "Hello World!" and the message ID is the one you expect _0xb8cb414128f440e115dcd5d6ead50e14d250f9a47577c38af4f70deb14191457_.
**Note**: These example contracts are designed to work bi-directionally. As an exercise, you can use them to send data from _Avalanche Fuji_ to _Ethereum Sepolia_ and from _Ethereum Sepolia_ back to _Avalanche Fuji_.
## [Explanation](https://docs.chain.link/ccip/tutorials/evm/send-arbitrary-data\#explanation)
The smart contract featured in this tutorial is designed to interact with CCIP to send and receive messages. The contract code contains supporting comments clarifying the functions, events, and underlying logic. Here we will further explain initializing the contract and sending and receiving data.
### [Initializing of the contract](https://docs.chain.link/ccip/tutorials/evm/send-arbitrary-data\#initializing-of-the-contract)
When deploying the contract, we define the router address and LINK contract address of the blockchain we deploy the contract on.
Defining the router address is useful for the following:
- Sender part:
- Calls the router's `getFee` [function](https://docs.chain.link/ccip/api-reference/evm/v1.6.0/i-router-client#getfee) to estimate the CCIP fees.
- Calls the router's `ccipSend` [function](https://docs.chain.link/ccip/api-reference/evm/v1.6.0/i-router-client#ccipsend) to send CCIP messages.
- Receiver part:
- The contract inherits from [CCIPReceiver](https://docs.chain.link/ccip/api-reference/evm/v1.6.0/ccip-receiver), which serves as a base contract for receiver contracts. This contract requires that child contracts implement the `_ccipReceive` [function](https://docs.chain.link/ccip/api-reference/evm/v1.6.0/ccip-receiver#_ccipreceive). `_ccipReceive` is called by the `ccipReceive` [function](https://docs.chain.link/ccip/api-reference/evm/v1.6.0/ccip-receiver#ccipreceive), which ensures that only the router can deliver CCIP messages to the receiver contract.
### [Sending data and pay in LINK](https://docs.chain.link/ccip/tutorials/evm/send-arbitrary-data\#sending-data-and-pay-in-link)
The `sendMessagePayLINK` function undertakes five primary operations:
1. Call the `_buildCCIPMessage` private function to construct a CCIP-compatible message using the `EVM2AnyMessage` [struct](https://docs.chain.link/ccip/api-reference/evm/v1.6.0/client#any2evmmessage):
- The `_receiver` address is encoded in bytes to accommodate non-EVM destination blockchains with distinct address formats. The encoding is achieved through [abi.encode](https://docs.soliditylang.org/en/develop/abi-spec.html).
- The `data` is encoded from a `string` to `bytes` using [abi.encode](https://docs.soliditylang.org/en/develop/abi-spec.html).
- The `tokenAmounts` is an empty `EVMTokenAmount` [struct](https://docs.chain.link/ccip/api-reference/evm/v1.6.0/client#evmtokenamount) array as no tokens are transferred.
- The `extraArgs` specifies the `gasLimit` for relaying the message to the recipient contract on the destination blockchain. In this example, the `gasLimit` is set to `200000`.
- The `_feeTokenAddress` designates the token address used for CCIP fees. Here, `address(linkToken)` signifies payment in LINK.
2. Computes the fees by invoking the router's `getFee` [function](https://docs.chain.link/ccip/api-reference/evm/v1.6.0/i-router-client#getfee).
3. Ensures your contract balance in LINK is enough to cover the fees.
4. Grants the router contract permission to deduct the fees from the contract's LINK balance.
5. Dispatches the CCIP message to the destination chain by executing the router's `ccipSend` [function](https://docs.chain.link/ccip/api-reference/evm/v1.6.0/i-router-client#ccipsend).
**Note**: As a security measure, the `sendMessagePayLINK` function is protected by the `onlyAllowlistedDestinationChain`, ensuring the contract owner has allowlisted a destination chain.
### [Sending data and pay in native](https://docs.chain.link/ccip/tutorials/evm/send-arbitrary-data\#sending-data-and-pay-in-native)
The `sendMessagePayNative` function undertakes four primary operations:
1. Call the `_buildCCIPMessage` private function to construct a CCIP-compatible message using the `EVM2AnyMessage` [struct](https://docs.chain.link/ccip/api-reference/evm/v1.6.0/client#any2evmmessage):
- The `_receiver` address is encoded in bytes to accommodate non-EVM destination blockchains with distinct address formats. The encoding is achieved through [abi.encode](https://docs.soliditylang.org/en/develop/abi-spec.html).
- The `data` is encoded from a `string` to `bytes` using [abi.encode](https://docs.soliditylang.org/en/develop/abi-spec.html).
- The `tokenAmounts` is an empty `EVMTokenAmount` [struct](https://docs.chain.link/ccip/api-reference/evm/v1.6.0/client#evmtokenamount) array as no tokens are transferred.
- The `extraArgs` specifies the `gasLimit` for relaying the message to the recipient contract on the destination blockchain. In this example, the `gasLimit` is set to `200000`.
- The `_feeTokenAddress` designates the token address used for CCIP fees. Here, `address(0)` signifies payment in native gas tokens (ETH).
2. Computes the fees by invoking the router's `getFee` [function](https://docs.chain.link/ccip/api-reference/evm/v1.6.0/i-router-client#getfee).
3. Ensures your contract balance in native gas is enough to cover the fees.
4. Dispatches the CCIP message to the destination chain by executing the router's `ccipSend` [function](https://docs.chain.link/ccip/api-reference/evm/v1.6.0/i-router-client#ccipsend). **Note**: `msg.value` is set because you pay in native gas.
**Note**: As a security measure, the `sendMessagePayNative` function is protected by the `onlyAllowlistedDestinationChain`, ensuring the contract owner has allowlisted a destination chain.
### [Receiving data](https://docs.chain.link/ccip/tutorials/evm/send-arbitrary-data\#receiving-data)
On the destination blockchain, the router invokes the `ccipReceive` [function](https://docs.chain.link/ccip/api-reference/evm/v1.6.0/ccip-receiver#ccipreceive) which expects an `Any2EVMMessage` [struct](https://docs.chain.link/ccip/api-reference/evm/v1.6.0/client#any2evmmessage) that contains:
- The CCIP `messageId`.
- The `sourceChainSelector`.
- The `sender` address in bytes format. Given that the sender is known to be a contract deployed on an EVM-compatible blockchain, the address is decoded from bytes to an Ethereum address using the [ABI specifications](https://docs.soliditylang.org/en/v0.8.20/abi-spec.html).
- The `data`, which is also in bytes format. Given a `string` is expected, the data is decoded from bytes to a string using the [ABI specifications](https://docs.soliditylang.org/en/v0.8.20/abi-spec.html).
This example applies three important security measures:
- `_ccipReceive` is called by the `ccipReceive` [function](https://docs.chain.link/ccip/api-reference/evm/v1.6.0/ccip-receiver#ccipreceive), which ensures that only the router can deliver CCIP messages to the receiver contract. See the `onlyRouter` [modifier](https://docs.chain.link/ccip/api-reference/evm/v1.6.0/ccip-receiver#onlyrouter) for more information.
- The modifier `onlyAllowlisted` ensures that only a call from an allowlisted source chain and sender is accepted.
## What's next
- [\> Send Arbitrary Data and Receive Transfer Confirmation: A -> B -> A](https://docs.chain.link/ccip/tutorials/evm/send-arbitrary-data-receipt-acknowledgment)
- [\> See example cross-chain dApps and tools](https://docs.chain.link/ccip/examples)
- [\> CCIP Directory](https://docs.chain.link/ccip/directory)
- [\> Learn about CCIP Architecture and Billing](https://docs.chain.link/ccip/concepts/architecture)
- [\> Learn CCIP best practices](https://docs.chain.link/ccip/concepts/best-practices/evm)
## Get the latest Chainlink content straight to your inbox.
Email Address
## xSolvBTC Token Overview
[iframe](https://www.googletagmanager.com/ns.html?id=GTM-N6DQ47T)
Chainlink CCIP is now officially live on Solana. [View lanes and tokens.](https://docs.chain.link/ccip/directory/mainnet/chain/solana-mainnet?utm_medium=referral&utm_source=chainlink-docs&utm_campaign=solana-ccip)
On this page
[CCIP Directory](https://docs.chain.link/ccip/directory/mainnet) [xSolvBTC](https://docs.chain.link/ccip/directory/mainnet/token/xSolvBTC)


# xSolvBTCxSolvBTC
Listed Networks (14)

| Network | Name | Symbol | Decimals | Token address | Token pool type | Token pool address |
| --- | --- | --- | --- | --- | --- | --- |
| Arbitrum One | xSolvBTC | xSolvBTC | 18 | [0x346c57...9947aB](https://explorer.arbitrum.io/address/0x346c574C56e1A4aAa8dc88Cda8F7EB12b39947aB "0x346c574C56e1A4aAa8dc88Cda8F7EB12b39947aB") | Burn/Mint | [0x0Cd252...8d3118](https://explorer.arbitrum.io/address/0x0Cd252108EF0CE50f95F75045a97C72A0A8d3118 "0x0Cd252108EF0CE50f95F75045a97C72A0A8d3118") |
| Avalanche | xSolvBTC | xSolvBTC | 18 | [0xCC0966...169A8c](https://snowtrace.io/address/0xCC0966D8418d412c599A6421b760a847eB169A8c "0xCC0966D8418d412c599A6421b760a847eB169A8c") | Burn/Mint | [0x2AB9cD...3e0cC5](https://snowtrace.io/address/0x2AB9cD10aC8077a554511FbcBCB0c94D833e0cC5 "0x2AB9cD10aC8077a554511FbcBCB0c94D833e0cC5") |
| Base | xSolvBTC | xSolvBTC | 18 | [0xC26C90...282561](https://basescan.org/address/0xC26C9099BD3789107888c35bb41178079B282561 "0xC26C9099BD3789107888c35bb41178079B282561") | Burn/Mint | [0x1b0193...0B72bf](https://basescan.org/address/0x1b019366e7fD47425c7E3D07C18D52D77c0B72bf "0x1b019366e7fD47425c7E3D07C18D52D77c0B72bf") |
| BNB Chain | xSolvBTC | xSolvBTC | 18 | [0x1346b6...D446a5](https://bscscan.com/address/0x1346b618dC92810EC74163e4c27004c921D446a5 "0x1346b618dC92810EC74163e4c27004c921D446a5") | Burn/Mint | [0xf0314c...E70f88](https://bscscan.com/address/0xf0314c4B42cd6fCA8772bDE359E0A7d3b5E70f88 "0xf0314c4B42cd6fCA8772bDE359E0A7d3b5E70f88") |
| BOB | xSolvBTC | xSolvBTC | 18 | [0xCC0966...169A8c](https://explorer.gobob.xyz/address/0xCC0966D8418d412c599A6421b760a847eB169A8c "0xCC0966D8418d412c599A6421b760a847eB169A8c") | Burn/Mint | [0x3f2Be1...300b68](https://explorer.gobob.xyz/address/0x3f2Be15aEA9F68f63ADE10440C6fE00753300b68 "0x3f2Be15aEA9F68f63ADE10440C6fE00753300b68") |
| Ethereum | xSolvBTC | xSolvBTC | 18 | [0xd9D920...159DEf](https://etherscan.io/address/0xd9D920AA40f578ab794426F5C90F6C731D159DEf "0xd9D920AA40f578ab794426F5C90F6C731D159DEf") | Burn/Mint | [0x99bb52...aeD212](https://etherscan.io/address/0x99bb52AAF045F63F74d0a3FbE6Cf3e7B23aeD212 "0x99bb52AAF045F63F74d0a3FbE6Cf3e7B23aeD212") |
| Ink | xSolvBTC | xSolvBTC | 18 | [0xc99F5c...91F077](https://explorer.inkonchain.com/address/0xc99F5c922DAE05B6e2ff83463ce705eF7C91F077 "0xc99F5c922DAE05B6e2ff83463ce705eF7C91F077") | Burn/Mint | [0xdb9E8D...80f586](https://explorer.inkonchain.com/address/0xdb9E8DF31cE12817DdD1C4d2c3acef038580f586 "0xdb9E8DF31cE12817DdD1C4d2c3acef038580f586") |
| Linea | xSolvBTC | xSolvBTC | 18 | [0xCC0966...169A8c](https://lineascan.build/address/0xCC0966D8418d412c599A6421b760a847eB169A8c "0xCC0966D8418d412c599A6421b760a847eB169A8c") | Burn/Mint | [0xd25987...60D22E](https://lineascan.build/address/0xd25987B0712FA66D05aA2F7A35bA4B01fB60D22E "0xd25987B0712FA66D05aA2F7A35bA4B01fB60D22E") |
| Polygon | xSolvBTC | xSolvBTC | 18 | [0xc99F5c...91F077](https://polygonscan.com/address/0xc99F5c922DAE05B6e2ff83463ce705eF7C91F077 "0xc99F5c922DAE05B6e2ff83463ce705eF7C91F077") | Burn/Mint | [0x44F2B4...69107b](https://polygonscan.com/address/0x44F2B4dE683f5225704376699fD1eF3E2769107b "0x44F2B4dE683f5225704376699fD1eF3E2769107b") |
| Sei Network | xSolvBTC | xSolvBTC | 18 | [0xCC0966...169A8c](https://seitrace.com/address/0xCC0966D8418d412c599A6421b760a847eB169A8c?chain=pacific-1 "0xCC0966D8418d412c599A6421b760a847eB169A8c") | Burn/Mint | [0xd2bdD1...8b5a42](https://seitrace.com/address/0xd2bdD1E01fd2F8d7d42b209c111c7b32158b5a42?chain=pacific-1 "0xd2bdD1E01fd2F8d7d42b209c111c7b32158b5a42") |
| Solana | xSolvBTC | xSolvBTC | 8 | [SoLvAiHL...RoDAX4](https://explorer.solana.com/address/SoLvAiHLF7LGEaiTN5KGZt1bNnraoWTi5mjcvRoDAX4 "SoLvAiHLF7LGEaiTN5KGZt1bNnraoWTi5mjcvRoDAX4") | Burn/Mint | [JBxSefWb...7wESVn](https://explorer.solana.com/address/JBxSefWbahYApU5DVsqXcHugDVGFNUaaZgWh3u7wESVn "JBxSefWbahYApU5DVsqXcHugDVGFNUaaZgWh3u7wESVn") |
| Soneium | xSolvBTC | xSolvBTC | 18 | [0xCC0966...169A8c](https://soneium.blockscout.com/address/0xCC0966D8418d412c599A6421b760a847eB169A8c "0xCC0966D8418d412c599A6421b760a847eB169A8c") | Burn/Mint | [0xEf5313...4d2441](https://soneium.blockscout.com/address/0xEf53137aF78Afc63b312f0af64fe3c24804d2441 "0xEf53137aF78Afc63b312f0af64fe3c24804d2441") |
| Sonic | xSolvBTC | xSolvBTC | 18 | [0xCC0966...169A8c](https://sonicscan.org/address/0xCC0966D8418d412c599A6421b760a847eB169A8c "0xCC0966D8418d412c599A6421b760a847eB169A8c") | Burn/Mint | [0x2B4d8F...99cDbD](https://sonicscan.org/address/0x2B4d8FAD49A3276853560A9cAFaa59392a99cDbD "0x2B4d8FAD49A3276853560A9cAFaa59392a99cDbD") |
| ZKsync | xSolvBTC | xSolvBTC | 18 | [0x287829...2D801c](https://explorer.zksync.io/address/0x2878295D69Aa3BDcf9004FCf362F0959992D801c "0x2878295D69Aa3BDcf9004FCf362F0959992D801c") | Burn/Mint | [0x978103...449F81](https://explorer.zksync.io/address/0x97810368dE6F7213Cf54f2918A267cEa25449F81 "0x97810368dE6F7213Cf54f2918A267cEa25449F81") |
## Get the latest Chainlink content straight to your inbox.
Email Address
## Chainlink CCIP Architecture
[iframe](https://www.googletagmanager.com/ns.html?id=GTM-N6DQ47T)
Chainlink CCIP is now officially live on Solana. [View lanes and tokens.](https://docs.chain.link/ccip/directory/mainnet/chain/solana-mainnet?utm_medium=referral&utm_source=chainlink-docs&utm_campaign=solana-ccip)
On this page
# [CCIP Architecture - Key Concepts](https://docs.chain.link/ccip/concepts/architecture/key-concepts\#overview)
This page explains the high-level, chain-agnostic concepts behind Chainlink CCIP. We recommend reading these concepts before diving deep into the architecture pages.
## [Prerequisites](https://docs.chain.link/ccip/concepts/architecture/key-concepts\#prerequisites)
Before diving into Chainlink CCIP, ensure you understand these fundamental blockchain concepts:
- **Accounts / Addresses**: Many blockchains distinguish between user-controlled addresses (called Externally Owned Accounts (EOAs) on EVM blockchains) and onchain program addresses (often called contract accounts in EVM ecosystems). Even if the name or the underlying account model differs, the principle is that a user's private key or authority controls one address (EOA) while the other is controlled by onchain code or logic (contract account).
- **Smart Contracts**: On EVM-based blockchains, these are pieces of logic (often written in languages like Solidity) that get compiled into bytecode and deployed onchain. Other blockchains—such as SVM-based (e.g., Solana) or MVM-based (e.g., Sui or Aptos) chains—may refer to these as "modules," "programs," or simply "onchain code." The basic idea is the same: executable code that lives on the blockchain and enforces rules without centralized control.
- **Decentralized Applications (dApps)**: [dApps](https://ethereum.org/en/developers/docs/dapps/) are applications that use onchain logic to manage data and transactions.
- **Token Standards**: Many chains use standards (like [ERC-20](https://ethereum.org/en/developers/docs/standards/tokens/erc-20/) on EVM-based blockchains) or equivalents (e.g., [SPL tokens on Solana](https://spl.solana.com/token)) to represent fungible tokens.
- **Merkle Trees**: A data structure that summarizes and verifies large information sets with small cryptographic proofs. To learn more, try this [tutorial](https://ethereum.org/en/developers/tutorials/merkle-proofs-for-offline-data-integrity/).
## [Blockchain Families](https://docs.chain.link/ccip/concepts/architecture/key-concepts\#blockchain-families)
When you see references to "smart contracts" or "onchain programs," they are executed within a virtual machine (VM). Different blockchains implement different VMs with unique design choices:
- **EVM (Ethereum Virtual Machine)**: Used by Ethereum and many other EVM-compatible chains. Contracts are typically written in languages like [Solidity](https://docs.soliditylang.org/) or [Vyper](https://vyper.readthedocs.io/), compiled to EVM bytecode, and executed in a single-threaded environment. Read this [page](https://ethereum.org/en/developers/docs/evm/) to learn more.
- **SVM (Solana Virtual Machine)**: Solana uses the Sealevel parallelization engine to execute onchain programs compiled to Berkeley Packet Filter (BPF) bytecode. This parallel processing approach can handle multiple simultaneous transactions. Read this [page](https://solana.com/news/sealevel---parallel-processing-thousands-of-smart-contracts) to learn more.
- **MVM (Move Virtual Machine)**: Aptos, Sui, and other Move-based chains use the Move language and runtime. Move is designed to emphasize resource safety, access control, and predictable execution. Read this [page](https://aptos.dev/en/network/blockchain/move) to learn more.
## [Cross-Chain dApps](https://docs.chain.link/ccip/concepts/architecture/key-concepts\#cross-chain-dapps)
**Cross-chain dApps** are decentralized applications designed to run on—or interact with—multiple blockchains. By leveraging CCIP for cross-chain interoperability, these dApps can:
- Execute transactions, send data, and transfer tokens between different blockchains.
- Provide their users with access to features or liquidity across multiple ecosystems via a unified experience.
- Specialize in the strengths of each underlying chain, such as high throughput, low fees, or specialized contract (or module) functionality.
Because of this multi-chain support, cross-chain dApps can offer broader functionality than dApps confined to a single blockchain.
## [Blockchain Finality](https://docs.chain.link/ccip/concepts/architecture/key-concepts\#blockchain-finality)
**Blockchain finality** is the assurance that past transactions included on a given blockchain are extremely difficult or impossible to revert. Finality varies across different blockchains. Some blockchains offer instant finality, while others require multiple block confirmations.
Finality is crucial for cross-chain transfers, both for arbitrary messaging and non-intents-based token transfers. It ensures that funds are released/minted or that any specified action is executed on the destination chain only after the source chain action (such as a lock or burn) is finalized. This minimizes loss of funds (in the case of token transfers) or unintended actions (in the case of arbitrary messaging) due to source chain reorganizations.
To learn more about finality and how CCIP handles this, read the [CCIP Execution Latency](https://docs.chain.link/ccip/ccip-execution-latency) conceptual guide.
## [Lane](https://docs.chain.link/ccip/concepts/architecture/key-concepts\#lane)
A **lane** in CCIP is a conceptual unidirectional path from one specific blockchain (the source) to another (the destination). For example, the lane from Blockchain A to Blockchain B is distinct from the lane from Blockchain B to Blockchain A. This concept helps in configuring settings that apply uniquely to each path, such as rate limits or other parameters. For instance, sending a message from an EVM blockchain to an SVM blockchain may require different parameters compared to sending a message in the reverse direction.
## [Node Operators](https://docs.chain.link/ccip/concepts/architecture/key-concepts\#node-operators)
Organizations with specialized expertise in running Chainlink nodes. Each operator can run multiple nodes across different decentralized oracle networks.
## [Decentralized Oracle Network (DON)](https://docs.chain.link/ccip/concepts/architecture/key-concepts\#decentralized-oracle-network-don)
A **decentralized oracle network (DON)** consists of multiple independent Chainlink nodes. These nodes monitor and retrieve data from specified sources (e.g., a source chain), reach consensus off-chain, and post results to a blockchain (e.g., a destination chain) in a [trust-minimized manner](https://blog.chain.link/what-is-trust-minimization/). For more details on the DONs used in CCIP, refer to the CCIP Offchain architecture page.
## [Risk Management Network](https://docs.chain.link/ccip/concepts/architecture/key-concepts\#risk-management-network)
The Risk Management Network is a unique architectural feature of CCIP that reinforces system security through a defense-in-depth approach based on established engineering principles such as N-version programming. On blockchains where RMN is enabled, a distinct set of node operators—separate from those of the core CCIP DONs—manages RMN functions.
The RMN runs a minimal, separate implementation of the Chainlink node software using a different programming language than the primary CCIP system. This client diversity enhances robustness and minimizes external dependencies, thereby reducing the risk of supply chain attacks.
On the blockchains where RMN is enabled, the RMN nodes independently verify and attest to source chain actions. The core CCIP components on the destination chain verify these attestations. For more details, refer to the following section.
## Get the latest Chainlink content straight to your inbox.
Email Address
## CCIP EVM Architecture
[iframe](https://www.googletagmanager.com/ns.html?id=GTM-N6DQ47T)
On this page
# [CCIP Onchain Architecture (EVM)](https://docs.chain.link/ccip/concepts/architecture/onchain/evm\#overview)
Chainlink CCIP's EVM onchain architecture consists of a set of smart contracts deployed on both source and destination chains. These components work together with CCIP's offchain infrastructure to provide end-to-end cross-chain interoperability.
- **[Overview](https://docs.chain.link/ccip/concepts/architecture/onchain/evm/overview)**: Provides a high-level introduction to CCIP's onchain architecture, including a component diagram, key roles, and a detailed walk-through of a message's lifecycle from source to destination chain.
- **[Components](https://docs.chain.link/ccip/concepts/architecture/onchain/evm/components)**: Describes each architectural component in detail.
- **[Upgradability](https://docs.chain.link/ccip/concepts/architecture/onchain/evm/upgradability)**: Explains CCIP's approach to secure system evolution.
## Get the latest Chainlink content straight to your inbox.
Email Address
## SVM to EVM Prerequisites
[iframe](https://www.googletagmanager.com/ns.html?id=GTM-N6DQ47T)
Chainlink CCIP is now officially live on Solana. [View lanes and tokens.](https://docs.chain.link/ccip/directory/mainnet/chain/solana-mainnet?utm_medium=referral&utm_source=chainlink-docs&utm_campaign=solana-ccip)
On this page
# [Prerequisites for SVM to EVM Tutorials](https://docs.chain.link/ccip/tutorials/svm/source/prerequisites\#overview)
Before starting the SVM to EVM tutorials, ensure you have:
## [Development Environment](https://docs.chain.link/ccip/tutorials/svm/source/prerequisites\#development-environment)
- **Anchor and Solana CLI Tools**: Install Anchor and Solana CLI Tools following the [installation guide](https://www.anchor-lang.com/docs/installation). This requires Rust to be installed.
- **Node.js v20 or higher**: You can use the [nvm package](https://www.npmjs.com/package/nvm) to install and switch between Node.js versions. Once installed, you can verify the node version with:

```bash
node -v
```
Example output:

```text
$ node -v
v23.11.0
```
- **Yarn**: For installing and managing dependencies.
- **Git**: For cloning the repository.
## [Starter Kit Repository](https://docs.chain.link/ccip/tutorials/svm/source/prerequisites\#starter-kit-repository)
1. Clone the CCIP Solana Starter Kit:

```bash
git clone https://github.com/smartcontractkit/solana-starter-kit.git && cd solana-starter-kit
```
2. Checkout to the `ccip` branch:

```bash
git checkout ccip
```
3. Install dependencies:

```bash
yarn install
```
## [Wallets](https://docs.chain.link/ccip/tutorials/svm/source/prerequisites\#wallets)
- **Solana Wallet with Private Key**: You'll need a Solana keypair file. If you don't have one, create it with:

```bash
solana-keygen new --outfile ~/.config/solana/id.json
```
- **Ethereum Wallet Address**: You'll need an Ethereum address as the destination for your cross-chain messages. You don't need the private key for these tutorials since you're only sending to, not from, Ethereum.
## [Solana RPC URL](https://docs.chain.link/ccip/tutorials/svm/source/prerequisites\#solana-rpc-url)
- A Solana Devnet RPC URL. You can use the default public endpoint ( [https://api.devnet.solana.com](https://api.devnet.solana.com/)) or sign up for a personal endpoint from [Helius](https://www.helius.dev/), [Alchemy](https://www.alchemy.com/), or another node provider service.
### [Configure Solana CLI for Devnet](https://docs.chain.link/ccip/tutorials/svm/source/prerequisites\#configure-solana-cli-for-devnet)
Before proceeding, ensure your Solana CLI is configured to use Devnet:

```bash
# Using the default public endpoint
solana config set --url https://api.devnet.solana.com
# OR using a custom RPC endpoint if you have one
# solana config set --url YOUR_CUSTOM_DEVNET_RPC_URL
```
You can verify your current configuration with:

```bash
solana config get
```
You should see your configured Devnet RPC URL in the output. Example output:

```text
$ solana config get
Config File: /Users//.config/solana/cli/config.yml
RPC URL: https://api.devnet.solana.com
WebSocket URL: wss://api.devnet.solana.com/ (computed)
Keypair Path: /Users//.config/solana/id.json
Commitment: confirmed
```
## [Native Tokens for Transaction Fees](https://docs.chain.link/ccip/tutorials/svm/source/prerequisites\#native-tokens-for-transaction-fees)
**SOL** tokens are used for Solana transaction fees. For these tutorials, we will also use SOL to pay for CCIP fees (though LINK and WSOL are alternative payment options).
- Obtain SOL on Devnet using the airdrop command:

```bash
solana airdrop 3
```
- Example output:

```text
Requesting airdrop of 3 SOL
Signature: 2MiFptKYiJQNfzERzNzB4X1tYeBaW1muJ4oNaUpujeaWmgCiwCZ1ftMyYmg9fAitw2Trbsw8yfBNSanLGX4SUAr7
13.25722618 SOL
```
## [Associated Token Accounts (ATAs)](https://docs.chain.link/ccip/tutorials/svm/source/prerequisites\#associated-token-accounts-atas)
Solana's token model requires an Associated Token Account (ATA) for each token you want to hold. These must be created before you can receive or send tokens.
### [Creating ATAs](https://docs.chain.link/ccip/tutorials/svm/source/prerequisites\#creating-atas)
Create an ATA for each token needed in these tutorials:

```bash
# Create ATA for BnM token (used for cross-chain token transfers)
spl-token create-account 3PjyGzj1jGVgHSKS4VR1Hr1memm63PmN8L9rtPDKwzZ6
# Create ATA for LINK token (used for CCIP fee payments)
spl-token create-account GAn1RmBY76BjdqPAFnqM4jhqSSeeo9Zf7ASqHoWLdwZb
# Create ATA for Wrapped SOL (used for wrapped native fee payments)
spl-token create-account So11111111111111111111111111111111111111112
```
If using a non-default keypair (other than `~/.config/solana/id.json`), specify it explicitly:

```bash
spl-token create-account --owner
```
### [Verifying ATAs](https://docs.chain.link/ccip/tutorials/svm/source/prerequisites\#verifying-atas)
Confirm your ATAs were created successfully:

```bash
spl-token accounts
```
Example output:

```text
Token Balance
---------------------------------------------------------------------------------------------------------------
3PjyGzj1jGVgHSKS4VR1Hr1memm63PmN8L9rtPDKwzZ6 0.09
GAn1RmBY76BjdqPAFnqM4jhqSSeeo9Zf7ASqHoWLdwZb 0
So11111111111111111111111111111111111111112 4.440009443
```
## [Token Delegation](https://docs.chain.link/ccip/tutorials/svm/source/prerequisites\#token-delegation)
Before sending CCIP messages with tokens from Solana, you must delegate authority to the CCIP Router's Program Derived Addresses (PDAs). This allows the router to transfer tokens on your behalf when executing cross-chain messages.
### [Understanding Token Delegations](https://docs.chain.link/ccip/tutorials/svm/source/prerequisites\#understanding-token-delegations)
In Solana, unlike Ethereum where you approve a smart contract to spend your tokens, you need to:
1. **Delegate to CCIP Router's Fee Billing Signer PDA**: For fee tokens (LINK and Wrapped SOL)
2. **Delegate to CCIP Router's Fee Billing Signer PDA**: For tokens you want to send cross-chain (BnM)
### [Automating Token Delegation](https://docs.chain.link/ccip/tutorials/svm/source/prerequisites\#automating-token-delegation)
The `token:delegate` script automates the token delegation process by:
1. Identifying your token accounts for Wrapped SOL, BnM, and LINK
2. Delegating the maximum possible amount to the CCIP Router's fee-billing PDA (allowing it to use tokens for fees)
3. Providing transaction confirmations and explorer links for verification
Run the delegation script:

```bash
yarn svm:token:delegate
```
After running, verify your token delegations:

```bash
yarn svm:token:check
```
The verification shows:
- Your current token balances
- The delegate address for each token
- Delegation amounts
- Status of each delegation (✓ Correct or ✗ Missing/Invalid)
## [Obtaining Testnet Tokens](https://docs.chain.link/ccip/tutorials/svm/source/prerequisites\#obtaining-testnet-tokens)
### [BnM Tokens on Solana Devnet](https://docs.chain.link/ccip/tutorials/svm/source/prerequisites\#bnm-tokens-on-solana-devnet)
To complete the cross-chain token transfer examples, you'll need BnM tokens:
1. Bridge BnM tokens from Ethereum Sepolia to your Solana Devnet wallet
2. Follow the detailed instructions in the [token transfers tutorial](https://docs.chain.link/ccip/tutorials/svm/destination/token-transfers)
### [Wrapped SOL (wSOL)](https://docs.chain.link/ccip/tutorials/svm/source/prerequisites\#wrapped-sol-wsol)
Native SOL must be wrapped into wSOL token format before it can be used with token-based interfaces. To wrap your SOL:

```bash
yarn svm:token:wrap
```
This command wraps 0.1 SOL to wSOL by default. To specify a custom amount:

```bash
yarn svm:token:wrap --amount
```
Example:

```text
$ yarn svm:token:wrap --amount 10000000
...
==== Operation Summary ====
[2025-05-01T20:18:03.134Z] Token: Wrapped SOL (wSOL)
[2025-05-01T20:18:03.134Z] Amount Wrapped: 10000000 lamports
[2025-05-01T20:18:03.134Z] New Balance: 4450009443 lamports
[2025-05-01T20:18:03.134Z]
SOL wrapping completed successfully
```
**Note**: All amounts are specified in lamports (1 SOL = 1,000,000,000 lamports).
## Get the latest Chainlink content straight to your inbox.
Email Address
## Check CCIP Status
[iframe](https://www.googletagmanager.com/ns.html?id=GTM-N6DQ47T)
On this page
# [Checking CCIP Message Status](https://docs.chain.link/ccip/tutorials/evm/offchain/get-status-offchain\#overview)
In this tutorial, you will learn how to verify the status of a Chainlink CCIP transaction offchain using JavaScript. Starting with a CCIP message ID, you'll execute the script to query the current status of a cross-chain message.
## [Before you begin](https://docs.chain.link/ccip/tutorials/evm/offchain/get-status-offchain\#before-you-begin)
1. Initiate a CCIP transaction and note the CCIP message ID. You can obtain the CCIP message ID by running any of the previous CCIP tutorials.
2. Complete the prerequisites steps of the [Transfer Tokens between EOAs](https://docs.chain.link/ccip/tutorials/evm/offchain/transfer-tokens-from-eoa#before-you-begin) tutorial.
## [Tutorial](https://docs.chain.link/ccip/tutorials/evm/offchain/get-status-offchain\#tutorial)
This tutorial shows you on how to check the status of a Chainlink CCIP transaction using the [`get-status.js`](https://github.com/smartcontractkit/smart-contract-examples/blob/main/ccip/offchain/javascript/src/get-status.js) script. By supplying the script with the source, destination chains, and your CCIP message ID, you can verify the current status of your cross-chain message.
**Execute the script in your command line:**
```bash
node src/get-status.js sourceChain destinationChain messageID
```
**The script requires the following parameters:**
- `sourceChain` is the identifier for the source blockchain. For example, `avalancheFuji`.
- `destinationChain` is the identifier for the destination blockchain. For example, `ethereumSepolia`.
- `messageID` is the unique identifier for the CCIP transaction message that you need to check.
**Example Usage:**
If you initiated a transaction from the Avalanche Fuji testnet to the Ethereum Sepolia testnet and received a message ID, you can check the status of this message with the following command:
```text
$ node src/get-status.js avalancheFuji ethereumSepolia 0x25d18c6adfc1f99514b40f9931a14ca08228cdbabfc5226c1e6a43ce7441595d
Status of message 0x25d18c6adfc1f99514b40f9931a14ca08228cdbabfc5226c1e6a43ce7441595d on offRamp 0x000b26f604eAadC3D874a4404bde6D64a97d95ca is SUCCESS
```
## [Code Explanation](https://docs.chain.link/ccip/tutorials/evm/offchain/get-status-offchain\#code-explanation)
The JavaScript `get-status.js` is designed to check the status of a user-provided CCIP message. The contract code includes several code comments to clarify each step, but this section explains the key elements.
### [Imports](https://docs.chain.link/ccip/tutorials/evm/offchain/get-status-offchain\#imports)
The script imports the required modules and data:
- **Ethers.js**: [JavaScript library](https://docs.ethers.org/v6/) for interacting with the Ethereum Blockchain and its ecosystem.
- **Router and OffRamp Contract ABIs**: These Application Binary Interfaces (ABIs) enable the script to interact with specific smart contracts on the blockchain.
- **Configuration Functions**: Includes `getProviderRpcUrl` for retrieving the RPC URL of a blockchain, `getRouterConfig` for accessing the router smart contract's configuration, and `getMessageStatus` for translating numeric status codes into readable strings.
#### [Understanding the `getMessageStatus` function](https://docs.chain.link/ccip/tutorials/evm/offchain/get-status-offchain\#understanding-the-getmessagestatus-function)
Before diving into the script execution, it's crucial to understand how the [`getMessageStatus`](https://github.com/smartcontractkit/smart-contract-examples/blob/main/ccip/offchain/javascript/src/config/offramp.js) function works. This function is designed to translate the numeric status codes returned by Solidity enums into human-readable statuses so they are clear to developers and users. The function uses a mapping defined in [`messageState.json`](https://github.com/smartcontractkit/smart-contract-examples/blob/main/ccip/offchain/config/messageState.json), which correlates to the [`MessageExecutionState`](https://github.com/smartcontractkit/ccip/tree/release/contracts-ccip-1.5.1/contracts/src/v0.8/ccip/libraries/Internal.sol#L144) enum used by the [Chainlink CCIP's OffRamp](https://docs.chain.link/ccip/concepts/architecture/onchain/evm/components#offramp) contract.
### [Handling Arguments](https://docs.chain.link/ccip/tutorials/evm/offchain/get-status-offchain\#handling-arguments)
The `handleArguments` function ensures the script operates with the correct parameters. It validates the presence of three command-line arguments – the source chain identifier, the destination chain identifier, and the message ID.
### [Main Function: getStatus](https://docs.chain.link/ccip/tutorials/evm/offchain/get-status-offchain\#main-function-getstatus)
The script's core is encapsulated in the `getStatus` asynchronous function. This function completes initialization, configuration retrieval, and contract instantiation.
#### [Initialization](https://docs.chain.link/ccip/tutorials/evm/offchain/get-status-offchain\#initialization)
Firstly, it establishes connections to the source and destination blockchain networks using the `JsonRpcProvider`.
#### [Configuration Retrieval](https://docs.chain.link/ccip/tutorials/evm/offchain/get-status-offchain\#configuration-retrieval)
The script then retrieves the configuration for router contracts on both the source and destination chains. This includes the router addresses and chain selectors.
#### [Contract Instantiation](https://docs.chain.link/ccip/tutorials/evm/offchain/get-status-offchain\#contract-instantiation)
The script instantiates the source and destination router contracts using ethers and the router contract addresses.
#### [Status Query](https://docs.chain.link/ccip/tutorials/evm/offchain/get-status-offchain\#status-query)
To query the status of the provided CCIP message ID, the script completes the following steps:
1. Check if the source chain's router supports the destination chain
2. Fetch OffRamp contracts associated with the destination router
3. Filter these contracts to find those that match the source chain
4. Query each matching OffRamp contract for an event related to the message ID
If an event is found, the script reads the status from the arguments. It translates the numeric status into a human-readable status and logs this information.
## Get the latest Chainlink content straight to your inbox.
Email Address
## EVM Cross-Chain Best Practices
[iframe](https://www.googletagmanager.com/ns.html?id=GTM-N6DQ47T)
Chainlink CCIP is now officially live on Solana. [View lanes and tokens.](https://docs.chain.link/ccip/directory/mainnet/chain/solana-mainnet?utm_medium=referral&utm_source=chainlink-docs&utm_campaign=solana-ccip)
On this page
# [CCIP Best Practices (EVM)](https://docs.chain.link/ccip/concepts/best-practices/evm\#overview)
Before you deploy your cross-chain dApps to mainnet, make sure that your dApps follow the best practices in this document. You are responsible for thoroughly reviewing your code and applying best practices to ensure that your cross-chain dApps are secure and reliable. If you have a unique use case for CCIP that might involve additional cross-chain risk, [contact the Chainlink Labs Team](https://chain.link/ccip-contact) before deploying your application to mainnet.
## [Verify destination chain](https://docs.chain.link/ccip/concepts/best-practices/evm\#verify-destination-chain)
Before calling the router's `ccipSend` [function](https://docs.chain.link/ccip/api-reference/evm/v1.6.0/i-router-client#ccipsend), ensure that your code allows users to send CCIP messages to trusted destination chains.
**Example**: For an example of how to verify the destination chain, refer to the [Transfer Tokens with Data - Defensive](https://docs.chain.link/ccip/tutorials/evm/programmable-token-transfers-defensive#tutorial) example.
## [Verify source chain](https://docs.chain.link/ccip/concepts/best-practices/evm\#verify-source-chain)
When implementing the `ccipReceive` [method](https://docs.chain.link/ccip/api-reference/evm/v1.6.0/ccip-receiver#ccipreceive) in a contract residing on the destination chain, ensure to verify the source chain of the incoming CCIP message. This verification ensures that CCIP messages can only be received from trusted source chains.
**Example**: For an example of how to verify the source chain, refer to the [Transfer Tokens with Data - Defensive](https://docs.chain.link/ccip/tutorials/evm/programmable-token-transfers-defensive#tutorial) example.
## [Verify sender](https://docs.chain.link/ccip/concepts/best-practices/evm\#verify-sender)
When implementing the `ccipReceive` [method](https://docs.chain.link/ccip/api-reference/evm/v1.6.0/ccip-receiver#ccipreceive) in a contract residing on the destination chain, it's important to validate the sender of the incoming CCIP message. This check ensures that CCIP messages are received only from trusted sender addresses.
**Note**: Depending on your use case, this verification might not always be necessary.
**Example**: For an example of how to verify the sender of the incoming CCIP message, refer to the [Transfer Tokens with Data - Defensive](https://docs.chain.link/ccip/tutorials/evm/programmable-token-transfers-defensive#tutorial) example.
## [Verify router addresses](https://docs.chain.link/ccip/concepts/best-practices/evm\#verify-router-addresses)
When you implement the `ccipReceive` [method](https://docs.chain.link/ccip/api-reference/evm/v1.6.0/ccip-receiver#ccipreceive) in the contract residing on the destination chain, validate that the `msg.sender` is the correct router address. This verification ensures that only the router contract can call the `ccipReceive` function on the receiver contract and is for developers that want to restrict which accounts are allowed to call `ccipReceive`.
**Example**: For an example of how to verify the router, refer to the [Transfer Tokens with Data - Defensive](https://docs.chain.link/ccip/tutorials/evm/programmable-token-transfers-defensive#tutorial) example.
## [Using `extraArgs`](https://docs.chain.link/ccip/concepts/best-practices/evm\#using-extraargs)
The purpose of [`extraArgs`](https://docs.chain.link/ccip/api-reference/evm/v1.6.0/client#genericextraargsv2) is to allow compatibility with future CCIP upgrades. To get this benefit, make sure that `extraArgs` is mutable in production deployments. This allows you to build it offchain and pass it in a call to a function or store it in a variable that you can update on-demand.
If `extraArgs` are left empty, a default of _200000_ `gasLimit` will be set.
### [Setting `gasLimit`](https://docs.chain.link/ccip/concepts/best-practices/evm\#setting-gaslimit)
The `gasLimit` specifies the maximum amount of gas CCIP can consume to execute `ccipReceive()` on the contract located on the destination blockchain. It is the main factor in determining the fee to send a message. Unspent gas is not refunded.
To transfer tokens directly to an EOA as a _receiver_ on the destination blockchain, the `gasLimit` should be set to `0` since there is no `ccipReceive()` implementation to call.
To estimate the accurate gas limit for your destination contract, consider the following options:
- Leveraging Ethereum client RPC by applying `eth_estimateGas` on `receiver.ccipReceive()`. You can find more information on the [Ethereum API Documentation](https://ethereum.github.io/execution-apis/api-documentation/) and [Alchemy documentation](https://docs.alchemy.com/reference/eth-estimategas).
- Conducting [Foundry gas tests](https://book.getfoundry.sh/forge/gas-tracking).
- Using [Hardhat plugin for gas tests](https://github.com/cgewecke/eth-gas-reporter).
- Using a blockchain explorer to look up the gas consumption of a particular internal transaction.
**Example**: For an example of how to estimate the gas limit, refer to the [Optimizing Gas Limit Settings in CCIP Messages](https://docs.chain.link/ccip/tutorials/evm/ccipreceive-gaslimit) guide.
### [Setting `allowOutOfOrderExecution`](https://docs.chain.link/ccip/concepts/best-practices/evm\#setting-allowoutoforderexecution)
The `allowOutOfOrderExecution` parameter enables you to control the execution order of your messages on the destination blockchain. This parameter is part of [`GenericExtraArgsV2`](https://docs.chain.link/ccip/api-reference/evm/v1.6.0/client#genericextraargsv2) and is available only on lanes where the **Out of Order Execution** property is set to **Optional** or **Required**. Refer to the [CCIP Directory](https://docs.chain.link/ccip/directory) to determine if your target lane supports this feature.
#### [Best Practices](https://docs.chain.link/ccip/concepts/best-practices/evm\#best-practices)
- **When `allowOutOfOrderExecution` is Optional:**
- You can set `allowOutOfOrderExecution` to either `true` or `false`, depending on your application's requirements.
- **`true`:** Messages can be executed in any order relative to other messages from the same sender. If a previous message has not yet been executed on the destination chain, it does not block the execution of subsequent messages.
- **`false`:** Messages are executed in order. CCIP ensures that preceding messages are processed before executing the current message.
- **When `allowOutOfOrderExecution` is Required:**
- You **must** set `allowOutOfOrderExecution` to `true`. This setting acknowledges that messages may be executed out of order. If set to `false`, the message will revert and will not be processed.
- This requirement is enforced on lanes where technical constraints necessitate out-of-order execution, such as mitigating issues related to zero-knowledge proof limitations. For more information, see the [proof overflow problem](https://community.scroll.io/t/the-proof-overflow-problem/841).
## [Decoupling CCIP Message Reception and Business Logic](https://docs.chain.link/ccip/concepts/best-practices/evm\#decoupling-ccip-message-reception-and-business-logic)
As a best practice, separate the reception of CCIP messages from the core business logic of the contract. Implement 'escape hatches' or fallback mechanisms to gracefully manage situations where the business logic encounters issues. To explore this concept further, refer to the [Defensive Example](https://docs.chain.link/ccip/tutorials/evm/programmable-token-transfers-defensive) guide.
## [Evaluate the security and reliability of the networks that you use](https://docs.chain.link/ccip/concepts/best-practices/evm\#evaluate-the-security-and-reliability-of-the-networks-that-you-use)
Although CCIP has been thoroughly reviewed and audited, inherent risks might still exist based on your use case, the blockchain networks where you deploy your contracts, and the network conditions on those blockchains.
## [Review and audit your code](https://docs.chain.link/ccip/concepts/best-practices/evm\#review-and-audit-your-code)
Before securing value with contracts that implement CCIP interfaces and routers, ensure that your code is secure and reliable. If you have a unique use case for CCIP that might involve additional cross-chain risk, [contact the Chainlink Labs Team](https://chain.link/ccip-contact) before deploying your application to mainnet.
## [Soak test your dApps](https://docs.chain.link/ccip/concepts/best-practices/evm\#soak-test-your-dapps)
Be aware of the [Service Limits and Rate Limits for Supported Networks](https://docs.chain.link/ccip/directory). Before you provide access to end users or secure value, soak test your cross-chain dApps. Ensure that your dApps can operate within these limits and operate correctly during usage spikes or unfavorable network conditions.
## [Monitor your dApps](https://docs.chain.link/ccip/concepts/best-practices/evm\#monitor-your-dapps)
When you build applications that depend on CCIP, include monitoring and safeguards to protect against the negative impact of extreme market events, possible malicious activity on your dApp, potential delays, and outages.
Create your own monitoring alerts based on deviations from normal activity. This will notify you when potential issues occur so you can respond to them.
## [Best Practices for Cross-Chain Token (CCT) Administration](https://docs.chain.link/ccip/concepts/best-practices/evm\#best-practices-for-cross-chain-token-cct-administration)
When managing your tokens and token pools, it's critical to follow best practices to ensure the security and integrity of your cross-chain operations. This includes proper handling of admin roles and safeguarding against unauthorized access.
### [Securely Manage Admin Roles](https://docs.chain.link/ccip/concepts/best-practices/evm\#securely-manage-admin-roles)
The **token admin** is responsible for configuring token pools across blockchains and enabling cross-chain operations. This role allows the token admin to set the token pool for a token on each supported CCIP blockchain. To ensure security, follow these guidelines:
- **Understand the Responsibilities of a Token Developer**: Review [Token Developer Responsibilities](https://docs.chain.link/ccip/service-responsibility#token-developers-responsibilities).
- **Assign Admin Roles with Caution**: Only trusted EOAs or smart accounts should be assigned the **token admin** role.
- **Use Multi-Signature Smart Accounts**: For added security, consider assigning the token admin role to a **multi-signature smart account**. This ensures that multiple approvals are required for critical operations.
### [Protect Against Unauthorized Admin Actions](https://docs.chain.link/ccip/concepts/best-practices/evm\#protect-against-unauthorized-admin-actions)
- **Monitor Admin Activity**: Implement monitoring systems to track any actions taken by **token admins**, **token pool owners**, and **rate limit admins**. This helps detect unauthorized attempts to modify configurations or execute cross-chain transfers.
- **Limit Admin Privileges When Possible**: For example, instead of giving the full owner access to manage rate limits, consider assigning the **rate limit admin** role, which is specifically responsible for updating rate limits.
- **Leverage Smart Contract Audits**: Ensure your tokens and token pools are audited and follow secure development practices.
### [Best Practices for Token Pool Owners and Rate Limit Admins](https://docs.chain.link/ccip/concepts/best-practices/evm\#best-practices-for-token-pool-owners-and-rate-limit-admins)
- **Token Pool Owner Responsibilities**: The **token pool owner** can enable remote chains, set remote pool addresses for a given chain selector, and configure rate limits. Ensure that this role is assigned to a trusted EOA or smart account, and monitor activity regularly.
- **Set Rate Limits Appropriately**: Ensure that you set appropriate rate limits for outbound and inbound token transfers when configuring token pools.
- \\*\\* Delegate Rate Limit Admin Role \*\*: The rate limit admin is an optional role that the token pool owner can assign to another trusted entity using the `setRateLimitAdmin ()` function. The rate limit admin can only manage rate limits, so this role provides a way to delegate responsibility without giving full access to the token pool configuration.
## [Best Practices for Liquidity Management](https://docs.chain.link/ccip/concepts/best-practices/evm\#best-practices-for-liquidity-management)
Effective liquidity management is crucial for ensuring the smooth operation of token pools, especially in [**Lock and Release**](https://github.com/smartcontractkit/ccip/blob/release/contracts-ccip-1.5.1/contracts/src/v0.8/ccip/pools/LockReleaseTokenPool.sol) token pools. The most critical aspect is ensuring that the token pool has enough liquidity available when it is acting in **reception mode** (on the destination blockchain), allowing tokens to be released to the receiver. Failure to manage liquidity will result in a degraded user experience and can result in user funds being 'stuck' in transit.
### [Ensure Sufficient Liquidity](https://docs.chain.link/ccip/concepts/best-practices/evm\#ensure-sufficient-liquidity)
When a **LockReleaseTokenPool** operates in **reception mode** (on the destination blockchain), it releases the tokens locked in the token pool. The pool **_must_** have sufficient liquidity to ensure that tokens can be released to the receiver. If the pool lacks liquidity, the release operation will fail and user funds will not be available on the destination blockchain until sufficient liquidity is replenished and manual execution is performed.
- **Best Practice**: Estimate expected volume when preparing to add and manage liquidity to ensure sustainable operations.
- **Best Practice**: Regularly monitor the liquidity available in your token pool and ensure that there is always enough liquidity to support the release of tokens to the receiver when the pool acts as the destination.
### [Avoid Fragmented Liquidity with Multiple Issuing Blockchains](https://docs.chain.link/ccip/concepts/best-practices/evm\#avoid-fragmented-liquidity-with-multiple-issuing-blockchains)
Using a **Lock and Unlock** mechanism across multiple issuing blockchains can lead to fragmented liquidity, making it more difficult to maintain sufficient liquidity in each pool.
- **Best Practice**: Where possible, avoid using the **Lock and Unlock** mechanism across multiple issuing blockchains. Fragmented liquidity increases operational overhead and complicates liquidity management.
### [Monitor Liquidity Health and Automate Alerts](https://docs.chain.link/ccip/concepts/best-practices/evm\#monitor-liquidity-health-and-automate-alerts)
Monitoring the health of your token pool's liquidity is essential for ensuring the liveness of cross-chain transfers. Automated alerts can notify you if liquidity falls below a certain threshold, allowing you to take action before transfers fail.
- **Best Practice**: Calculate the amount of time required to deplete your token pool to various threshold levels (ie: Low: 50% \[Warning\], Very Low \[Critical\] 30%) and utilize automated alerting and pre-defined operational procedures to ensure adequate preparedness to respond by replenishing the pool before users are impacted. For this calculation, be sure to assume users will utilize max capacity transfers paired with token pool's refill rate.
### [Use the `provideLiquidity` and `withdrawLiquidity` Functions Properly](https://docs.chain.link/ccip/concepts/best-practices/evm\#use-the-provideliquidity-and-withdrawliquidity-functions-properly)
In pools like the **LockReleaseTokenPool**, liquidity providers can add and remove liquidity using the [`provideLiquidity`](https://docs.chain.link/ccip/api-reference/evm/v1.6.0/lock-release-token-pool#provideliquidity) and [`withdrawLiquidity`](https://docs.chain.link/ccip/api-reference/evm/v1.6.0/lock-release-token-pool#withdrawliquidity) functions.
- **Best Practice**: Only trusted entities, such as a designated rebalancer, should be allowed to manage liquidity. Make sure to configure liquidity controls securely to prevent unauthorized liquidity manipulation.
### [Set and Manage the Rebalancer Role](https://docs.chain.link/ccip/concepts/best-practices/evm\#set-and-manage-the-rebalancer-role)
The **rebalancer** is responsible for managing the liquidity of the pool and ensuring that there is always sufficient liquidity when needed. They can rebalance liquidity between different pools or pool versions if necessary.
- **Best Practice**: Assign the rebalancer role to a trusted entity and ensure they understand the responsibilities, such as maintaining liquidity in the pool to support token releases.
## [Multi-Signature Contracts](https://docs.chain.link/ccip/concepts/best-practices/evm\#multi-signature-contracts)
Multi-signature contracts, such as [Safe Smart Accounts](https://github.com/safe-global/safe-smart-account), enhance security by requiring multiple signatures to authorize transactions.
### [Threshold configuration](https://docs.chain.link/ccip/concepts/best-practices/evm\#threshold-configuration)
Set an optimal threshold for signers based on the trust level of participants and the required security.
### [Role-based access control](https://docs.chain.link/ccip/concepts/best-practices/evm\#role-based-access-control)
Assign roles with specific permissions to different signers, limiting access to critical operations to trusted individuals.
### [Hardware wallet integration](https://docs.chain.link/ccip/concepts/best-practices/evm\#hardware-wallet-integration)
Use hardware-backed keys for signers to safeguard private keys from online vulnerabilities. Ensure that these devices are secure and regularly updated.
### [Regular audits and updates](https://docs.chain.link/ccip/concepts/best-practices/evm\#regular-audits-and-updates)
Conduct periodic audits of signer access and contract settings. Update the multisig setup as necessary, especially when personnel changes occur.
### [Emergency recovery plans](https://docs.chain.link/ccip/concepts/best-practices/evm\#emergency-recovery-plans)
Implement procedures for recovering from lost keys or compromised accounts, such as a predefined recovery multisig or recovery key holders.
### [Transaction review process](https://docs.chain.link/ccip/concepts/best-practices/evm\#transaction-review-process)
Establish a standard process for reviewing and approving transactions, which can include a waiting period for large transfers to mitigate risks and verifying data on a hardware wallet before signing to protect against front-end compromises.
### [Security tooling](https://docs.chain.link/ccip/concepts/best-practices/evm\#security-tooling)
Tools such as [Tenderly](https://tenderly.co/) or [Hypernative](https://www.hypernative.io/) can provide additional layers of security related to transaction simulation, risk monitoring, and alerting.
### [Documentation and training](https://docs.chain.link/ccip/concepts/best-practices/evm\#documentation-and-training)
Maintain thorough documentation of multisig operations and provide training for all signers to ensure familiarity with processes and security protocols.
## [Chain-Specific Considerations](https://docs.chain.link/ccip/concepts/best-practices/evm\#chain-specific-considerations)
### [Hedera Fee Decimal Handling](https://docs.chain.link/ccip/concepts/best-practices/evm\#hedera-fee-decimal-handling)
When using Chainlink CCIP with Hedera, you must be aware of a critical difference in decimal handling. Hedera's native HBAR token and wrapped WHBAR both use 8 decimals, while most EVM chains use 18 decimals for their native tokens.
#### [Impact on CCIP Fee Calculation](https://docs.chain.link/ccip/concepts/best-practices/evm\#impact-on-ccip-fee-calculation)
When interacting with Hedera using HBAR or WHBAR as fee tokens:
1. HBAR and WHBAR natively use 8 decimals
2. Hedera's JSON-RPC conversion layer expects a value with 18 decimals for `msg.value` when sending transactions
_Source: [Hedera Documentation on HBAR Decimal Places](https://docs.hedera.com/hedera/sdks-and-apis/sdks/hbars#hbar-decimal-places)_
#### [Required Fee Scaling](https://docs.chain.link/ccip/concepts/best-practices/evm\#required-fee-scaling)
For off-chain applications (like frontends or scripts) that:
1. Call `getFee()` to determine the fee amount
2. Then use that amount to send CCIP messages
You **must scale the fee** by multiplying it by **10 decimals**:

```plaintext
Scaled Fee = getFee() * 10^10
```
When using native HBAR as the fee token, you need to send this scaled value as `msg.value` during the `ccipSend()` call.
When using WHBAR as the fee token, users must approve (ERC20) at least this scaled amount before calling `ccipSend()` with no msg.value.
## Get the latest Chainlink content straight to your inbox.
Email Address
## CCIP Execution Latency
[iframe](https://www.googletagmanager.com/ns.html?id=GTM-N6DQ47T)
On this page
# CCIP Execution Latency
## [CCIP transaction lifecycle](https://docs.chain.link/ccip/ccip-execution-latency\#ccip-transaction-lifecycle)
As depicted in the [CCIP detailed architecture](https://docs.chain.link/ccip/concepts/architecture/overview) section, the CCIP transaction lifecycle involves multiple stages from the source blockchain to the destination blockchain:
**Source blockchain:**
1. A sender contract or externally owned account (EOA) sends a CCIP message.
2. The transaction is included in a block and processed by "network participants" (validators in PoS and miners in PoW blockchains).
3. The Committing Decentralized Oracle Network (DON) waits for the block containing the transaction to achieve finality.
**Destination blockchain:**
1. After finality is reached on the source blockchain, the Committing DON relays the Merkle root of a batch of finalized messages to the OffRamp contract on the destination chain.
2. The Risk Management Network verifies and blesses the committed Merkle root on the destination chain, confirming the integrity of the Merkle root and the messages it authenticates.
3. The Executing DON executes the message on the destination chain. If the execution cost on the destination chain is within an acceptable range, the message is executed promptly after being blessed by the Risk Management Network.
The combined latencies of each step in the transaction lifecycle on both the source and destination blockchains impact the total end-to-end execution time for a CCIP transaction. Because different blockchains have unique optimizations for their consensus mechanisms, block sizes, and block times, some blockchains are faster at processing transactions than others. However, various factors can lead to variation in transaction times, including when transferring between the same pair of blockchains:
- **Finality:** Finality is the assurance that past transactions included onchain are extremely difficult or impossible to revert. Finality varies across different blockchains. Some blockchains offer instant finality, while others require multiple block confirmations.
- **Network Congestion:** Network congestion occurs when the volume of transactions exceeds the capacity of the blockchain network, leading to delays in transaction processing. Multiple factors can contribute to network congestion, such as high transaction volumes, increased adoption of blockchain technologies, and events like token launches.
- **Gas Price:** Network participants often prioritize transactions with higher gas prices. If a low gas price is set for a transaction, it can take longer to process than one with a higher gas price, especially during network congestion.
Waiting for finality on the source blockchain is crucial when transacting across multiple networks, as it helps ensure that actions taken on the destination blockchain are based on transactions on the source blockchain that are extremely difficult or impossible to revert. Because the time to achieve finality varies across blockchains and significantly impacts the total CCIP execution latency, the following sections will focus on explaining the different types of finality and how CCIP approaches source chain security on each supported blockchain.
## [Finality](https://docs.chain.link/ccip/ccip-execution-latency\#finality)
Different blockchains employ various consensus mechanisms, leading to different types of finality. This affects users, as even once a transaction is onchain, they must often wait for it to be considered finalized (a time period that varies by blockchain). Finality with blockchains can primarily be categorized into two main types: **probabilistic** finality and **deterministic** finality:
- **Probabilistic finality** is mainly used by Proof-of-Work blockchains and is not the main subject of this article.
- **Deterministic finality** is widely used in most smart contract enabled blockchains that Chainlink CCIP is integrated with today.
### [Types of Deterministic Finality](https://docs.chain.link/ccip/ccip-execution-latency\#types-of-deterministic-finality)
#### [Finality on L1 PoA/PoS Chains](https://docs.chain.link/ccip/ccip-execution-latency\#finality-on-l1-poapos-chains)
Typically, Proof of Authority / Proof of Stake (PoA/PoS) chains use a deterministic model to determine when a block/transaction is considered final. The consensus protocol utilized in such a system is usually designed to be Byzantine Fault Tolerant (BFT). This means that under the assumption that some subset (usually between 51% - 67%) of the participating nodes/stake are honest, and there are no errors in the protocol's implementation, the system works as expected and finality assurances are upheld.
**Examples:**
- **Ethereum's PoS:** Ethereum PoS achieves Byzantine Fault Tolerance (BFT) through economic constraints. Ethereum PoS manages finality using "checkpoint" blocks. The first block in each epoch is designated as a checkpoint. Validators vote on pairs of checkpoints. When two-thirds of the total staked ETH validators agree on the validity of the pair, the earlier of the two checkpoints becomes finalized. To revert a finalized block, an attacker would have to burn at least one-third of the total staked ether, making such an attack extremely costly and difficult to achieve.
- **Comet BFT (Cosmos Hub Network):** Comet BFT is a Byzantine Fault Tolerant (BFT) consensus algorithm designed to provide instant finality. It achieves BFT by ensuring that consensus can be reached as long as more than two-thirds of validators are honest. Once these validators confirm a block, it is immediately considered final and irreversible.
- **Avalanche:** Avalanche uses a random sampling of validators who repeatedly vote on transactions. This process continues until enough validators agree, achieving sub-second finality.
- **BNB Chain:** BNB Chain uses a combination of Proof of Staked Authority (PoSA) and Byzantine Fault Tolerance (BFT) algorithms to finalize transactions. If two-thirds or more of the validators vote as expected, it takes an average of 2.5 blocks to finalize a transaction.
#### [Finality on L2s](https://docs.chain.link/ccip/ccip-execution-latency\#finality-on-l2s)
Layer 2 blockchains, or L2s, are implementations of blockchain systems built on top of existing blockchains (known as Layer 1, or L1) to improve scalability and reduce transaction costs. While they operate independently, L2s are designed to inherit the security of the underlying Layer 1 blockchain: L2s post periodic checkpoints to the underlying blockchain they are built on top of, settling their state and providing stronger finality guarantees than what is provided by their native model.
**Optimistic Rollups:**
Most of the popular optimistic rollups that exist today are run through a centralized sequencer. The sequencer is responsible for ordering incoming transactions, including them in blocks, batching them together and posting them as a bundle to the underlying blockchain they settle on. These bundles serve as commitments and once posted provide more certainty on the finalized state of the rollup. Given that the sequencer is centralized, users are faced with the choice to trust that it won't change the order of the transactions or wait until these commitments are posted to the underlying L1 blockchain.
The optimistic model means that the commitment is valid by default when it is posted to the Layer 1 (L1) blockchain. This is why optimistic rollups typically provide a challenge period, during which a commitment can be challenged if it turns out to be fraudulent. If a challenge is successful, the commitment is replaced and the rollup state is updated to the correct one.
**The typical lifecycle of an optimistic rollup transaction is:**
1. Transaction is included in an L2 block by the sequencer.
2. Transaction is included in a batch that is committed to the L1.
3. Challenge period during which a batch can be challenged if it's invalid - usually lasts a week or more.
4. Transaction is finalized on the L1 - at this point it is considered irreversible.
In the popular optimistic rollup implementations that exist (e.g. OP, Arbitrum, etc.), a commitment can only be challenged if it contains an invalid state root. If the commitment is a valid continuation of the L2, it cannot be challenged. Therefore, seeing a commitment and verifying that it is valid is sufficient certainty for most users to assume finality on this type of L2s, as long as they trust the finality guarantees of the underlying L1. Importantly, this guarantee is supported by waiting for the commitment to the L1 to be finalized according to the L1's finality model.
**ZK Rollups:**
Similarly to optimistic rollups, most popular ZK rollups that exist today are run through a centralized sequencer. The ZK rollup sequencer is also responsible for ordering incoming transactions, including them in blocks, batching them together and posting them as a bundle to the underlying L1 blockchain they settle on. However, in the case of ZK rollups, they also post a validity proof with each batch that is automatically verified onchain on the underlying L1. This validity proof removes the need for a challenge period like on optimistic rollups.
**The typical lifecycle of a ZK rollup transaction is:**
1. Transaction is included in an L2 block by the sequencer.
2. Transaction is included in a batch that is committed to the L1.
3. Validity proof is posted on the L1 that proves the commitment from step 2.
4. Transaction is finalized on the L1.
5. Transaction is considered irreversible. In many cases this happens after a considerable rollup-specific "safety delay" (12-24 hours) from the previous step, which is expected to be reduced as the technology matures.
### [How CCIP Determines Finality](https://docs.chain.link/ccip/ccip-execution-latency\#how-ccip-determines-finality)
The end-to-end transaction times of CCIP messages depend largely on the time-to-finality of the source blockchain. Different blockchains have varying finality types, leading to different times to reach finality. This section explains how CCIP determines finality for different blockchains.
#### [Finality Tag](https://docs.chain.link/ccip/ccip-execution-latency\#finality-tag)
Blockchains with deterministic finality often use a finality tag to indicate when a block is considered final. The finality tag delineates which blocks are finalized, offering a standardized way to determine transaction finality.
- After The Merge, Ethereum shifted to an epoch-based process in PoS, where finality is achieved when two-thirds of validators agree on block finalization over two epochs (64 slots, approximately 12.8 minutes). The Ethereum team introduced the finality tag to provide a default block parameter in specific [JSON-RPC calls](https://ethereum.org/en/developers/docs/apis/json-rpc/), delineating finalized blocks without ambiguity. The finality tag is supported by various Ethereum clients, including Geth.
- Other blockchains have adopted similar finality tags to indicate finalized blocks.
#### [Block Depth](https://docs.chain.link/ccip/ccip-execution-latency\#block-depth)
In some cases, CCIP relies on block depth to determine when a transaction can be considered final. The block depth refers to the number of successive blocks added after the one containing a given transaction. CCIP uses a sufficient number of blocks to consider the transaction most likely safe from reorgs. There are three cases where CCIP would use block depth:
- Blockchains with probabilistic finality.
- Blockchains with deterministic finality but without a finality tag: In some cases, blockchains have deterministic finality but do not provide a finality tag.
- Blockchains with deterministic finality but slow finality times: In some cases, deterministic finality can take a significant amount of time to reach, leading to a poor user experience.
### [Finality by blockchain](https://docs.chain.link/ccip/ccip-execution-latency\#finality-by-blockchain)
This section provides an overview of the finality methods CCIP uses to determine finality for each currently supported blockchain. The table below lists each blockchain and its finality method—whether it uses a finality tag or block depth (with the number of blocks specified for block depth)—and the estimated time required to achieve finality.
| Source Blockchain | Finality Method | Estimated Time for Finality |
| --- | --- | --- |
| Apechain | Finality tag | 50 minutes |
| Arbitrum | Finality tag | 17 minutes |
| Astar | Finality tag | 35 seconds |
| Avalanche | Finality tag | < 1 second |
| Base | Finality tag | 18 minutes |
| Berachain | Finality tag | 7 seconds |
| BitLayer | [Block depth](https://docs.chain.link/ccip/ccip-execution-latency#block-depth) (21 blocks) | 1 minute |
| Blast | Finality tag | 20 minutes |
| BNB | Finality tag | 5 seconds |
| Bob | Finality tag | 2 hours |
| B² | Finality tag | 20 minutes |
| Celo | Finality tag | < 1 second |
| Core | [Block depth](https://docs.chain.link/ccip/ccip-execution-latency#block-depth) (7 blocks) | 1 minute |
| Corn | Finality tag | 12 hours |
| Cronos | Finality tag | 1 second |
| Cronos zkEVM | Finality tag | 31 hours |
| Ethereum | Finality tag | 15 minutes |
| Fraxtal | Finality tag | 30 minutes |
| Gnosis | Finality tag | 3 minutes |
| Hashkey | Finality tag | 1 hour |
| Ink | Finality tag | 2 hours |
| Kroma | Finality tag | 25 minutes |
| Linea | [Block depth](https://docs.chain.link/ccip/ccip-execution-latency#block-depth) (600 blocks) | 20 minutes |
| Mantle | Finality tag | 28 minutes |
| Metis | Finality tag | 2 hours |
| Mind Network | Finality tag | 1 hour |
| Mode | Finality tag | 37 minutes |
| OP | Finality tag | 20 minutes |
| Polygon | Finality tag | 2 minutes |
| Polygon zkEVM | Finality tag | 2 hours |
| Ronin | Finality tag | 10 seconds |
| Scroll | Finality tag | 1 hour |
| Sei | Finality tag | 1 second |
| Soneium | Finality tag | 27 minutes |
| Sonic | [Block depth](https://docs.chain.link/ccip/ccip-execution-latency#block-depth) (10 blocks) | 7 seconds |
| Shibarium | Finality tag | 1 minute |
| Treasure | Finality tag | 7 hours |
| Unichain | Finality tag | 24 minutes |
| Wemix | Finality tag | < 1 second |
| Worldchain | Finality tag | 40 minutes |
| XLayer | Finality tag | 1 hour |
| Zircuit | Finality tag | 21 minutes |
| ZKsync | [Block depth](https://docs.chain.link/ccip/ccip-execution-latency#block-depth) (1200 blocks) | 20 minutes |
This page provides details on the expected latency for a cross-chain transaction using CCIP, covering the different stages of transaction processing and the factors that influence overall execution times.
For a comprehensive understanding of CCIP's architecture and how messages flow through the system, refer to the [CCIP detailed architecture](https://docs.chain.link/ccip/concepts/architecture/overview) documentation.
## Get the latest Chainlink content straight to your inbox.
Email Address
## Programmable Token Transfers
[iframe](https://www.googletagmanager.com/ns.html?id=GTM-N6DQ47T)
Chainlink CCIP is now officially live on Solana. [View lanes and tokens.](https://docs.chain.link/ccip/directory/mainnet/chain/solana-mainnet?utm_medium=referral&utm_source=chainlink-docs&utm_campaign=solana-ccip)
On this page
# [Transfer Tokens with Data](https://docs.chain.link/ccip/tutorials/evm/programmable-token-transfers\#overview)
In this tutorial, you will use Chainlink CCIP to transfer tokens and arbitrary data between smart contracts on different blockchains. First, you will pay for the CCIP fees on the source blockchain using LINK. Then, you will use the same contract to pay CCIP fees in native gas tokens. For example, you would use ETH on Ethereum or AVAX on Avalanche.
## [Before you begin](https://docs.chain.link/ccip/tutorials/evm/programmable-token-transfers\#before-you-begin)
1. You should understand how to write, compile, deploy, and fund a smart contract. If you need to brush up on the basics, read this [tutorial](https://docs.chain.link/quickstarts/deploy-your-first-contract), which will guide you through using the [Solidity programming language](https://soliditylang.org/), interacting with the [MetaMask wallet](https://metamask.io/) and working within the [Remix Development Environment](https://remix.ethereum.org/).
2. Your account must have some AVAX and LINK tokens on _Avalanche Fuji_ and ETH tokens on _Ethereum Sepolia_. Learn how to [Acquire testnet LINK](https://docs.chain.link/resources/acquire-link).
3. Check the [CCIP Directory](https://docs.chain.link/ccip/directory) to confirm that the tokens you will transfer are supported for your lane. In this example, you will transfer tokens from _Avalanche Fuji_ to _Ethereum Sepolia_ so check the list of supported tokens [here](https://docs.chain.link/ccip/directory/testnet/chain/avalanche-fuji-testnet).
4. Learn how to [acquire CCIP test tokens](https://docs.chain.link/ccip/test-tokens#mint-test-tokens). Following this guide, you should have CCIP-BnM tokens, and CCIP-BnM should appear in the list of your tokens in MetaMask.
5. Learn how to [fund your contract](https://docs.chain.link/resources/fund-your-contract). This guide shows how to fund your contract in LINK, but you can use the same guide for funding your contract with any ERC20 tokens as long as they appear in the list of tokens in MetaMask.
6. Follow the previous tutorial: [_Transfer tokens_](https://docs.chain.link/ccip/tutorials/evm/transfer-tokens-from-contract).
## [Tutorial](https://docs.chain.link/ccip/tutorials/evm/programmable-token-transfers\#tutorial)
In this tutorial, you will send a _string_ text and CCIP-BnM tokens between smart contracts on _Avalanche Fuji_ and _Ethereum Sepolia_ using CCIP. First, you will pay [CCIP fees in LINK](https://docs.chain.link/ccip/tutorials/evm/programmable-token-transfers#transfer-and-receive-tokens-and-data-and-pay-in-link), then you will pay [CCIP fees in native gas](https://docs.chain.link/ccip/tutorials/evm/programmable-token-transfers#transfer-and-receive-tokens-and-data-and-pay-in-native).

```solidity
// SPDX-License-Identifier: MIT
pragma solidity 0.8.24;
import {IRouterClient} from "@chainlink/contracts-ccip/contracts/interfaces/IRouterClient.sol";
import {OwnerIsCreator} from "@chainlink/contracts/src/v0.8/shared/access/OwnerIsCreator.sol";
import {Client} from "@chainlink/contracts-ccip/contracts/libraries/Client.sol";
import {CCIPReceiver} from "@chainlink/contracts-ccip/contracts/applications/CCIPReceiver.sol";
import {IERC20} from "@chainlink/contracts/src/v0.8/vendor/openzeppelin-solidity/v4.8.3/contracts/token/ERC20/IERC20.sol";
import {SafeERC20} from "@chainlink/contracts/src/v0.8/vendor/openzeppelin-solidity/v4.8.3/contracts/token/ERC20/utils/SafeERC20.sol";
/**
* THIS IS AN EXAMPLE CONTRACT THAT USES HARDCODED VALUES FOR CLARITY.
* THIS IS AN EXAMPLE CONTRACT THAT USES UN-AUDITED CODE.
* DO NOT USE THIS CODE IN PRODUCTION.
*/
/// @title - A simple messenger contract for transferring/receiving tokens and data across chains.
contract ProgrammableTokenTransfers is CCIPReceiver, OwnerIsCreator {
using SafeERC20 for IERC20;
// Custom errors to provide more descriptive revert messages.
error NotEnoughBalance(uint256 currentBalance, uint256 calculatedFees); // Used to make sure contract has enough balance to cover the fees.
error NothingToWithdraw(); // Used when trying to withdraw Ether but there's nothing to withdraw.
error FailedToWithdrawEth(address owner, address target, uint256 value); // Used when the withdrawal of Ether fails.
error DestinationChainNotAllowed(uint64 destinationChainSelector); // Used when the destination chain has not been allowlisted by the contract owner.
error SourceChainNotAllowed(uint64 sourceChainSelector); // Used when the source chain has not been allowlisted by the contract owner.
error SenderNotAllowed(address sender); // Used when the sender has not been allowlisted by the contract owner.
error InvalidReceiverAddress(); // Used when the receiver address is 0.
// Event emitted when a message is sent to another chain.
event MessageSent(
bytes32 indexed messageId, // The unique ID of the CCIP message.
uint64 indexed destinationChainSelector, // The chain selector of the destination chain.
address receiver, // The address of the receiver on the destination chain.
string text, // The text being sent.
address token, // The token address that was transferred.
uint256 tokenAmount, // The token amount that was transferred.
address feeToken, // the token address used to pay CCIP fees.
uint256 fees // The fees paid for sending the message.
);
// Event emitted when a message is received from another chain.
event MessageReceived(
bytes32 indexed messageId, // The unique ID of the CCIP message.
uint64 indexed sourceChainSelector, // The chain selector of the source chain.
address sender, // The address of the sender from the source chain.
string text, // The text that was received.
address token, // The token address that was transferred.
uint256 tokenAmount // The token amount that was transferred.
);
bytes32 private s_lastReceivedMessageId; // Store the last received messageId.
address private s_lastReceivedTokenAddress; // Store the last received token address.
uint256 private s_lastReceivedTokenAmount; // Store the last received amount.
string private s_lastReceivedText; // Store the last received text.
// Mapping to keep track of allowlisted destination chains.
mapping(uint64 => bool) public allowlistedDestinationChains;
// Mapping to keep track of allowlisted source chains.
mapping(uint64 => bool) public allowlistedSourceChains;
// Mapping to keep track of allowlisted senders.
mapping(address => bool) public allowlistedSenders;
IERC20 private s_linkToken;
/// @notice Constructor initializes the contract with the router address.
/// @param _router The address of the router contract.
/// @param _link The address of the link contract.
constructor(address _router, address _link) CCIPReceiver(_router) {
s_linkToken = IERC20(_link);
}
/// @dev Modifier that checks if the chain with the given destinationChainSelector is allowlisted.
/// @param _destinationChainSelector The selector of the destination chain.
modifier onlyAllowlistedDestinationChain(uint64 _destinationChainSelector) {
if (!allowlistedDestinationChains[_destinationChainSelector])
revert DestinationChainNotAllowed(_destinationChainSelector);
_;
}
/// @dev Modifier that checks the receiver address is not 0.
/// @param _receiver The receiver address.
modifier validateReceiver(address _receiver) {
if (_receiver == address(0)) revert InvalidReceiverAddress();
_;
}
/// @dev Modifier that checks if the chain with the given sourceChainSelector is allowlisted and if the sender is allowlisted.
/// @param _sourceChainSelector The selector of the destination chain.
/// @param _sender The address of the sender.
modifier onlyAllowlisted(uint64 _sourceChainSelector, address _sender) {
if (!allowlistedSourceChains[_sourceChainSelector])
revert SourceChainNotAllowed(_sourceChainSelector);
if (!allowlistedSenders[_sender]) revert SenderNotAllowed(_sender);
_;
}
/// @dev Updates the allowlist status of a destination chain for transactions.
/// @notice This function can only be called by the owner.
/// @param _destinationChainSelector The selector of the destination chain to be updated.
/// @param allowed The allowlist status to be set for the destination chain.
function allowlistDestinationChain(
uint64 _destinationChainSelector,
bool allowed
) external onlyOwner {
allowlistedDestinationChains[_destinationChainSelector] = allowed;
}
/// @dev Updates the allowlist status of a source chain
/// @notice This function can only be called by the owner.
/// @param _sourceChainSelector The selector of the source chain to be updated.
/// @param allowed The allowlist status to be set for the source chain.
function allowlistSourceChain(
uint64 _sourceChainSelector,
bool allowed
) external onlyOwner {
allowlistedSourceChains[_sourceChainSelector] = allowed;
}
/// @dev Updates the allowlist status of a sender for transactions.
/// @notice This function can only be called by the owner.
/// @param _sender The address of the sender to be updated.
/// @param allowed The allowlist status to be set for the sender.
function allowlistSender(address _sender, bool allowed) external onlyOwner {
allowlistedSenders[_sender] = allowed;
}
/// @notice Sends data and transfer tokens to receiver on the destination chain.
/// @notice Pay for fees in LINK.
/// @dev Assumes your contract has sufficient LINK to pay for CCIP fees.
/// @param _destinationChainSelector The identifier (aka selector) for the destination blockchain.
/// @param _receiver The address of the recipient on the destination blockchain.
/// @param _text The string data to be sent.
/// @param _token token address.
/// @param _amount token amount.
/// @return messageId The ID of the CCIP message that was sent.
function sendMessagePayLINK(
uint64 _destinationChainSelector,
address _receiver,
string calldata _text,
address _token,
uint256 _amount
)
external
onlyOwner
onlyAllowlistedDestinationChain(_destinationChainSelector)
validateReceiver(_receiver)
returns (bytes32 messageId)
{
// Create an EVM2AnyMessage struct in memory with necessary information for sending a cross-chain message
// address(linkToken) means fees are paid in LINK
Client.EVM2AnyMessage memory evm2AnyMessage = _buildCCIPMessage(
_receiver,
_text,
_token,
_amount,
address(s_linkToken)
);
// Initialize a router client instance to interact with cross-chain router
IRouterClient router = IRouterClient(this.getRouter());
// Get the fee required to send the CCIP message
uint256 fees = router.getFee(_destinationChainSelector, evm2AnyMessage);
if (fees > s_linkToken.balanceOf(address(this)))
revert NotEnoughBalance(s_linkToken.balanceOf(address(this)), fees);
// approve the Router to transfer LINK tokens on contract's behalf. It will spend the fees in LINK
s_linkToken.approve(address(router), fees);
// approve the Router to spend tokens on contract's behalf. It will spend the amount of the given token
IERC20(_token).approve(address(router), _amount);
// Send the message through the router and store the returned message ID
messageId = router.ccipSend(_destinationChainSelector, evm2AnyMessage);
// Emit an event with message details
emit MessageSent(
messageId,
_destinationChainSelector,
_receiver,
_text,
_token,
_amount,
address(s_linkToken),
fees
);
// Return the message ID
return messageId;
}
/// @notice Sends data and transfer tokens to receiver on the destination chain.
/// @notice Pay for fees in native gas.
/// @dev Assumes your contract has sufficient native gas like ETH on Ethereum or POL on Polygon.
/// @param _destinationChainSelector The identifier (aka selector) for the destination blockchain.
/// @param _receiver The address of the recipient on the destination blockchain.
/// @param _text The string data to be sent.
/// @param _token token address.
/// @param _amount token amount.
/// @return messageId The ID of the CCIP message that was sent.
function sendMessagePayNative(
uint64 _destinationChainSelector,
address _receiver,
string calldata _text,
address _token,
uint256 _amount
)
external
onlyOwner
onlyAllowlistedDestinationChain(_destinationChainSelector)
validateReceiver(_receiver)
returns (bytes32 messageId)
{
// Create an EVM2AnyMessage struct in memory with necessary information for sending a cross-chain message
// address(0) means fees are paid in native gas
Client.EVM2AnyMessage memory evm2AnyMessage = _buildCCIPMessage(
_receiver,
_text,
_token,
_amount,
address(0)
);
// Initialize a router client instance to interact with cross-chain router
IRouterClient router = IRouterClient(this.getRouter());
// Get the fee required to send the CCIP message
uint256 fees = router.getFee(_destinationChainSelector, evm2AnyMessage);
if (fees > address(this).balance)
revert NotEnoughBalance(address(this).balance, fees);
// approve the Router to spend tokens on contract's behalf. It will spend the amount of the given token
IERC20(_token).approve(address(router), _amount);
// Send the message through the router and store the returned message ID
messageId = router.ccipSend{value: fees}(
_destinationChainSelector,
evm2AnyMessage
);
// Emit an event with message details
emit MessageSent(
messageId,
_destinationChainSelector,
_receiver,
_text,
_token,
_amount,
address(0),
fees
);
// Return the message ID
return messageId;
}
/**
* @notice Returns the details of the last CCIP received message.
* @dev This function retrieves the ID, text, token address, and token amount of the last received CCIP message.
* @return messageId The ID of the last received CCIP message.
* @return text The text of the last received CCIP message.
* @return tokenAddress The address of the token in the last CCIP received message.
* @return tokenAmount The amount of the token in the last CCIP received message.
*/
function getLastReceivedMessageDetails()
public
view
returns (
bytes32 messageId,
string memory text,
address tokenAddress,
uint256 tokenAmount
)
{
return (
s_lastReceivedMessageId,
s_lastReceivedText,
s_lastReceivedTokenAddress,
s_lastReceivedTokenAmount
);
}
/// handle a received message
function _ccipReceive(
Client.Any2EVMMessage memory any2EvmMessage
)
internal
override
onlyAllowlisted(
any2EvmMessage.sourceChainSelector,
abi.decode(any2EvmMessage.sender, (address))
) // Make sure source chain and sender are allowlisted
{
s_lastReceivedMessageId = any2EvmMessage.messageId; // fetch the messageId
s_lastReceivedText = abi.decode(any2EvmMessage.data, (string)); // abi-decoding of the sent text
// Expect one token to be transferred at once, but you can transfer several tokens.
s_lastReceivedTokenAddress = any2EvmMessage.destTokenAmounts[0].token;
s_lastReceivedTokenAmount = any2EvmMessage.destTokenAmounts[0].amount;
emit MessageReceived(
any2EvmMessage.messageId,
any2EvmMessage.sourceChainSelector, // fetch the source chain identifier (aka selector)
abi.decode(any2EvmMessage.sender, (address)), // abi-decoding of the sender address,
abi.decode(any2EvmMessage.data, (string)),
any2EvmMessage.destTokenAmounts[0].token,
any2EvmMessage.destTokenAmounts[0].amount
);
}
/// @notice Construct a CCIP message.
/// @dev This function will create an EVM2AnyMessage struct with all the necessary information for programmable tokens transfer.
/// @param _receiver The address of the receiver.
/// @param _text The string data to be sent.
/// @param _token The token to be transferred.
/// @param _amount The amount of the token to be transferred.
/// @param _feeTokenAddress The address of the token used for fees. Set address(0) for native gas.
/// @return Client.EVM2AnyMessage Returns an EVM2AnyMessage struct which contains information for sending a CCIP message.
function _buildCCIPMessage(
address _receiver,
string calldata _text,
address _token,
uint256 _amount,
address _feeTokenAddress
) private pure returns (Client.EVM2AnyMessage memory) {
// Set the token amounts
Client.EVMTokenAmount[]
memory tokenAmounts = new Client.EVMTokenAmount[](1);
tokenAmounts[0] = Client.EVMTokenAmount({
token: _token,
amount: _amount
});
// Create an EVM2AnyMessage struct in memory with necessary information for sending a cross-chain message
return
Client.EVM2AnyMessage({
receiver: abi.encode(_receiver), // ABI-encoded receiver address
data: abi.encode(_text), // ABI-encoded string
tokenAmounts: tokenAmounts, // The amount and type of token being transferred
extraArgs: Client._argsToBytes(
// Additional arguments, setting gas limit and allowing out-of-order execution.
// Best Practice: For simplicity, the values are hardcoded. It is advisable to use a more dynamic approach
// where you set the extra arguments off-chain. This allows adaptation depending on the lanes, messages,
// and ensures compatibility with future CCIP upgrades. Read more about it here: https://docs.chain.link/ccip/concepts/best-practices/evm#using-extraargs
Client.GenericExtraArgsV2({
gasLimit: 200_000, // Gas limit for the callback on the destination chain
allowOutOfOrderExecution: true // Allows the message to be executed out of order relative to other messages from the same sender
})
),
// Set the feeToken to a feeTokenAddress, indicating specific asset will be used for fees
feeToken: _feeTokenAddress
});
}
/// @notice Fallback function to allow the contract to receive Ether.
/// @dev This function has no function body, making it a default function for receiving Ether.
/// It is automatically called when Ether is sent to the contract without any data.
receive() external payable {}
/// @notice Allows the contract owner to withdraw the entire balance of Ether from the contract.
/// @dev This function reverts if there are no funds to withdraw or if the transfer fails.
/// It should only be callable by the owner of the contract.
/// @param _beneficiary The address to which the Ether should be sent.
function withdraw(address _beneficiary) public onlyOwner {
// Retrieve the balance of this contract
uint256 amount = address(this).balance;
// Revert if there is nothing to withdraw
if (amount == 0) revert NothingToWithdraw();
// Attempt to send the funds, capturing the success status and discarding any return data
(bool sent, ) = _beneficiary.call{value: amount}("");
// Revert if the send failed, with information about the attempted transfer
if (!sent) revert FailedToWithdrawEth(msg.sender, _beneficiary, amount);
}
/// @notice Allows the owner of the contract to withdraw all tokens of a specific ERC20 token.
/// @dev This function reverts with a 'NothingToWithdraw' error if there are no tokens to withdraw.
/// @param _beneficiary The address to which the tokens will be sent.
/// @param _token The contract address of the ERC20 token to be withdrawn.
function withdrawToken(
address _beneficiary,
address _token
) public onlyOwner {
// Retrieve the balance of this contract
uint256 amount = IERC20(_token).balanceOf(address(this));
// Revert if there is nothing to withdraw
if (amount == 0) revert NothingToWithdraw();
IERC20(_token).safeTransfer(_beneficiary, amount);
}
}
```
[Open in Remix](https://remix.ethereum.org/#url=https://docs.chain.link/samples/CCIP/ProgrammableTokenTransfers.sol&autoCompile=true) [What is Remix?](https://docs.chain.link/getting-started/conceptual-overview#what-is-remix)
### [Deploy your contracts](https://docs.chain.link/ccip/tutorials/evm/programmable-token-transfers\#deploy-your-contracts)
To use this contract:
1. [Open the contract in Remix](https://remix.ethereum.org/#url=https://docs.chain.link/samples/CCIP/ProgrammableTokenTransfers.sol).
2. Compile your contract.
3. Deploy, fund your sender contract on _Avalanche Fuji_ and enable sending messages to _Ethereum Sepolia_:
1. Open MetaMask and select the network _Avalanche Fuji_.
2. In Remix IDE, click on _Deploy & Run Transactions_ and select _Injected Provider - MetaMask_ from the environment list. Remix will then interact with your MetaMask wallet to communicate with _Avalanche Fuji_.
3. Fill in your blockchain's router and LINK contract addresses. The router address can be found on the [CCIP Directory](https://docs.chain.link/ccip/directory) and the LINK contract address on the [LINK token contracts page](https://docs.chain.link/resources/link-token-contracts). For _Avalanche Fuji_:
- The router address is `0xF694E193200268f9a4868e4Aa017A0118C9a8177`,
- The LINK contract address is `0x0b9d5D9136855f6FEc3c0993feE6E9CE8a297846`.
4. Click the **transact** button. After you confirm the transaction, the contract address appears on the _Deployed Contracts_ list.
Note your contract address.
5. Open MetaMask and fund your contract with CCIP-BnM tokens. You can transfer `0.002` _CCIP-BnM_ to your contract.
6. Enable your contract to send CCIP messages to _Ethereum Sepolia_:
1. In Remix IDE, under _Deploy & Run Transactions_, open the list of functions of your smart contract deployed on _Avalanche Fuji_.
2. Call the `allowlistDestinationChain`, setting the destination chain selector to `16015286601757825753` and setting `allowed` to `true`. Each chain selector is found on the [CCIP Directory](https://docs.chain.link/ccip/directory).
4. Deploy your receiver contract on _Ethereum Sepolia_ and enable receiving messages from your sender contract:
1. Open MetaMask and select the network _Ethereum Sepolia_.
2. In Remix IDE, under _Deploy & Run Transactions_, make sure the environment is still _Injected Provider - MetaMask_.
3. Fill in your blockchain's router and LINK contract addresses. The router address can be found on the [CCIP Directory](https://docs.chain.link/ccip/directory) and the LINK contract address on the [LINK token contracts page](https://docs.chain.link/resources/link-token-contracts). For _Ethereum Sepolia_, the router address is `0x0BF3dE8c5D3e8A2B34D2BEeB17ABfCeBaf363A59` and the LINK contract address is `0x779877A7B0D9E8603169DdbD7836e478b4624789`.
4. Click the **transact** button. After you confirm the transaction, the contract address appears on the _Deployed Contracts_ list.
Note your contract address.
5. Enable your contract to receive CCIP messages from _Avalanche Fuji_:
1. In Remix IDE, under _Deploy & Run Transactions_, open the list of functions of your smart contract deployed on _Ethereum Sepolia_.
2. Call the `allowlistSourceChain` with `14767482510784806043` as the source chain selector, and `true` as allowed. Each chain selector is found on the [CCIP Directory](https://docs.chain.link/ccip/directory).
6. Enable your contract to receive CCIP messages from the contract that you deployed on _Avalanche Fuji_:
1. In Remix IDE, under _Deploy & Run Transactions_, open the list of functions of your smart contract deployed on _Ethereum Sepolia_.
2. Call the `allowlistSender` with the contract address of the contract that you deployed on _Avalanche Fuji_, and `true` as allowed.
At this point, you have one _sender_ contract on _Avalanche Fuji_ and one _receiver_ contract on _Ethereum Sepolia_. As security measures, you enabled the sender contract to send CCIP messages to _Ethereum Sepolia_ and the receiver contract to receive CCIP messages from the sender on _Avalanche Fuji_.
**Note**: Another security measure enforces that only the router can call the `_ccipReceive` function. Read the [explanation](https://docs.chain.link/ccip/tutorials/evm/programmable-token-transfers#explanation) section for more details.
### [Transfer and Receive tokens and data and pay in LINK](https://docs.chain.link/ccip/tutorials/evm/programmable-token-transfers\#transfer-and-receive-tokens-and-data-and-pay-in-link)
You will transfer _0.001 CCIP-BnM_ and a text. The CCIP fees for using CCIP will be paid in LINK. Read this [explanation](https://docs.chain.link/ccip/tutorials/evm/programmable-token-transfers#transferring-tokens-and-data-and-pay-in-link) for a detailed description of the code example.
1. Open MetaMask and connect to _Avalanche Fuji_. Fund your contract with LINK tokens. You can transfer `70` _LINK_ to your contract. In this example, LINK is used to pay the CCIP fees.
**Note:** This transaction fee is significantly higher than normal due to gas spikes on Sepolia. To run this example, you can get additional testnet LINK
from [faucets.chain.link](https://faucets.chain.link/) or use a supported testnet other than Sepolia.
2. Send a string data with tokens from _Avalanche Fuji_:
1. Open MetaMask and select the network _Avalanche Fuji_.
2. In Remix IDE, under _Deploy & Run Transactions_, open the list of functions of your smart contract deployed on _Avalanche Fuji_.
3. Fill in the arguments of the _**sendMessagePayLINK**_ function:
| Argument | Value and Description |
| --- | --- |
| \_destinationChainSelector | `16015286601757825753`
CCIP Chain identifier of the destination blockchain ( _Ethereum Sepolia_ in this example). You can find each chain selector on the [CCIP Directory](https://docs.chain.link/ccip/directory). |
| \_receiver | Your receiver contract address on _Ethereum Sepolia_.
The destination contract address. |
| \_text | `Hello World!`
Any `string` |
| \_token | `0xD21341536c5cF5EB1bcb58f6723cE26e8D8E90e4`
The _CCIP-BnM_ contract address at the source chain ( _Avalanche Fuji_ in this example). You can find all the addresses for each supported blockchain on the [CCIP Directory](https://docs.chain.link/ccip/directory). |
| \_amount | `1000000000000000`
The token amount ( _0.001 CCIP-BnM_). |
4. Click on `transact` and confirm the transaction on MetaMask.
5. After the transaction is successful, record the transaction hash. Here is an [example](https://testnet.snowtrace.io/tx/0xd3a0fade0e143fb39964c764bd4803e40062ba8c88e129f44ee795e33ade464b) of a transaction on _Avalanche Fuji_.
3. Open the [CCIP explorer](https://ccip.chain.link/) and search your cross-chain transaction using the transaction hash.
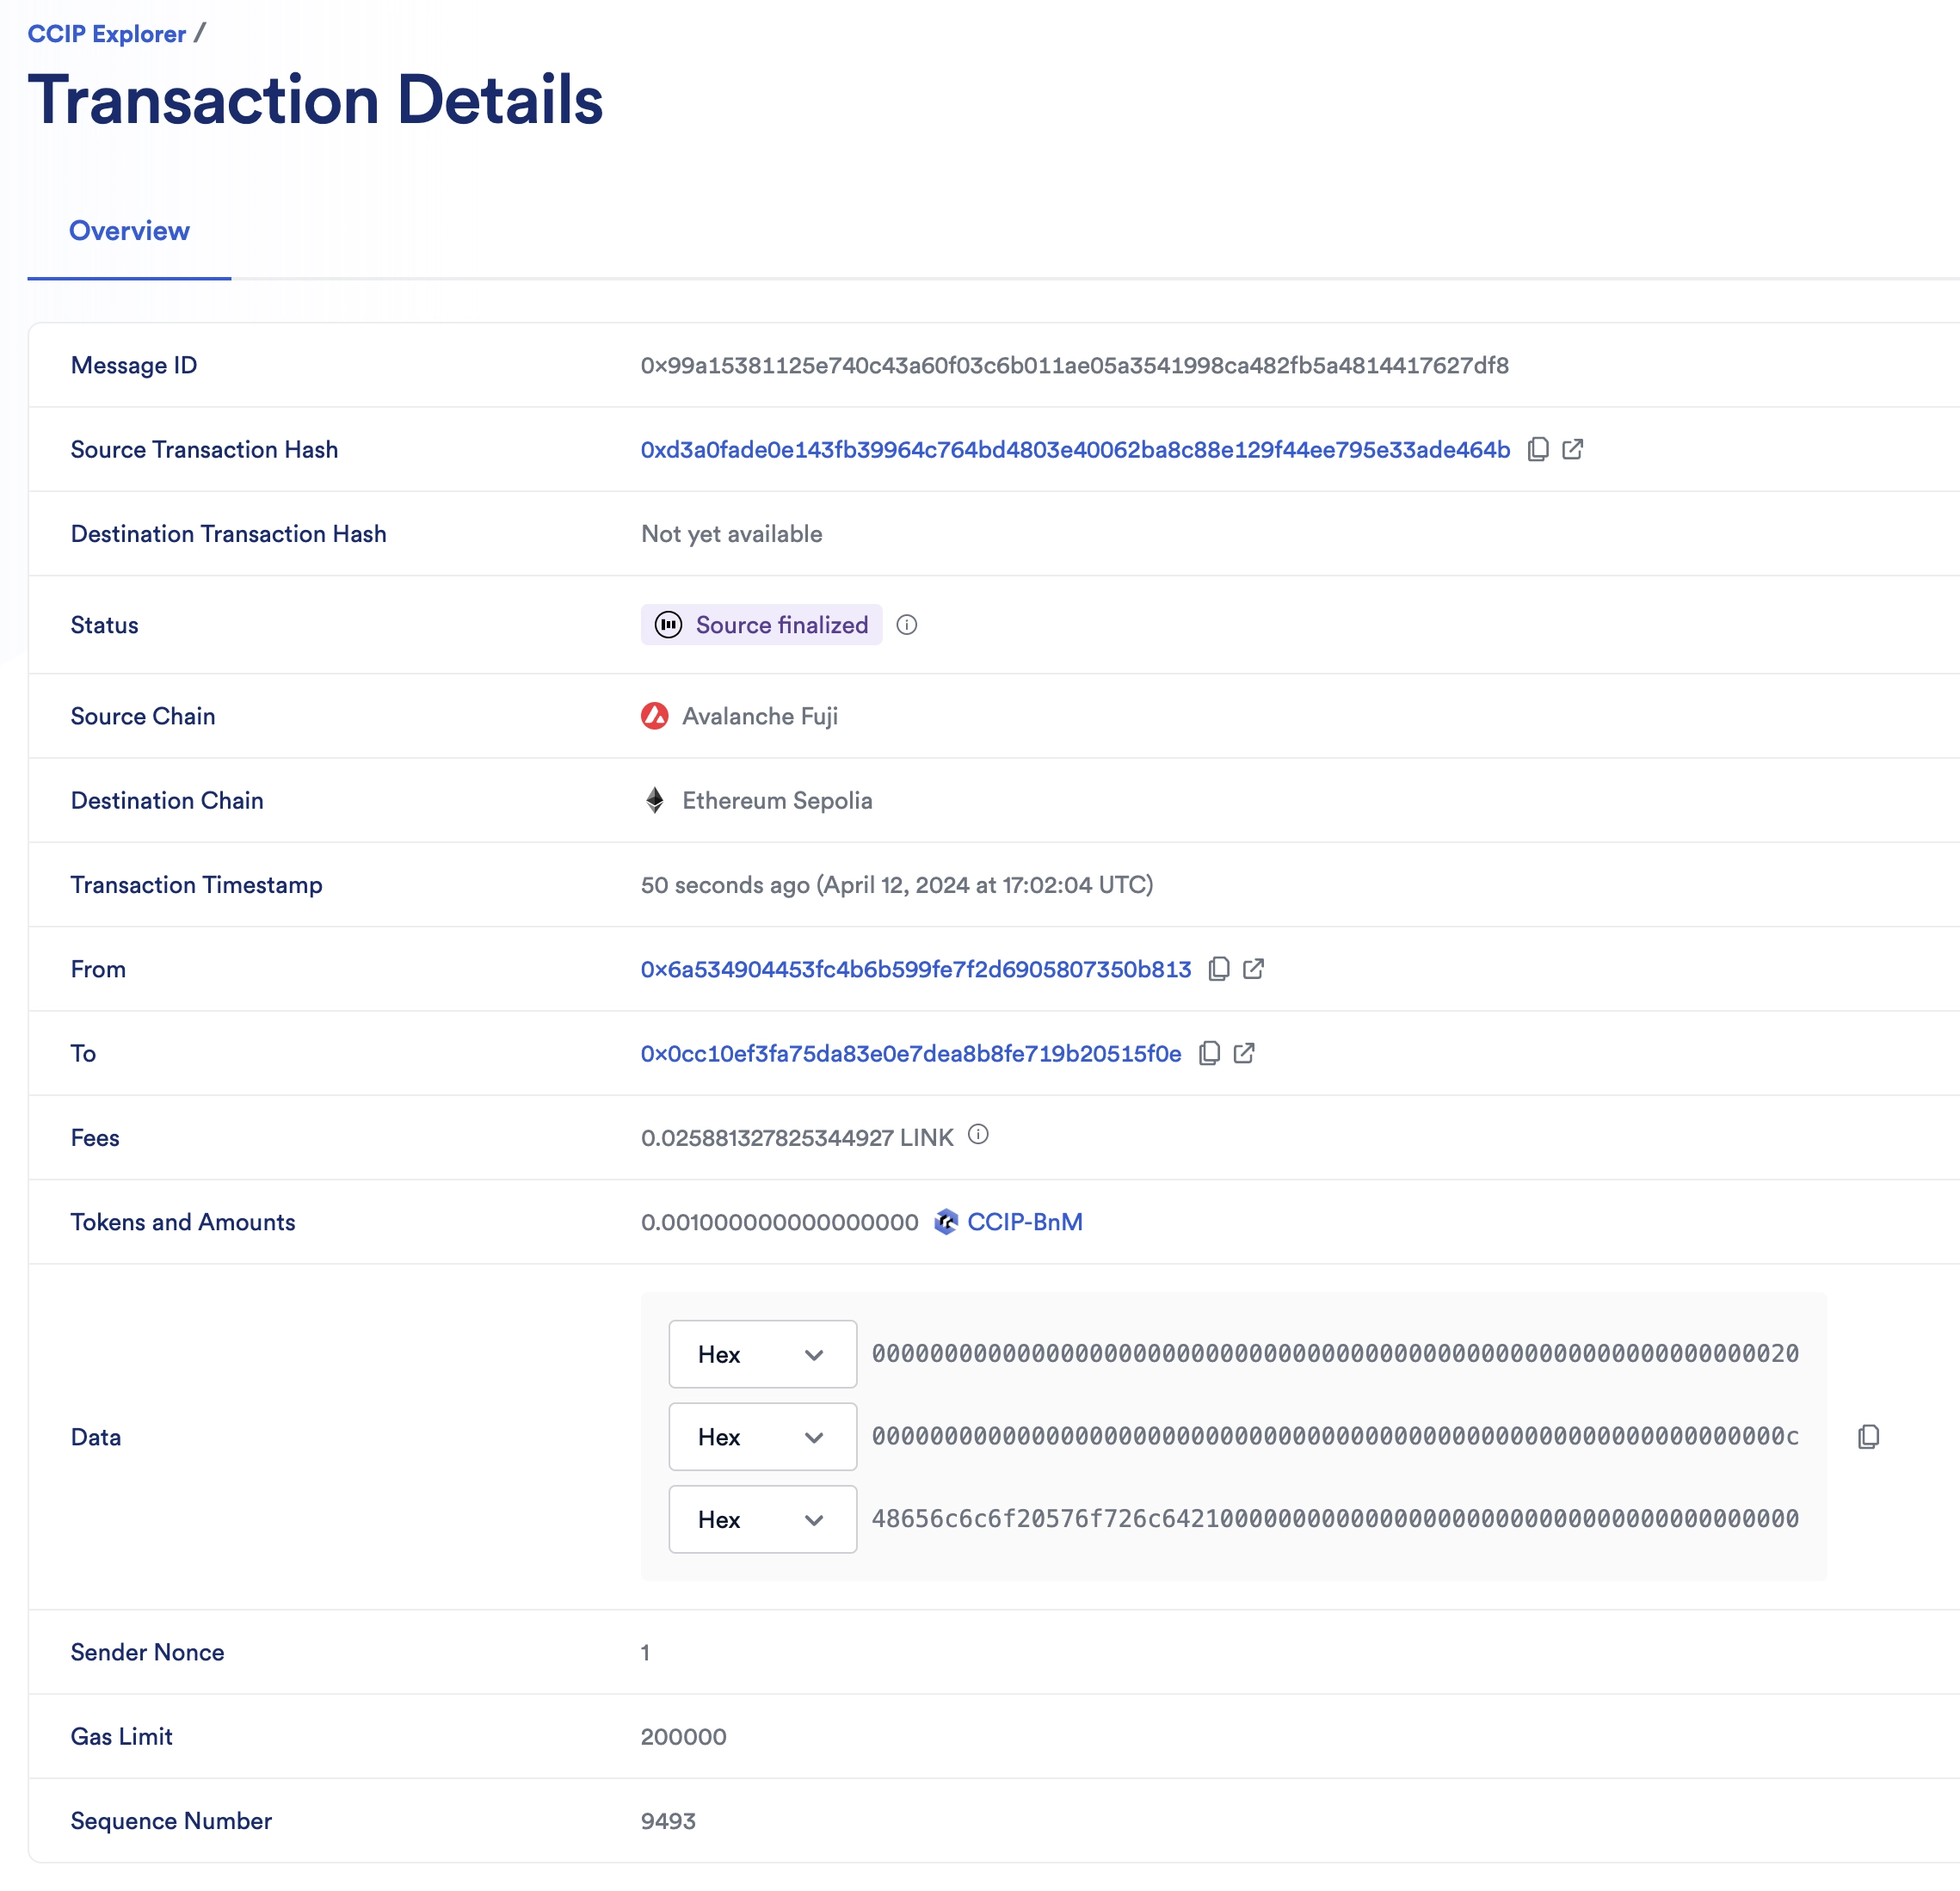
4. The CCIP transaction is completed once the status is marked as "Success". In this example, the CCIP message ID is _0x99a15381125e740c43a60f03c6b011ae05a3541998ca482fb5a4814417627df8_.

5. Check the receiver contract on the destination chain:
1. Open MetaMask and select the network _Ethereum Sepolia_.
2. In Remix IDE, under _Deploy & Run Transactions_, open the list of functions of your smart contract deployed on _Ethereum Sepolia_.
3. Call the `getLastReceivedMessageDetails` function.
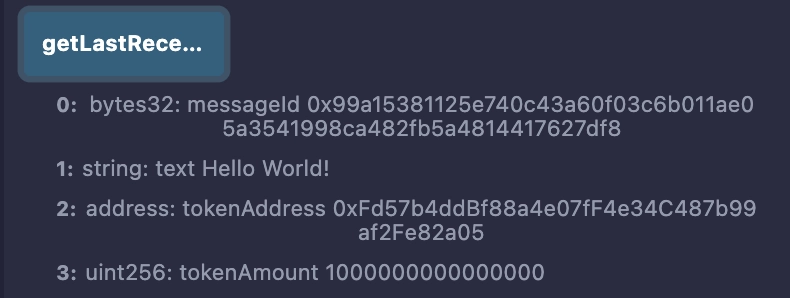
4. Notice the received messageId is _0x99a15381125e740c43a60f03c6b011ae05a3541998ca482fb5a4814417627df8_, the received text is _Hello World!_, the token address is _0xFd57b4ddBf88a4e07fF4e34C487b99af2Fe82a05_ (CCIP-BnM token address on _Ethereum Sepolia_) and the token amount is 1000000000000000 (0.001 CCIP-BnM).
**Note**: These example contracts are designed to work bi-directionally. As an exercise, you can use them to transfer tokens with data from _Avalanche Fuji_ to _Ethereum Sepolia_ and from _Ethereum Sepolia_ back to _Avalanche Fuji_.
### [Transfer and Receive tokens and data and pay in native](https://docs.chain.link/ccip/tutorials/evm/programmable-token-transfers\#transfer-and-receive-tokens-and-data-and-pay-in-native)
You will transfer _0.001 CCIP-BnM_ and a text. The CCIP fees for using CCIP will be paid in Avalanche's native AVAX. Read this [explanation](https://docs.chain.link/ccip/tutorials/evm/programmable-token-transfers#transferring-tokens-and-data-and-pay-in-native) for a detailed description of the code example.
1. Open MetaMask and connect to _Avalanche Fuji_. Fund your contract with AVAX tokens. You can transfer `0.2` _AVAX_ to your contract. The native gas tokens are used to pay the CCIP fees.
2. Send a string data with tokens from _Avalanche Fuji_:
1. Open MetaMask and select the network _Avalanche Fuji_.
2. In Remix IDE, under _Deploy & Run Transactions_, open the list of functions of your smart contract deployed on _Avalanche Fuji_.
3. Fill in the arguments of the _**sendMessagePayNative**_ function:
| Argument | Value and Description |
| --- | --- |
| \_destinationChainSelector | `16015286601757825753`
CCIP Chain identifier of the destination blockchain ( _Ethereum Sepolia_ in this example). You can find each chain selector on the [CCIP Directory](https://docs.chain.link/ccip/directory). |
| \_receiver | Your receiver contract address at _Ethereum Sepolia_.
The destination contract address. |
| \_text | `Hello World!`
Any `string` |
| \_token | `0xD21341536c5cF5EB1bcb58f6723cE26e8D8E90e4`
The _CCIP-BnM_ contract address at the source chain ( _Avalanche Fuji_ in this example). You can find all the addresses for each supported blockchain on the [CCIP Directory](https://docs.chain.link/ccip/directory). |
| \_amount | `1000000000000000`
The token amount ( _0.001 CCIP-BnM_). |
4. Click on `transact` and confirm the transaction on MetaMask.
5. Once the transaction is successful, note the transaction hash. Here is an [example](https://testnet.snowtrace.io/tx/0x8101fef78288981813915e77f8e5746bdba69711bdb7bc1706944a67ac70854b) of a transaction on _Avalanche Fuji_.
3. Open the [CCIP explorer](https://ccip.chain.link/) and search your cross-chain transaction using the transaction hash.
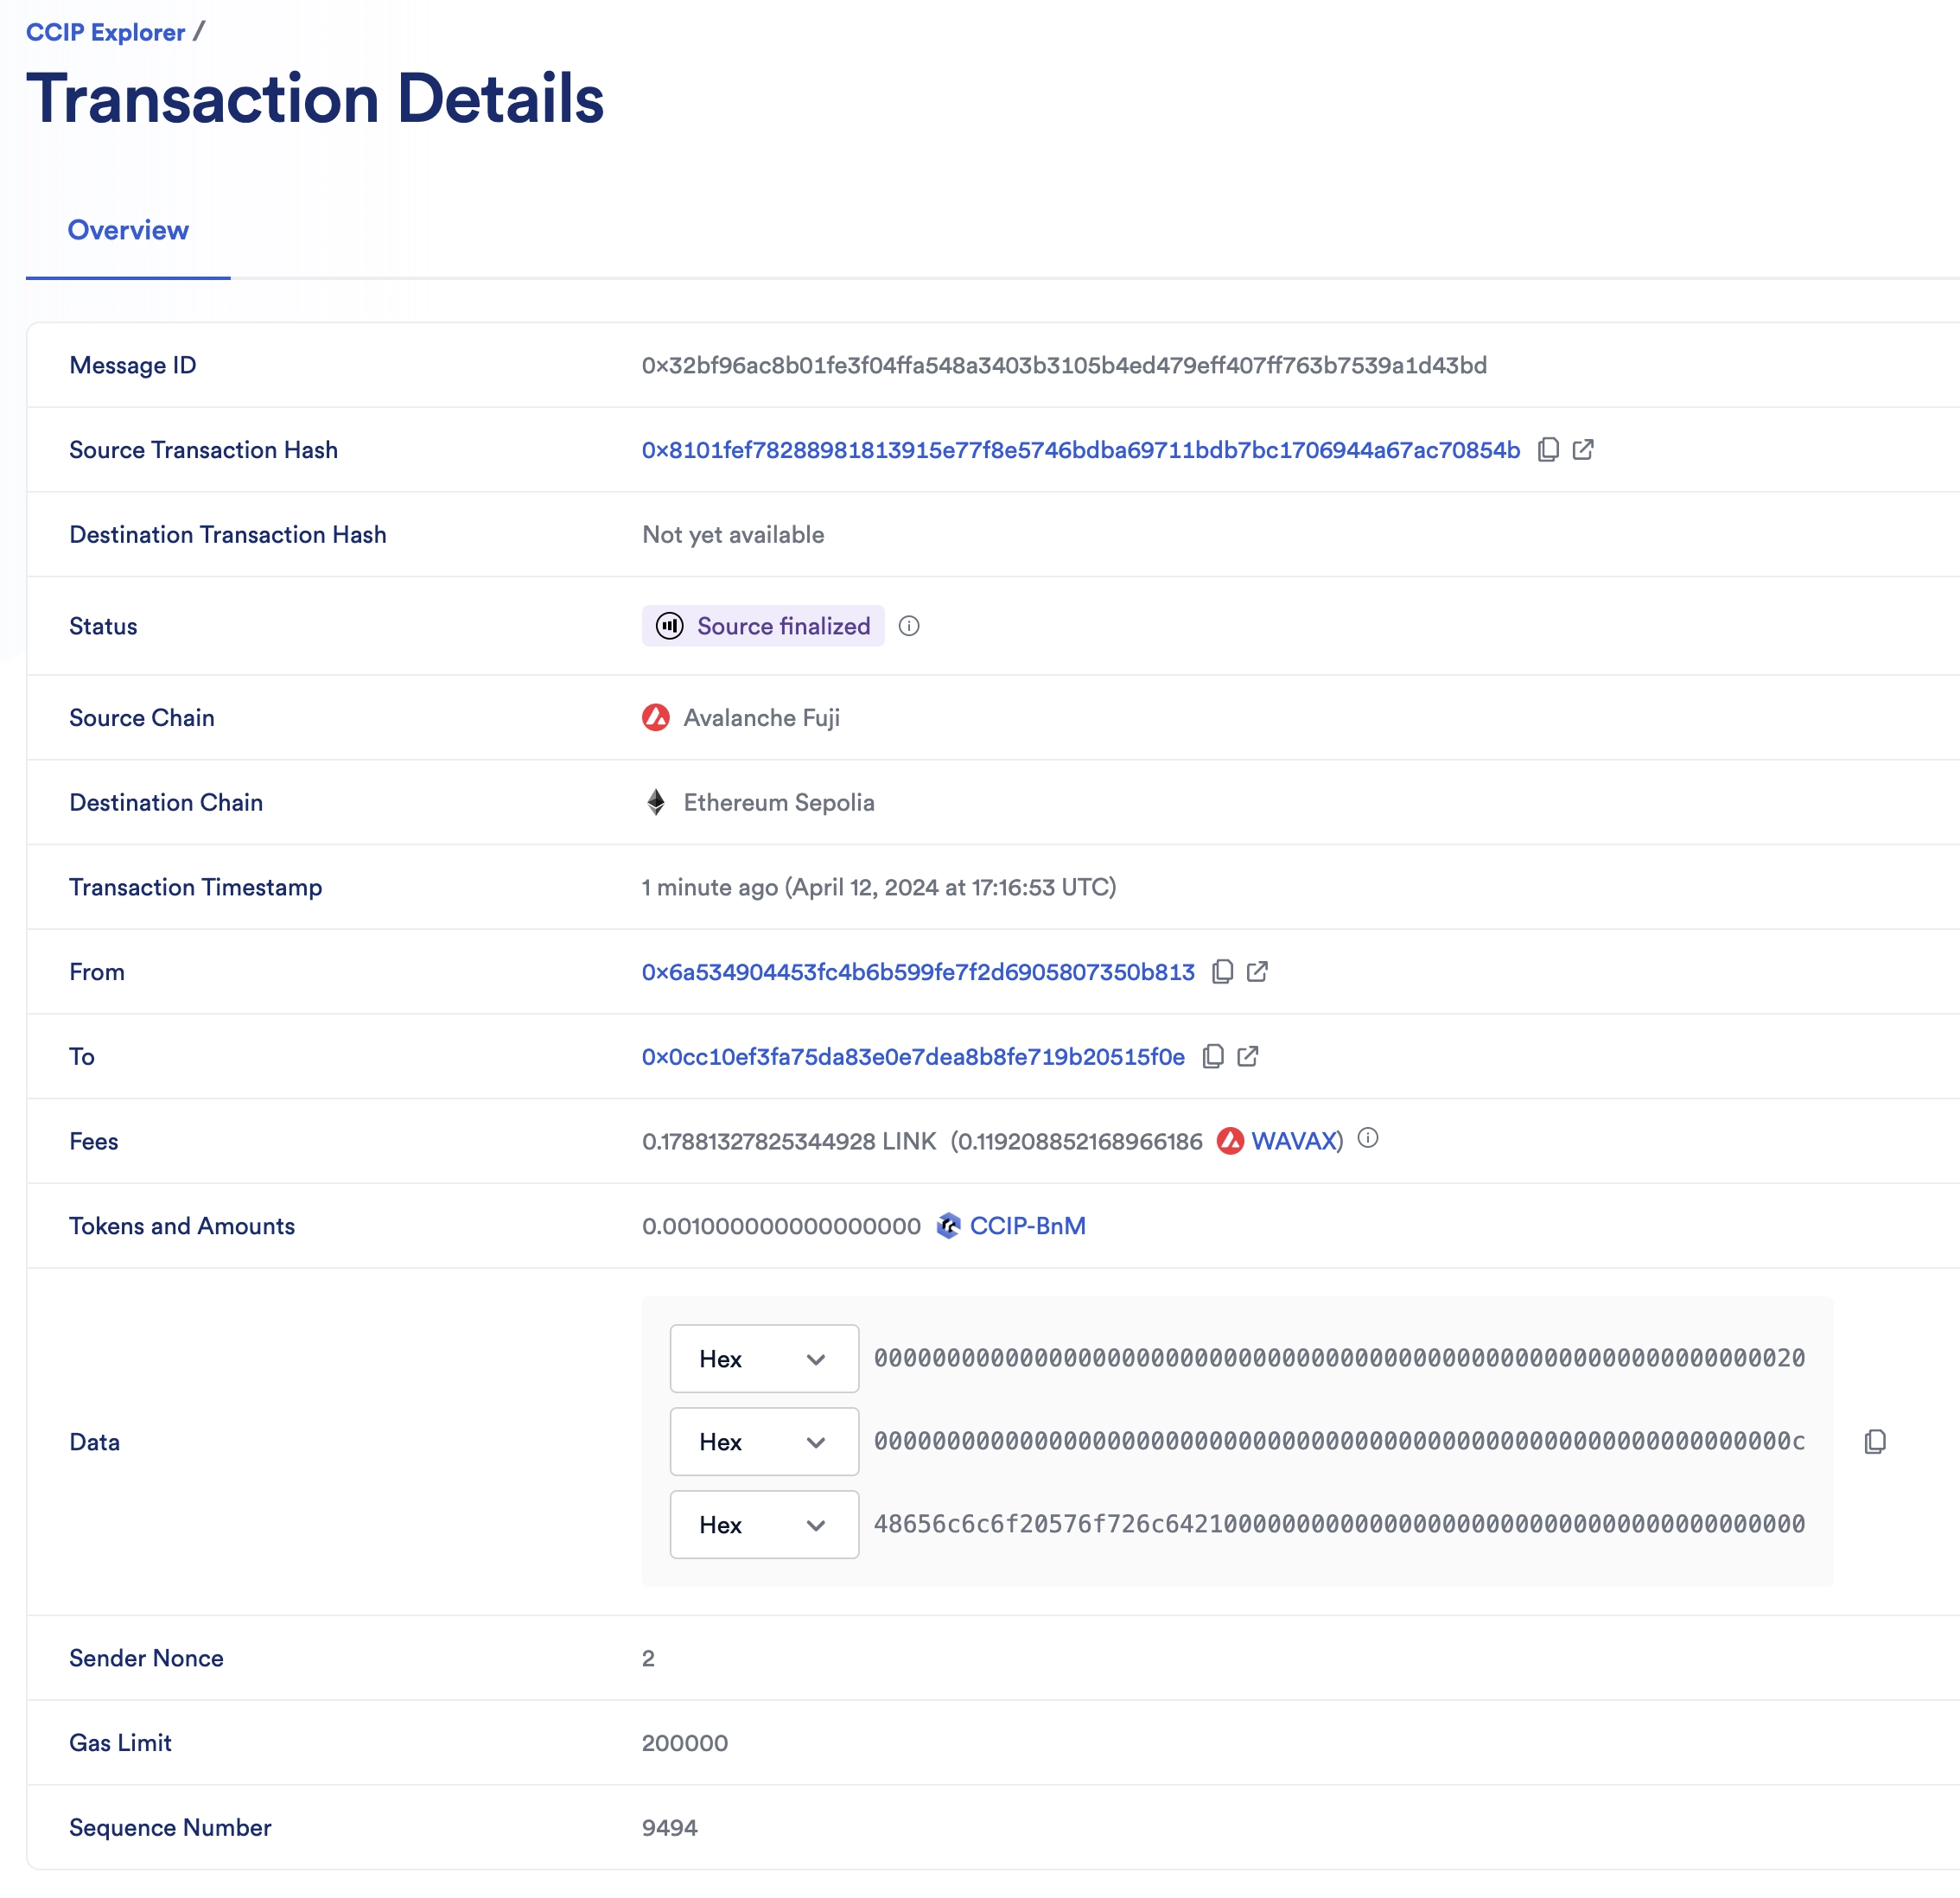
4. The CCIP transaction is completed once the status is marked as "Success". In this example, the CCIP message ID is _0x32bf96ac8b01fe3f04ffa548a3403b3105b4ed479eff407ff763b7539a1d43bd_. Note that CCIP fees are denominated in LINK. Even if CCIP fees are paid using native gas tokens, node operators will be paid in LINK.

5. Check the receiver contract on the destination chain:
1. Open MetaMask and select the network _Ethereum Sepolia_.
2. In Remix IDE, under _Deploy & Run Transactions_, open the list of functions of your smart contract deployed on _Ethereum Sepolia_.
3. Call the `getLastReceivedMessageDetails` function.
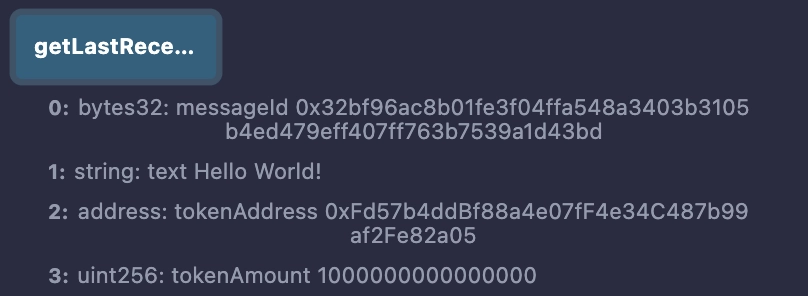
4. Notice the received messageId is _0x32bf96ac8b01fe3f04ffa548a3403b3105b4ed479eff407ff763b7539a1d43bd_, the received text is _Hello World!_, the token address is _0xFd57b4ddBf88a4e07fF4e34C487b99af2Fe82a05_ (CCIP-BnM token address on _Ethereum Sepolia_) and the token amount is 1000000000000000 (0.001 CCIP-BnM).
**Note**: These example contracts are designed to work bi-directionally. As an exercise, you can use them to transfer tokens with data from _Avalanche Fuji_ to _Ethereum Sepolia_ and from _Ethereum Sepolia_ back to _Avalanche Fuji_.
## [Explanation](https://docs.chain.link/ccip/tutorials/evm/programmable-token-transfers\#explanation)
The smart contract featured in this tutorial is designed to interact with CCIP to transfer and receive tokens and data. The contract code contains supporting comments clarifying the functions, events, and underlying logic. Here we will further explain initializing the contract and sending data with tokens.
### [Initializing the contract](https://docs.chain.link/ccip/tutorials/evm/programmable-token-transfers\#initializing-the-contract)
When deploying the contract, we define the router address and LINK contract address of the blockchain we deploy the contract on.
Defining the router address is useful for the following:
- Sender part:
- Calls the router's `getFee` [function](https://docs.chain.link/ccip/api-reference/evm/v1.6.0/i-router-client#getfee) to estimate the CCIP fees.
- Calls the router's `ccipSend` [function](https://docs.chain.link/ccip/api-reference/evm/v1.6.0/i-router-client#ccipsend) to send CCIP messages.
- Receiver part:
- The contract inherits from [CCIPReceiver](https://docs.chain.link/ccip/api-reference/evm/v1.6.0/ccip-receiver), which serves as a base contract for receiver contracts. This contract requires that child contracts implement the `_ccipReceive` [function](https://docs.chain.link/ccip/api-reference/evm/v1.6.0/ccip-receiver#_ccipreceive). `_ccipReceive` is called by the `ccipReceive` [function](https://docs.chain.link/ccip/api-reference/evm/v1.6.0/ccip-receiver#ccipreceive), which ensures that only the router can deliver CCIP messages to the receiver contract.
### [Transferring tokens and data and pay in LINK](https://docs.chain.link/ccip/tutorials/evm/programmable-token-transfers\#transferring-tokens-and-data-and-pay-in-link)
The `sendMessagePayLINK` function undertakes six primary operations:
1. Call the `_buildCCIPMessage` private function to construct a CCIP-compatible message using the `EVM2AnyMessage` [struct](https://docs.chain.link/ccip/api-reference/evm/v1.6.0/client#any2evmmessage):
- The `_receiver` address is encoded in bytes to accommodate non-EVM destination blockchains with distinct address formats. The encoding is achieved through [abi.encode](https://docs.soliditylang.org/en/develop/abi-spec.html).
- The `data` is encoded from a `string` to `bytes` using [abi.encode](https://docs.soliditylang.org/en/develop/abi-spec.html).
- The `tokenAmounts` is an array, with each element comprising an `EVMTokenAmount` [struct](https://docs.chain.link/ccip/api-reference/evm/v1.6.0/client#evmtokenamount) containing the token address and amount. The array contains one element where the `_token` (token address) and `_amount` (token amount) are passed by the user when calling the `sendMessagePayLINK` function.
- The `extraArgs` specifies the `gasLimit` for relaying the message to the recipient contract on the destination blockchain. In this example, the `gasLimit` is set to \`200000.
- The `_feeTokenAddress` designates the token address used for CCIP fees. Here, `address(linkToken)` signifies payment in LINK.
2. Computes the fees by invoking the router's `getFee` [function](https://docs.chain.link/ccip/api-reference/evm/v1.6.0/i-router-client#getfee).
3. Ensures your contract balance in LINK is enough to cover the fees.
4. Grants the router contract permission to deduct the fees from the contract's LINK balance.
5. Grants the router contract permission to deduct the amount from the contract's _CCIP-BnM_ balance.
6. Dispatches the CCIP message to the destination chain by executing the router's `ccipSend` [function](https://docs.chain.link/ccip/api-reference/evm/v1.6.0/i-router-client#ccipsend).
**Note**: As a security measure, the `sendMessagePayLINK` function is protected by the `onlyAllowlistedDestinationChain`, ensuring the contract owner has allowlisted a destination chain.
### [Transferring tokens and data and pay in native](https://docs.chain.link/ccip/tutorials/evm/programmable-token-transfers\#transferring-tokens-and-data-and-pay-in-native)
The `sendMessagePayNative` function undertakes five primary operations:
1. Call the `_buildCCIPMessage` private function to construct a CCIP-compatible message using the `EVM2AnyMessage` [struct](https://docs.chain.link/ccip/api-reference/evm/v1.6.0/client#any2evmmessage):
- The `_receiver` address is encoded in bytes to accommodate non-EVM destination blockchains with distinct address formats. The encoding is achieved through [abi.encode](https://docs.soliditylang.org/en/develop/abi-spec.html).
- The `data` is encoded from a `string` to `bytes` using [abi.encode](https://docs.soliditylang.org/en/develop/abi-spec.html).
- The `tokenAmounts` is an array, with each element comprising an `EVMTokenAmount` [struct](https://docs.chain.link/ccip/api-reference/evm/v1.6.0/client#evmtokenamount) containing the token address and amount. The array contains one element where the `_token` (token address) and `_amount` (token amount) are passed by the user when calling the `sendMessagePayNative` function.
- The `extraArgs` specifies the `gasLimit` for relaying the message to the recipient contract on the destination blockchain. In this example, the `gasLimit` is set to \`200000.
- The `_feeTokenAddress` designates the token address used for CCIP fees. Here, `address(0)` signifies payment in native gas tokens (ETH).
2. Computes the fees by invoking the router's `getFee` [function](https://docs.chain.link/ccip/api-reference/evm/v1.6.0/i-router-client#getfee).
3. Ensures your contract balance in native gas is enough to cover the fees.
4. Grants the router contract permission to deduct the amount from the contract's _CCIP-BnM_ balance.
5. Dispatches the CCIP message to the destination chain by executing the router's `ccipSend` [function](https://docs.chain.link/ccip/api-reference/evm/v1.6.0/i-router-client#ccipsend). **Note**: `msg.value` is set because you pay in native gas.
**Note**: As a security measure, the `sendMessagePayNative` function is protected by the `onlyAllowlistedDestinationChain`, ensuring the contract owner has allowlisted a destination chain.
### [Receiving messages](https://docs.chain.link/ccip/tutorials/evm/programmable-token-transfers\#receiving-messages)
On the destination blockchain, the router invokes the `_ccipReceive` [function](https://docs.chain.link/ccip/api-reference/evm/v1.6.0/ccip-receiver#_ccipreceive) which expects a `Any2EVMMessage` [struct](https://docs.chain.link/ccip/api-reference/evm/v1.6.0/client#any2evmmessage) that contains:
- The CCIP `messageId`.
- The `sourceChainSelector`.
- The `sender` address in bytes format. Given that the sender is known to be a contract deployed on an EVM-compatible blockchain, the address is decoded from bytes to an Ethereum address using the [ABI specifications](https://docs.soliditylang.org/en/v0.8.20/abi-spec.html).
- The `tokenAmounts` is an array containing received tokens and their respective amounts. Given that only one token transfer is expected, the first element of the array is extracted.
- The `data`, which is also in bytes format. Given a `string` is expected, the data is decoded from bytes to a string using the [ABI specifications](https://docs.soliditylang.org/en/v0.8.20/abi-spec.html).
**Note**: Three important security measures are applied:
- `_ccipReceive` is called by the `ccipReceive` [function](https://docs.chain.link/ccip/api-reference/evm/v1.6.0/ccip-receiver#ccipreceive), which ensures that only the router can deliver CCIP messages to the receiver contract. See the `onlyRouter` [modifier](https://docs.chain.link/ccip/api-reference/evm/v1.6.0/ccip-receiver#onlyrouter) for more information.
- The modifier `onlyAllowlisted` ensures that only a call from an allowlisted source chain and sender is accepted.
## What's next
- [\> Learn how to manually execute a failed CCIP transaction](https://docs.chain.link/ccip/tutorials/evm/manual-execution)
- [\> Learn how to handle errors gracefully when making CCIP transactions](https://docs.chain.link/ccip/tutorials/evm/programmable-token-transfers-defensive)
- [\> Transfer Tokens Between EOAs](https://docs.chain.link/ccip/tutorials/evm/offchain/transfer-tokens-from-eoa)
- [\> See example cross-chain dApps and tools](https://docs.chain.link/ccip/examples)
- [\> CCIP Directory](https://docs.chain.link/ccip/directory)
- [\> Learn CCIP best practices](https://docs.chain.link/ccip/concepts/best-practices/evm)
## Get the latest Chainlink content straight to your inbox.
Email Address
## Chainlink CCIP API
[iframe](https://www.googletagmanager.com/ns.html?id=GTM-N6DQ47T)
Chainlink CCIP is now officially live on Solana. [View lanes and tokens.](https://docs.chain.link/ccip/directory/mainnet/chain/solana-mainnet?utm_medium=referral&utm_source=chainlink-docs&utm_campaign=solana-ccip)
On this page
# [CCIP v1.5.1 API Reference](https://docs.chain.link/ccip/api-reference/evm/v151\#overview)
## [API References](https://docs.chain.link/ccip/api-reference/evm/v151\#api-references)
### [Core Components](https://docs.chain.link/ccip/api-reference/evm/v151\#core-components)
- [CCIPReceiver](https://docs.chain.link/ccip/api-reference/evm/v1.5.1/ccip-receiver) \- Base contract for receiving CCIP messages
- [Client](https://docs.chain.link/ccip/api-reference/evm/v1.5.1/client) \- Library providing structs and types for building CCIP messages
- [IRouterClient](https://docs.chain.link/ccip/api-reference/evm/v1.5.1/i-router-client) \- Interface for sending messages through CCIP
- [Pool](https://docs.chain.link/ccip/api-reference/evm/v1.5.1/pool) \- Library providing token pool functions for cross-chain operations
- [RateLimiter](https://docs.chain.link/ccip/api-reference/evm/v1.5.1/rate-limiter) \- Contract for managing rate limits on token transfers
- [TypeAndVersion](https://docs.chain.link/ccip/api-reference/evm/v1.5.1/i-type-and-version) \- Interface for contract versioning
### [Token Pools](https://docs.chain.link/ccip/api-reference/evm/v151\#token-pools)
- [BurnFromMintTokenPool](https://docs.chain.link/ccip/api-reference/evm/v1.5.1/burn-from-mint-token-pool) \- Implementation using `burnFrom(address, amount)` for token burning
- [BurnMintERC20](https://docs.chain.link/ccip/api-reference/evm/v1.5.1/burn-mint-erc20) \- Implementation for burning and minting ERC20 tokens
- [BurnMintTokenPool](https://docs.chain.link/ccip/api-reference/evm/v1.5.1/burn-mint-token-pool) \- Implementation using `burn(amount)` for token burning
- [BurnMintTokenPoolAbstract](https://docs.chain.link/ccip/api-reference/evm/v1.5.1/burn-mint-token-pool-abstract) \- Abstract contract for burn/mint token handling
- [LockReleaseTokenPool](https://docs.chain.link/ccip/api-reference/evm/v1.5.1/lock-release-token-pool) \- Implementation for locking and releasing tokens on their native chain
- [TokenPool](https://docs.chain.link/ccip/api-reference/evm/v1.5.1/token-pool) \- Base abstract class defining common functionality for all token pools
### [Access Control](https://docs.chain.link/ccip/api-reference/evm/v151\#access-control)
- [Ownable2Step](https://docs.chain.link/ccip/api-reference/evm/v1.5.1/ownable-2-step) \- Base contract implementing secure two-step ownership transfer
- [Ownable2StepMsgSender](https://docs.chain.link/ccip/api-reference/evm/v1.5.1/ownable-2-step-msg-sender) \- Extension of Ownable2Step that sets msg.sender as initial owner
### [Registry Components](https://docs.chain.link/ccip/api-reference/evm/v151\#registry-components)
- [RegistryModuleOwnerCustom](https://docs.chain.link/ccip/api-reference/evm/v1.5.1/registry-module-owner-custom) \- Registry module for token admin registration
- [TokenAdminRegistry](https://docs.chain.link/ccip/api-reference/evm/v1.5.1/token-admin-registry) \- Contract for storing token pool configurations
### [Error Handling](https://docs.chain.link/ccip/api-reference/evm/v151\#error-handling)
- [Errors](https://docs.chain.link/ccip/api-reference/evm/v1.5.1/errors) \- Comprehensive list of CCIP error codes and their descriptions
## Get the latest Chainlink content straight to your inbox.
Email Address
## CCIP Explorer
[iframe](https://www.googletagmanager.com/ns.html?id=GTM-N6DQ47T)
On this page
# [CCIP Explorer](https://docs.chain.link/ccip/tools-resources/ccip-explorer\#overview)
The [Chainlink CCIP Explorer](https://ccip.chain.link/) is a web interface for tracking the status of cross-chain messages.
## [Key Features](https://docs.chain.link/ccip/tools-resources/ccip-explorer\#key-features)
- **Transaction Tracking**: View the latest CCIP transactions processed across supported blockchains. You can search for specific transactions using their unique Message ID.
- **Network & Lane Status**: Observe the status of supported blockchains.
Use the CCIP Explorer to gain insights into message processing times, monitor network health, and confirm the successful execution of your cross-chain transactions.
## Get the latest Chainlink content straight to your inbox.
Email Address
## Optimize CCIP Gas Limits
[iframe](https://www.googletagmanager.com/ns.html?id=GTM-N6DQ47T)
Chainlink CCIP is now officially live on Solana. [View lanes and tokens.](https://docs.chain.link/ccip/directory/mainnet/chain/solana-mainnet?utm_medium=referral&utm_source=chainlink-docs&utm_campaign=solana-ccip)
On this page
# [Optimizing Gas Limit Settings in CCIP Messages](https://docs.chain.link/ccip/tutorials/evm/ccipreceive-gaslimit\#overview)
When constructing a [CCIP message](https://docs.chain.link/ccip/api-reference/evm/v1.6.0/client#evm2anymessage), it's crucial to set the gas limit accurately. The gas limit represents the maximum amount of gas consumed to execute the [`ccipReceive`](https://docs.chain.link/ccip/api-reference/evm/v1.6.0/ccip-receiver#ccipreceive) function on the CCIP Receiver, which influences the transaction fees for sending a CCIP message. Notably, unused gas is not reimbursed, making it essential to estimate the gas limit carefully:
- Setting the gas limit too low will cause the transaction to revert when CCIP calls `ccipReceive` on the CCIP Receiver, which requires a manual re-execution with an increased gas limit. For more details about this scenario, read the [Manual Execution](https://docs.chain.link/ccip/tutorials/evm/manual-execution) guide.
- Conversely, an excessively high gas limit leads to higher fees.
This tutorial shows you how to estimate the gas limit for the `ccipReceive` function using various methods. You will learn how to use a CCIP Receiver where the gas consumption of the `ccipReceive` function varies based on the input data. This example emphasizes the need for testing under diverse conditions. This tutorial includes tasks for the following environments:
1. **Local Environment**: Using [Hardhat](https://hardhat.org/) and [Foundry](https://book.getfoundry.sh/) on a local blockchain provides a swift initial gas estimate. However, different frameworks can yield different results and the local environment will not always be representative of your destination blockchain. Consider these figures to be preliminary estimates. Then, incorporate a buffer and conduct subsequent validations on a testnet.
2. **Testnet**: You can precisely determine the required gas limit by deploying your CCIP Sender and Receiver on a testnet and transmitting several CCIP messages with the previously estimated gas. Although this approach is more time-intensive, especially if testing across multiple blockchains, it offers enhanced accuracy.
3. **Offchain Methods**: Estimating gas with an offchain Web3 provider or tools like [Tenderly](https://docs.tenderly.co/) offers the most accurate and swift way to determine the needed gas limit.
These approaches will give you insights into accurately estimating the gas limit for the `ccipReceive` function, ensuring cost-effective CCIP transactions.
Before you begin, open a terminal, clone the [smart-contract-examples repository](https://github.com/smartcontractkit/smart-contract-examples), and navigate to the `smart-contract-examples/ccip/estimate-gas` directory.

```bash
git clone https://github.com/smartcontractkit/smart-contract-examples.git && \
cd smart-contract-examples/ccip/estimate-gas
```
## [Examine the code](https://docs.chain.link/ccip/tutorials/evm/ccipreceive-gaslimit\#examine-the-code)
The source code for the CCIP Sender and Receiver is located in the `contracts` directory for Hardhat projects and in the `src` directory for Foundry projects. The code includes detailed comments for clarity and is designed to ensure self-explanatory functionality. This section focuses on the `_ccipReceive` function:

```solidity
function _ccipReceive(Client.Any2EVMMessage memory any2EvmMessage) internal override {
uint256 iterations = abi.decode(any2EvmMessage.data, (uint256));
uint256 result = iterations;
uint256 maxIterations = iterations % 100;
for (uint256 i = 0; i < maxIterations; i++) {
result += i;
}
emit MessageReceived(
any2EvmMessage.messageId,
any2EvmMessage.sourceChainSelector,
abi.decode(any2EvmMessage.sender, (address)),
iterations,
maxIterations,
result
);
}
```
The `_ccipReceive` function operates as follows:
1. **Input Processing:** The function accepts a `Client.Any2EVMMessage`. The first step involves decoding the number of iterations from the message's data using ABI decoding.
2. **Logic Execution:** It initializes the `result` variable with the number of iterations. The function calculates `maxIterations` by taking the modulo of iterations with 100, which sets an upper limit for iteration. This step is a safeguard to ensure that the function does not run out of gas.
3. **Iteration:** The function executes a loop from 0 to `maxIterations`, simulating variable computational work based on the input data. This variability directly influences gas consumption.
4. **Event Emission:** Finally, an event `MessageReceived` is emitted.
This code shows how gas consumption for the `_ccipReceive` function can fluctuate in response to the input data, highlighting the necessity for thorough testing under different scenarios to determine the correct `gasLimit`.
## [Gas estimation in a local environment](https://docs.chain.link/ccip/tutorials/evm/ccipreceive-gaslimit\#gas-estimation-in-a-local-environment)
To facilitate testing within a local environment, you will use the [MockCCIPRouter](https://github.com/smartcontractkit/chainlink-ccip/blob/contracts-ccip-release/1.6.0/chains/evm/contracts/test/mocks/MockRouter.sol) contract. This contract serves as a mock implementation of the CCIP Router contract, enabling the local testing of CCIP Sender and Receiver contracts.
A notable feature of the `MockCCIPRouter` contract is its ability to emit a `MsgExecuted` event:

```solidity
event MsgExecuted(bool success, bytes retData, uint256 gassed))
```
This event reports the amount of gas consumed by the `ccipReceive` function.
### [Foundry](https://docs.chain.link/ccip/tutorials/evm/ccipreceive-gaslimit\#foundry)
#### [Prerequisites](https://docs.chain.link/ccip/tutorials/evm/ccipreceive-gaslimit\#prerequisites)
1. In your terminal, change to the `foundry` directory:

```bash
cd foundry
```
2. Ensure Foundry is [installed](https://book.getfoundry.sh/getting-started/installation).
3. Check the Foundry version:

```bash
forge --version
```
The output should be similar to the following:

```text
forge 0.2.0 (545cd0b 2024-03-14T00:20:00.210934000Z)
```
You need version 0.2.0 or above. Run `foundryup` to update Foundry if necessary.
4. Build your project:

```bash
forge build
```
The output should be similar to:

```text
[⠊] Compiling...
[⠔] Compiling 52 files with 0.8.19
[⠑] Solc 0.8.19 finished in 2.55s
Compiler run successful!
```
#### [Estimate gas](https://docs.chain.link/ccip/tutorials/evm/ccipreceive-gaslimit\#estimate-gas)
Located in the `test` directory, the `SendReceive.t.sol` test file assesses the gas consumption of the `ccipReceive` function. This file features a test case that sends a CCIP message to the `MockCCIPRouter` contract, which triggers the `MsgExecuted` event. This event provides insights into the gas requirements of the `ccipReceive` function by detailing the amount of gas consumed. The test case explores three scenarios to examine gas usage comprehensively across various operational conditions:
- **Baseline gas consumption:** This scenario runs `0` iteration to determine the baseline gas consumption, representing the least amount of gas required.
- **Average gas consumption:** This scenario runs `50` iterations to estimate the gas consumption under average operational conditions.
- **Peak gas consumption:** This scenario runs `99` iterations to estimate the peak gas consumption, marking the upper limit of gas usage.
To run the test, execute the following command:

```bash
forge test -vv --isolate
```
Output example:

```text
[⠊] Compiling...
[⠘] Compiling 52 files with 0.8.19
[⠃] Solc 0.8.19 finished in 2.72s
Compiler run successful!
Ran 3 tests for test/SendReceive.t.sol:SenderReceiverTest
[PASS] test_SendReceiveAverage() (gas: 125166)
Logs:
Number of iterations 50 - Gas used: 14740
[PASS] test_SendReceiveMax() (gas: 134501)
Logs:
Number of iterations 99 - Gas used: 24099
[PASS] test_SendReceiveMin() (gas: 115581)
Logs:
Number of iterations 0 - Gas used: 5190
Suite result: ok. 3 passed; 0 failed; 0 skipped; finished in 10.84ms (5.28ms CPU time)
Ran 1 test suite in 188.81ms (10.84ms CPU time): 3 tests passed, 0 failed, 0 skipped (3 total tests)
```
This table summarizes the gas usage for different iterations:
| Scenario | Number of iterations | Gas used |
| --- | --- | --- |
| Baseline gas consumption | 0 | 5190 |
| Average gas consumption | 50 | 14740 |
| Peak gas consumption | 99 | 24099 |
The output demonstrates that gas consumption increases with the number of iterations, peaking when the iteration count reaches `99`.
In the next section, you will compare these results with those obtained from a local Hardhat environment.
### [Hardhat](https://docs.chain.link/ccip/tutorials/evm/ccipreceive-gaslimit\#hardhat)
#### [Prerequisites](https://docs.chain.link/ccip/tutorials/evm/ccipreceive-gaslimit\#prerequisites-1)
1. In your terminal, navigate to the `hardhat` directory:

```bash
cd ../hardhat
```
2. Install the dependencies:

```bash
npm install
```
3. Set the password to encrypt your environment variables using the following command:

```bash
npx env-enc set-pw
```
4. Set the following environment variables to deploy contracts on testnets:
- `PRIVATE_KEY`: The private key for your testnet wallet. If you use MetaMask, follow the instructions to [Export a Private Key](https://support.metamask.io/hc/en-us/articles/360015289632-How-to-export-an-account-s-private-key). **Note:** Your private key is needed to sign any transactions you make such as making requests.
- `ETHEREUM_SEPOLIA_RPC_URL`: The RPC URL for Ethereum Sepolia testnet. You can sign up for a personal endpoint from [Alchemy](https://www.alchemy.com/), [Infura](https://www.infura.io/), or another node provider service.
- `AVALANCHE_FUJI_RPC_URL`: The RPC URL for Avalanche Fuji testnet. You can sign up for a personal endpoint from [Infura](https://www.infura.io/) or another node provider service.
- `ETHERSCAN_API_KEY`: An Ethereum explorer API key, used to verify your contract. Follow [this guide](https://docs.etherscan.io/getting-started/viewing-api-usage-statistics) to get one from Etherscan.
Input these variables using the following command:

```bash
npx env-enc set
```
5. Compile the contracts:

```bash
npx hardhat compile
```
The output should be similar to:

```text
Generating typings for: 31 artifacts in dir: typechain-types for target: ethers-v6
Successfully generated 114 typings!
Compiled 33 Solidity files successfully (evm target: paris).
```
#### [Estimate gas](https://docs.chain.link/ccip/tutorials/evm/ccipreceive-gaslimit\#estimate-gas-1)
Located in the `test` directory, the `Send-Receive.ts` test file is designed to evaluate the gas usage of the `ccipReceive` function. This file employs the same logic as the Foundry test file, featuring three scenarios varying by the number of iterations. The test case transmits a CCIP message to the `MockCCIPRouter` contract, triggering the `MsgExecuted` event. This event provides insights into the gas requirements of the `ccipReceive` function by detailing the amount of gas used.
To run the test, execute the following command:

```bash
npx hardhat test
```
Example of the output:

```text
Sender and Receiver
Final Gas Usage Report:
Number of iterations 0 - Gas used: 5168
Number of iterations 50 - Gas used: 14718
Number of iterations 99 - Gas used: 24077
✔ should CCIP message from sender to receiver (1716ms)
1 passing (2s)
```
This table summarizes the gas usage across different iterations:
| Scenario | Number of iterations | Gas used |
| --- | --- | --- |
| Baseline gas consumption | 0 | 5168 |
| Average gas consumption | 50 | 14718 |
| Peak gas consumption | 99 | 24077 |
The output demonstrates that gas consumption increases with the number of iterations, peaking when the iteration count reaches `99`.
### [Compare the results from Foundry and Hardhat](https://docs.chain.link/ccip/tutorials/evm/ccipreceive-gaslimit\#compare-the-results-from-foundry-and-hardhat)
This table summarizes the gas usage for different iterations from both Foundry and Hardhat:
| Scenario | Number of iterations | Gas used (Foundry) | Gas used (Hardhat) |
| --- | --- | --- | --- |
| Baseline gas consumption | 0 | 5190 | 5168 |
| Average gas consumption | 50 | 14740 | 14718 |
| Peak gas consumption | 99 | 24099 | 24077 |
Gas usage trends across different iterations are consistent between Foundry and Hardhat and increase with the number of iterations, reaching a peak at 99. However, slight variations in gas usage between the two environments at each iteration level demonstrate the importance of extending gas usage estimation beyond local environment testing. To accurately determine the appropriate gas limit, it is recommended to conduct additional validations on the target blockchain. Setting the gas limit with a buffer is advisable to account for differences between local environment estimations and actual gas usage on the target blockchain.
### [Estimate gas usage on your local environment](https://docs.chain.link/ccip/tutorials/evm/ccipreceive-gaslimit\#estimate-gas-usage-on-your-local-environment)
Now that you've locally estimated the gas usage of the `ccipReceive` function using the provided projects, you can apply the same approach to your own Foundry or Hardhat project. This section will guide you through estimating gas usage in your Foundry or Hardhat project.
#### [Estimate `ccipReceive` gas usage locally in your Foundry project](https://docs.chain.link/ccip/tutorials/evm/ccipreceive-gaslimit\#estimate-ccipreceive-gas-usage-locally-in-your-foundry-project)
To estimate the gas usage of the `ccipReceive` function within your own Foundry project, follow these steps:
1. Create a testing file in the `test` directory of your project and import the [`MockCCIPRouter`](https://github.com/smartcontractkit/chainlink-ccip/blob/contracts-ccip-release/1.6.0/chains/evm/contracts/test/mocks/MockRouter.sol) contract:

```solidity
import {MockCCIPRouter} from "@chainlink/contracts-ccip/contracts/test/mocks/MockRouter.sol";
```
**_Note_:** The `MockCCIPRouter` receives the CCIP message from your CCIP Sender, calls the `ccipReceive` function on your CCIP Receiver, and emits the `MsgExecuted` event with the gas used.
2. Inside the `setUp` function, deploy the `MockCCIPRouter` contract, and use its address to deploy your CCIP Sender and CCIP Receiver contracts. For more details, check this [example](https://github.com/smartcontractkit/smart-contract-examples/blob/main/ccip/estimate-gas/foundry/test/SendReceive.t.sol#L23).
3. In your test cases:
1. Before transmitting any CCIP messages, use `vm.recordLogs()` to start capturing events. For more details, check this [example](https://github.com/smartcontractkit/smart-contract-examples/blob/main/ccip/estimate-gas/foundry/test/SendReceive.t.sol#L39).
2. After sending the CCIP message, use `vm.getRecordedLogs()` to collect the recorded logs. For more details, check this [example](https://github.com/smartcontractkit/smart-contract-examples/blob/4b3800967e475ecd990fd417bec9960dd9ebe2af/ccip/estimate-gas/foundry/test/SendReceive.t.sol#L47C32-L47C52).
3. Parse the logs to find the `MsgExecuted(bool,bytes,uint256)` event and extract the gas used. For more details, check this [example](https://github.com/smartcontractkit/smart-contract-examples/blob/main/ccip/estimate-gas/foundry/test/SendReceive.t.sol#L53).
#### [Estimate `ccipReceive` gas usage locally in your Hardhat project](https://docs.chain.link/ccip/tutorials/evm/ccipreceive-gaslimit\#estimate-ccipreceive-gas-usage-locally-in-your-hardhat-project)
To estimate the gas usage of the `ccipReceive` function within your own Hardhat project, follow these steps:
1. Create a Solidity file in the `contracts` directory of your project and import the [`MockCCIPRouter`](https://github.com/smartcontractkit/chainlink-ccip/blob/contracts-ccip-release/1.6.0/chains/evm/contracts/test/mocks/MockRouter.sol) contract:

```solidity
import {MockCCIPRouter} from "@chainlink/contracts-ccip/contracts/test/mocks/MockRouter.sol";
```
**_Note_:** The `MockCCIPRouter` receives the CCIP message from your CCIP Sender, calls the `ccipReceive` function on your CCIP Receiver, and emits the `MsgExecuted` event with the gas used.
2. Create a testing file in your project's `test` directory.
3. Inside the `deployFixture` function, deploy the `MockCCIPRouter` contract and use its address to deploy your CCIP Sender and CCIP Receiver contracts. For more details, check this [example](https://github.com/smartcontractkit/smart-contract-examples/blob/4b3800967e475ecd990fd417bec9960dd9ebe2af/ccip/estimate-gas/hardhat/test/Send-Receive.ts#L14).
4. In your test cases:
1. Send the CCIP message to the `MockCCIPRouter` contract. For more details, check this [example](https://github.com/smartcontractkit/smart-contract-examples/blob/4b3800967e475ecd990fd417bec9960dd9ebe2af/ccip/estimate-gas/hardhat/test/Send-Receive.ts#L51).
2. Parse the logs to find the `MsgExecuted(bool,bytes,uint256)` event and extract the gas used. For more details, check this [example](https://github.com/smartcontractkit/smart-contract-examples/blob/main/ccip/estimate-gas/hardhat/test/Send-Receive.ts#L59).
## [Gas estimation on a testnet](https://docs.chain.link/ccip/tutorials/evm/ccipreceive-gaslimit\#gas-estimation-on-a-testnet)
To accurately validate your local environment's gas usage estimations, follow these steps:
1. Deploy and configure the CCIP Sender contract on the Avalanche Fuji testnet and the CCIP Receiver contract on the Ethereum Sepolia testnet.
2. Send several CCIP messages with the same number of iterations used in your local testing. For this purpose, use the `sendCCIPMessage.ts` script in the `scripts/testing` directory. This script includes a 10% buffer over the estimated gas usage to ensure a sufficient gas limit. Refer to the table below for the buffered gas limits for each iteration:
| Scenario | Number of iterations | Estimated gas usage (Hardhat) | Buffered gas limit (+10%) |
| --- | --- | --- | --- |
| Baseline gas consumption | 0 | 5168 | 5685 |
| Average gas consumption | 50 | 14718 | 16190 |
| Peak gas consumption | 99 | 24077 | 26485 |
3. Use [Tenderly](https://dashboard.tenderly.co/) to monitor and confirm that the transactions execute successfully within the buffered gas limits. Subsequently, compare the actual gas usage of the `ccipReceive` function on the Ethereum Sepolia testnet against the buffered limits to fine-tune the final gas limit.
This approach ensures that your gas limit settings are validated against real-world conditions on testnets, providing a more accurate and reliable estimation for deploying on live blockchains.
### [Deploy and configure the contracts](https://docs.chain.link/ccip/tutorials/evm/ccipreceive-gaslimit\#deploy-and-configure-the-contracts)
To deploy and configure the CCIP Sender contract on the Avalanche Fuji testnet and the CCIP Receiver contract on the Ethereum Sepolia testnet, follow the steps below. **Note**: Your account must have some ETH tokens on Ethereum Sepolia and AVAX tokens on Avalanche Fuji.
1. Deploy the CCIP Sender on the Avalanche Fuji testnet:

```bash
npx hardhat run scripts/deployment/deploySender.ts --network avalancheFuji
```
2. Deploy the CCIP Receiver on the Ethereum Sepolia testnet:

```bash
npx hardhat run scripts/deployment/deployReceiver.ts --network ethereumSepolia
```
3. Authorize the Sender to send messages to Ethereum Sepolia:

```bash
npx hardhat run scripts/configuration/allowlistingForSender.ts --network avalancheFuji
```
4. Authorize the Receiver to receive messages from the Sender:

```bash
npx hardhat run scripts/configuration/allowlistingForReceiver.ts --network ethereumSepolia
```
Upon completion, you will find the CCIP Sender and Receiver contracts deployed and configured on their respective testnets. Contract addresses are available in the `scripts/generatedData.json` file.
### [Send CCIP Messages](https://docs.chain.link/ccip/tutorials/evm/ccipreceive-gaslimit\#send-ccip-messages)
1. Send three CCIP messages with different numbers of iterations:

```bash
npx hardhat run scripts/testing/sendCCIPMessages.ts --network avalancheFuji
```
Example output:

```text
$ npx hardhat run scripts/testing/sendCCIPMessages.ts --network avalancheFuji
Approving 0x0b9d5D9136855f6FEc3c0993feE6E9CE8a297846 for 0x32A24e40851E19d1eD2a7E697d1a38228e9388a3. Allowance is 115792089237316195423570985008687907853269984665640564039457584007913129639935. Signer 0x9d087fC03ae39b088326b67fA3C788236645b717...
115792089237316195423570985008687907853269984665640564039457584007913129639935n
Number of iterations 0 - Gas limit: 5685 - Message Id: 0xf23b17366d69159ea7d502835c4178a1c1d1d6325edf3d91dca08f2c7a2900f7
Number of iterations 50 - Gas limit: 16190 - Message Id: 0x4b3a97f6ac959f67d769492ab3e0414e87fdd9c143228f9c538b22bb695ca728
Number of iterations 99 - Gas limit: 26485 - Message Id: 0x37d1867518c0f8c54ceb0c5507b46b8d44c6c53864218f448cba0234f8de867a
```
2. Open the [CCIP explorer](https://ccip.chain.link/), search each message by its ID, and wait for each message to be successfully transmitted ( `Status` in the explorer: `Success`).
For the example above, here are the destination transaction hashes:
| Message id | Ethereum Sepolia transaction hash |
| --- | --- |
| 0xf23b17366d69159ea7d502835c4178a1c1d1d6325edf3d91dca08f2c7a2900f7 | 0xf004eb6dab30b3cfb9d1d631c3f9832410b8d4b3179e65b85730563b67b1e689 |
| 0x4b3a97f6ac959f67d769492ab3e0414e87fdd9c143228f9c538b22bb695ca728 | 0xf004eb6dab30b3cfb9d1d631c3f9832410b8d4b3179e65b85730563b67b1e689 |
| 0x37d1867518c0f8c54ceb0c5507b46b8d44c6c53864218f448cba0234f8de867a | 0xf004eb6dab30b3cfb9d1d631c3f9832410b8d4b3179e65b85730563b67b1e689 |
**Note** that the Ethereum Sepolia transaction hash is the same for all the messages. This is because CCIP batched the messages.
### [Check the actual gas usage](https://docs.chain.link/ccip/tutorials/evm/ccipreceive-gaslimit\#check-the-actual-gas-usage)
1. Open [Tenderly](https://dashboard.tenderly.co/) and search for the [destination transaction hash](https://dashboard.tenderly.co/tx/sepolia/0xf004eb6dab30b3cfb9d1d631c3f9832410b8d4b3179e65b85730563b67b1e689).
2. Search for `_callWithExactGasSafeReturnData` with a payload containing your `messageId` (without `0x`). [Example](https://dashboard.tenderly.co/tx/sepolia/0xf004eb6dab30b3cfb9d1d631c3f9832410b8d4b3179e65b85730563b67b1e689?trace=0.8.4.2) for `0xf23b17366d69159ea7d502835c4178a1c1d1d6325edf3d91dca08f2c7a2900f7`.
3. Below the payload with your `messageId`, you will find the call trace from the Router to your Receiver contract. [Call trace example](https://dashboard.tenderly.co/tx/sepolia/0xf004eb6dab30b3cfb9d1d631c3f9832410b8d4b3179e65b85730563b67b1e689?trace=0.8.4.2.0).
4. Click on the _Debugger_ tab and you'll get the gas details:

```text
"gas":{
"gas_left":5685
"gas_used":5031
"total_gas_used":7994315
}
```
5. Note the `gas_left` is equal to the limit that is set in the `sendCCIPMessages.ts` script: `5685`. The `gas_used` is the actual gas used by the Receiver contract to process the message.
6. Repeating the same steps for the other two messages, we can summarize the output:
| Scenario | Number of iterations | Estimated gas usage (Hardhat) | Buffered gas limit (+10%) | Gas used on testnet |
| --- | --- | --- | --- | --- |
| Baseline gas consumption | 0 | 5168 | 5685 | 5031 |
| Average gas consumption | 50 | 14718 | 16190 | 14581 |
| Peak gas consumption | 99 | 24077 | 26485 | 23940 |
Testing on testnets has confirmed that a gas limit of 26,485 is adequate for the `ccipReceive` function to execute successfully under various conditions. However, it is important to note that gas usage may differ across testnets. Therefore, it is advisable to conduct similar validation efforts on the blockchain where you intend to deploy. Deploying and validating contracts across multiple testnets can be time-consuming. For efficiency, consider using [offchain methods](https://docs.chain.link/ccip/tutorials/evm/ccipreceive-gaslimit#offchain-methods) to estimate gas usage.
## [Offchain methods](https://docs.chain.link/ccip/tutorials/evm/ccipreceive-gaslimit\#offchain-methods)
This section guides you through estimating gas usage using two different offchain methods:
- A Web3 provider using the [ethers.js `estimateGas`](https://docs.ethers.org/v6/api/providers/#Provider-estimateGas) function.
- [Tenderly simulation API](https://docs.tenderly.co/reference/api#tag/Simulations/operation/simulateTransaction). The Tenderly simulation API provides a more accurate result (Read this [blog post](https://blog.tenderly.co/how-tenderly-enables-most-accurate-ethereum-gas-estimation/) to learn more) but you are limited to the blockchains supported by Tenderly.
These methods provide the most accurate and rapid means to determine the necessary gas limit for the `ccipReceive` function. You will use the same CCIP Receiver contract deployed on the Ethereum Sepolia testnet in the previous section.
### [Prerequisites](https://docs.chain.link/ccip/tutorials/evm/ccipreceive-gaslimit\#prerequisites-2)
1. In your terminal, navigate to the `offchain` directory:

```bash
cd ../offchain
```
2. Modify the `data.json` file to insert the deployed addresses of your Sender and Receiver contracts.
3. Install the dependencies:

```bash
npm install
```
4. Set the password to encrypt your environment variables:

```bash
npx env-enc set-pw
```
5. Set up the following environment variables:
- `ETHEREUM_SEPOLIA_RPC_URL`: The RPC URL for Ethereum Sepolia testnet. You can sign up for a personal endpoint from [Alchemy](https://www.alchemy.com/), [Infura](https://www.infura.io/), or another node provider service.
- `TENDERLY_ACCOUNT_SLUG`: This is one part of your Tenderly API URL. You can [find this value in your Tenderly account](https://docs.tenderly.co/account/projects/account-project-slug).
- `TENDERLY_PROJECT_SLUG`: This is one part of your Tenderly API URL. You can [find this value in your Tenderly account](https://docs.tenderly.co/account/projects/account-project-slug).
- `TENDERLY_ACCESS_KEY`: If you don't already have one, you can [generate a new access token](https://docs.tenderly.co/account/projects/how-to-generate-api-access-token).
Input these variables using the following command:

```bash
npx env-enc set
```
6. Generate [Typechain typings](https://www.npmjs.com/package/typechain) for the Receiver contract:

```bash
npm run generate-types
```
### [Introduction of the scripts](https://docs.chain.link/ccip/tutorials/evm/ccipreceive-gaslimit\#introduction-of-the-scripts)
The scripts are located in the `src` directory. Each script is self-explanatory and includes comprehensive comments to explain its functionality and usage. There are three scripts:
- `estimateGasProvider.ts`: This script uses the [`eth_estimateGas`](https://docs.alchemy.com/reference/eth-estimategas) Ethereum API to estimate the gas usage of the `ccipReceive` function. It simulates sending three CCIP messages to the Receiver contract with a varying number of iterations and estimates the gas usage using the [ethers.js `estimateGas`](https://docs.ethers.org/v6/api/providers/#Provider-estimateGas) function.
- `estimateGasTenderly.ts`: This script leverages the Tenderly `simulate` API to estimate the gas usage of the `ccipReceive` function. Similar to the previous script, it simulates sending three CCIP messages to the Receiver contract with different numbers of iterations and estimates the gas usage using the [Tenderly `simulate` API](https://docs.tenderly.co/reference/api#tag/Simulations/operation/simulateTransaction).
- `helper.ts`: This script contains helper functions used by the other scripts. The two main functions are:
- `buildTransactionData`: This function constructs a CCIP message for a specified number of iterations and then returns the transaction data.
- `estimateIntrinsicGas`: Exclusively called by the `estimateGasProvider.ts` script, this function estimates the intrinsic gas of a transaction. The intrinsic gas represents the minimum amount of gas required before executing a transaction. It is determined by the transaction data and the type of transaction. Since this gas is paid by the initiator of the transaction, we use this function to estimate the intrinsic gas and then deduct it from the total gas used to isolate the gas consumed by the `ccipReceive` function.
### [Estimate gas using a Web3 provider](https://docs.chain.link/ccip/tutorials/evm/ccipreceive-gaslimit\#estimate-gas-using-a-web3-provider)
Ethereum nodes implement the [`eth_estimateGas`](https://docs.alchemy.com/reference/eth-estimategas) Ethereum API to predict the gas required for a transaction's successful execution. To estimate the gas usage of the `ccipReceive` function, you can directly call the `eth_estimateGas` API via a Web3 provider or leverage a library like ethers.js, simplifying this interaction. This guide focuses on the [ethers.js `estimateGas`](https://docs.ethers.org/v6/api/providers/#Provider-estimateGas) function for gas estimation. To estimate the gas usage, execute the following command in your terminal:

```bash
npm run estimate-gas-provider
```
Example output:

```text
$ npm run estimate-gas-provider
> offchain-simulator@1.0.0 estimate-gas-provider
> ts-node src/estimateGasProvider.ts
Final Gas Usage Report:
Number of iterations 0 - Gas used: 5377
Number of iterations 50 - Gas used: 14946
Number of iterations 99 - Gas used: 24324
```
The estimate may exceed the actual gas used by the transaction for various reasons, including differences in node performance and EVM mechanics. For a more precise estimation, consider using Tenderly (see the next section for details).
### [Estimate gas using Tenderly](https://docs.chain.link/ccip/tutorials/evm/ccipreceive-gaslimit\#estimate-gas-using-tenderly)
To estimate the gas usage of the `ccipReceive` function using Tenderly, execute the following command:

```bash
npm run estimate-gas-tenderly
```
Example output:

```text
$ npm run estimate-gas-tenderly
> offchain-simulator@1.0.0 estimate-gas-tenderly
> ts-node src/estimateGasTenderly.ts
Final Gas Usage Report:
Number of iterations 0 - Gas used: 5031
Number of iterations 50 - Gas used: 14581
Number of iterations 99 - Gas used: 23940
```
### [Comparison](https://docs.chain.link/ccip/tutorials/evm/ccipreceive-gaslimit\#comparison)
The table below summarizes the gas estimations for different iterations using both Web3 provider and Tenderly:
| Scenario | Number of iterations | Gas estimated (Web3 provider) | Gas estimated (Tenderly) |
| --- | --- | --- | --- |
| Baseline gas consumption | 0 | 5377 | 5031 |
| Average gas consumption | 50 | 14946 | 14581 |
| Peak gas consumption | 99 | 24324 | 23940 |
The gas estimations from both Web3 provider and Tenderly are consistent across different iterations and align with actual testnet results. This demonstrates the accuracy and reliability of these offchain methods in estimating gas usage. However, you can notice that Tenderly provides more accurate results.
## [Conclusion](https://docs.chain.link/ccip/tutorials/evm/ccipreceive-gaslimit\#conclusion)
This tutorial has guided you through estimating the gas limit for the `ccipReceive` function using various methods. You have learned how to estimate gas usage in a local environment using Hardhat and Foundry, validate these estimations on testnets, and use offchain methods to estimate gas usage.
As we have explored various methods for estimating gas for the `ccipReceive` function, it is crucial to apply this knowledge effectively. Here are some targeted recommendations to enhance your approach to gas estimation:
1. **Comprehensive Testing:** Emphasize testing under diverse scenarios to ensure your gas estimations are robust. Different conditions can significantly affect gas usage, so covering as many cases as possible in your tests is crucial.
2. **Preliminary Local Estimates:** Local testing is a critical first step for estimating gas and ensuring your contracts function correctly under various scenarios. While Hardhat and Foundry facilitate development and testing, it's key to remember that these environments may not perfectly mirror your target blockchain's conditions. These initial estimates serve as valuable insights, guiding you toward more accurate gas limit settings when you proceed to testnet validations. Incorporating a buffer based on these preliminary results can help mitigate the risks of underestimating gas requirements due to environmental differences.
3. **Efficiency with Offchain Methods:** Since testing across different blockchains can be resource-intensive, leaning on offchain methods for gas estimation is invaluable. Tools such as Tenderly not only facilitate rapid and accurate gas usage insights on your target blockchains but also enable you to simulate the execution of the `ccipReceive` function on actual contracts deployed on mainnets. If Tenderly doesn't support a particular blockchain, a practical alternative is to use a Web3 provider that does support that chain, as illustrated in the [Estimate gas using a Web3 provider](https://docs.chain.link/ccip/tutorials/evm/ccipreceive-gaslimit#estimate-gas-using-a-web3-provider) section. This is particularly helpful when considering the diversity in gas metering rules across blockchains. This approach saves time and enhances the precision of your gas limit estimations, allowing for more cost-effective transactions from your dApp.
## Get the latest Chainlink content straight to your inbox.
Email Address
## Chainlink CCIP Directory
[iframe](https://www.googletagmanager.com/ns.html?id=GTM-N6DQ47T)
Chainlink CCIP is now officially live on Solana. [View lanes and tokens.](https://docs.chain.link/ccip/directory/mainnet/chain/solana-mainnet?utm_medium=referral&utm_source=chainlink-docs&utm_campaign=solana-ccip)
On this page
[CCIP Directory](https://docs.chain.link/ccip/directory/mainnet) [Ethereum](https://docs.chain.link/ccip/directory/mainnet/chain/mainnet)


# Ethereum
Router
[0x8022...6f7D](https://etherscan.io/address/0x80226fc0Ee2b096224EeAc085Bb9a8cba1146f7D "0x80226fc0Ee2b096224EeAc085Bb9a8cba1146f7D")
Chain selector

5009297550715157269
RMN

[0x411d...5e81](https://etherscan.io/address/0x411dE17f12D1A34ecC7F45f49844626267c75e81 "0x411dE17f12D1A34ecC7F45f49844626267c75e81")
Token admin registry

[0xb227...5Cb6](https://etherscan.io/address/0xb22764f98dD05c789929716D677382Df22C05Cb6 "0xb22764f98dD05c789929716D677382Df22C05Cb6")
Registry module owner

[0x4855...CA64](https://etherscan.io/address/0x4855174E9479E211337832E109E7721d43A4CA64 "0x4855174E9479E211337832E109E7721d43A4CA64")
Fee tokens

GHO
[0x40D1...6C2f](https://etherscan.io/address/0x40D16FC0246aD3160Ccc09B8D0D3A2cD28aE6C2f "0x40D16FC0246aD3160Ccc09B8D0D3A2cD28aE6C2f")

LINK
[0x5149...86CA](https://etherscan.io/address/0x514910771AF9Ca656af840dff83E8264EcF986CA "0x514910771AF9Ca656af840dff83E8264EcF986CA")

WETH
[0xC02a...6Cc2](https://etherscan.io/address/0xC02aaA39b223FE8D0A0e5C4F27eAD9083C756Cc2 "0xC02aaA39b223FE8D0A0e5C4F27eAD9083C756Cc2")

ETH
(native gas token)
Outbound lanesInbound lanes

| Destination network | OnRamp address | Status |
| --- | --- | --- |
| Abstract | [0x266e...7b8F](https://etherscan.io/address/0x266e520E272FCca3cE46A379a06Dc5ba62717b8F "0x266e520E272FCca3cE46A379a06Dc5ba62717b8F") | Loading... |
| Apechain | [0x48F8...1980](https://etherscan.io/address/0x48F836a7697c0082B2Ecb4B2639f6da79de21980 "0x48F836a7697c0082B2Ecb4B2639f6da79de21980") | Loading... |
| Arbitrum One | [0x69eC...c284](https://etherscan.io/address/0x69eCC4E2D8ea56E2d0a05bF57f4Fd6aEE7f2c284 "0x69eCC4E2D8ea56E2d0a05bF57f4Fd6aEE7f2c284") | Loading... |
| Astar | [0xD8E8...E252](https://etherscan.io/address/0xD8E8720709a3d9A18a9B281E6148E94149B2E252 "0xD8E8720709a3d9A18a9B281E6148E94149B2E252") | Loading... |
| Avalanche | [0xaFd3...9d8A](https://etherscan.io/address/0xaFd31C0C78785aDF53E4c185670bfd5376249d8A "0xaFd31C0C78785aDF53E4c185670bfd5376249d8A") | Loading... |
| B² | [0xddF4...234b](https://etherscan.io/address/0xddF4b4aF7A9603869C90189EFa8826683D0D234b "0xddF4b4aF7A9603869C90189EFa8826683D0D234b") | Loading... |
| Base | [0xb8a8...1937](https://etherscan.io/address/0xb8a882f3B88bd52D1Ff56A873bfDB84b70431937 "0xb8a882f3B88bd52D1Ff56A873bfDB84b70431937") | Loading... |
| Berachain | [0xBeFf...6c42](https://etherscan.io/address/0xBeFfEF56Cd6FA063d2e04E126cF1b93269886c42 "0xBeFfEF56Cd6FA063d2e04E126cF1b93269886c42") | Loading... |
| Bitlayer | [0x4FB5...05c5](https://etherscan.io/address/0x4FB5407d6911DaA0B8bde58A754E7D01CB8b05c5 "0x4FB5407d6911DaA0B8bde58A754E7D01CB8b05c5") | Loading... |
| Blast | [0x6751...4e36](https://etherscan.io/address/0x6751cA96b769129dFE6eB8E349c310deCEDb4e36 "0x6751cA96b769129dFE6eB8E349c310deCEDb4e36") | Loading... |
| BNB Chain | [0x9483...480d](https://etherscan.io/address/0x948306C220Ac325fa9392A6E601042A3CD0b480d "0x948306C220Ac325fa9392A6E601042A3CD0b480d") | Loading... |
| BOB | [0x1B96...195d](https://etherscan.io/address/0x1B960560324c03db5565545B353198fdd07A195d "0x1B960560324c03db5565545B353198fdd07A195d") | Loading... |
See more
## Tokens (110)
[Add my token](https://docs.chain.link/ccip/tutorials/evm/token-manager#verifying-your-token)
## Get the latest Chainlink content straight to your inbox.
Email Address
## Chainlink CCIP SVM Architecture
[iframe](https://www.googletagmanager.com/ns.html?id=GTM-N6DQ47T)
Chainlink CCIP is now officially live on Solana. [View lanes and tokens.](https://docs.chain.link/ccip/directory/mainnet/chain/solana-mainnet?utm_medium=referral&utm_source=chainlink-docs&utm_campaign=solana-ccip)
On this page
# [CCIP Onchain Architecture (SVM)](https://docs.chain.link/ccip/concepts/architecture/onchain/svm\#overview)
Chainlink CCIP's SVM onchain architecture consists of specialized Solana programs deployed on both source and destination chains. These components work together with CCIP's offchain infrastructure to provide end-to-end cross-chain interoperability.
- **[Overview](https://docs.chain.link/ccip/concepts/architecture/onchain/svm/overview)**: Provides a high-level introduction to CCIP's SVM-based architecture, including component diagrams, key roles, and a detailed walk-through of a message's lifecycle from source to destination chain.
- **[Components](https://docs.chain.link/ccip/concepts/architecture/onchain/svm/components)**: Describes each architectural component in detail.
- **[Upgradability](https://docs.chain.link/ccip/concepts/architecture/onchain/svm/upgradability)**: Explains CCIP's approach to secure system evolution.
## Get the latest Chainlink content straight to your inbox.
Email Address
## Chainlink CCIP API
[iframe](https://www.googletagmanager.com/ns.html?id=GTM-N6DQ47T)
Chainlink CCIP is now officially live on Solana. [View lanes and tokens.](https://docs.chain.link/ccip/directory/mainnet/chain/solana-mainnet?utm_medium=referral&utm_source=chainlink-docs&utm_campaign=solana-ccip)
On this page
# [CCIP v1.6.0 SVM API Reference](https://docs.chain.link/ccip/api-reference/svm/v160\#overview)
## [API References](https://docs.chain.link/ccip/api-reference/svm/v160\#api-references)
### [Core Components](https://docs.chain.link/ccip/api-reference/svm/v160\#core-components)
- [Messages](https://docs.chain.link/ccip/api-reference/svm/v1.6.0/messages) \- Message structures and extra args for cross-chain messaging
- [Router](https://docs.chain.link/ccip/api-reference/svm/v1.6.0/router) \- Instructions for sending messages through CCIP on Solana
- [Events](https://docs.chain.link/ccip/api-reference/svm/v1.6.0/events) \- Event emissions for tracking cross-chain messages
### [Error Handling](https://docs.chain.link/ccip/api-reference/svm/v160\#error-handling)
- [Errors](https://docs.chain.link/ccip/api-reference/svm/v1.6.0/errors) \- Comprehensive list of CCIP error codes for SVM blockchains
## Get the latest Chainlink content straight to your inbox.
Email Address
## IBTC Token Overview
[iframe](https://www.googletagmanager.com/ns.html?id=GTM-N6DQ47T)
Chainlink CCIP is now officially live on Solana. [View lanes and tokens.](https://docs.chain.link/ccip/directory/mainnet/chain/solana-mainnet?utm_medium=referral&utm_source=chainlink-docs&utm_campaign=solana-ccip)
On this page
[CCIP Directory](https://docs.chain.link/ccip/directory/mainnet) [IBTC](https://docs.chain.link/ccip/directory/mainnet/token/IBTC)


# IBTCiBTC
Listed Networks (4)

| Network | Name | Symbol | Decimals | Token address | Token pool type | Token pool address |
| --- | --- | --- | --- | --- | --- | --- |
| Arbitrum One | iBTC | IBTC | 8 | [0x050C24...9CC77A](https://explorer.arbitrum.io/address/0x050C24dBf1eEc17babE5fc585F06116A259CC77A "0x050C24dBf1eEc17babE5fc585F06116A259CC77A") | Burn/Mint | [0xCBeD22...f8725F](https://explorer.arbitrum.io/address/0xCBeD22C12b9CBFaBa8E352D1EC6279885Df8725F "0xCBeD22C12b9CBFaBa8E352D1EC6279885Df8725F") |
| Base | iBTC | IBTC | 8 | [0x124187...21cF62](https://basescan.org/address/0x12418783e860997eb99e8aCf682DF952F721cF62 "0x12418783e860997eb99e8aCf682DF952F721cF62") | Burn/Mint | [0x206E9A...3CBb95](https://basescan.org/address/0x206E9A22B384d3863b606C41030Ec2A19D3CBb95 "0x206E9A22B384d3863b606C41030Ec2A19D3CBb95") |
| Ethereum | iBTC | IBTC | 8 | [0x20157D...7B5AD2](https://etherscan.io/address/0x20157DBAbb84e3BBFE68C349d0d44E48AE7B5AD2 "0x20157DBAbb84e3BBFE68C349d0d44E48AE7B5AD2") | Burn/Mint | [0x08B405...7b5aBb](https://etherscan.io/address/0x08B4058F16D243C977ea1fe91B20Af31057b5aBb "0x08B4058F16D243C977ea1fe91B20Af31057b5aBb") |
| OP Mainnet | iBTC | IBTC | 8 | [0x2bAa7E...719438](https://optimistic.etherscan.io/address/0x2bAa7E92F3F14883264BfA63058cC223Ad719438 "0x2bAa7E92F3F14883264BfA63058cC223Ad719438") | Burn/Mint | [0xb6f8e9...E736A7](https://optimistic.etherscan.io/address/0xb6f8e9604BAFD1482631740931783998e9E736A7 "0xb6f8e9604BAFD1482631740931783998e9E736A7") |
## Get the latest Chainlink content straight to your inbox.
Email Address
## BETS Token Overview
[iframe](https://www.googletagmanager.com/ns.html?id=GTM-N6DQ47T)
Chainlink CCIP is now officially live on Solana. [View lanes and tokens.](https://docs.chain.link/ccip/directory/mainnet/chain/solana-mainnet?utm_medium=referral&utm_source=chainlink-docs&utm_campaign=solana-ccip)
On this page
[CCIP Directory](https://docs.chain.link/ccip/directory/mainnet) [BETS](https://docs.chain.link/ccip/directory/mainnet/token/BETS)


# BETSBetSwirl v2
Listed Networks (8)

| Network | Name | Symbol | Decimals | Token address | Token pool type | Token pool address |
| --- | --- | --- | --- | --- | --- | --- |
| Arbitrum One | BetSwirl v2 | BETS | 18 | [0x940257...e8E6e5](https://explorer.arbitrum.io/address/0x94025780a1aB58868D9B2dBBB775f44b32e8E6e5 "0x94025780a1aB58868D9B2dBBB775f44b32e8E6e5") | Burn/Mint | [0xCba063...BDD70a](https://explorer.arbitrum.io/address/0xCba063b1f328e4d42b05a165CBBB590939BDD70a "0xCba063b1f328e4d42b05a165CBBB590939BDD70a") |
| Avalanche | BetSwirl v2 | BETS | 18 | [0x940257...e8E6e5](https://snowtrace.io/address/0x94025780a1aB58868D9B2dBBB775f44b32e8E6e5 "0x94025780a1aB58868D9B2dBBB775f44b32e8E6e5") | Burn/Mint | [0xEf50b3...E64da6](https://snowtrace.io/address/0xEf50b39fE4302D8bF499ce854f19B84098E64da6 "0xEf50b39fE4302D8bF499ce854f19B84098E64da6") |
| Base | BetSwirl v2 | BETS | 18 | [0x940257...e8E6e5](https://basescan.org/address/0x94025780a1aB58868D9B2dBBB775f44b32e8E6e5 "0x94025780a1aB58868D9B2dBBB775f44b32e8E6e5") | Burn/Mint | [0xdfeaa4...Ed9DEe](https://basescan.org/address/0xdfeaa4acb814564Ab8c756A95E8269C620Ed9DEe "0xdfeaa4acb814564Ab8c756A95E8269C620Ed9DEe") |
| BNB Chain | BetSwirl v2 | BETS | 18 | [0x940257...e8E6e5](https://bscscan.com/address/0x94025780a1aB58868D9B2dBBB775f44b32e8E6e5 "0x94025780a1aB58868D9B2dBBB775f44b32e8E6e5") | Burn/Mint | [0x77BEd5...7A900d](https://bscscan.com/address/0x77BEd59eaBa481F3f5122A1C9953d477d97A900d "0x77BEd59eaBa481F3f5122A1C9953d477d97A900d") |
| Ethereum | BetSwirl v2 | BETS | 18 | [0x940257...e8E6e5](https://etherscan.io/address/0x94025780a1aB58868D9B2dBBB775f44b32e8E6e5 "0x94025780a1aB58868D9B2dBBB775f44b32e8E6e5") | Burn/Mint | [0x8315Bb...27336E](https://etherscan.io/address/0x8315Bbe2b2828559CEeCCCBCB4550A466227336E "0x8315Bbe2b2828559CEeCCCBCB4550A466227336E") |
| OP Mainnet | BetSwirl v2 | BETS | 18 | [0x940257...e8E6e5](https://optimistic.etherscan.io/address/0x94025780a1aB58868D9B2dBBB775f44b32e8E6e5 "0x94025780a1aB58868D9B2dBBB775f44b32e8E6e5") | Burn/Mint | [0x17B54B...3159dB](https://optimistic.etherscan.io/address/0x17B54BCEb4dd037d8AFF01EccdAd358De73159dB "0x17B54BCEb4dd037d8AFF01EccdAd358De73159dB") |
| Polygon | BetSwirl v2 | BETS | 18 | [0x940257...e8E6e5](https://polygonscan.com/address/0x94025780a1aB58868D9B2dBBB775f44b32e8E6e5 "0x94025780a1aB58868D9B2dBBB775f44b32e8E6e5") | Burn/Mint | [0xe7A4bc...7a83fA](https://polygonscan.com/address/0xe7A4bcEb04a06AabC63BAeffb34F7B75217a83fA "0xe7A4bcEb04a06AabC63BAeffb34F7B75217a83fA") |
| Unichain | BetSwirl v2 | BETS | 18 | [0x940257...e8E6e5](https://uniscan.xyz//address/0x94025780a1aB58868D9B2dBBB775f44b32e8E6e5 "0x94025780a1aB58868D9B2dBBB775f44b32e8E6e5") | Burn/Mint | [0x463D98...B227AC](https://uniscan.xyz//address/0x463D98c150A664452F68B914c353C4fB99B227AC "0x463D98c150A664452F68B914c353C4fB99B227AC") |
## Get the latest Chainlink content straight to your inbox.
Email Address
## ALU Token Information
[iframe](https://www.googletagmanager.com/ns.html?id=GTM-N6DQ47T)
Chainlink CCIP is now officially live on Solana. [View lanes and tokens.](https://docs.chain.link/ccip/directory/mainnet/chain/solana-mainnet?utm_medium=referral&utm_source=chainlink-docs&utm_campaign=solana-ccip)
On this page
[CCIP Directory](https://docs.chain.link/ccip/directory/mainnet) [ALU](https://docs.chain.link/ccip/directory/mainnet/token/ALU)


# ALUAltura
Listed Networks (3)

| Network | Name | Symbol | Decimals | Token address | Token pool type | Token pool address |
| --- | --- | --- | --- | --- | --- | --- |
| Base | Altura | ALU | 18 | [0x91Ad1b...6Bf4c9](https://basescan.org/address/0x91Ad1b44913cD1B8241A4Ff1e2EAa198DA6Bf4c9 "0x91Ad1b44913cD1B8241A4Ff1e2EAa198DA6Bf4c9") | Burn/Mint | [0xA9B679...695495](https://basescan.org/address/0xA9B67934d59AE3DC8728a9F92Febd24e81695495 "0xA9B67934d59AE3DC8728a9F92Febd24e81695495") |
| BNB Chain | Altura | ALU | 18 | [0x8263CD...8e3be0](https://bscscan.com/address/0x8263CD1601FE73C066bf49cc09841f35348e3be0 "0x8263CD1601FE73C066bf49cc09841f35348e3be0") | Lock/Release | [0x626586...D58B1D](https://bscscan.com/address/0x6265860e9EF745C8FF2333379443479e54D58B1D "0x6265860e9EF745C8FF2333379443479e54D58B1D") |
| Ethereum | Altura | ALU | 18 | [0x786A67...382b6f](https://etherscan.io/address/0x786A6743efe9500011C92c7D8540608a62382b6f "0x786A6743efe9500011C92c7D8540608a62382b6f") | Burn/Mint | [0x7Ee278...d11332](https://etherscan.io/address/0x7Ee2788AecB35Be3F13FA1389c4f578a38d11332 "0x7Ee2788AecB35Be3F13FA1389c4f578a38d11332") |
## Get the latest Chainlink content straight to your inbox.
Email Address
## DefiPulse Index Token
[iframe](https://www.googletagmanager.com/ns.html?id=GTM-N6DQ47T)
Chainlink CCIP is now officially live on Solana. [View lanes and tokens.](https://docs.chain.link/ccip/directory/mainnet/chain/solana-mainnet?utm_medium=referral&utm_source=chainlink-docs&utm_campaign=solana-ccip)
On this page
[CCIP Directory](https://docs.chain.link/ccip/directory/mainnet) [DPI](https://docs.chain.link/ccip/directory/mainnet/token/DPI)


# DPIDefiPulse Index
Listed Networks (3)

| Network | Name | Symbol | Decimals | Token address | Token pool type | Token pool address |
| --- | --- | --- | --- | --- | --- | --- |
| Arbitrum One | DefiPulse Index | DPI | 18 | [0x9737C6...54F500](https://explorer.arbitrum.io/address/0x9737C658272e66Faad39D7AD337789Ee6D54F500 "0x9737C658272e66Faad39D7AD337789Ee6D54F500") | Burn/Mint | [0x5dFdAF...daA5b2](https://explorer.arbitrum.io/address/0x5dFdAF7A7BDB9Da17FF22a8a796e2fcE58daA5b2 "0x5dFdAF7A7BDB9Da17FF22a8a796e2fcE58daA5b2") |
| Base | DefiPulse Index | DPI | 18 | [0xc6955B...885BD8](https://basescan.org/address/0xc6955B85b622369a54Cc8C6DBeCb8e03c0885BD8 "0xc6955B85b622369a54Cc8C6DBeCb8e03c0885BD8") | Burn/Mint | [0xA77Ca3...75490f](https://basescan.org/address/0xA77Ca3B16aEe1e177FD8Eff038F929819B75490f "0xA77Ca3B16aEe1e177FD8Eff038F929819B75490f") |
| Ethereum | DefiPulse Index | DPI | 18 | [0x1494CA...BA3C2b](https://etherscan.io/address/0x1494CA1F11D487c2bBe4543E90080AeBa4BA3C2b "0x1494CA1F11D487c2bBe4543E90080AeBa4BA3C2b") | Lock/Release | [0x9b8FEf...Db0DCC](https://etherscan.io/address/0x9b8FEf06D74c3880FC6886b3c6FbbBf601Db0DCC "0x9b8FEf06D74c3880FC6886b3c6FbbBf601Db0DCC") |
## Get the latest Chainlink content straight to your inbox.
Email Address
[iframe](https://td.doubleclick.net/td/rul/346357746?random=1747983107272&cv=11&fst=1747983107272&fmt=3&bg=ffffff&guid=ON&async=1&gcl_ctr=1>m=45be55l1v891173849z8847174275za201zb847174275&gcd=13l3l3l3l1l1&dma=0&tag_exp=101509157~103116026~103130498~103130500~103200004~103233427~103252644~103252646~103301114~103301116~104481633~104481635&ptag_exp=101509157~102015665~103116026~103130495~103130497~103200004~103233427~103252644~103252646~103301114~103301116~104481633~104481635&u_w=1280&u_h=1024&url=https%3A%2F%2Fdocs.chain.link%2Fccip%2Fdirectory%2Fmainnet%2Ftoken%2FDPI&label=_duuCKn_k4cYEPL_k6UB&hn=www.googleadservices.com&frm=0&tiba=CCIP%20Supported%20Tokens%20-%20DPI%20%7C%20Chainlink%20Documentation&value=0&bttype=purchase&npa=0&pscdl=noapi&auid=520889415.1747983107&uaa=x86&uab=64&uafvl=Chromium%3B136.0.7103.113%7CGoogle%2520Chrome%3B136.0.7103.113%7CNot.A%252FBrand%3B99.0.0.0&uamb=0&uam=&uap=Linux%20x86_64&uapv=6.6.72&uaw=0&fledge=1&capi=1&_tu=Cg&ct_cookie_present=0)
## MYST Token Overview
[iframe](https://www.googletagmanager.com/ns.html?id=GTM-N6DQ47T)
Chainlink CCIP is now officially live on Solana. [View lanes and tokens.](https://docs.chain.link/ccip/directory/mainnet/chain/solana-mainnet?utm_medium=referral&utm_source=chainlink-docs&utm_campaign=solana-ccip)
On this page
[CCIP Directory](https://docs.chain.link/ccip/directory/mainnet) [MYST](https://docs.chain.link/ccip/directory/mainnet/token/MYST)


# MYSTMyStandard
Listed Networks (3)

| Network | Name | Symbol | Decimals | Token address | Token pool type | Token pool address |
| --- | --- | --- | --- | --- | --- | --- |
| Avalanche | MyStandard | MYST | 18 | [0x0256B2...2D4474](https://snowtrace.io/address/0x0256B279D973C8d687264AC3eB36bE09232D4474 "0x0256B279D973C8d687264AC3eB36bE09232D4474") | Burn/Mint | [0xA4D5EF...8fA23a](https://snowtrace.io/address/0xA4D5EF72fCFfa9eac0907856B1db1b68098fA23a "0xA4D5EF72fCFfa9eac0907856B1db1b68098fA23a") |
| Base | MyStandard | MYST | 18 | [0xA821aD...525967](https://basescan.org/address/0xA821aDaCCf08d856c0A36DC2C136B5188c525967 "0xA821aDaCCf08d856c0A36DC2C136B5188c525967") | Burn/Mint | [0x717C75...889B29](https://basescan.org/address/0x717C753F9EA66eb763466cf3F8d299C634889B29 "0x717C753F9EA66eb763466cf3F8d299C634889B29") |
| Ethereum | MyStandard | MYST | 18 | [0x3d5F61...1Eba65](https://etherscan.io/address/0x3d5F61a4BB385B6D1eB34F47aA790A996f1Eba65 "0x3d5F61a4BB385B6D1eB34F47aA790A996f1Eba65") | Burn/Mint | [0xe1A822...0Dc37f](https://etherscan.io/address/0xe1A8223DAc2aeC3090322674F054D35C240Dc37f "0xe1A8223DAc2aeC3090322674F054D35C240Dc37f") |
## Get the latest Chainlink content straight to your inbox.
Email Address
## Syrup USDC Token Info
[iframe](https://www.googletagmanager.com/ns.html?id=GTM-N6DQ47T)
Chainlink CCIP is now officially live on Solana. [View lanes and tokens.](https://docs.chain.link/ccip/directory/mainnet/chain/solana-mainnet?utm_medium=referral&utm_source=chainlink-docs&utm_campaign=solana-ccip)
On this page
[CCIP Directory](https://docs.chain.link/ccip/directory/mainnet) [syrupUSDC](https://docs.chain.link/ccip/directory/mainnet/token/syrupUSDC)


# syrupUSDCSyrup USDC
Listed Networks (2)

| Network | Name | Symbol | Decimals | Token address | Token pool type | Token pool address |
| --- | --- | --- | --- | --- | --- | --- |
| Ethereum | Syrup USDC | syrupUSDC | 6 | [0x80ac24...f5Cc0b](https://etherscan.io/address/0x80ac24aA929eaF5013f6436cdA2a7ba190f5Cc0b "0x80ac24aA929eaF5013f6436cdA2a7ba190f5Cc0b") | Lock/Release | [0x20B79D...e06491](https://etherscan.io/address/0x20B79D39Bd44dEee4F89B1e9d0e3b945fde06491 "0x20B79D39Bd44dEee4F89B1e9d0e3b945fde06491") |
| Solana | Syrup USDC | syrupUSDC | 6 | [AvZZF1Ya...eaZeUj](https://explorer.solana.com/address/AvZZF1YaZDziPY2RCK4oJrRVrbN3mTD9NL24hPeaZeUj "AvZZF1YaZDziPY2RCK4oJrRVrbN3mTD9NL24hPeaZeUj") | Burn/Mint | [HrTBpF3L...ndvHbm](https://explorer.solana.com/address/HrTBpF3LqSxXnjnYdR4htnBLyMHNZ6eNaDZGPundvHbm "HrTBpF3LqSxXnjnYdR4htnBLyMHNZ6eNaDZGPundvHbm") |
## Get the latest Chainlink content straight to your inbox.
Email Address
## CANNED Token Info
[iframe](https://www.googletagmanager.com/ns.html?id=GTM-N6DQ47T)
On this page
[CCIP Directory](https://docs.chain.link/ccip/directory/mainnet) [CANNED](https://docs.chain.link/ccip/directory/mainnet/token/CANNED)


# CANNEDCanned dog
Listed Networks (2)

| Network | Name | Symbol | Decimals | Token address | Token pool type | Token pool address |
| --- | --- | --- | --- | --- | --- | --- |
| Base | Canned dog | CANNED | 18 | [0xa2e543...936a67](https://basescan.org/address/0xa2e543EE6531bb9640dde7ad018eA965cD936a67 "0xa2e543EE6531bb9640dde7ad018eA965cD936a67") | Burn/Mint | [0x5d7ccb...fDF370](https://basescan.org/address/0x5d7ccbaa5b0D65aa8A2Ed5989B32C64963fDF370 "0x5d7ccbaa5b0D65aa8A2Ed5989B32C64963fDF370") |
| Shibarium | Canned dog | CANNED | 18 | [0x5d63C6...cc227a](https://www.shibariumscan.io/address/0x5d63C604803BbF7919953b73c89309B5CBcc227a "0x5d63C604803BbF7919953b73c89309B5CBcc227a") | Lock/Release | [0x9076EF...2F4A29](https://www.shibariumscan.io/address/0x9076EFCAC1a98dF0edC756e3892ED0F54A2F4A29 "0x9076EFCAC1a98dF0edC756e3892ED0F54A2F4A29") |
## Get the latest Chainlink content straight to your inbox.
Email Address
## pufETH Token Overview
[iframe](https://www.googletagmanager.com/ns.html?id=GTM-N6DQ47T)
Chainlink CCIP is now officially live on Solana. [View lanes and tokens.](https://docs.chain.link/ccip/directory/mainnet/chain/solana-mainnet?utm_medium=referral&utm_source=chainlink-docs&utm_campaign=solana-ccip)
On this page
[CCIP Directory](https://docs.chain.link/ccip/directory/mainnet) [pufETH](https://docs.chain.link/ccip/directory/mainnet/token/pufETH)


# pufETHpufETH
Listed Networks (4)

| Network | Name | Symbol | Decimals | Token address | Token pool type | Token pool address |
| --- | --- | --- | --- | --- | --- | --- |
| Arbitrum One | pufETH | pufETH | 18 | [0x37D638...eDDBcF](https://explorer.arbitrum.io/address/0x37D6382B6889cCeF8d6871A8b60E667115eDDBcF "0x37D6382B6889cCeF8d6871A8b60E667115eDDBcF") | Burn/Mint | [0x87d000...5392b6](https://explorer.arbitrum.io/address/0x87d00066cf131ff54B72B134a217D5401E5392b6 "0x87d00066cf131ff54B72B134a217D5401E5392b6") |
| Berachain | pufETH | pufETH | 18 | [0x417b0F...e6F205](https://berascan.com/address/0x417b0Ff8358Eb72867Da92225CaB99BCD5e6F205 "0x417b0Ff8358Eb72867Da92225CaB99BCD5e6F205") | Burn/Mint | [0x8dA0ba...74F3E4](https://berascan.com/address/0x8dA0baE597aC15fB0924713b1e3c1F624474F3E4 "0x8dA0baE597aC15fB0924713b1e3c1F624474F3E4") |
| Ethereum | pufETH | pufETH | 18 | [0xD9A442...306a72](https://etherscan.io/address/0xD9A442856C234a39a81a089C06451EBAa4306a72 "0xD9A442856C234a39a81a089C06451EBAa4306a72") | Lock/Release | [0xBc1324...78BFF3](https://etherscan.io/address/0xBc1324F4FaB8e63bF33E5117bb887671B378BFF3 "0xBc1324F4FaB8e63bF33E5117bb887671B378BFF3") |
| Soneium | pufETH | pufETH | 18 | [0x6c460b...9B9A8B](https://soneium.blockscout.com/address/0x6c460b2c6D6719562D5dA43E5152B375e79B9A8B "0x6c460b2c6D6719562D5dA43E5152B375e79B9A8B") | Burn/Mint | [0xF9Dd33...Dcf0e7](https://soneium.blockscout.com/address/0xF9Dd335bF363b2E4ecFe3c94A86EBD7Dd3Dcf0e7 "0xF9Dd335bF363b2E4ecFe3c94A86EBD7Dd3Dcf0e7") |
## Get the latest Chainlink content straight to your inbox.
Email Address
## Zunami Omni USD
[iframe](https://www.googletagmanager.com/ns.html?id=GTM-N6DQ47T)
Chainlink CCIP is now officially live on Solana. [View lanes and tokens.](https://docs.chain.link/ccip/directory/mainnet/chain/solana-mainnet?utm_medium=referral&utm_source=chainlink-docs&utm_campaign=solana-ccip)
On this page
[CCIP Directory](https://docs.chain.link/ccip/directory/mainnet) [zunUSD](https://docs.chain.link/ccip/directory/mainnet/token/zunUSD)


# zunUSDZunami Omni USD
Listed Networks (4)

| Network | Name | Symbol | Decimals | Token address | Token pool type | Token pool address |
| --- | --- | --- | --- | --- | --- | --- |
| Arbitrum One | Zunami Omni USD | zunUSD | 18 | [0xBfEB8B...5420D1](https://explorer.arbitrum.io/address/0xBfEB8B6813491bb4fB823b8f451b62eF535420D1 "0xBfEB8B6813491bb4fB823b8f451b62eF535420D1") | Burn/Mint | [0x68b49D...C8F1C0](https://explorer.arbitrum.io/address/0x68b49DC715214A2D138B0d73A2fC82a87dC8F1C0 "0x68b49DC715214A2D138B0d73A2fC82a87dC8F1C0") |
| Base | Zunami Omni USD | zunUSD | 18 | [0xD5B9dD...049B1F](https://basescan.org/address/0xD5B9dDB04f20eA773C9b56607250149B26049B1F "0xD5B9dDB04f20eA773C9b56607250149B26049B1F") | Burn/Mint | [0x580017...072fCb](https://basescan.org/address/0x5800177Ab2cEFd1f7704A4e7eA8A309D98072fCb "0x5800177Ab2cEFd1f7704A4e7eA8A309D98072fCb") |
| Ethereum | Zunami USD | zunUSD | 18 | [0x8C0D76...A1A0e6](https://etherscan.io/address/0x8C0D76C9B18779665475F3E212D9Ca1Ed6A1A0e6 "0x8C0D76C9B18779665475F3E212D9Ca1Ed6A1A0e6") | Lock/Release | [0x45af36...4F8AA3](https://etherscan.io/address/0x45af366C76a8C8f18806A8C404FE3E3bbA4F8AA3 "0x45af366C76a8C8f18806A8C404FE3E3bbA4F8AA3") |
| OP Mainnet | Zunami Omni USD | zunUSD | 18 | [0xdC30b3...aCB423](https://optimistic.etherscan.io/address/0xdC30b3bdE2734A0Bc55AF01B38943ef04aaCB423 "0xdC30b3bdE2734A0Bc55AF01B38943ef04aaCB423") | Burn/Mint | [0xD4DC5f...2E81Fd](https://optimistic.etherscan.io/address/0xD4DC5f4573FE1E39a33C4e4aF8292b925B2E81Fd "0xD4DC5f4573FE1E39a33C4e4aF8292b925B2E81Fd") |
## Get the latest Chainlink content straight to your inbox.
Email Address
## EARNM Token Information
[iframe](https://www.googletagmanager.com/ns.html?id=GTM-N6DQ47T)
Chainlink CCIP is now officially live on Solana. [View lanes and tokens.](https://docs.chain.link/ccip/directory/mainnet/chain/solana-mainnet?utm_medium=referral&utm_source=chainlink-docs&utm_campaign=solana-ccip)
On this page
[CCIP Directory](https://docs.chain.link/ccip/directory/mainnet) [EARNM](https://docs.chain.link/ccip/directory/mainnet/token/EARNM)


# EARNMEARNM Token
Listed Networks (4)

| Network | Name | Symbol | Decimals | Token address | Token pool type | Token pool address |
| --- | --- | --- | --- | --- | --- | --- |
| Arbitrum One | EARNM Token | EARNM | 18 | [0xcF1C66...6a23c5](https://explorer.arbitrum.io/address/0xcF1C66E3CF649F8E29835337687Be692896a23c5 "0xcF1C66E3CF649F8E29835337687Be692896a23c5") | Burn/Mint | [0xaB9502...fC46d0](https://explorer.arbitrum.io/address/0xaB9502c8886Bd9CEd344A3684784a5e4C0fC46d0 "0xaB9502c8886Bd9CEd344A3684784a5e4C0fC46d0") |
| Base | EARNM Token | EARNM | 18 | [0xcF1C66...6a23c5](https://basescan.org/address/0xcF1C66E3CF649F8E29835337687Be692896a23c5 "0xcF1C66E3CF649F8E29835337687Be692896a23c5") | Burn/Mint | [0xaB9502...fC46d0](https://basescan.org/address/0xaB9502c8886Bd9CEd344A3684784a5e4C0fC46d0 "0xaB9502c8886Bd9CEd344A3684784a5e4C0fC46d0") |
| Ethereum | EARNM Token | EARNM | 18 | [0xcF1C66...6a23c5](https://etherscan.io/address/0xcF1C66E3CF649F8E29835337687Be692896a23c5 "0xcF1C66E3CF649F8E29835337687Be692896a23c5") | Burn/Mint | [0xaB9502...fC46d0](https://etherscan.io/address/0xaB9502c8886Bd9CEd344A3684784a5e4C0fC46d0 "0xaB9502c8886Bd9CEd344A3684784a5e4C0fC46d0") |
| Polygon | EARNM Token | EARNM | 18 | [0xBA98B0...1a4097](https://polygonscan.com/address/0xBA98B09050F8837424fa8b71B4802c61cb1a4097 "0xBA98B09050F8837424fa8b71B4802c61cb1a4097") | Lock/Release | [0xaB9502...fC46d0](https://polygonscan.com/address/0xaB9502c8886Bd9CEd344A3684784a5e4C0fC46d0 "0xaB9502c8886Bd9CEd344A3684784a5e4C0fC46d0") |
## Get the latest Chainlink content straight to your inbox.
Email Address
## Chainlink CCIP Solana
[iframe](https://www.googletagmanager.com/ns.html?id=GTM-N6DQ47T)
Chainlink CCIP is now officially live on Solana. [View lanes and tokens.](https://docs.chain.link/ccip/directory/mainnet/chain/solana-mainnet?utm_medium=referral&utm_source=chainlink-docs&utm_campaign=solana-ccip)
## 404
## Page not found
We're sorry, but we couldn't find the page you were looking for. You can select a section from the top of the
page, or browse the links on the left. If you followed a broken link, [let us know](https://github.com/smartcontractkit/documentation/issues/new), or send a PR on [GitHub](https://github.com/smartcontractkit/documentation/)
## Get the latest Chainlink content straight to your inbox.
Email Address
## hyETH Token Overview
[iframe](https://www.googletagmanager.com/ns.html?id=GTM-N6DQ47T)
Chainlink CCIP is now officially live on Solana. [View lanes and tokens.](https://docs.chain.link/ccip/directory/mainnet/chain/solana-mainnet?utm_medium=referral&utm_source=chainlink-docs&utm_campaign=solana-ccip)
On this page
[CCIP Directory](https://docs.chain.link/ccip/directory/mainnet) [hyETH](https://docs.chain.link/ccip/directory/mainnet/token/hyETH)


# hyETHHigh Yield ETH Index
Listed Networks (3)

| Network | Name | Symbol | Decimals | Token address | Token pool type | Token pool address |
| --- | --- | --- | --- | --- | --- | --- |
| Arbitrum One | High Yield ETH Index | hyETH | 18 | [0x8b5D1d...026142](https://explorer.arbitrum.io/address/0x8b5D1d8B3466eC21f8eE33cE63F319642c026142 "0x8b5D1d8B3466eC21f8eE33cE63F319642c026142") | Burn/Mint | [0x288B1b...cb0E59](https://explorer.arbitrum.io/address/0x288B1b97603b4ae48F18B893caf721f20fcb0E59 "0x288B1b97603b4ae48F18B893caf721f20fcb0E59") |
| Base | High Yield ETH Index | hyETH | 18 | [0xC73e76...a71dAD](https://basescan.org/address/0xC73e76Aa9F14C1837CDB49bd028E8Ff5a0a71dAD "0xC73e76Aa9F14C1837CDB49bd028E8Ff5a0a71dAD") | Burn/Mint | [0xbEE038...Ddb1CE](https://basescan.org/address/0xbEE038Af079a702b2ED0af7886DA101443Ddb1CE "0xbEE038Af079a702b2ED0af7886DA101443Ddb1CE") |
| Ethereum | High Yield ETH Index | hyETH | 18 | [0xc45060...9B99Ee](https://etherscan.io/address/0xc4506022Fb8090774E8A628d5084EED61D9B99Ee "0xc4506022Fb8090774E8A628d5084EED61D9B99Ee") | Lock/Release | [0x399949...A3E576](https://etherscan.io/address/0x3999490C55Fb8332F5f3AD00212435526fA3E576 "0x3999490C55Fb8332F5f3AD00212435526fA3E576") |
## Get the latest Chainlink content straight to your inbox.
Email Address
## SXT Token Information
[iframe](https://www.googletagmanager.com/ns.html?id=GTM-N6DQ47T)[iframe](https://td.doubleclick.net/td/rul/346357746?random=1747983107313&cv=11&fst=1747983107313&fmt=3&bg=ffffff&guid=ON&async=1&gcl_ctr=1>m=45be55l1v891173849z8847174275za201zb847174275&gcd=13l3l3l3l1l1&dma=0&tag_exp=101509157~102015666~103116026~103130498~103130500~103200004~103233427~103252644~103252646~103301114~103301116~104481633~104481635&ptag_exp=101509157~103116026~103130495~103130497~103200004~103233427~103252644~103252646~103290358~103301114~103301116~104481633~104481635&u_w=1280&u_h=1024&url=https%3A%2F%2Fdocs.chain.link%2Fccip%2Fdirectory%2Fmainnet%2Ftoken%2FSXT&_ng=1&label=_duuCKn_k4cYEPL_k6UB&hn=www.googleadservices.com&frm=0&tiba=CCIP%20Supported%20Tokens%20-%20SXT%20%7C%20Chainlink%20Documentation&value=0&bttype=purchase&npa=0&pscdl=noapi&auid=1842037372.1747983107&uaa=x86&uab=64&uafvl=Chromium%3B136.0.7103.113%7CGoogle%2520Chrome%3B136.0.7103.113%7CNot.A%252FBrand%3B99.0.0.0&uamb=0&uam=&uap=Linux%20x86_64&uapv=6.6.72&uaw=0&fledge=1&capi=1&_tu=Cg&ct_cookie_present=0)
## ETHx Token Overview
[iframe](https://www.googletagmanager.com/ns.html?id=GTM-N6DQ47T)
Chainlink CCIP is now officially live on Solana. [View lanes and tokens.](https://docs.chain.link/ccip/directory/mainnet/chain/solana-mainnet?utm_medium=referral&utm_source=chainlink-docs&utm_campaign=solana-ccip)
On this page
[CCIP Directory](https://docs.chain.link/ccip/directory/mainnet) [ETHx](https://docs.chain.link/ccip/directory/mainnet/token/ETHx)


# ETHxETHx
Listed Networks (3)

| Network | Name | Symbol | Decimals | Token address | Token pool type | Token pool address |
| --- | --- | --- | --- | --- | --- | --- |
| Arbitrum One | ETHx | ETHx | 18 | [0xED65C5...944Dc7](https://explorer.arbitrum.io/address/0xED65C5085a18Fa160Af0313E60dcc7905E944Dc7 "0xED65C5085a18Fa160Af0313E60dcc7905E944Dc7") | Burn/Mint | [0xc707F7...42cBf5](https://explorer.arbitrum.io/address/0xc707F7E0f73c17a4eE7D3965c7b3c5E0ab42cBf5 "0xc707F7E0f73c17a4eE7D3965c7b3c5E0ab42cBf5") |
| Ethereum | ETHx | ETHx | 18 | [0xA35b1B...00A15b](https://etherscan.io/address/0xA35b1B31Ce002FBF2058D22F30f95D405200A15b "0xA35b1B31Ce002FBF2058D22F30f95D405200A15b") | Lock/Release | [0xeAD31B...26461d](https://etherscan.io/address/0xeAD31B98179e2637Bb052a970Ac92Cbb2E26461d "0xeAD31B98179e2637Bb052a970Ac92Cbb2E26461d") |
| OP Mainnet | ETHx | ETHx | 18 | [0xc54B43...1453c2](https://optimistic.etherscan.io/address/0xc54B43eaF921A5194c7973A4d65E055E5a1453c2 "0xc54B43eaF921A5194c7973A4d65E055E5a1453c2") | Burn/Mint | [0xb144Fc...1AFA55](https://optimistic.etherscan.io/address/0xb144FcE921D564d77FD9F226965984654C1AFA55 "0xb144FcE921D564d77FD9F226965984654C1AFA55") |
## Get the latest Chainlink content straight to your inbox.
Email Address
## Lombard Staked Bitcoin
[iframe](https://www.googletagmanager.com/ns.html?id=GTM-N6DQ47T)
On this page
[CCIP Directory](https://docs.chain.link/ccip/directory/mainnet) [LBTC](https://docs.chain.link/ccip/directory/mainnet/token/LBTC)


# LBTCLombard Staked Bitcoin
Listed Networks (4)

| Network | Name | Symbol | Decimals | Token address | Token pool type | Token pool address |
| --- | --- | --- | --- | --- | --- | --- |
| Base | Lombard Staked Bitcoin | LBTC | 8 | [0xecAc9C...5c11c1](https://basescan.org/address/0xecAc9C5F704e954931349Da37F60E39f515c11c1 "0xecAc9C5F704e954931349Da37F60E39f515c11c1") | Burn/Mint | [0x84166e...8c88aA](https://basescan.org/address/0x84166eAf4530994C565E6aCC774a6950Ce8c88aA "0x84166eAf4530994C565E6aCC774a6950Ce8c88aA") |
| BNB Chain | Lombard Staked Bitcoin | LBTC | 8 | [0xecAc9C...5c11c1](https://bscscan.com/address/0xecAc9C5F704e954931349Da37F60E39f515c11c1 "0xecAc9C5F704e954931349Da37F60E39f515c11c1") | Burn/Mint | [0x75BEaf...4FE11F](https://bscscan.com/address/0x75BEafC5E96aD88B4BD0Ae44a56FebCAD64FE11F "0x75BEafC5E96aD88B4BD0Ae44a56FebCAD64FE11F") |
| Ethereum | Lombard Staked Bitcoin | LBTC | 8 | [0x8236a8...634494](https://etherscan.io/address/0x8236a87084f8B84306f72007F36F2618A5634494 "0x8236a87084f8B84306f72007F36F2618A5634494") | Burn/Mint | [0xac82d0...e9E453](https://etherscan.io/address/0xac82d09D3BaE049C2119f5940ad517E6f1e9E453 "0xac82d09D3BaE049C2119f5940ad517E6f1e9E453") |
| Sonic | Lombard Staked Bitcoin | LBTC | 8 | [0xecAc9C...5c11c1](https://sonicscan.org/address/0xecAc9C5F704e954931349Da37F60E39f515c11c1 "0xecAc9C5F704e954931349Da37F60E39f515c11c1") | Burn/Mint | [0x3BA7ED...887Fa2](https://sonicscan.org/address/0x3BA7EDC2C37D8069B1A29159290604da93887Fa2 "0x3BA7EDC2C37D8069B1A29159290604da93887Fa2") |
## Get the latest Chainlink content straight to your inbox.
Email Address
## USDC Token Information
[iframe](https://www.googletagmanager.com/ns.html?id=GTM-N6DQ47T)
Chainlink CCIP is now officially live on Solana. [View lanes and tokens.](https://docs.chain.link/ccip/directory/mainnet/chain/solana-mainnet?utm_medium=referral&utm_source=chainlink-docs&utm_campaign=solana-ccip)
On this page
[CCIP Directory](https://docs.chain.link/ccip/directory/testnet) [USDC](https://docs.chain.link/ccip/directory/testnet/token/USDC)


# USDCUSD Coin
Listed Networks (7)

| Network | Name | Symbol | Decimals | Token address | Token pool type | Token pool address |
| --- | --- | --- | --- | --- | --- | --- |
| Arbitrum Sepolia | USD Coin | USDC | 6 | [0x75faf1...46AA4d](https://sepolia.arbiscan.io/address/0x75faf114eafb1BDbe2F0316DF893fd58CE46AA4d "0x75faf114eafb1BDbe2F0316DF893fd58CE46AA4d") | Burn/Mint | [0xbfd2b0...4F769f](https://sepolia.arbiscan.io/address/0xbfd2b0b21bd22fD9aB482BAAbc815ef4974F769f "0xbfd2b0b21bd22fD9aB482BAAbc815ef4974F769f") |
| Avalanche Fuji | USD Coin | USDC | 6 | [0x542589...31Bc65](https://testnet.snowtrace.io/address/0x5425890298aed601595a70AB815c96711a31Bc65 "0x5425890298aed601595a70AB815c96711a31Bc65") | Burn/Mint | [0x593182...5aa8C9](https://testnet.snowtrace.io/address/0x5931822f394baBC2AACF4588E98FC77a9f5aa8C9 "0x5931822f394baBC2AACF4588E98FC77a9f5aa8C9") |
| Base Sepolia | USDC | USDC | 6 | [0x036CbD...3dCF7e](https://sepolia.basescan.org/address/0x036CbD53842c5426634e7929541eC2318f3dCF7e "0x036CbD53842c5426634e7929541eC2318f3dCF7e") | Burn/Mint | [0x593182...5aa8C9](https://sepolia.basescan.org/address/0x5931822f394baBC2AACF4588E98FC77a9f5aa8C9 "0x5931822f394baBC2AACF4588E98FC77a9f5aa8C9") |
| Ethereum Sepolia | USDC | USDC | 6 | [0x1c7D4B...9C7238](https://sepolia.etherscan.io/address/0x1c7D4B196Cb0C7B01d743Fbc6116a902379C7238 "0x1c7D4B196Cb0C7B01d743Fbc6116a902379C7238") | Burn/Mint | [0xAff3fE...0005EC](https://sepolia.etherscan.io/address/0xAff3fE524ea94118EF09DaDBE3c77ba6AA0005EC "0xAff3fE524ea94118EF09DaDBE3c77ba6AA0005EC") |
| OP Sepolia | USDC | USDC | 6 | [0x5fd842...3130D7](https://sepolia-optimism.etherscan.io/address/0x5fd84259d66Cd46123540766Be93DFE6D43130D7 "0x5fd84259d66Cd46123540766Be93DFE6D43130D7") | Burn/Mint | [0x18591F...57903f](https://sepolia-optimism.etherscan.io/address/0x18591F40d9981C395fb85aB1982441F14657903f "0x18591F40d9981C395fb85aB1982441F14657903f") |
| Polygon Amoy | USDC | USDC | 6 | [0x41E94E...0e7582](https://amoy.polygonscan.com//address/0x41E94Eb019C0762f9Bfcf9Fb1E58725BfB0e7582 "0x41E94Eb019C0762f9Bfcf9Fb1E58725BfB0e7582") | Burn/Mint | [0x593182...5aa8C9](https://amoy.polygonscan.com//address/0x5931822f394baBC2AACF4588E98FC77a9f5aa8C9 "0x5931822f394baBC2AACF4588E98FC77a9f5aa8C9") |
| Ronin Saigon | USD Coin | USDC | 6 | [0x7e72e2...04b74c](https://saigon-app.roninchain.com/address/0x7e72e240572311F558A98C2D782079Fba704b74c "0x7e72e240572311F558A98C2D782079Fba704b74c") | Burn/Mint | [0xd7CE1E...114115](https://saigon-app.roninchain.com/address/0xd7CE1E7262ce471CC3Db3Bcd8c3EdeEe6d114115 "0xd7CE1E7262ce471CC3Db3Bcd8c3EdeEe6d114115") |
## Get the latest Chainlink content straight to your inbox.
Email Address
## Creative Token CRTV
[iframe](https://www.googletagmanager.com/ns.html?id=GTM-N6DQ47T)
Chainlink CCIP is now officially live on Solana. [View lanes and tokens.](https://docs.chain.link/ccip/directory/mainnet/chain/solana-mainnet?utm_medium=referral&utm_source=chainlink-docs&utm_campaign=solana-ccip)
On this page
[CCIP Directory](https://docs.chain.link/ccip/directory/mainnet) [CRTV](https://docs.chain.link/ccip/directory/mainnet/token/CRTV)


# CRTVCreative Token
Listed Networks (3)

| Network | Name | Symbol | Decimals | Token address | Token pool type | Token pool address |
| --- | --- | --- | --- | --- | --- | --- |
| Base | Creative Token | CRTV | 18 | [0x4B62D9...E56c44](https://basescan.org/address/0x4B62D9b3DE9FAB98659693c9ee488D2E4eE56c44 "0x4B62D9b3DE9FAB98659693c9ee488D2E4eE56c44") | Lock/Release | [0xE9daD7...2D9837](https://basescan.org/address/0xE9daD7c1D857F09547703Be89Be102ca232D9837 "0xE9daD7c1D857F09547703Be89Be102ca232D9837") |
| OP Mainnet | Creative Token | CRTV | 18 | [0x06B9f0...394eB6](https://optimistic.etherscan.io/address/0x06B9f097407084b9C7d82EA82E8FC693d3394eB6 "0x06B9f097407084b9C7d82EA82E8FC693d3394eB6") | Burn/Mint | [0x7A1678...F4F828](https://optimistic.etherscan.io/address/0x7A16780ABCa3CB7C1968c7C726C31A4916F4F828 "0x7A16780ABCa3CB7C1968c7C726C31A4916F4F828") |
| Polygon | Creative Token | CRTV | 18 | [0xEB531C...a9ad0f](https://polygonscan.com/address/0xEB531C4470E8588520a7deb8B5Ea2289f9a9ad0f "0xEB531C4470E8588520a7deb8B5Ea2289f9a9ad0f") | Burn/Mint | [0x07d31a...4E62F2](https://polygonscan.com/address/0x07d31ab079BF606BADdb806cced99D23284E62F2 "0x07d31ab079BF606BADdb806cced99D23284E62F2") |
## Get the latest Chainlink content straight to your inbox.
Email Address
## WBTC Token Information
[iframe](https://www.googletagmanager.com/ns.html?id=GTM-N6DQ47T)
Chainlink CCIP is now officially live on Solana. [View lanes and tokens.](https://docs.chain.link/ccip/directory/mainnet/chain/solana-mainnet?utm_medium=referral&utm_source=chainlink-docs&utm_campaign=solana-ccip)
On this page
[CCIP Directory](https://docs.chain.link/ccip/directory/mainnet) [WBTC](https://docs.chain.link/ccip/directory/mainnet/token/WBTC)


# WBTCWrapped BTC
Listed Networks (2)

| Network | Name | Symbol | Decimals | Token address | Token pool type | Token pool address |
| --- | --- | --- | --- | --- | --- | --- |
| Ethereum | Wrapped BTC | WBTC | 8 | [0x2260FA...c2C599](https://etherscan.io/address/0x2260FAC5E5542a773Aa44fBCfeDf7C193bc2C599 "0x2260FAC5E5542a773Aa44fBCfeDf7C193bc2C599") | Lock/Release | [0xF66980...875b93](https://etherscan.io/address/0xF6698064776D521b0AFE469F30C40B39B4875b93 "0xF6698064776D521b0AFE469F30C40B39B4875b93") |
| Ronin | Wrapped Bitcoin | WBTC | 8 | [0xCa3Eb6...20cdC3](https://app.roninchain.com/address/0xCa3Eb64F3DFd7861C76070e3d1492eE5ee20cdC3 "0xCa3Eb64F3DFd7861C76070e3d1492eE5ee20cdC3") | Burn/Mint | [0x57C6e9...71F323](https://app.roninchain.com/address/0x57C6e9E48476B4d08CeAc0ba885D34f7dE71F323 "0x57C6e9E48476B4d08CeAc0ba885D34f7dE71F323") |
## Get the latest Chainlink content straight to your inbox.
Email Address
## IXT Token Overview
[iframe](https://www.googletagmanager.com/ns.html?id=GTM-N6DQ47T)
On this page
[CCIP Directory](https://docs.chain.link/ccip/directory/mainnet) [IXT](https://docs.chain.link/ccip/directory/mainnet/token/IXT)


# IXTxPlanetIX
Listed Networks (5)

| Network | Name | Symbol | Decimals | Token address | Token pool type | Token pool address |
| --- | --- | --- | --- | --- | --- | --- |
| Arbitrum One | xPlanetIX | xIXT | 18 | [0x8b04bf...99C6a7](https://explorer.arbitrum.io/address/0x8b04bf3358B88e3630aa64C1c76FF3B6C699C6a7 "0x8b04bf3358B88e3630aa64C1c76FF3B6C699C6a7") | Burn/Mint | [0x803e38...629ee7](https://explorer.arbitrum.io/address/0x803e3858B81E0595E5F39946a68AF3546D629ee7 "0x803e3858B81E0595E5F39946a68AF3546D629ee7") |
| Base | PlanetIX | IXT | 18 | [0xD32B4e...10bECd](https://basescan.org/address/0xD32B4e4a565A1B786979276de16a13eA2e10bECd "0xD32B4e4a565A1B786979276de16a13eA2e10bECd") | Burn/Mint | [0xF85fB9...97Bf78](https://basescan.org/address/0xF85fB90550bB01905556Efd7B07eDe487097Bf78 "0xF85fB90550bB01905556Efd7B07eDe487097Bf78") |
| BNB Chain | xPlanetIX | xIXT | 18 | [0x8b04bf...99C6a7](https://bscscan.com/address/0x8b04bf3358B88e3630aa64C1c76FF3B6C699C6a7 "0x8b04bf3358B88e3630aa64C1c76FF3B6C699C6a7") | Burn/Mint | [0x1e9C67...67f30E](https://bscscan.com/address/0x1e9C67b9cbe6FfFfDc441Be359d9f78B5167f30E "0x1e9C67b9cbe6FfFfDc441Be359d9f78B5167f30E") |
| Ethereum | xPlanetIX | xIXT | 18 | [0x8b04bf...99C6a7](https://etherscan.io/address/0x8b04bf3358B88e3630aa64C1c76FF3B6C699C6a7 "0x8b04bf3358B88e3630aa64C1c76FF3B6C699C6a7") | Burn/Mint | [0x51df97...57883D](https://etherscan.io/address/0x51df9751404DB200b354ED6a5e27DdA6C557883D "0x51df9751404DB200b354ED6a5e27DdA6C557883D") |
| Polygon | PlanetIX | IXT | 18 | [0xE06Bd4...eAEefE](https://polygonscan.com/address/0xE06Bd4F5aAc8D0aA337D13eC88dB6defC6eAEefE "0xE06Bd4F5aAc8D0aA337D13eC88dB6defC6eAEefE") | Lock/Release | [0x8206A1...725FaB](https://polygonscan.com/address/0x8206A135cac573a2f96873dc7ad7C83B08725FaB "0x8206A135cac573a2f96873dc7ad7C83B08725FaB") |
## Get the latest Chainlink content straight to your inbox.
Email Address
## ANIMA Token Information
[iframe](https://www.googletagmanager.com/ns.html?id=GTM-N6DQ47T)
Chainlink CCIP is now officially live on Solana. [View lanes and tokens.](https://docs.chain.link/ccip/directory/mainnet/chain/solana-mainnet?utm_medium=referral&utm_source=chainlink-docs&utm_campaign=solana-ccip)
On this page
[CCIP Directory](https://docs.chain.link/ccip/directory/mainnet) [ANIMA](https://docs.chain.link/ccip/directory/mainnet/token/ANIMA)


# ANIMAAnima
Listed Networks (2)

| Network | Name | Symbol | Decimals | Token address | Token pool type | Token pool address |
| --- | --- | --- | --- | --- | --- | --- |
| Ethereum | Anima | ANIMA | 18 | [0x153A38...A828a7](https://etherscan.io/address/0x153A381D1207862cA003f68600462fAa66A828a7 "0x153A381D1207862cA003f68600462fAa66A828a7") | Burn/Mint | [0xD4C618...57329e](https://etherscan.io/address/0xD4C6184DEC4e10395AB84b9e7a7ab46d0D57329e "0xD4C6184DEC4e10395AB84b9e7a7ab46d0D57329e") |
| Ronin | Anima | ANIMA | 18 | [0xF80132...3d704D](https://app.roninchain.com/address/0xF80132FC0A86ADd011BffCe3AedD60A86E3d704D "0xF80132FC0A86ADd011BffCe3AedD60A86E3d704D") | Lock/Release | [0xD27F88...8c3812](https://app.roninchain.com/address/0xD27F88501e62D0BDc70B20d6ed06d8E0fF8c3812 "0xD27F88501e62D0BDc70B20d6ed06d8E0fF8c3812") |
## Get the latest Chainlink content straight to your inbox.
Email Address
## GHO Token Overview
[iframe](https://www.googletagmanager.com/ns.html?id=GTM-N6DQ47T)
Chainlink CCIP is now officially live on Solana. [View lanes and tokens.](https://docs.chain.link/ccip/directory/mainnet/chain/solana-mainnet?utm_medium=referral&utm_source=chainlink-docs&utm_campaign=solana-ccip)
On this page
[CCIP Directory](https://docs.chain.link/ccip/directory/mainnet) [GHO](https://docs.chain.link/ccip/directory/mainnet/token/GHO)


# GHOGho Token
Listed Networks (3)

| Network | Name | Symbol | Decimals | Token address | Token pool type | Token pool address |
| --- | --- | --- | --- | --- | --- | --- |
| Arbitrum One | Gho Token | GHO | 18 | [0x7dfF72...7c8B33](https://explorer.arbitrum.io/address/0x7dfF72693f6A4149b17e7C6314655f6A9F7c8B33 "0x7dfF72693f6A4149b17e7C6314655f6A9F7c8B33") | Burn/Mint | [0xB94Ab2...CCA5eB](https://explorer.arbitrum.io/address/0xB94Ab28c6869466a46a42abA834ca2B3cECCA5eB "0xB94Ab28c6869466a46a42abA834ca2B3cECCA5eB") |
| Base | Gho Token | GHO | 18 | [0x6Bb7a2...da10Ee](https://basescan.org/address/0x6Bb7a212910682DCFdbd5BCBb3e28FB4E8da10Ee "0x6Bb7a212910682DCFdbd5BCBb3e28FB4E8da10Ee") | Burn/Mint | [0x98217A...7aAe34](https://basescan.org/address/0x98217A06721Ebf727f2C8d9aD7718ec28b7aAe34 "0x98217A06721Ebf727f2C8d9aD7718ec28b7aAe34") |
| Ethereum | Gho Token | GHO | 18 | [0x40D16F...aE6C2f](https://etherscan.io/address/0x40D16FC0246aD3160Ccc09B8D0D3A2cD28aE6C2f "0x40D16FC0246aD3160Ccc09B8D0D3A2cD28aE6C2f") | Lock/Release | [0x06179f...28660A](https://etherscan.io/address/0x06179f7C1be40863405f374E7f5F8806c728660A "0x06179f7C1be40863405f374E7f5F8806c728660A") |
## Get the latest Chainlink content straight to your inbox.
Email Address
## DFX Token Overview
[iframe](https://www.googletagmanager.com/ns.html?id=GTM-N6DQ47T)
Chainlink CCIP is now officially live on Solana. [View lanes and tokens.](https://docs.chain.link/ccip/directory/mainnet/chain/solana-mainnet?utm_medium=referral&utm_source=chainlink-docs&utm_campaign=solana-ccip)
On this page
[CCIP Directory](https://docs.chain.link/ccip/directory/mainnet) [DFX](https://docs.chain.link/ccip/directory/mainnet/token/DFX)


# DFXDFX Token (L2)
Listed Networks (3)

| Network | Name | Symbol | Decimals | Token address | Token pool type | Token pool address |
| --- | --- | --- | --- | --- | --- | --- |
| Arbitrum One | DFX Token (L2) | DFX | 18 | [0x27f485...239E93](https://explorer.arbitrum.io/address/0x27f485b62C4A7E635F561A87560Adf5090239E93 "0x27f485b62C4A7E635F561A87560Adf5090239E93") | Burn/Mint | [0x5B1f92...7bBf7c](https://explorer.arbitrum.io/address/0x5B1f92CD2a3cd4137BDc16d92A78795F697bBf7c "0x5B1f92CD2a3cd4137BDc16d92A78795F697bBf7c") |
| Ethereum | DFX Token | DFX | 18 | [0x888888...454c60](https://etherscan.io/address/0x888888435FDe8e7d4c54cAb67f206e4199454c60 "0x888888435FDe8e7d4c54cAb67f206e4199454c60") | Lock/Release | [0xc2ef2f...379979](https://etherscan.io/address/0xc2ef2f272D2C09b0a8523cEf32C96D3A7f379979 "0xc2ef2f272D2C09b0a8523cEf32C96D3A7f379979") |
| Polygon | DFX Token (L2) | DFX | 18 | [0x27f485...239E93](https://polygonscan.com/address/0x27f485b62C4A7E635F561A87560Adf5090239E93 "0x27f485b62C4A7E635F561A87560Adf5090239E93") | Burn/Mint | [0x04505E...c79187](https://polygonscan.com/address/0x04505E4182A2ab7989b03eB2321E3141C1c79187 "0x04505E4182A2ab7989b03eB2321E3141C1c79187") |
## Get the latest Chainlink content straight to your inbox.
Email Address
## BANANA Token Info
[iframe](https://www.googletagmanager.com/ns.html?id=GTM-N6DQ47T)
On this page
[CCIP Directory](https://docs.chain.link/ccip/directory/mainnet) [BANANA](https://docs.chain.link/ccip/directory/mainnet/token/BANANA)


# BANANABanana
Listed Networks (2)

| Network | Name | Symbol | Decimals | Token address | Token pool type | Token pool address |
| --- | --- | --- | --- | --- | --- | --- |
| Ethereum | Banana | BANANA | 18 | [0x94e496...A4F03a](https://etherscan.io/address/0x94e496474F1725f1c1824cB5BDb92d7691A4F03a "0x94e496474F1725f1c1824cB5BDb92d7691A4F03a") | Lock/Release | [0xB18eE1...fF635d](https://etherscan.io/address/0xB18eE11849a805651aC5D456034FD6352cfF635d "0xB18eE11849a805651aC5D456034FD6352cfF635d") |
| Ronin | Banana | BANANA | 18 | [0x1a89ec...d5E400](https://app.roninchain.com/address/0x1a89ecd466a23e98f07111b0510a2D6c1cd5E400 "0x1a89ecd466a23e98f07111b0510a2D6c1cd5E400") | Burn/Mint | [0x93Af6d...c0A58f](https://app.roninchain.com/address/0x93Af6da985fD08dFA839cB2eD189D31E11c0A58f "0x93Af6da985fD08dFA839cB2eD189D31E11c0A58f") |
## Get the latest Chainlink content straight to your inbox.
Email Address
## APRS Token Overview
[iframe](https://www.googletagmanager.com/ns.html?id=GTM-N6DQ47T)
Chainlink CCIP is now officially live on Solana. [View lanes and tokens.](https://docs.chain.link/ccip/directory/mainnet/chain/solana-mainnet?utm_medium=referral&utm_source=chainlink-docs&utm_campaign=solana-ccip)
On this page
[CCIP Directory](https://docs.chain.link/ccip/directory/mainnet) [APRS](https://docs.chain.link/ccip/directory/mainnet/token/APRS)


# APRSAperios
Listed Networks (2)

| Network | Name | Symbol | Decimals | Token address | Token pool type | Token pool address |
| --- | --- | --- | --- | --- | --- | --- |
| Ethereum | Aperios | APRS | 18 | [0x95b4B8...92aB0D](https://etherscan.io/address/0x95b4B8CaD3567B5d7EF7399C2aE1d7070692aB0D "0x95b4B8CaD3567B5d7EF7399C2aE1d7070692aB0D") | Lock/Release | [0x5882D1...Fe97b1](https://etherscan.io/address/0x5882D12bbf902ee88d5FCF8793113ae85fFe97b1 "0x5882D12bbf902ee88d5FCF8793113ae85fFe97b1") |
| Ronin | Aperios | APRS | 18 | [0x7894b3...Fd04C1](https://app.roninchain.com/address/0x7894b3088d069E70895EFfA4e8f7D2c243Fd04C1 "0x7894b3088d069E70895EFfA4e8f7D2c243Fd04C1") | Burn/Mint | [0x5dbBF9...D0C519](https://app.roninchain.com/address/0x5dbBF90Ad00130Fd2Eb788016DcB3E4dFbD0C519 "0x5dbBF90Ad00130Fd2Eb788016DcB3E4dFbD0C519") |
## Get the latest Chainlink content straight to your inbox.
Email Address
## DIP Token Information
[iframe](https://www.googletagmanager.com/ns.html?id=GTM-N6DQ47T)
Chainlink CCIP is now officially live on Solana. [View lanes and tokens.](https://docs.chain.link/ccip/directory/mainnet/chain/solana-mainnet?utm_medium=referral&utm_source=chainlink-docs&utm_campaign=solana-ccip)
On this page
[CCIP Directory](https://docs.chain.link/ccip/directory/mainnet) [DIP](https://docs.chain.link/ccip/directory/mainnet/token/DIP)


# DIPDecentralized Insurance Protocol Token
Listed Networks (2)

| Network | Name | Symbol | Decimals | Token address | Token pool type | Token pool address |
| --- | --- | --- | --- | --- | --- | --- |
| Base | Decentralized Insurance Protocol Token | DIP | 18 | [0xAc86f3...FCB9F5](https://basescan.org/address/0xAc86f3556cBd2b4d800D17ADC3a266B500FCB9F5 "0xAc86f3556cBd2b4d800D17ADC3a266B500FCB9F5") | Burn/Mint | [0x154d09...0CE034](https://basescan.org/address/0x154d09dB12E6e1EF94e57ca1889ffEcBb90CE034 "0x154d09dB12E6e1EF94e57ca1889ffEcBb90CE034") |
| Ethereum | Decentralized Insurance Protocol | DIP | 18 | [0xc719d0...6AcD83](https://etherscan.io/address/0xc719d010B63E5bbF2C0551872CD5316ED26AcD83 "0xc719d010B63E5bbF2C0551872CD5316ED26AcD83") | Lock/Release | [0xAc3453...5Bf95b](https://etherscan.io/address/0xAc3453eEF710e1E6457383F29D696Db5435Bf95b "0xAc3453eEF710e1E6457383F29D696Db5435Bf95b") |
## Get the latest Chainlink content straight to your inbox.
Email Address
## xRPL Token Overview
[iframe](https://www.googletagmanager.com/ns.html?id=GTM-N6DQ47T)
Chainlink CCIP is now officially live on Solana. [View lanes and tokens.](https://docs.chain.link/ccip/directory/mainnet/chain/solana-mainnet?utm_medium=referral&utm_source=chainlink-docs&utm_campaign=solana-ccip)
On this page
[CCIP Directory](https://docs.chain.link/ccip/directory/mainnet) [xRPL](https://docs.chain.link/ccip/directory/mainnet/token/xRPL)


# xRPLConstellation RPL
Listed Networks (3)

| Network | Name | Symbol | Decimals | Token address | Token pool type | Token pool address |
| --- | --- | --- | --- | --- | --- | --- |
| Arbitrum One | Constellation RPL | xRPL | 18 | [0xd3Bb9E...9e868A](https://explorer.arbitrum.io/address/0xd3Bb9E4e9aE431888873d3E51b3c03dA909e868A "0xd3Bb9E4e9aE431888873d3E51b3c03dA909e868A") | Burn/Mint | [0x1dBD62...BDF3E3](https://explorer.arbitrum.io/address/0x1dBD6224Cf535F624FcB41C4Ad8c065f10BDF3E3 "0x1dBD6224Cf535F624FcB41C4Ad8c065f10BDF3E3") |
| Ethereum | Constellation RPL | xRPL | 18 | [0x1DB1Af...7F1320](https://etherscan.io/address/0x1DB1Afd9552eeB28e2e36597082440598B7F1320 "0x1DB1Afd9552eeB28e2e36597082440598B7F1320") | Lock/Release | [0x8d9F01...31D639](https://etherscan.io/address/0x8d9F0185c49752d626ef0c318B24Bba83931D639 "0x8d9F0185c49752d626ef0c318B24Bba83931D639") |
| Linea | Constellation RPL | xRPL | 18 | [0x2775De...CD82c6](https://lineascan.build/address/0x2775DeeB4FaDCc486562CAa777dE70AD6CCD82c6 "0x2775DeeB4FaDCc486562CAa777dE70AD6CCD82c6") | Burn/Mint | [0xDdEDeb...9ACEaE](https://lineascan.build/address/0xDdEDeb125315ba7b6539A6C18478ccf8b59ACEaE "0xDdEDeb125315ba7b6539A6C18478ccf8b59ACEaE") |
## Get the latest Chainlink content straight to your inbox.
Email Address
## zBTC Token Overview
[iframe](https://www.googletagmanager.com/ns.html?id=GTM-N6DQ47T)
Chainlink CCIP is now officially live on Solana. [View lanes and tokens.](https://docs.chain.link/ccip/directory/mainnet/chain/solana-mainnet?utm_medium=referral&utm_source=chainlink-docs&utm_campaign=solana-ccip)
On this page
[CCIP Directory](https://docs.chain.link/ccip/directory/mainnet) [zBTC](https://docs.chain.link/ccip/directory/mainnet/token/zBTC)


# zBTCzBTC
Listed Networks (4)

| Network | Name | Symbol | Decimals | Token address | Token pool type | Token pool address |
| --- | --- | --- | --- | --- | --- | --- |
| Base | zBTC | zBTC | 8 | [0x7F544C...6969D0](https://basescan.org/address/0x7F544C3a1a16059dd3bbc23AA3BC5c4f5B6969D0 "0x7F544C3a1a16059dd3bbc23AA3BC5c4f5B6969D0") | Burn/Mint | [0x7B58df...5a52a4](https://basescan.org/address/0x7B58df98a12F54813fDec73B5791642Fa35a52a4 "0x7B58df98a12F54813fDec73B5791642Fa35a52a4") |
| Ethereum | zBTC | zBTC | 8 | [0x24eCd4...32cAbc](https://etherscan.io/address/0x24eCd41CE6646ADa857995A682e1a5c42732cAbc "0x24eCd41CE6646ADa857995A682e1a5c42732cAbc") | Burn/Mint | [0xe3f4B7...08c4B8](https://etherscan.io/address/0xe3f4B78cdd20f6B8AE8644064656d3E2bF08c4B8 "0xe3f4B78cdd20f6B8AE8644064656d3E2bF08c4B8") |
| Solana | zBTC | zBTC | 8 | [zBTCug3e...ESYfLg](https://explorer.solana.com/address/zBTCug3er3tLyffELcvDNrKkCymbPWysGcWihESYfLg "zBTCug3er3tLyffELcvDNrKkCymbPWysGcWihESYfLg") | Burn/Mint | [9EvWTQvZ...PqoisX](https://explorer.solana.com/address/9EvWTQvZafNxEgpt6snY2sTFT7hARk4tU5QtdRPqoisX "9EvWTQvZafNxEgpt6snY2sTFT7hARk4tU5QtdRPqoisX") |
| Sonic | zBTC | zBTC | 8 | [0x006A22...5Ced72](https://sonicscan.org/address/0x006A22D3120eaD503F0654Be855BCDfbba5Ced72 "0x006A22D3120eaD503F0654Be855BCDfbba5Ced72") | Burn/Mint | [0x66d78C...36ab3e](https://sonicscan.org/address/0x66d78C6AF776350F89DA8D63b66008122236ab3e "0x66d78C6AF776350F89DA8D63b66008122236ab3e") |
## Get the latest Chainlink content straight to your inbox.
Email Address
## CKP Token Overview
[iframe](https://www.googletagmanager.com/ns.html?id=GTM-N6DQ47T)
Chainlink CCIP is now officially live on Solana. [View lanes and tokens.](https://docs.chain.link/ccip/directory/mainnet/chain/solana-mainnet?utm_medium=referral&utm_source=chainlink-docs&utm_campaign=solana-ccip)
On this page
[CCIP Directory](https://docs.chain.link/ccip/directory/mainnet) [CKP](https://docs.chain.link/ccip/directory/mainnet/token/CKP)


# CKPCakepie
Listed Networks (2)

| Network | Name | Symbol | Decimals | Token address | Token pool type | Token pool address |
| --- | --- | --- | --- | --- | --- | --- |
| Arbitrum One | Cakepie | CKP | 18 | [0x346Af1...928F1d](https://explorer.arbitrum.io/address/0x346Af1954e3d6be46B96dA713a1f7fD2d1928F1d "0x346Af1954e3d6be46B96dA713a1f7fD2d1928F1d") | Burn/Mint | [0x97Cb0f...2cd032](https://explorer.arbitrum.io/address/0x97Cb0f52CF2270971eB588C1CE664F65382cd032 "0x97Cb0f52CF2270971eB588C1CE664F65382cd032") |
| BNB Chain | Cakepie | CKP | 18 | [0x2B5D9A...EdA649](https://bscscan.com/address/0x2B5D9ADea07B590b638FFc165792b2C610EdA649 "0x2B5D9ADea07B590b638FFc165792b2C610EdA649") | Burn/Mint | [0xA690C4...44DB90](https://bscscan.com/address/0xA690C439dCd4a5507FCEB4Da0517a69e8244DB90 "0xA690C439dCd4a5507FCEB4Da0517a69e8244DB90") |
## Get the latest Chainlink content straight to your inbox.
Email Address
## BR Token Overview
[iframe](https://www.googletagmanager.com/ns.html?id=GTM-N6DQ47T)
Chainlink CCIP is now officially live on Solana. [View lanes and tokens.](https://docs.chain.link/ccip/directory/mainnet/chain/solana-mainnet?utm_medium=referral&utm_source=chainlink-docs&utm_campaign=solana-ccip)
On this page
[CCIP Directory](https://docs.chain.link/ccip/directory/mainnet) [BR](https://docs.chain.link/ccip/directory/mainnet/token/BR)


# BRBedrock
Listed Networks (3)

| Network | Name | Symbol | Decimals | Token address | Token pool type | Token pool address |
| --- | --- | --- | --- | --- | --- | --- |
| Berachain | Bedrock | BR | 18 | [0xd352dc...ea4087](https://berascan.com/address/0xd352dc6e5F0c45E2F2b38eb5565EB286A1ea4087 "0xd352dc6e5F0c45E2F2b38eb5565EB286A1ea4087") | Burn/Mint | [0xEbaf52...9e2a58](https://berascan.com/address/0xEbaf5275843E4Ea7C9867307BB801D2a829e2a58 "0xEbaf5275843E4Ea7C9867307BB801D2a829e2a58") |
| BNB Chain | Bedrock | BR | 18 | [0xFf7d6A...f56B41](https://bscscan.com/address/0xFf7d6A96ae471BbCD7713aF9CB1fEeB16cf56B41 "0xFf7d6A96ae471BbCD7713aF9CB1fEeB16cf56B41") | Lock/Release | [0x2E02DF...754dc3](https://bscscan.com/address/0x2E02DF052e7C4a12e1B334DC3D182c39bb754dc3 "0x2E02DF052e7C4a12e1B334DC3D182c39bb754dc3") |
| Ethereum | Bedrock | BR | 18 | [0x9B6187...882096](https://etherscan.io/address/0x9B61879e91a0b1322F3d61c23Aaf936231882096 "0x9B61879e91a0b1322F3d61c23Aaf936231882096") | Burn/Mint | [0x3d430E...00EF9a](https://etherscan.io/address/0x3d430E1380286560899B94E3E9459c4ec300EF9a "0x3d430E1380286560899B94E3E9459c4ec300EF9a") |
## Get the latest Chainlink content straight to your inbox.
Email Address
## MEEM Token Overview
[iframe](https://www.googletagmanager.com/ns.html?id=GTM-N6DQ47T)
Chainlink CCIP is now officially live on Solana. [View lanes and tokens.](https://docs.chain.link/ccip/directory/mainnet/chain/solana-mainnet?utm_medium=referral&utm_source=chainlink-docs&utm_campaign=solana-ccip)
On this page
[CCIP Directory](https://docs.chain.link/ccip/directory/mainnet) [MEEM](https://docs.chain.link/ccip/directory/mainnet/token/MEEM)


# MEEMCryptex Meme Index
Listed Networks (2)

| Network | Name | Symbol | Decimals | Token address | Token pool type | Token pool address |
| --- | --- | --- | --- | --- | --- | --- |
| Base | Cryptex Meme Index | MEEM | 18 | [0x15f9ce...6ee160](https://basescan.org/address/0x15f9cec1c568352Cd48Da1E84D3e74F27f6ee160 "0x15f9cec1c568352Cd48Da1E84D3e74F27f6ee160") | Burn/Mint | [0x797C54...80fa74](https://basescan.org/address/0x797C54f6E028c70d76c0031e03ab43Eb1b80fa74 "0x797C54f6E028c70d76c0031e03ab43Eb1b80fa74") |
| Ethereum | Cryptex Meme Index | MEEM | 18 | [0xA544b3...287905](https://etherscan.io/address/0xA544b3F0c46c15F0B2b00ba3D67b56C250287905 "0xA544b3F0c46c15F0B2b00ba3D67b56C250287905") | Lock/Release | [0xbfc86C...E63351](https://etherscan.io/address/0xbfc86CA9b7fa158287bD392eE098246465E63351 "0xbfc86CA9b7fa158287bD392eE098246465E63351") |
## Get the latest Chainlink content straight to your inbox.
Email Address
## BYTES Token Information
[iframe](https://www.googletagmanager.com/ns.html?id=GTM-N6DQ47T)
Chainlink CCIP is now officially live on Solana. [View lanes and tokens.](https://docs.chain.link/ccip/directory/mainnet/chain/solana-mainnet?utm_medium=referral&utm_source=chainlink-docs&utm_campaign=solana-ccip)
On this page
[CCIP Directory](https://docs.chain.link/ccip/directory/mainnet) [BYTES](https://docs.chain.link/ccip/directory/mainnet/token/BYTES)


# BYTESBYTES
Listed Networks (2)

| Network | Name | Symbol | Decimals | Token address | Token pool type | Token pool address |
| --- | --- | --- | --- | --- | --- | --- |
| Ethereum | BYTES | BYTES | 18 | [0xa19f52...0Bea86](https://etherscan.io/address/0xa19f5264F7D7Be11c451C093D8f92592820Bea86 "0xa19f5264F7D7Be11c451C093D8f92592820Bea86") | Lock/Release | [0x2CcD6B...52B0f6](https://etherscan.io/address/0x2CcD6B51E7BEa429ba0D4C526C60c4F71852B0f6 "0x2CcD6B51E7BEa429ba0D4C526C60c4F71852B0f6") |
| Polygon | BYTES | BYTES | 18 | [0x13af0F...dD8B6b](https://polygonscan.com/address/0x13af0Fe9eB35e91758B467f95cbc78e16FdD8B6b "0x13af0Fe9eB35e91758B467f95cbc78e16FdD8B6b") | Burn/Mint | [0x8Cc3af...b0c11e](https://polygonscan.com/address/0x8Cc3af9D6f107124791A34DFD05A496983b0c11e "0x8Cc3af9D6f107124791A34DFD05A496983b0c11e") |
## Get the latest Chainlink content straight to your inbox.
Email Address
## FLUID Token Information
[iframe](https://www.googletagmanager.com/ns.html?id=GTM-N6DQ47T)
On this page
[CCIP Directory](https://docs.chain.link/ccip/directory/mainnet) [FLUID](https://docs.chain.link/ccip/directory/mainnet/token/FLUID)


# FLUIDFluid
Listed Networks (3)

| Network | Name | Symbol | Decimals | Token address | Token pool type | Token pool address |
| --- | --- | --- | --- | --- | --- | --- |
| Arbitrum One | Fluid | FLUID | 18 | [0x61E030...3449Cd](https://explorer.arbitrum.io/address/0x61E030A56D33e8260FdD81f03B162A79Fe3449Cd "0x61E030A56D33e8260FdD81f03B162A79Fe3449Cd") | Burn/Mint | [0x2d29D7...656BfC](https://explorer.arbitrum.io/address/0x2d29D728C48C3F75e221D28d844E2bdFe5656BfC "0x2d29D728C48C3F75e221D28d844E2bdFe5656BfC") |
| Base | Fluid | FLUID | 18 | [0x61E030...3449Cd](https://basescan.org/address/0x61E030A56D33e8260FdD81f03B162A79Fe3449Cd "0x61E030A56D33e8260FdD81f03B162A79Fe3449Cd") | Burn/Mint | [0x99D94f...97CA17](https://basescan.org/address/0x99D94f528CeA3eE1791ab7B476A1FACb4297CA17 "0x99D94f528CeA3eE1791ab7B476A1FACb4297CA17") |
| Ethereum | Fluid | FLUID | 18 | [0x6f40d4...d303eb](https://etherscan.io/address/0x6f40d4A6237C257fff2dB00FA0510DeEECd303eb "0x6f40d4A6237C257fff2dB00FA0510DeEECd303eb") | Lock/Release | [0x639f35...11a50c](https://etherscan.io/address/0x639f35C5E212D61Fe14Bd5CD8b66aAe4df11a50c "0x639f35C5E212D61Fe14Bd5CD8b66aAe4df11a50c") |
## Get the latest Chainlink content straight to your inbox.
Email Address
## DOLO Token Information
[iframe](https://www.googletagmanager.com/ns.html?id=GTM-N6DQ47T)
Chainlink CCIP is now officially live on Solana. [View lanes and tokens.](https://docs.chain.link/ccip/directory/mainnet/chain/solana-mainnet?utm_medium=referral&utm_source=chainlink-docs&utm_campaign=solana-ccip)
On this page
[CCIP Directory](https://docs.chain.link/ccip/directory/mainnet) [DOLO](https://docs.chain.link/ccip/directory/mainnet/token/DOLO)


# DOLODolomite
Listed Networks (3)

| Network | Name | Symbol | Decimals | Token address | Token pool type | Token pool address |
| --- | --- | --- | --- | --- | --- | --- |
| Arbitrum One | Dolomite | DOLO | 18 | [0x0F8100...39a654](https://explorer.arbitrum.io/address/0x0F81001eF0A83ecCE5ccebf63EB302c70a39a654 "0x0F81001eF0A83ecCE5ccebf63EB302c70a39a654") | Burn/Mint | [0xeDD4b6...C26bAC](https://explorer.arbitrum.io/address/0xeDD4b6936bDD9Fc272ac3a8dDC4A1b61b5C26bAC "0xeDD4b6936bDD9Fc272ac3a8dDC4A1b61b5C26bAC") |
| Berachain | Dolomite | DOLO | 18 | [0x0F8100...39a654](https://berascan.com/address/0x0F81001eF0A83ecCE5ccebf63EB302c70a39a654 "0x0F81001eF0A83ecCE5ccebf63EB302c70a39a654") | Burn/Mint | [0x9E7728...890992](https://berascan.com/address/0x9E7728077F753dFDF53C2236097E27C743890992 "0x9E7728077F753dFDF53C2236097E27C743890992") |
| Ethereum | Dolomite | DOLO | 18 | [0x0F8100...39a654](https://etherscan.io/address/0x0F81001eF0A83ecCE5ccebf63EB302c70a39a654 "0x0F81001eF0A83ecCE5ccebf63EB302c70a39a654") | Burn/Mint | [0xC69e7a...0932c7](https://etherscan.io/address/0xC69e7a187fA739028Ee613426795D91B610932c7 "0xC69e7a187fA739028Ee613426795D91B610932c7") |